Alexandra | Apr 18, 2021
Want to add multiple photos in one Instagram Story?
I’m going to show you how to do it on iPhone and on Android.
You can use this trick to create photo collages, add background photos in your Stories, or create any aesthetic Insta Stories you want.
Ready?
First, let’s look at how to do it on an iPhone.
Click here to use it
Instagram has a feature called “Photo Sticker” on Instagram Stories.
You can use this feature to add multiple photos in one Story.
Here’s how to do it:
Open your Story in your Instagram app.
For this example, I’m going to choose a background color (see tutorial).
Now press on the “Sticker” button on top of your screen.
The “Photo” sticker will allow you to add multiple photos in your Instagram Story.
Tip: If you don’t have this feature yet, check this blog post to see how you could get it.
Now just choose the photo you want to add in your Story.
At the moment, you can only add one photo at a time.
Instagram will automatically make your photo with rounded corners.
If you don’t want rounded corners, tap on the photo and they will be square.
You can do the “zoom” in and out motion with your fingers on the photo to resize it and place it wherever you want on the screen.
And you’re done!
Watch how I created a beautiful Insta Story using this trick.
Now let’s look how to do it on Android phone.
Instagram doesn’t have the “Photo Sticker” feature for all Android phones at the moment.
So you just need to download an app that will allow you to add your own Sticker Photos in your Stories.
It literally takes 30 seconds to add multiple photos to your Stories on Android using this method.
This app will allow you to add multiple photos to your Stories.
Download it and follow the steps on the screen to activate it on your phone.
That’s how the app works:
One screenshot = one sticker.
So just take screenshots of the photos you want to add in your Story.
Once you’ve taken your screenshots, you can open your Story on the Instagram app.
You have 2 choices:
I’m going to make the background brown.
Press on the “aA” at the top of your screen.
Now press on the “camera” button on the top right corner to add a photo.
Select the photo you want to add in your Insta Story, and you’re done!
Just like on iPhone, you can resize and move your photos.
Repeat the same steps to add more photos in your Insta Stories.
Was it helpful?
Let me know if you have any questions about this trick.
More tips:
Click here to use it
By: Jenn Herman and Eric Butow and Corey Walker and
Updated: 09-01-2021
From The Book: Instagram For Business For Dummies
Explore Book Buy On Amazon
You don’t need to have one Instagram post for each photo. Instead, you can add as many as ten photos in your Camera Roll (or Gallery if you use an Android smartphone) to a single post. The most recent photo in your Camera Roll (or Gallery) appears in the viewer.
The select multiple icon in the viewer is blue and the other viewer icons have disappeared.
If you select a photo but then decide that you don’t want to include it, just tap the thumbnail photo. The order of your photos will change if you selected more than two photos. To deselect all photos, tap the blue select multiple icon in the lower-right corner of the viewer.
The most recently selected photo appears in the viewer.
To reorder the photos, you have to deselect them and then reselect them in the correct order. (Yes, this is something Instagram needs to work on.) For example, suppose you select five photos and want to move photos 3 and 4 to positions 4 and 5, respectively. First deselect photos 3 and 4. At this point, the former photo 5 becomes photo 3. Then select the former photo 3, which becomes photo 4, and then select the former photo 4, which becomes photo 5.
The filter name appears above the filter thumbnail image.
A row of filter types appears below the photo. Swipe from right to left in the row to view all the filters. To apply a filter to all photos in the group, tap the thumbnail image under the filter name.
At the right side of the screen, you see part of the next photo in your photo group. To see the other photos, swipe left. To add another photo to your post, swipe to the end of the row, tap the + icon, and then select the photo from the Camera Roll screen.
In the New Post screen, you can write a caption, tag people, add a location, share your photo on other social networks, and turn commenting on and off.
You can't write a caption for each photo when you have multiple photos in your post. So when you write your description, the caption should describe all your photos, not just one.
When you've finished editing your photos, it's time to share them. Tap Share in the upper-right corner of the New Post screen.Jenn Herman, a social media consultant and world-renowned Instagram expert, pens a top-rated social media blog, Jenn's Trends.
Corey Walker offers social media strategy, content, ad management, and analytics focused on Instagram and Facebook.
Eric Butow provides website design, online marketing, and technical documentation services to businesses.
John Sonmez is a software developer and the author of two best-selling books, The Complete Software Developer's Career Guide and Soft Skills: The Software Developer's Life Manual. He is also the founder of the Simple Programmer blog and YouTube channel. Eric Butow is the owner of Butow Communications Group (BCG), which offers website design, online marketing, and technical documentation services for businesses. He is the author of 32 computer and user experience books.
Jenn Herman, a social media consultant and world-renowned Instagram expert, pens a top-rated social media blog, Jenn's Trends.
Corey Walker offers social media strategy, content, ad management, and analytics focused on Instagram and Facebook.
Eric Butow provides website design, online marketing, and technical documentation services to businesses.
Do you want your Stories to be really cool and stand out from the competition? Just adding a photo is not so difficult, we will tell you about it. But you can turn stories into a real masterpiece, and our article will help you with this.
Let's figure out what gadgets and chips on Instagram* will help you post several photos at once in the Story and make it attractive to the audience.
And to learn how to plan content for a section, read the article "How to create a content plan for Instagram Stories *".
We will tell you in detail how to do it and what additional effects can be added to make your story stand out in the main mass :–)
If you are going to add photos to Instagram Story* in the standard way , we have just prepared detailed instructions. We tell you how to proceed step by step.
Open your Instagram profile*. Click on the blue plus sign on your profile icon (1) and select the photos you want to add to your story (2).
Remember that you can upload no more than 10 photos or videos to one storyTo select multiple images, you need to click on the photo that will be displayed first and hold it down (3). A blue circle with the number 1 will appear in the upper right corner of the photo. Select the rest of the photos without a long press, set the number and order.
If you decide to change the order - just remove the numbers from the photo and put them again, already in the right orderSo, we found and chose the ones we wanted. Now it's time to add effects to them. To do this, call up the effects menu by clicking on the stars (3).
After clicking on the stars, we get to the effects menu After going to the effects menu, you can select them. Find the effects that best suit your stories by swiping left (6).
We settled on the Iridescent Glitter effect (7). He gave more shine to the garlands on the tree, but this does not mean that he is suitable only for such photos. Experiment and check :–)
You have to choose the effect separately for each photo. After choosing an effect for one photo, you need to click the checkmark in the upper right corner, confirming the choice, and select the next image at the bottom of the menu. For him, also select the effect and move on.
You can also add a drawing or an inscription made by your own hand to the photo. In addition, you can save to the gallery what you have already done. If you like the caption idea, click on the three dots to the right of the stars and select "drawing" (8).
You can never have too many effects - choose your own effect for each photo, but so that they are in the same style :–) In the top line of the menu you can choose the tools with which you will draw, and in the bottom line you can choose the color. The thickness of the pencil or brush is set by the vertical slider on the left.
If the drawing is ready, in our case it is an abbreviated New Year's greeting, click on the checkmark at the top right (9). You will move on and be able to share your completed Story (10).
Drawing is, of course, more difficult than typing. But with your own hand :–)By the way, if your story is for a narrow circle of people, you can publish it for the Close Friends list or send it in a message to one of your friends personally.
But since we are talking about public stories, feel free to click "done" (11) and wait for our Story to be published. When it is ready and visible to people, a new story will appear on top of your profile (12).
You can choose to additionally send to individual users by selecting under "where else to share"The story is ready (13), but it's not over yet.
Stories can be shared as a post or added to the Featured We can add stories to the Featured. There you can store the most important and interesting Stories, they will be available to your subscribers until you remove them from your profile.
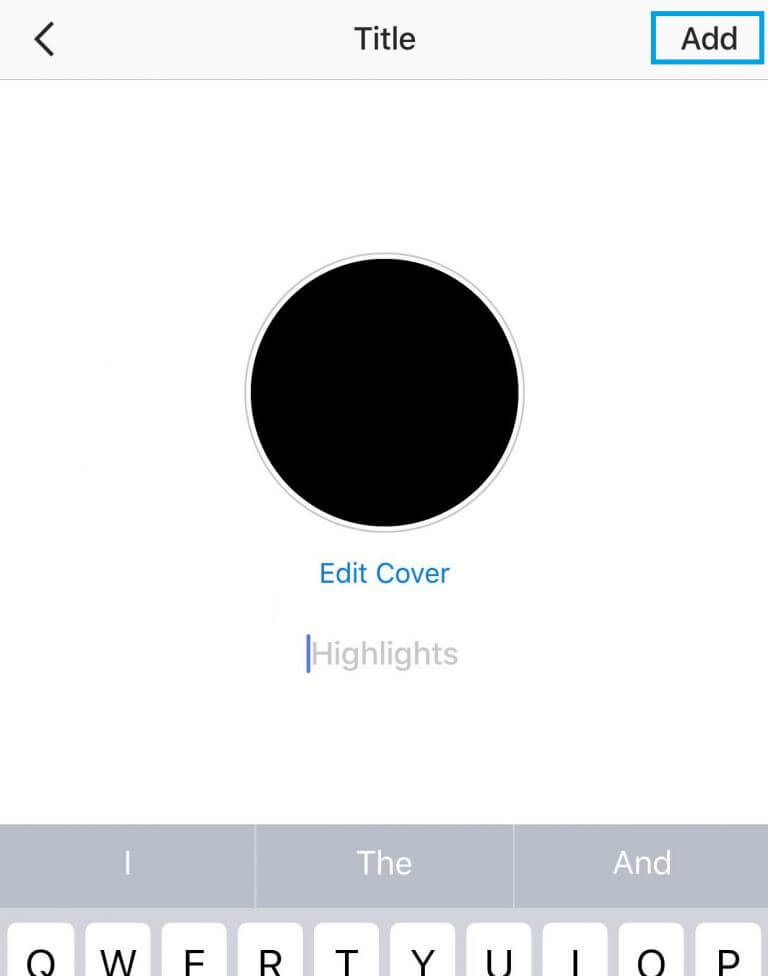
The button for adding to the Topical is located at the bottom of the finished Story (14). We click on it, a tab opens with a plus sign in a circle (15). By clicking on the plus sign, you create a new selection of Actual Stories. Don't forget to give this collection a title so that it will be easier to find later if you have many such collections.
Click on “Add”, give a name and admire the resultClick “Add” (16), and now our History is saved in a new selection of Actual (17) - we look, admire, remember at any time.
You can start from the other side - click on Topical and add pictures from there To prepare stories for several days at once, we recommend using the SMMplanner scheduling posting service. With it, you can prepare stories or posts, plan dates and times for them to be published, and take care of other important things or projects. When registering via the link to SMMplanner, you will get free access to all functionality for 2 weeks. A great option to try all the amenities of the service and start saving your time and nerves.
How to upload multiple photos to Instagram Stories* if you plan to choose from the gallery, you already know from the block above. Now let's see how to post multiple photos to Instagram Story* using the camera.
How to upload multiple photos to Instagram Story* at the same time? Click on the camera and go ahead, take new shotsClick on the plus sign on the profile icon and select the "Camera" tab. You will see a menu with different functions, but we are interested in the "Collage" function (2).
You will see a frame divided into 4 parts. This means that you can take or select up to 4 photos By clicking on the "Take photo" button (3), you can also see how many more shots you can take (4).
You can also add different effects and drawings to the collage, following the block above.
If you don't like any of the photos, for example, I don't like the carpet, you can change it to another one by simply clicking on it. When the collage contains the number of photos you need, and they are edited, click on the checkmark in the circle (5).Next, click on the arrow in the white circle (6) to go to the "Share" menu.
We send to stories for everyone, only for relatives or a personal messageClick "Share" (7), the system will offer you to share in a message with your subscribers personally - it's all up to you. You can just post stories.
When you're done and you're ready to submit your Story for publication, click the Done button. Your Story is published. We wait. Everything will be ready within a minute.
By the way, about the "Share" button and how subscribers share your posts. Our blog has an article "Forward" metric in Instagram* Stories statistics: what it is, why and how to track it. In it, we tell you why to track this indicator, what it affects and how to increase it.
So, we have added some photos to stories. And how to make the story look cooler and more interesting for users? We've put together a few tricks you can use to create a poll, add music or hashtags, and more. Each of these techniques in its own way will help increase the activity and involvement of the audience.
For example, you have already selected the photos you want to publish. It's time to give your story a more interesting look, you can post some question to subscribers - click on the smiley (1) and select the function you are interested in (2).
Just look how many stickers are available for sharing in stories You can also add a hashtag to get into the search for a potential follower or recommendation. We talk a lot about hashtags and show them on the blog. Many companies ignore them, and in vain. With their help, you can try to increase sales, the number of subscribers or comments. One of the latest articles is “We select hashtags to increase sales on Instagram*”. In it, we tell you which hashtags should be used if you want to increase sales.
What other features are there for Instagram Stories*? We tell below.
In the menu under the emoticon, select the "Music" section. In the line "Search for music" (3) enter the name of the song or melody that you would like to use. In our case, this is “A Christmas tree was born in the forest” (4).
Melody added to History. It will play simultaneously with stories.
Learn more about this feature in our article "How to Add Music to Instagram* Stories". It tells in detail how to add high-quality tracks or recordings from a voice recorder.
In the menu under the emoticon, select the "#HASHTAG" section. In the input line, enter a keyword or phrase without a hash mark (5). The hashtag #NEWYEAR is the most suitable for our stories (6), but you choose the ones that fit the theme.
You can read more about hashtags and their benefits in stories and posts in our articles:
In the menu under the emoticon, select the “Poll” section. In the input line, ask your audience a question (7). Our question is about the New Year (8), your question may be the same or different.
We talked more about polls in the idea for the "Polls" story. There, we provided examples of questions to ask the audience and cautions, along with a story about what kind of business such surveys are suitable for.
Now we can admire the finished Story with interesting features. We just have to publish it.
Music, question and hashtag added. You can see what it looks like in the picture. Click "Next" (9) and share the Story with subscribers (10).
The story is ready and looks quite good :–)Instagram* never ceases to amaze with its updates and new features. Impressive is the “Image Sticker” feature for creating stories from multiple photos. Previously, this option was only available for iOS, but in 2021, Instagram* allowed Android users to use this feature.
We go to the already familiar gallery, but then it's interestingChoose one photo from the gallery (1) or take a picture. Click on the smiley (2). A menu with functions and tools will open (3).
On some devices you may have to scroll down a bit to find the sticker you want Use the Image Sticker feature (4) to create a Story from multiple photos.
Overlay a photo of a Christmas tree (6) on the selected photo. Snow was used as a background, as we associate it with the New Year.
A photo of a Christmas tree can be turned into a star or another stickerWe make an asterisk from a photo of a Christmas tree (7). Each time you click, the shape of the photo changes. Spread the photo apart with your fingers if you want to resize. We chose 4 photos with different shapes (8).
You can also add text if it's appropriate or necessary for your post.Add text to your Story by clicking "Aa" to the left of the smiley face. You can change the color, font and size of the text by choosing the settings at the bottom and at the top (9). You can also animate text.
And we share in the standard way with those subscribers with whom we wantStory ready for publication (11 and 12). Click "Share" and enjoy our cool Story.
Even more about the new stickers on Instagram*, we talked in the article "Overview of new stickers on Instagram* 2021 + fresh ideas for use. " There we took a detailed look at all the ideas and stickers that can be used in Instagram Stories in 2022*.
We looked at different ways to upload multiple photos to your Instagram Story*. We talked about unusual effects, shapes and features available for Stories. We’ve broken down the entire publishing process step by step – everything for you and your new creative stories. More information about promotion, development of accounts and business in general - in our blog. Fly in to read :–)
valued at 4.57 of 5
1.49(€ – 599.00(€estimated at 4.21 out of 5
From: 19.99(€ / month valued at 4. 68 out of 5
estimated at 4.67 out of 5
From: 2.99(€ per week with 1 week free trialThere is a very popular question around the Instagram story on the Internet: how to combine two photos into an Instagram story? And it seems that many users have eluded the various capture modes that this feature allows. However, if you are one of them, don't worry because here we will explain how to do it step by step. Whether you have an Android phone, you can use the Instagram Stories tool or if you have an iPhone and want to go further. You can create all sorts of collages and montages, and have all the details on how to post two photos on Instagram stories.
If you use Android, it's easy to answer how to connect two photos in Instagram Stories. Basically, you have to use the Instagram Stories design template to create your favorite collage. There is no need to use other applications or other tools. So you don't need to download anything at all.
All you have to do is go to Instagram Stories to take regular pictures. You already know that you need to tap on the top left corner on the Instagram home screen or swipe from left to right to access this section. Here, before you shoot, take a look at the tools on the left. Among them, the third one is called "Design", it is a form of collage. Click on it to use.
At this time, the screen is divided into four parts according to the normal layout. However, if you are looking for how to merge two photos in Instagram Stories, you should click on the icon in the Design section, one of which has a grid. This will bring up a submenu with various collage options. Two of them allow you to split the screen in half to fit two photos into an Instagram story. One vertical and one horizontal. Choose the one you like best: vertical or narrow or horizontal and wide.
valued at 4. 33 out of 5
valued at 3.86 out of 5
1.49(€ – 900.00(€estimated at 4.00 out of 5
40.00(€estimated at 4.00 out of 5
74.99(€So you will see that the screen is divided into one of these two layouts. Well, now there is only a snag. Use the Instagram trigger one by one in the normal way. This is the current method of posting two photos in Instagram Stories. Remember that you can apply filters, effects and add GIF animations, music, etc. later.
Remember, you can recompose the image to suit the photo. Click on the spot where you want to select the photo, and then use the pinch gesture to zoom in or out on the photo as you see fit, but always cover the entire space. When you're done, click the "Publish" button.
Of course, putting two photos in Instagram Stories doesn't make any difference when it comes to Android and iPhone. In other words, on your iPhone, you can also use the Instagram story design tool as described in the previous tutorial and add two captured images or two images you previously had in the gallery. You just need to select the "Layout" option and then select the grid shape. But here, using iPhone, there is another very useful and curious way to answer how to put two photos in an Instagram story.
Enable clipboard usage. On Apple phones, this tool can do more than copy and paste text such as links or messages. It will also copy the image. Thus, you can go to the mobile gallery and copy the photos you have previously taken or uploaded.
Then go to Instagram Stories and take pictures regularly. No need to use design tools. After posting and before posting, press and hold and paste the previously copied photo. Look, you will have two photos in your Instagram story at the same time. The second photo (pasted) behaves like a sticker, so you can move it anywhere on the screen, and zoom in or out with the pinch gesture. Always on top of another photo, of course, i.e. the photo you took with Instagram Stories and that photo will remain as the background. Now you just have to choose music, emoji, text, or whatever you want to add to the story. And ready to launch.
However, if you want to know how to add multiple photos in the same Instagram story, the answer goes back to the design tool. Remember that you will have different options before posting. In other words, you can select two or up to six photos at the same time in one image. Of course, this is a rather limited tool. You can take screenshots or add photos from the gallery, but don't edit the grid with colors or look for custom and brighter patterns. So if you are a very creative user, you may not have many options.
If you want to put multiple photos in the same Instagram story but have more creative freedom, you should use a different app. A good example is the free Canvas app for Android and iPhone. Among them, you will find pre-made art templates and drawings, and you can collect multiple photos or even multiple videos in one post. All of this includes additional content such as fonts and animated text, as well as other design options.
Of course, in this case the process is more complicated. You will need to create content in Canvas, produce it and export it, and then finally upload it to Instagram Stories as if it were a photo or video in a gallery. However, you will at least have the strong decision power to choose exquisite decorative items without understanding aesthetics, art, and color. The Canvas app has done its dirty work.
So you already know how to create more creative and interesting posts by resorting to posting multiple photos in the same Instagram story, which is the most used feature in the social platform today.