Home Tech News Bored of your Instagram Explore feed? Here’s how you can change, reset it
Instagram Explore feed is a valuable feature for most users, but those who like to change things frequently and diversify the things they see, can definitely push the reset button. Here is how to reset Instagram Explore feed.
Instagram is one of the most popular image and video sharing platforms on the planet. It not only enables users to share their creative content and shop from its platform, but it also enables them to follow their favourite artists and creators. This in turn starts a cycle wherein users see suggestions on Instagram that are tailored to their likes and dislikes. These suggestions appear in Instagram's Explore section. While these suggestions are great, sometimes they can also prevent Instagram users from exploring new things and more diverse content.
Thankfully, Instagram has settings that can enable its users to reset or even change the Explore section in the app. However, do remember that Instagram Explore is all about personalising content for you and ultimately, the feed will start curating and reflecting exactly what it interprets is to your liking.
Also read: Looking for a smartphone? Check Mobile Finder here.
How to reset Instagram Explore section - a step-by-step guide:
Step 1: Open the Instagram app on Android or iOS.
Step 2: Tap on your profile icon on the bottom right corner of the app.
Step 3: Now, tap on the burger menu icon on the top right corner of the app.
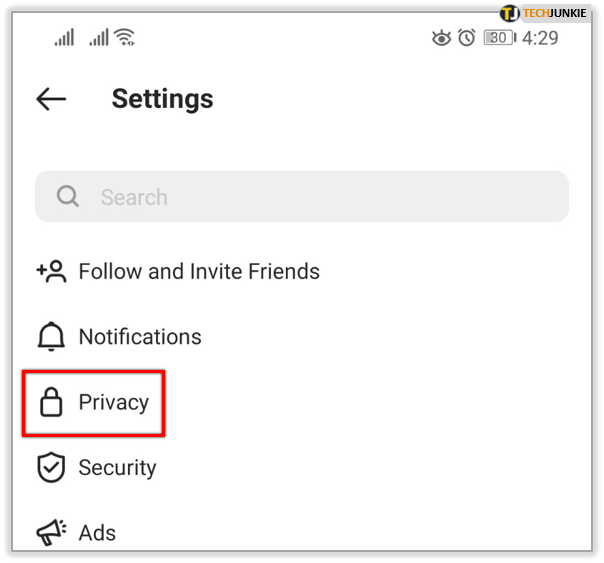
Step 4: At the bottom, tap on the Settings option.
Step 5: Now tap on the Security option.
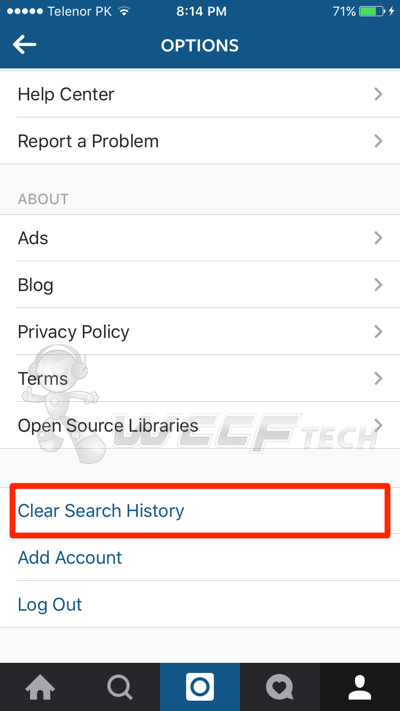
Step 6: Under the Data and History section, look for the Search History option and tap on it.
Step 7: Now tap on the Clear All option.
Step 8: Now, you will get a prompt asking if you want to clear your search history.![]() Tap on the Clear All option.
Tap on the Clear All option.
How to change the Explore section on Instagram
Step 1: Open the Instagram app on your Android or iOS smartphone.
Step 2: Tap on the magnifying glass search icon in the bottom row of the app.
Step 3: Next, select a post that you do not like.
Step 4: Now, tap the three-dot menu icon of the particular post.
Step 5: Now, tap on the Not Interested button and the post will be removed from the feed.
Follow HT Tech for the latest tech news and reviews , also keep up with us on Twitter, Facebook, Google News, and Instagram. For our latest videos, subscribe to our YouTube channel.
First Published Date: 09 Jul, 17:03 IST
Tags: instagram
NEXT ARTICLE BEGINS
Looking for an iPhone charger? Best ones to buy for iPhone 14, iPhone 13, iPhone SE 3
Safe online payment tricks: Know 5 easy ways to keep your money safe on UPI, Net banking
WhatsApp Update for emoji reactions: Now see up to 4 reactions within chat bubbles
Weather today: Your iPhone can give rain alert; save yourself much pain
Google Calendar can now announce event details verbally; know how
Apple iPhone 14 Plus in for review: Big iPhone for small(er) wallets
Kodak Matrix QLED TV review: Cinematic TV experience now affordable!
Xiaomi Smart TV X50 Review: Great 4K experience, stellar audio
Dizo Watch R Talk Review: Fast and Feature packed
Realme GT Neo 3T review: A power-packed deja vu
Redmi Pad Review: An All-Rounder Tablet
Looking for an iPhone charger? Best ones to buy for iPhone 14, iPhone 13, iPhone SE 3
Shocking spike! Buying a refurbished iPhone 13 Pro, iPhone 13 Pro Max? Read this
Fossil launches Wellness Edition of Fossil Gen 6 smartwatch with Wear OS 3
Apple iPhone 14 Plus in for review: Big iPhone for small(er) wallets
Hounded at home, China's video game firms welcomed in Europe
Spider-Man: Miles Morales PC launch date is OUT! Check out system requirements
Free PS Plus games! Check list, including GTA Vice City, Assassin’s Creed Odyssey, more
Watch out NASA, this Minecraft player just built the entire universe
Microsoft Says Biased Sony Attack on $69 Bn Call of Duty-Maker Activision Deal Swayed UK
Contents
Instagram is a great place to share the most eye-pleasing visuals and curate them according to your taste. That means you can customize Instagram as you want, and you’ll find a more enjoyable place. However, when you browse the Explore Page, you may want to customize and reset the Instagram Explore Page.
Social media is developing more and more every day. Many applications with innovations appealing to all ages and audiences are in a fierce race in this field. One of the most effective candidates of this race lately is undoubtedly Instagram.
Instagram, which can be described as a photo and video sharing application in basic terms, has made important developments since its first step on the scene. Instagram, which always keeps its users’ satisfaction at the forefront, has recently attracted attention with its new features such as zooming photos and liking comments, especially in the stories section.![]()
In addition to the beautiful features of Instagram that attract millions of users, there may be some dislikes from time to time. When the users’ complaints increase in a certain direction, Instagram can manage to achieve user satisfaction in a short time.
For example, until recently, the Explore section of Instagram was a section with problems for its users. The method applied in previous versions in the section called explore on Instagram was to have the most liked photos in the foreground. This situation can become boring for users, and users can always get bored seeing the same style of photos.
The Explore page is a feed that analyzes what you like on Instagram the most. In that way, it’s possible to filter your experience according to what you want to see at that moment.
When you like something on Instagram, it gets a hint about what you may like in the future. In the Explore Page, Instagram provides you more content based on that simple hint.
The simplest way to customize that page is to like more photos that you want to see. Instagram will notice your interests and recommend more content that you may like.
In that way, you can get accustomed to more relevant people you might need for your business or brand to thrive, or you may even find your future partner!
You can simply use the “Show Fewer Posts Like This” button. It’s a really handy tool to hide content you don’t desire to see on your Instagram Feed.
Instagram is a large platform, and you may not like everything you will see on it! That’s completely normal; we can change our preferences in that case.
Just as it is a common issue to find the best place to get Instagram followers, there are many issues that Instagram users are interested in. One of them is about how to reset the Instagram Explore Page.
Another problem with Instagram users’ discover section is cleaning the explore history. To provide faster service to Instagram users, it maintains a system that will record your searches and serve as a source for your future searches.
In other words, when you are going to type something in the search bar, Instagram shows you the suggested content by making suggestions by considering your previous searches. However, this situation can sometimes be annoying. So much so that when you press a letter, it is normal to get tired of the old connotations of that letter coming across constantly. For this reason, one of the problems to be solved for users is cleaning Instagram’s search history.
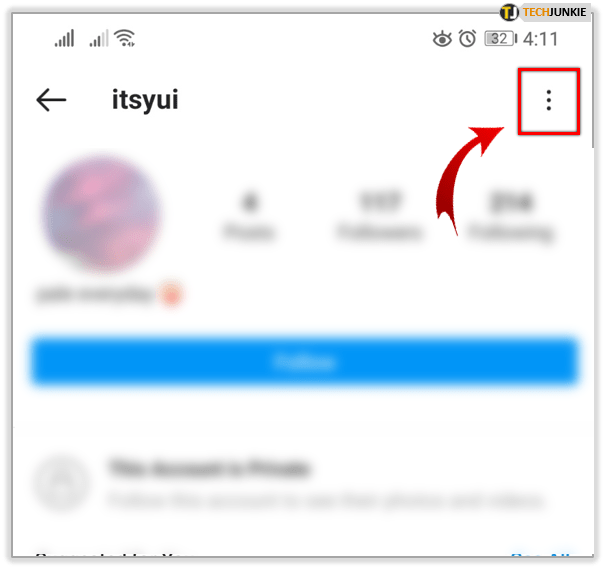
It’s pretty easy to do this. When you enter your profile, you can find the clear search history section in the settings by clicking the section in the upper right corner that expresses the options. However, sometimes this transaction is not enough to delete the history.
There are some methods you should apply in the face of this frequently encountered problem. First of all, you should go to the applications section of the phone settings and find the Instagram application. After you choose Instagram, you can clear the cache.
In this way, the problem is solved. If you cannot delete the history with this method, there will be a need to restart the phone. If you are still not sure that the problem has been solved, you can find applications that can solve your problem in application markets.
RECENT POSTS
Instagram is a social networking service that people use to share photos and videos. Since 2010, it has become one of the most popular social media to. ..
..
Instagram is one of the most popular social media platforms today. People are also posting reels by sharing posts on their Instagram profiles. But eve...
In that way, you can reset what you see on the Explore Page and open yourself a fresh route where you can only see what you want to see after the clearance.
When users tap explore, they will see content related to their previous searches. Sometimes it may be boring to see something they searched before.
Because they can see the thing they don’t want to see as soon as they type a letter. When they clear history, they can get rid of all these unnecessary things at once.

As you see, it’s possible to customize your Instagram experience by changing the details of your Explore Page. It’s a featured place that changes to your taste, and you can discover a lot of unnoticed content.
Also, it’s possible to clear your search history if you don’t like what you see on this page as it can turn to a place where everything is messed up real quick. You can enhance your experience that way.
So, do you like what you see on Explore Page? Let us know right down in the comments.
Thanks for reading this article!
menu
Content
social networks retain everything what you post in your account. The same applies to Instagram search history.
In this article, you will learn how to delete your Instagram search history and how to prevent individual accounts from showing up. After that, you will no longer be able to view the history directly. But on the other hand, you can easily find your favorite subscriptions and hashtags again.
The app saves your search results in the Overview tab to make it easier to find your favorite accounts and content. If you have previously used certain hashtags for posts, these hashtags will immediately pop up again when you search for similar ones.
Clearing your Instagram search history is an important part of your right to privacy. Saving your search history helps improve your experience, but it can compromise personal privacy and security on Instagram.
In addition, due to saving, pages of unwanted users often come across in the recommended ones.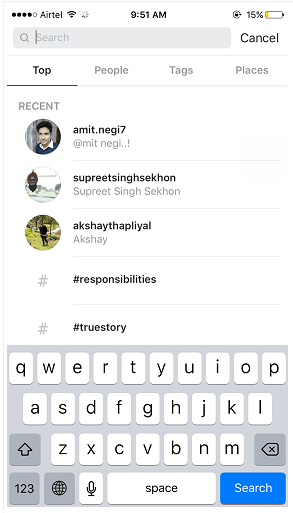 But, in any case, most often this feature makes it easier to follow the activity of a friend, acquaintance or celebrity.
Fortunately, the removal will take less than 5 minutes. This happens through the Instagram app, which is available for iOS, Android, and Windows.
If you have an iPhone, you can also easily delete history right from the Overview panel. In the line you will see your history (a list of accounts or hashtags that you have recently viewed).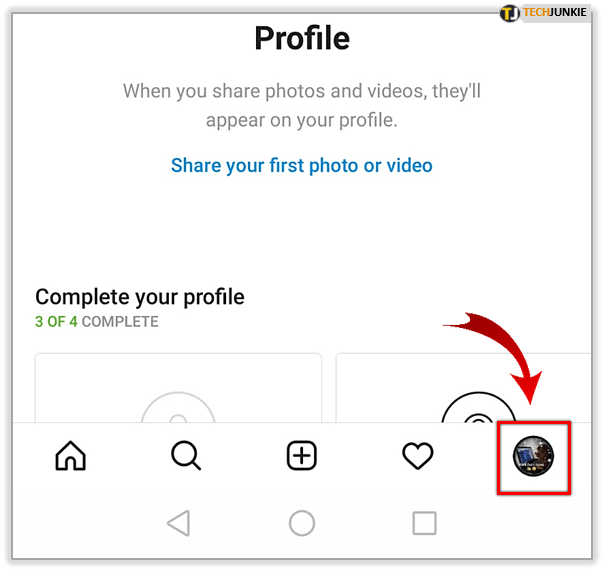
In the upper right corner, click on the "All" button and then "Clear All", also located in the upper right corner. This will instantly erase results for accounts, locations, and hashtags in the Explore tab.
After this action, the feed will change because it is now based on:
Click this tab and it will no longer display the latest results. This is how easy and simple you can erase your search history. Now let's move on to how to hide individual accounts on Instagram.
You may notice that you often meet the same users in the recommended. If you don't like it, there is a way to hide accounts from your Instagram search history. Follow these simple steps:
 Then go to the "Search Bar" located at the top of the screen.
 If you still see your history even after clearing it, stay calm: there are other solutions to this problem.
Once you've erased your Instagram search history, reboot. Sometimes all it takes to fix a technical problem on your phone is to simply restart your smartphone and update Instagram.
Another way to solve this problem is to log out.
Are you an Android user? Then use another solution: try clearing Instagram cache and history.
 This time, click Clear Data or Clear Storage.
 When you clear the cache, only the application's temporary storage is cleared, where temporary images or data from the Internet reside.
But when you clear application data, you basically delete all data like username, password, etc. When this happens, the app returns to the state it was in when it was first installed. Therefore, read in our blog what to do if you forgot your profile password.
The worst thing is if all the solutions didn't work. In this case, another option worth trying is to remove Instagram from your device.
Follow these steps to remove Instagram from Android.
You can also:
But if the removal is not enough to achieve the desired result, at least there are 4 more solutions to help deal with the problem.
Share with friends:
Twin
Share
share
Send
Grade
ADBLOCK
DETECTOR
Social Network Social Network "Instagram". almost every person has the most leading places in smartphones.
At first glance, it seems simple, but it has many of its own nuances, which causes some difficulties.
It happens that one or another Instagram profile or hashtag is not always found, and you have to delete your search history so as not to get confused.
But the question arises: how to do it? This article will explain in as much detail and step by step how to clear the search on Instagram using an application or a browser.
It is quite easy to clear the search on Instagram, the main thing is to remember the course of certain actions.
By going to your profile, you will see your main account (photo, number of publications, number of subscriptions and followers). Then you should go to "Settings" (indicated at the top right by three nearby small squares).
And remember that you can change settings and delete search history only in your own profile, you will not be able to access the settings and search history of someone else's account.![]()
After that, the search history will be cleared automatically. By following these simple steps, you can easily delete your search history in the Instagram app within one minute.
This was a way to delete the search history in the mobile app. In the event that you do not have the opportunity to download the application, and you urgently need to delete your search history, do not worry, as you can delete your search history by logging into your Instagram account through a browser.
In fact, everything is the same. However, when entering the “Settings”, some questions and difficulties may arise. To avoid them, step-by-step instructions will be shown again.
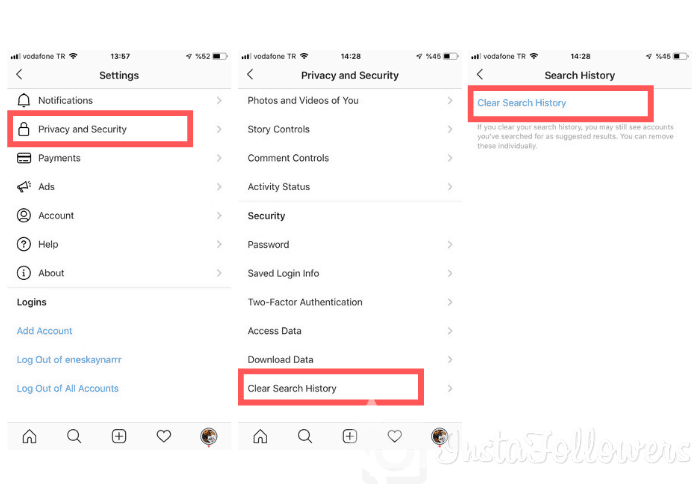
After going to "Settings", make sure that the versions of the application and the browser are significantly different. In our case, again, the very first and main section “Account” will be needed. Here you can see a new subsection - "Privacy and Security", we will need it.
Selecting this action, at the top you will see the date of registration on the network, then you again have to scroll a little to the heading "Search History", which is exactly what we are looking for. Next, click on the "Show All" action.
"Show all" in this case means the action "clear search history".
If you go back to the search history after deleting it through the browser, you will see the note "There is no information in your account that matches this category.