3 min
On Instagram, it’s impossible to post an album — multiple photos or videos in one post that you swipe through — with multiple different aspect ratios. In this article, I'll show you how to do it for free and online.
When posting an album, Instagram requires that the images have the same aspect ratio. In this post, I’ll describe how you can post multiple photos or videos with different sizes by first resizing them to square.
On Instagram, it’s impossible to post an album — multiple photos or videos in one post that you swipe through — with multiple different aspect ratios. For example, if you want to post a landscape image and a portrait image at the same time, you need to crop one or the other (or you could crop both to square). Instagram requires that your photos have the same aspect ratio.
When posting multiple photos or videos, all are cropped to squareTo post multiple different photos or videos with different sizes on Instagram, you need to use a tool to resize them first. To avoid cropping out content, add a white background to make each photo or video in to a square. Then, you can post the album without cropping out or changing the size of your image.
Here’s a step-by-step tutorial:
Open the Kapwing Studio and start with a square 1:1 canvas (or 4:5 or 5:4, which are both accepted by Instagram).
One at a time, upload the photos or videos you want to post. Kapwing is free to use and online, so you don’t need to download an app. It supports images, GIFs and videos.
If needed, tap the photo or video and resize the canvas to the right aspect ratio. On mobile, use the "Edit Background" button to find the Resize Canvas button.
1:1 for an Instagram Post appears under the "Size" dropdown (Kapwing also supports 9:16 sizing for Stories and other formats). Turn off "Canvas Blur" and select white for your background color. You can use Kapwing’s zoom and positioning tools to zoom in, crop, or add a border. Double tap to crop the image or video, and use the Play button to watch a preview of what your post will look like. Click Export once the preview matches what you want your post to look like.
After resizing your posts, you can download them and share them on Instagram as an album. Since each photo/video now has a 1:1 aspect ratio, you can publish them without cropping.
On an iPhone, use the "Downloads" gallery to find the file you just made and save it to your camera roll.
If you're not signed into a Kapwing account, sign in or sign up using your Google or Facebook account. Once you're signed in, each of your exports will be saved in your workspace so that you can download them later.
Repeat these steps for each of the photos and videos that you want to share in your Instagram carousel. After you've downloaded each of the square posts, open the Instagram app and upload them as an album.
For more ideas, tutorials, and features, check back in at the Kapwing Resources page or our YouTube channel! And remember to tag us @KapwingApp whenever you share your content on social media– we love to see what our creators are passionate about!
Related Articles:
• How to Caption Videos Using Instagram Threads
• How to Download Anyone's Instagram Stories
• How to Make Social Justice Slideshows for Instagram
• How to Download Instagram Reels
Answer
How do you put landscape and portrait photos together on Instagram?
There are a few ways to do this. The first is to use the built-in Instagram tools. When you’re posting a photo, there’s an option to switch between landscape and portrait mode.
If you want more control over how your photos look, you can use an app like Layout from Instagram or PicStitch. These apps let you combine multiple photos into one collage, and they give you more options for how your photos are arranged.
Can you mix vertical and horizontal photos on Instagram?
Yes, you can mix vertical and horizontal photos on Instagram. Just be sure to keep your posts in the same aspect ratio so they look consistent on your profile.
How do you post more than one landscape picture on Instagram?
You can post more than one landscape picture on Instagram by using a photo collage app. There are many different apps that you can use, but my favorite is PicStitch.
How do I put multiple pictures on Instagram without cropping?
There are a few ways to do this. The first is to use the built-in Instagram tools. When you’re posting a photo, there’s an option to switch between landscape and portrait mode.
If you want more control over how your photos look, you can use an app like Layout from Instagram or PicStitch. These apps let you combine multiple photos into one collage, and they give you more options for how your photos are arranged.
What is carousel Instagram?
Yes, you can mix vertical and horizontal photos on Instagram. Just be sure to keep your posts in the same aspect ratio so they look consistent on your profile.
How do you post together on Instagram?
You can post more than one landscape picture on Instagram by using a photo collage app. There are many different apps that you can use, but my favorite is PicStitch.
How do you create a sliding post on Instagram?
To create a sliding post on Instagram, you first need to create a video or photo that you want to post. Once you have your video or photo, open it in an editing software like Photoshop or iMovie. Next, add a black background to the entire image or video. After that, use the eraser tool to erase the parts of the image or video that you want to be visible. Finally, export the image or video as a .
Can you post portrait carousel on Instagram?
Yes, you can post a portrait carousel on Instagram. A portrait carousel is a series of images that are displayed in a vertical layout, similar to a slideshow. To create a portrait carousel, you’ll need to use an app or program that allows you to design and create slideshows. Once you have created your slideshows, you can post them to Instagram by uploading them as videos.
How do I add carousel to Instagram after posting?
To add a carousel to Instagram after you’ve already posted, first open the post and then click the “Add Carousel” button in the bottom left corner. You can then add up to 10 images or videos to your carousel.
How do you post side by side on Instagram?
To post side by side on Instagram, first open the app and click on the “plus” sign in the bottom-left corner of the screen to create a new post. Then, select the “dual” option at the top of the screen. Next, select the two photos you want to post side by side and drag them into the correct order. Finally, add a caption to your post and click “share.
Why won’t my Instagram let me post multiple photos?
There could be a few reasons why your Instagram is not letting you post multiple photos. One possibility is that you have reached the limit of how many photos you can post in one go. Another reason might be that you are trying to post photos that are too large in file size, and Instagram is not able to process them. Finally, if you are using an unofficial app to post to Instagram, it may be limiting you to only one photo at a time.
What is an Instagram Colab?
An Instagram Colab is a collaboration between two or more Instagram users. They can be as simple as two people exchanging photos, or as complex as a group of users working together to create a single piece of content.
Need to post multiple photos to Instagram* from a computer? We will tell you how to do this through the social network and through the SMMplanner scheduling posting service.
If you're going to post multiple photos to Instagram* from your computer, the first thing to remember is that no matter how hard you try, you can't fit more than 10 photos or pictures in one post. The rest of the process is simple and fast, let's do it.
Home page Open your profile home page or feed. On the top option panel there is a plus sign in a square. Click on it to post some photos to Instagram* from your computer.
For convenience, it is better to create a folder on your PC in advance with a photo for publication and drag a photo from it to this window.
You can also click the blue "Select from Computer" button and upload photos from any folder on your PC. You can navigate between folders, but you won't be able to select pictures from several at once.
Uploaded photosAfter uploading several photos and before posting them, you can edit them. To do this, click in the menu " Crop ".
Grid helps you to center the desired part of the frameUse the grid to move the image around to select the desired area of the photo. To do this, move the cursor over the photo and hold down the left mouse button. Everything, you can move the image.
Picture formats, you can choose the appropriate one Click the button with the circled checkmarks to select the format of the uploaded image and use the grid to move it horizontally or vertically.
There is also an option Zoom , which is controlled by a button with a magnifying glass in a circle. You can zoom in and out of objects in the photo to place the areas you need. This is a great way to help followers pay attention to the right part of the frame.
Add a photoWith the plus button you can add photos to the carousel . It works provided that there is space left - the number is less than or equal to 10. You can change the order of the photos in which they will be shown to subscribers. To do this, click "Next", and then on the plus in the circle and select files from your PC in the window that opens. Nothing complicated :-) In this way, you can set not only consecutive frames, but also a variety of pictures.
Click Next After all the manipulations with the number and scale of the photo, click "Next" and go to the "Edit" menu. There you can apply filters and change image settings.
In the image editing menu, you can apply 1 of 12 suggested filters to each photo. Click on "Filters" and use any of the ones you like. You can choose a separate filter for each image, but we still recommend choosing similar filters so that the photos do not look too scattered within the same post.
Image SettingsImage settings allow you to adjust brightness, contrast, saturation, etc. Click Settings and move the slider along the line, adjust the level of each parameter until you like the result. Already changed values can be transferred back if you do not like what happened. Or generally click on the arrow to the left of "Edit" to exit the editor and enter it again. In this case, the settings will be reset, and you will not have to reattach the pictures.
We talked about creating a beautiful visual in the article “How to create a beautiful visual for Instagram* in 2022”. In it, we tell you how to design posts in your account so that readers like your profile, and show what rules and tricks you should follow.
This is what the photo looks like after editing. After applying the settings and photo filters, click "Next" to move on and add a caption, hashtags, and more.
We talked more about hashtags in the article “How to use hashtags to promote on Instagram *: examples, opportunities, mistakes” - we talked about how to use tags correctly so that they benefit your account.
Menu before publication - do not forget to enter the text By the way, about the text. It is better that subscribers are hooked not only by the picture, but also by the text under it. This will help users stay on your profile. If you need ready-made texts, take a look at our article Posts for Instagram*: where to get ready-made texts. And if the text turns out to be too large - it does not matter. What to do in this case, we tell in the article "Large texts on Instagram *: why are they needed and how to design. "
"
In the Create Publication menu, you can add a signature, geodata, and take advantage of Accessibility and Advanced Settings.
AccessibilityBy selecting the "Accessibility" option, you can make a caption for each photo for people with visual impairments. Write your own text or it will be generated automatically. Alternative text is displayed only for special programs that recognize such texts and use them to describe the content of the photo aloud.
Advanced settingsIf you don't want your post to be commented on, disable this feature in the "Advanced settings".
Description of the publication Create a caption with or without hashtags, add a geotag to your publication. It all depends on the nature of your post: if you have a “local” business and you want your photos to be easy to find, use geotags and geotags, without neglecting hashtags with your brand. More about place hashtags in our articles “80 hashtags for promotion and promotion in social networks” and “How to correctly search for posts and people by hashtags on Instagram *: instructions”. In them you can find detailed information on how to use it and why, as well as what benefits it can bring.
A great way to not only publish several photos in one post, but also prepare posts in advance before publication is to use the SMMplannert delayed posting service. When registering via the link, you will get free access to all functionality for 2 weeks.
So, how to post a few photos on Instagram* from a computer:
Log in to the site, go to the "Posts" tab.
In the same way, you can publish a post in several social networks at onceClick "Schedule a post". An active window appears, in which we will create a future post for the profile.
In an empty box, write the text for the future postAdd photos. We click on "Photo / Video", a page with folders on the computer opens. Among them we find what we will publish.
To post multiple photos on Instagram* from your computer, simply select all the photos you want to post.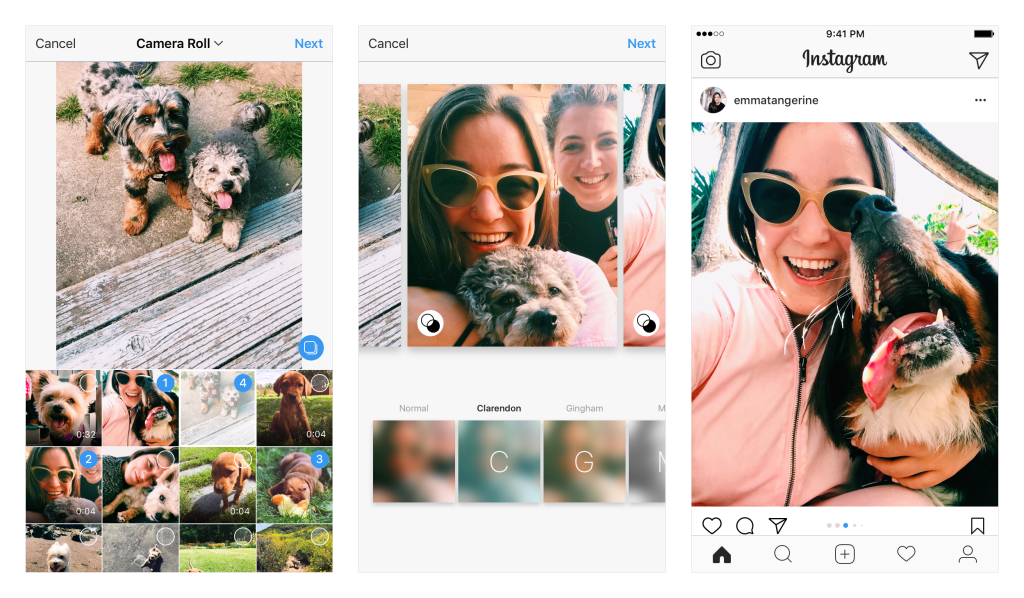
Select a page or multiple projects where the post will be published. An expanded list of options will appear:
You can also add a poll to your post, or create a custom design for one or each of the photos using Canva. There are many options for editing and improving images for a post. But the main advantage of the service is that it will publish posts while you are resting :-)
When everything is ready, click "OK", and the post will go to publication at the time specified for it.
Read our blog to keep abreast of news, find out the tricks of publications and advertising, understand how to promote accounts in all social networks.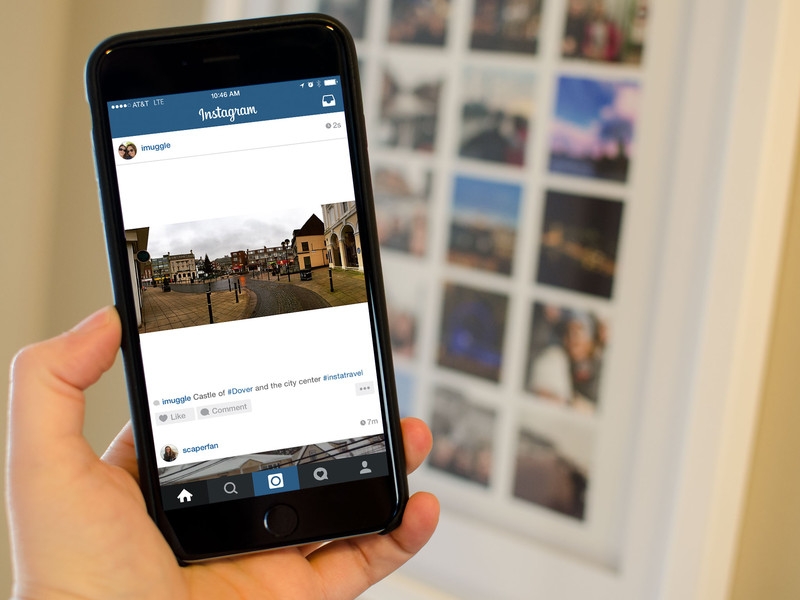 We'll tell you everything!
Article updated. First post: May 23, 2017
Instagram* is a social network where you can't post without an image, so it's important to know the optimal formats and sizes for photos, stories, and videos on Instagram*. By studying these parameters, you will know in advance which areas of the image or video will be selected and left in the frame.
Let's consider a technical question: what formats Instagram* eats, how to make files of such sizes, how to upload photos to Instagram* from a computer.
Anyone else remember the Instagram apps* that helped you post a rectangular photo? Which actually created a giant white border?
The time for square publications is long gone. Now Instagram * eats rectangular and square frames. There are three frame options:
 Looks great on your account. All photos are square, nothing is cropped, everything important is in the photo.
 Leah Kanarska , SMM specialist:
A good visual example of a psychologist blog on Instagram*. A winning visual on Instagram* gives a big advantage to a bloggerI like the 4:5 format in publications more than a boring square. It allows you to place text with a caption, while leaving a full-fledged photo. For example:
Photo resolution is 1080 px. You can upload better content, but Instagram* will crop it anyway.
Maximum size - 30 MB, file formats: png, jpg, gif.
Let's see the options for different frame sizes.
Pay attention to a little trick. Photos where there is a lot of text on the photos themselves, text logos, solids, as a rule, receive less coverage than pure photos. Text on photo - helps manage attention, aids in navigation, but reduces reach.
Your profile picture is like a trademark, it makes you recognizable among your followers. But I advise you to use the same photo in your personal profile as in other social networks, of course, if you want to make it easier to remember and find you.
Optimum size: 160 x 160 px.
Maximum resolution: 180 x 180 px.
Do not overload the avatar with small details, no one will see them because of the small size of the photo. And don't place anything important in the corners of the image, as the avatar is round and anything in the corners will be cut off.
Do you want to make your Instagram profile beautiful and correct*? Sign up for the master class "Create an account on Instagram*".
Can I upload a GIF on Instagram*? No. Instagram* will not be able to take an animated *gif file and make it move after posting. It will look like a static picture. To make the photo move, you will have to convert the gif to mp4 or avi, or to another supported video format.
Detailed figured out in the article "How to add your own GIF to the Story on Instagram *".
From a technical point of view, the simplest content. Go to Instagram* stories, swipe to live and start broadcasting.
It is better to use a tripod during broadcastsFrom the requirements - you must have good internet, well, good content that can be offered to subscribers.
Video : H.264 video compression standard, high profile preferred, widescreen pixels, fixed frame rate, progressive scan.
Audio : Stereo, AAC compression format, 128Kbps + preferred. Instagram* has its own audio copyright recognition algorithms. Therefore, for background music, it is better to use free music, creative commons. Otherwise, there is a chance to lose your account for copyright infringement.
Instagram video format*:
In fact, the file that you get from your phone's video camera will get into Instagram*.
Maximum video length : 60 seconds.
Video codecs: H.264, VP8
Almost any video editor from the app store can make videos that Instagram eats *. Pay attention to file compression, some applications reduce image quality.
Video aspect ratio can be square, landscape or vertical. But if you want to put it in the gallery, then crop the video to a square.
Square videos:
Horizontal videos, otherwise landscape:
The correct size depends on where you publish it.
IGTV video can be both vertical and horizontal, lasting from one to 60 minutes. From a mobile phone, you can upload a video up to 15 minutes.
The maximum file size for an Instagram* video up to 10 minutes long is 650 MB, for a 60-minute video it is 3. 6 GB.
6 GB.
Vertical IGTV:
Horizontal IGTV:
IGTV cover size:
Please note that if you have already uploaded the cover, you will not be able to edit it. Prepare it ahead of time.
Capacity : 10 photos and videos. On the very first day, I cut a five-minute video into 6 clips from 30 to 55 seconds and uploaded everything sequentially to the gallery.
Format : Square Only a square. For now, it's just a square. I don't know if this format will change or not, but now if you want to use rectangular photos and videos, they will have to be cropped. In SMMplanner you can choose whether you want to crop your photo/video or add color fields.