By default, Instagram compresses the photos and videos you upload on the platform. This reduces the quality, which could disappoint many people. While there’s no direct option to disable compression, you can follow some tips to get original image upload quality. Here’s how you can upload photos and videos without compression or losing quality on Instagram. Additionally, you can learn about Instagram Supervision and How to Use and Remove It From Your Account? (FAQS)
Table of Contents
When you upload photos and videos on Instagram, be it stories, posts, reels, or IGTV, they get compressed to reduce the file size and bandwidth. The compression may go overboard at times, causing the media to lose detail or appear pixelated.
Instagram uses its proprietary algorithm to apply compression to everything you upload. This is done:
If you don’t want the upload quality to suffer on Instagram, there are certain tips you can follow like checking the upload guidelines, resizing the image, changing how you transfer files, tweaking camera settings, and more. Check the guide below.
Instagram will upload the photo in its original resolution as long as you’re following the guidelines given below.
Use the latest version of the Instagram app.
Upload photos up to a width of at least 1080 pixels with an aspect ratio between 1.91:1 and 4:5.
Make sure you’re using a good quality camera because each phone has different quality cameras.
If you upload a picture with super high quality, Instagram will compress it to reduce the width to 1080 pixels. At the same time, if you upload a low-quality image, it will enlarge the image to a width of 320 pixels which again can mess with the clarity.
To make sure that Instagram places your photo in its original resolution, follow the requirements. Also, avoid using Add Music feature for photos in stories as it heavily reduces the image quality and makes it appear blurry.
Instagram Guidelines for High-Quality VideosFollow the recommended guidelines to upload videos without losing quality on Instagram.
 6GB
6GBYou can scale down your image size upfront to stop Instagram from applying compression. If your photo measures 4000 x 4000 pixels, scale it down to 1080 x 1080 pixels.
Follow the correct aspect ratio– 1:1 for square, 1.91:1 for landscape photos, and 4:5 for portraits. You can resize or compress the images via different tools on your phone or PC:
 Enable High-Quality Uploads for Instagram Videos
By default, Instagram reduces the video upload quality to suit network conditions. Here’s how you can turn it off to always upload high-quality reels and IG videos:
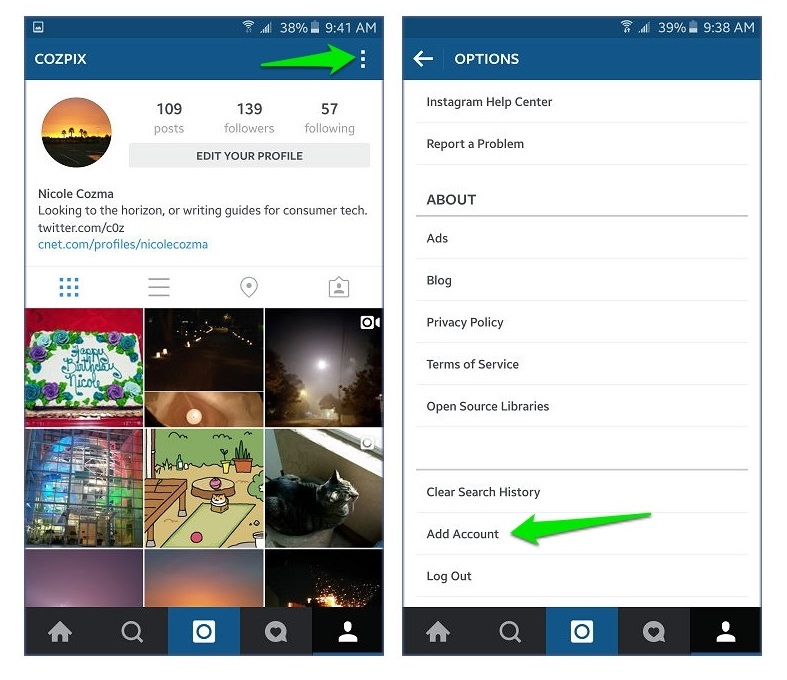
1. Open the Instagram app on your Android or iPhone.
2. Tap the profile icon at the bottom right.
3. Click the hamburger menu and select Settings.
4. Navigate to Account > Data Usage.
5. Here, enable the toggle for Upload at highest quality.
Once enabled, Instagram will always upload high-quality videos even if it takes a little longer. If the high-quality uploads option is not available, try switching to the creator’s account.
The easiest way to shell out the best quality for Instagram reels is to shoot in 4K and 60fps (provided you have ample light). Plus, Instagram is now testing HDR video uploads for iPhones. Here’s how to enable both options on your iOS device:
1. Open Settings on your iPhone.
2. Scroll down and click on Camera.
3. Click on Formats and select High Efficiency.
4. Next, go back, tap Record Video, and set it to 4K at 60fps.
5. On the same page, enable the toggle for HDR Video.
Make sure you have also enabled high-quality uploads in Instagram settings. Also, videos may not stay in HDR if you edit them before uploading. So, try editing in Photos or the iMovie app.
Once you upload the reel recorded in the above settings, the HDR status may disappear after some time. This is because Instagram takes time to process HDR videos- once it’s done, the status will be back again.
You can’t really get rid of compression while uploading high-quality videos on Instagram. However, you can compress the video yourself while keeping the maximum quality possible so that Instagram does not compress it further or reduce the quality.
You can use the free software called HandBrake to compress the video while keeping most of its quality. Instagram accepts both MP4 and MOV formats for uploads. H.264 MP4 is the recommended format to preserve the quality of the video after upload.
If videos are longer than a minute, it’d be better to upload them as IGTV instead of regular in-feed videos. If they’re short, you can still upload them as IGTV by either looping the video or adding blank footage.
Here are some easy ways to reduce video file size on mobile phones and PC.
If you’re transferring photos and videos from PC to phone or vice versa, make sure they’re not being compressed during the transfer.
If you have an iPhone and Mac, use AirDrop. Else, use services like Google Drive, Dropbox, etc. You can also send photos and videos without compression via Telegram. If using WhatsApp to transfer photos, send them as documents.
Tweak your camera settings to make sure you get the best picture quality for Instagram. Always capture photos and videos in their full resolution. You can then resize them later.
If clicking pictures on your phone, it is better to use the stock camera instead of the Instagram app.
These were easy ways to upload or post photos and videos on Instagram without compression or losing much quality. I hope this helps you in uploading high-quality posts on social media. Do try the methods, and let me know if they make any difference in the comments below.
You might be interested in:
You can also follow us for instant tech news at Google News or for tips and tricks, smartphones & gadgets reviews, join GadgetsToUse Telegram Group or for the latest review videos subscribe GadgetsToUse Youtube Channel.

Summary: Instagram story video quality bad after upload? In this article, we will tell you why Instagram Story videos go blurry and how to fix this issue. Check it out!
If you are an Instagram user, you will be aware of the importance of Instagram video/photo quality. However, on Quora and Reddit, you see lots of threads like this.
My videos become poor quality after uploading them to Instagram. There is no problem with the video. Why and how to fix this problem?
- Question from a Quora User
Instagram Story video quality bad issues may happen for various reasons, including the Internet connection, the app version. Whatever the case is, Instagram story video quality bad issues are not hard to solve. Follow the methods below and say no to blurry Instagram story videos.
Also Read: 8 Best Instagram Video Background Music Resources >
 Check Internet Connection
If your Internet connection is not stable, the uploaded Instagram story videos might get blurry because they are not fully loaded. That’s not all, while you are uploading videos to Instagram under bad Internet connection, Instagram will automatically reduce the video quality in order to upload it. Try to connect your devices to a stable WIFI switch to mobile data.
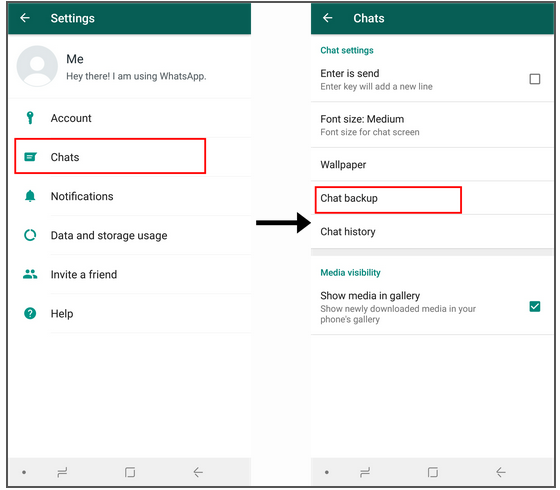
Restored your phone from a backup? Try another video or photos. The clarity of photos and videos may change in a corrupted backup.
On iPhone, to reset network settings, you have to go to Settings > General > Reset > Reset Network Settings. On Android phone, you need to go Settings >Backup and reset > Reset Network Settings.
When your phone can’t capture high-quality video, here is what you do to adjust phone camera settings.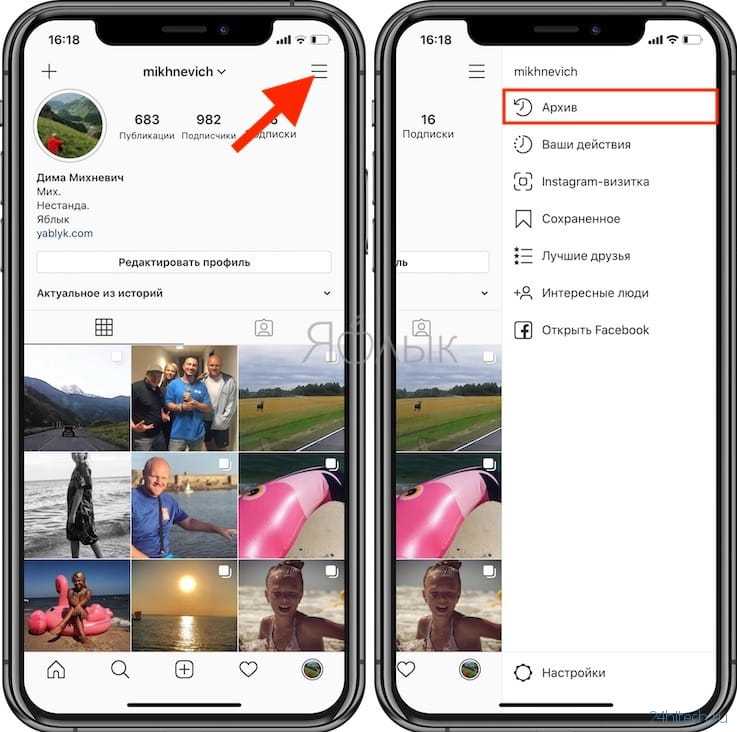
On Android:
Step 1 Open the default Camera app on your phone.
Step 2 Click on the Settings icon shaped like the gear icon.
Step 3 Adjust the picture and video size to the highest quality.
On iPhone:
Step 1 Launch iPhone Settings app on your phone.
Step 2 Find Camera.
Step 3 Adjust camera quality and toggle the “Auto DHR” on.
Instagram limits the size and quality of the photo and video you uploaded. If you are uploading a video or photo that is too large, Instagram will compress it so that your video could be loaded faster. As a solution, don’t use phone’s camera. Use Instagram’s camera instead. No trimming, no quality loss.
When you are in the older version of Instagram, the Instagram Story video might appear worse. Update it so that you can enjoy the new Instagram journey.
Instagram burns your mobile data. To prevent you from overusing the data, Instagram provides you a setting to keep your mobile data usage to a minimum. This will significantly lower your Instagram feed quality. This is what you do to toggle off this settings.
Step 1 Launch Instagram and tap your profile icon.
Step 2 Click on the three horizontal lines.
Step 3 Go to Settings > Account > Cellular data use.
Step 4 Toggle the Data Saver off.
Instagram has certain requirements for videos and photos. If the video you want to upload doesn’t meet the requirements, Instagram will automatically trim or compress it.
Visit Instagram Video Requirements >
Lots of video editor such as FlexClip helps you trim and compress the video to fit Instagram story format without quality loss. In clicks, you can adjust the aspect ratio, video length and video size. Moreover, it also provides you other video editing tools to level up the video, like transitions, filters, and video speed changer. Last but not least, FlexClip has numerous media resources you can apply, including royalty-free video clips, photos, music and even pre-made video templates.
Image Board: Instagram Story Video Quality Bad - FlexClip Overview
Create a VideoView Templates
Use This Template
Use This Template
Use This Template
The Bottom Line
With the 8 Instagram story video quality bad solutions, you will no longer suffer from blurry Instagram story videos! Share this post if you find it helpful. Have any ideas? Tell us via Facebook.
Elena /
Member of PearlMountain Limited. Has a mania for video editing. Love to share photo/video shooting tips and ideas.
Home
Blog
How to deal with poor video quality in stories
The amount of content posted on Instagram is not as important as its quality. And we are not talking about useful information for subscribers, but about the quality of shooting. After all, even if the video was originally of good quality, when uploaded to stories, it can become much worse. Let's figure out why this happens and how to deal with it.
Why Instagram ruins video quality in stories
How to improve the quality of Instagram stories
We have products that help automate social media work
Learn more
and improve accounts with analytics
deep analytics
Why Instagram spoils the quality of videos in stories
Android smartphone owners are more likely to experience poor quality stories than iOS users. Depending on the brand or model of smartphone, the default video quality settings on Android are different.
Instagram has its own requirements for video format, size, frame rate, and so on, so the social network compresses and optimizes the video for itself, which is why the quality deteriorates. On the iPhone, the default settings are more suitable for Instagram requirements. In addition, it is believed that the iPhone camera API is better and transmits a higher quality video stream, so problems with the quality of stories are less common.
There is no 100% way to solve the problem with low quality stories on Android, since the reasons for each user may be different, so we recommend experimenting and gradually eliminating each possible option.
How to improve the quality of stories on Instagram
The described options are most relevant for those who create content in advance or shoot videos not on the phone. For those who shoot instant content (here and now), the easiest way to do this is with the internal camera in the Instagram app. This is the easiest way not to get a compressed pixelated video and not to bother with proportions and formats for stories.
For owners of Android smartphones, before shooting, it is important to set the parameters for vertical video in the settings, which correspond to the dimensions of stories: aspect ratio 9:16, the optimal size is 1080 x 1920p at 30 fps.
Also try switching the video codec to MPEG4 (HEVC) in the camera settings. If this function is not available on your smartphone, you can install the Open Camera application, set the codec there and shoot video in the application.
The video is saved in MP4 format on Android and MOV format on iPhone. This can also be the reason for the poor quality of the uploaded video in stories. There is a version that MOV is preferable for Instagram, as this is the standard video format on the iPhone. You can convert MP4 or any other format (for example, if the video was shot with a professional camera) to MOV using the Convertio service.
Due to slow internet speeds, Instagram can also compress videos mercilessly. The social network is interested in fast video loading, so if the file weighs a lot and the Internet speed is low, Instagram optimizes it, reducing the weight at the expense of quality.
Prioritize uploading videos to stories when connected to good Wi-Fi. When in doubt about speed (for example, if connected to public Wi-Fi), compare mobile Internet and Wi-Fi using the Speedtest app (Android, iOS). Where the speed will be higher - through this connection and download.
To prevent Instagram from compressing the weight of the video on its own, try to compress large videos yourself. You can use the Clideo service. It allows you to reduce the size without quality loss from any device: Android, iPhone, Mac, Windows, Google Drive or Dropbox. This doesn't guarantee that Instagram won't compress the video, but at least it won't be so barbaric.
When editing video in third-party programs and applications, when applying filters or effects, as a rule, the video quality becomes worse. Try to upload original videos, if you cannot do without it - when saving, specify the video settings the same as in the original or lower, for this use the VN or Inshot applications.
For example, if the original video is in 4K resolution, it can be compressed to 1080p. If the original recording had a resolution of 720p, it makes no sense to set 1080p, such manipulation will only worsen the quality of the recording. Always leave the frame rate as in the original, for example, if the video was shot at 30 fps, then leave it.
In addition to the above options to improve the quality of stories, do not abuse the wide-angle camera when shooting. In stories, such videos can freeze a lot. Also, 4K videos are completely useless for stories - Instagram still won’t transmit the desired quality, and you will have to compress it additionally.
Avoid third-party story enhancement apps that require you to enter your username and password. This is not safe for your account. Better experiment and try the above methods to solve the problem with the quality of the uploaded video in stories.
Only important news in the monthly newsletter
By clicking on the button, you agree to the processing of personal data.
What's new in SMM?
Subscribe now and get 9 ways to promote on Instagram for free
Popular articles
#instagram Monday, July 1
Polls in Instagram stories
How to create a poll in stories, what to ask subscribers and what is the use of such an interactive.
≈ 6 min to read Monday, April 20
5 Cool Ideas for Instagram Stories
5 Ways to Design Stories to Stand Out and Surprise Instagram Users.
≈ 8 min to read Thursday, February 20
Competitor analysis on Instagram and other social networks
How to analyze the content of competitors on social networks, what insights can be found and how to test the hypotheses received in your account.
≈ 10 min to read Sunday, June 27
Deciphering Instagram stories statistics
How to view Instagram stories statistics and what each of its metrics means.
LiveDune Marketing Products - 7 days free
Our products help optimize your social media experience and improve your accounts with the help of deep analytics
Analysis of your own and other people's accounts using 50+ metrics in 6 social networks.
Account statistics
Message processing optimization: operators, statistics, tags, etc.
Direct Instagram
Automatic reports for 6 social networks. Upload to PDF, Excel, Google Slides.
Reports
Monitoring the progress of KPI for Instagram accounts.
Audit of Instagram accounts with clear conclusions and advice.
Express audit
We will help you to select "pure" bloggers for effective cooperation.
Checking bloggers
Posting clips to the social network Instagram is sometimes accompanied by some technical problems. One of these is the deterioration in the clarity of the “picture”. Such an anomaly is not only unpleasant for the author, but also unlikely to please the readers of the page. However, this is quite possible to avoid by following the rules.
Below we will figure out how to upload a video to Instagram without losing quality. Stay with us and check out useful tips on how to easily share your favorite video with your friends.
The first thing you should pay attention to before uploading a video to a common feed is the technical characteristics of the file. Ideally, they should fully comply with those set by the social network service. Namely:
Movie playback time is important:
The social network system will most likely not let you download the video:
Good to know. You can attach widescreen clips with a 16:9 aspect ratio to the post, but then white frames will appear on top and bottom of the film, and the video itself will be reduced.
So why does Instagram degrade video quality? The reason for this may be several things:
 Accordingly, the social network simply compresses or crops the “picture”.
 It is from this that the "picture" of the clip can deteriorate. What to do in this situation? It's simple:

So, how to keep good quality video files when uploading to Instagram? Follow the standard algorithm of actions. And since it will be slightly different for iPhone and Android owners, we will consider them separately.
To publish a video clip with the best resolution on a smartphone with the Android operating system, you will need:

If the Instagram video is still uploading in poor quality, then install an auxiliary utility on your smartphone - FilmoraGo. With it, you can:
Note. FilmoraGo is a free Android app.
For Apple owners, the step-by-step instructions are almost the same. Only the location of icons and options in the application can differ. All you need is:
If the resolution deteriorates, then you need to upload such a video with pre-processing. To do this, install the InShot editor on your phone. It will help:
Note. To improve the quality, install only official and user-tested programs from the Market. Utilities from unknown sites in the browser can be malicious.
Another way to avoid poor quality video on Instagram is to convert it. After all, an incorrect file format can lead to the fact that the clip will either not be added to the post, or it will “compress” greatly.
To improve the quality or restore the sharp "picture" of the movie, follow the step-by-step instructions below:

Done. Now you can upload the resulting "short film" in the usual way.
Important. When processing a movie in the editor, always choose the best quality for saving.
To upload a video to Instagram without losing quality, you need to know the requirements set by the social network.