$30
1 User
Though the tool offers numerous other capabilities, publishing and scheduling are some of the major highlights of SocialPilot. It is a favorite Facebook publishing tool for marketers working in small and big companies because of its range of features at an affordable price.
Scheduling and publishing on Facebook becomes super easy and highly organized with a tool like SocialPilot, which is tailored especially for increasing brand awareness, traffic, and reach. Over a thousand businesses trust this Facebook tool’s publishing and scheduling capabilities.
It allows you to bulk upload posts and automate scheduling, with exciting features like RSS feed automation, identifying popular content, and publishing it automatically. Some of the essential features that this social media management tool provides for Facebook publishing are mentioned as follows:
Why Use SocialPilot as Your Facebook Publishing Tool?
Pros
 For Susan Daniels, Founder of Beautiful Lives, the tool increased website traffic from zero to 10000!
C
Cindy C.
What I like most about SocialPilot software is that it saves me time! I have connected my Facebook, Twitter, and LinkedIn social media accounts to SocialPilot, and I manage my accounts directly from the dashboard! This software is smart and easy to use. It is designed in such a fantastic way that anybody can learn to use it. It is so easy to schedule posts to my various social media platforms ahead of time. I just love the efficiency of SocialPilot!
$120
10 social pages
Buffer is another famous Facebook publishing tool among social media marketers.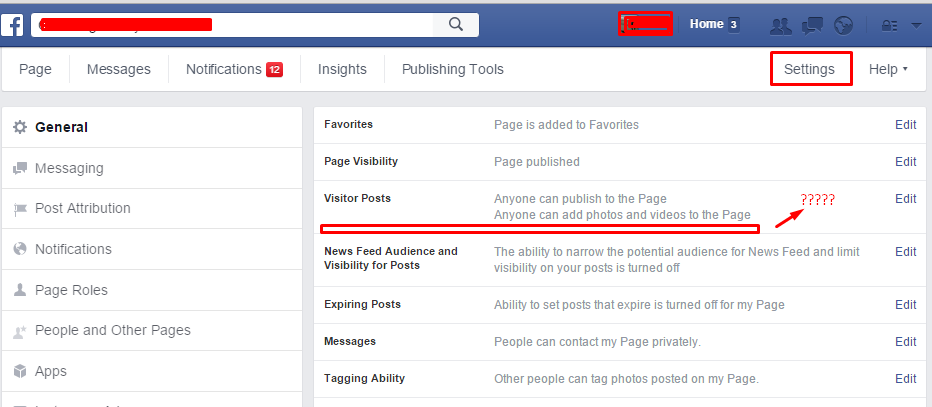 Automated publishing to Facebook with Buffer is a breeze.
The interface is pretty cool and user-friendly. Create your content within Buffer, add it to the queue, and schedule it for publishing later. You can customize your post for different platforms too.
Pros
Amber C.
Buffer makes it easy to schedule your social media posts ahead of time, and you can also manage multiple different accounts from one place. At our marketing company, it’s also easy for clients to understand and use on their own time whether they’re on their phone or computer.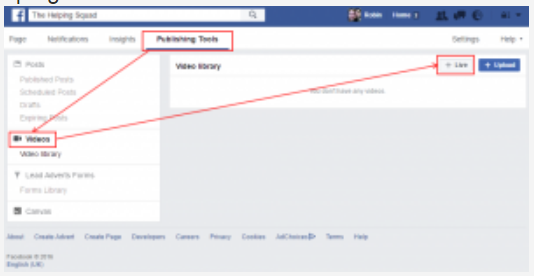
Cons
Darien C.
I quickly discovered that the platform could not suit my needs because of one insurmountable obstacle – price. The added features like direct Instagram Story & first comment seem interesting for me, but not at the cost of $663/annually when there are alternatives (be it with fewer features). With products such as “Reply,” “Publish,” and “Analyze,” featuring little to no immediately accessible descriptions, and each one carrying a different pricing structure & subscription requirement.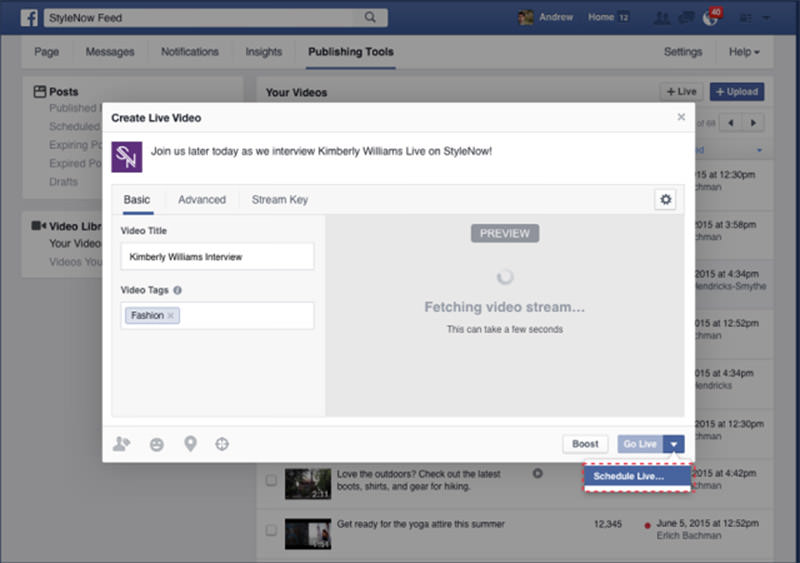 Lastly, one feature I’ve found missing on Buffer is the ability to draft a single post that can be queued in multiple social media channels and customized for each channel.
$169
1 User
SproutSocial is an easy-to-use Facebook publishing tool that is widely used for automating the social media posting and publishing process. The focus audience for this platform, however, is Twitter. You can also manage your Facebook publishing activities using Sprout Social.
The feature set that SproutSocial provides makes it clear that it is not only meant for social media marketers and managers. It is rather a full-fledged platform that can be used for customer care, employee advocacy, and intelligence management, besides social media management.
Pros
 Run Facebook messenger marketing for different clients using their bot feature.
Madison W
It is easy to use and has great support staff. We use it to post on Instagram, Twitter, Facebook, and Linkedin. It is great to schedule posts, so I do not have to set a reminder to post them on my days off or after work hours.
Cons
Fernando C.
It is a bit expensive for companies with many workers since the program is per user and its cost too. In addition, the cost rises if you want to have more functions. I don’t like that the reports are much more prepared, I mean that a heat map can be the solution. Another element that interferes with the total productivity of the program is that it needs consistent interaction metrics on all social platforms, that is, it would be ideal that it could cover all, not just some.
$24.88
Billed annually
Dlvr.it offers some great features for social media posting. What makes it stand out from most other tools in this list is that it is a posting tool only. Dlvr.it has capabilities like Facebook post scheduler and automatic Facebook posting software.
Using this Facebook post scheduler, you can instantly post new content or queue it to be published as per your scheduled time and date. On the other hand, the Facebook posting software has some advanced capabilities like filters, custom text, auto hashtags, etc.
All in all, it is quite a user-friendly tool for those who want to automate their social media publishing for Facebook and other platforms.
Pros
Gabriel D
You just specify the RSS feeds, connect social accounts, and set the interval. And the service does everything according to the schedule for you. Quite convenient and saves time.
Cons
Verified Dlvr.it User
It happens that the authentication of accounts disappears, and there may be no notice about it. Also, sometimes limitations in the free version lead to the fact that the news is not as quickly published as you want. Also, the configuration process is not completely transparent and leaves much to be desired.
$400
3 Users
Coschedule is like an ‘all-in-one’ platform for many marketers. However, one of its best features is the scheduling calendar. Facebook posting tools like Coschedule enable you to organize and manage your editorial calendar for short as well as long durations.
Easy integration with WordPress and Hubspot makes Coschedule a perfect tool for bloggers who wish to automate social media publishing.
Pros
Bruce M
CoSchedule removes a TON of friction from my social media workflow. That’s the biggest advantage for me.
Cons
Verified Coschedule User
It takes a lot to understand. It can be challenging to get your team on board as well. It is a lot to learn, which can take some time away from your day-to-day tasks.
$19
1 User
If you are specifically looking for a tool that manages social posting and publishing for Facebook, Post Planner fits the criteria. The Facebook publishing tool provides three straightforward capabilities – find, plan, and post.
The ‘find’ feature helps you identify content that has the potential to win you good engagement and something that your audience will love. The next step is pretty obvious. You can plan the automated posting to Facebook and other social media profiles.
Pros
Bob S.
I love the ease of use and the fact that I can post to all my social media sites with just a few clicks. They have a great search tool to find relevant content and even allow me to import my blog posts straight from my site. I also love the repeat post and recycle features.
Cons
Michael H.
Frequent outages, constant need to refresh share tokens to enable publishing, its “randomizer” is not random at all.
$99
10 Users
As the name suggests, Mentionlytics is a powerful analytics and social media monitoring tool. However, recently, the tool has added a number of publishing capabilities.
The Facebook publisher functionality in Mentionlytics allows you to schedule and publish Facebook posts. You get a calendar view of all the scheduled posts for various platforms from the dashboard.
Pros
Aretousa S.
I really like the simplicity of the interface, which is really easy to use, and also the fact that you get a complete picture of your business with just a single look at the dashboard. The support team is very friendly, and they helped me a lot to optimize my account in order to benefit from the tool’s potential to my account since I’m not a super tech-savvy person!
Cons
Verified Mentionlytics User
I wish more features were available to base plans, even on an a la carte basis. It would be great to see more options to display data. To really get it working for me, I needed to spend some time learning how to effectively use the interface of the tool.
$24. 99
99
1 Team
Postfity is one of the most simple and straightforward Facebook posting tools. Apart from Facebook, you can automate social media publishing for Twitter, LinkedIn, Instagram, and Vkontakte using Postify.
The tool offers some intelligent features like a built-in content recommendation engine, which helps you use your most engaging content to improve footfall. Additionally, the tool can recommend the right time for your posts to be published. Nonetheless, you can also schedule your posts as per your pre-decided time intervals.
Pros
Verified Postfity User
Postfity is a very easy social media scheduling tool that allows you to schedule and share posts to multiple social media networks at once. They offer both a Chrome extension and a web app to be able to schedule your posts.
Cons
Verified Postfity User
Facebook posting within the app has been disabled for quite some time, so a pretty major social network is inaccessible. It is also difficult to view all of the posts that you have scheduled.
$159
4 Users
Agorapulse is a Facebook publishing tool you need if you post on Facebook often. It lets you leverage Facebook insight to get the most out of your Facebook presence.
You can also find the best days to publish for a fruitful engagement. If you work in a team, then Agorapulse also takes care of your workflow establishment.
Pros
William A
The scheduler is very simple to use. It has all the features my business needs to publish on social media to our community and new members alike!
Cons
Verified Agorapulse User
I am probably missing something but I don’t understand why any links I copy and paste in when I am scheduling posts are stripped out. The help/conversation icon in the bottom right hovers over the calendar and when I am trying to schedule a post towards the end of the month. The reports tool doesn’t seem to work for a number of the Facebook accounts I am monitoring. I would also like to be able to monitor the feeds for the accounts I am managing, but I can’t with the plan we have.
$59
10 Users
Pagemodo has established itself as one of the most effective Facebook posting tools for customizing Facebook pages.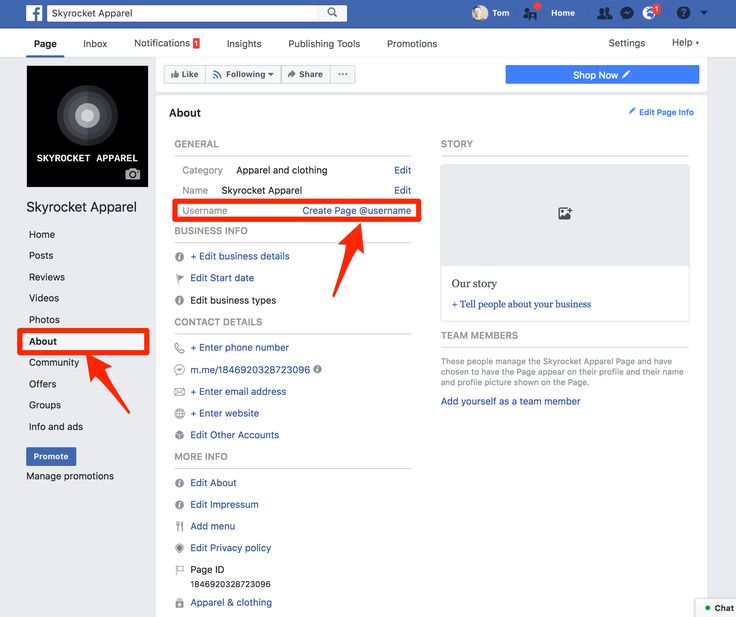 It has options for cover images, custom tabs, contests, and adverts.
You can use it to build a professional welcome tab and posts using customizable templates. Automated publishing to Facebook is easy with Pagemodo. You can run ad campaigns with in-depth analytics with this automatic Facebook posting tool.
Pros
Verified User
Pagemodo is extremely easy to use and makes it simple for you to track any contest or giveaway entries. It notifies you when you have received a new entry and then allows you to export all data onto an Excel sheet once the contest is over.
Cons
Mary Lawler
It would be great to be able to manipulate templates more. For example, changing the size of the photos and a drag-drop feature to create your own custom template.
$199
1 User
Fanpage Karma is yet another Facebook posting tool that offers you advanced social media management features. It gives you a score on your Facebook page with rigorous insights.
You can easily schedule and manage branded posts to your Facebook page and account as a Facebook publishing tool. It has benchmarking capabilities, so you can strategize better.
Apart from all these, Fanpage Karma lest you export insightful reports in multiple formats. Plus, you can unearth timings when your audience is active and is most likely to engage with your posts.
Pros
Tom N
The tool is easy to use, and you can create a dashboard with just a few clicks. It’s great for getting a quick overview of your most important KPIs on Facebook, Twitter, Instagram, Youtube and Pinterest.
Cons
Michael H
Requires login data for platforms like LinkedIn, has sometimes troubles catching smaller profiles, does not really serve as a listening tool that collects mentions, does not have a channel vs channel comparison included.
Conclusion
Despite the constant whisper of Facebook’s declining popularity, marketers believe in the platform’s power. After all, it does have the largest online demographic base. Investing in the right Facebook publishing tools, you can easily manage multiple profiles.
With a cohesive dashboard, you can connect all your social media profiles in one place and spend the least time posting and more time interacting with your audience.
SocialPilot ticks this off with its exceptionally pocket-friendly features like social inbox, bulk scheduling, White Label solutions, customized scheduling, Facebook ads, etc. , to accomplish more.
Start your free 14-day trial and get ready to be amazed.
Facebook has significantly evolved from the platform where you ordinarily share posts and share messages with family and friends. With over a billion downloads across all platforms, the social app has become the hub for businesses, celebrities, media outlets, and several other brands. With this evolution comes publishing tools for businesses to help with content for their page.
In this guide, we’ll go through finding the publishing tool, the features, and how to use them on a classic Facebook page and the Meta Business Suite.
Table of Contents
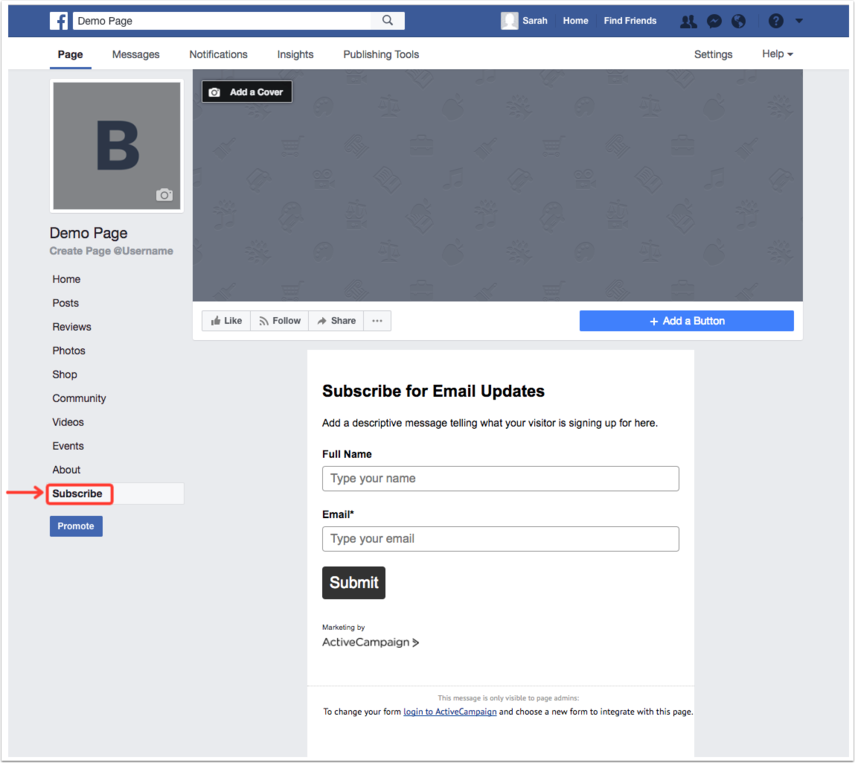
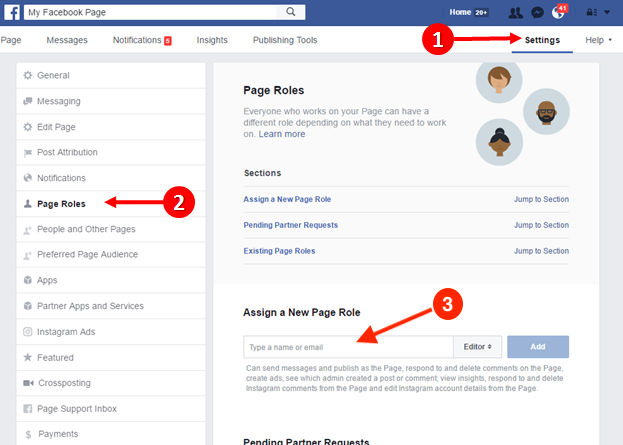
You can access the publishing tools on the Facebook classic page through the page’s menu. In these steps, you’ll find the Facebook publishing tools.
If you’re using Facebook’s New Page Experience, you won’t be able to use publishing tools as you’d ordinarily do from the classic page. You’d need to log into the Meta Business Suite.
Facebook’s publishing tools control your posts in scheduling, managing, and posting. The publishing tools allow you to integrate with Instagram, the other app of Meta, and you can schedule and publish posts on Instagram as you do on Facebook. The publishing tools apply to both posts and stories on Facebook or Instagram.
The full features of Facebook’s publishing tools are discussed in the following.
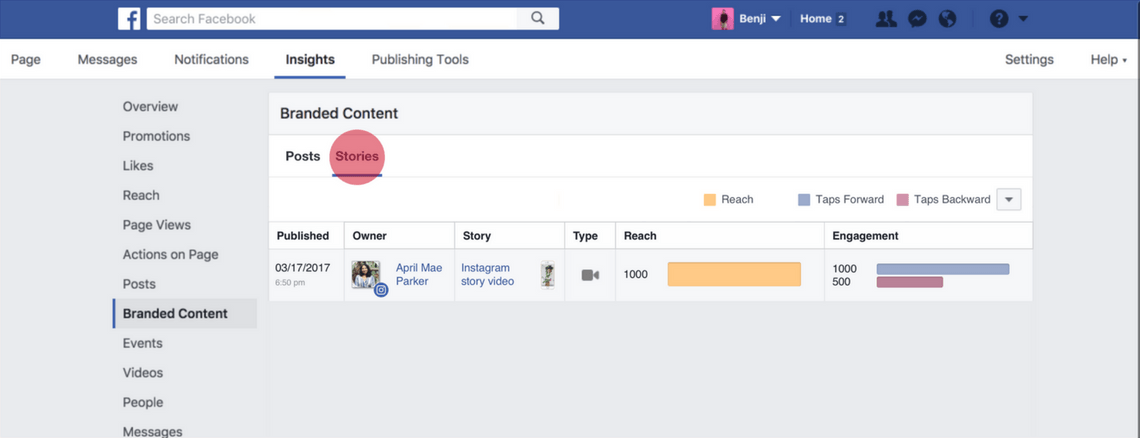
With Facebook’s publishing tools, you can schedule posts and stories when it’s the right time to be seen by your target audience. The tool also lets you see a list of all scheduled posts and stories you have for your business page.
You can archive posts with the tools, and you can also see all stories and archive posts you’ve shared on your page.
A notable feature of Facebook’s publishing tools is setting an expiry date on your posts. Once such posts become expired, they cease to appear on News Feed.
Facebook’s publishing tools have a drafts section where you can save posts you’ve not finished working on or just want to keep for later.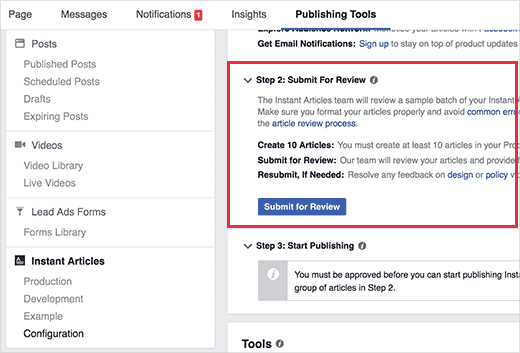 You can go to your drafts and schedule the post to publish at any time.
This feature is available for the Meta Business Suite, and it helps give you insights into your marketing experiments on Facebook. You’ll see which of your posts resonates better with your audience before publishing.
The features of using Facebook publishing tools might seem like a lot, but the most important is how to create and publish posts. Without posts created, the other features are basically without function.
You can create and schedule a post in these simple steps with the publishing tools:
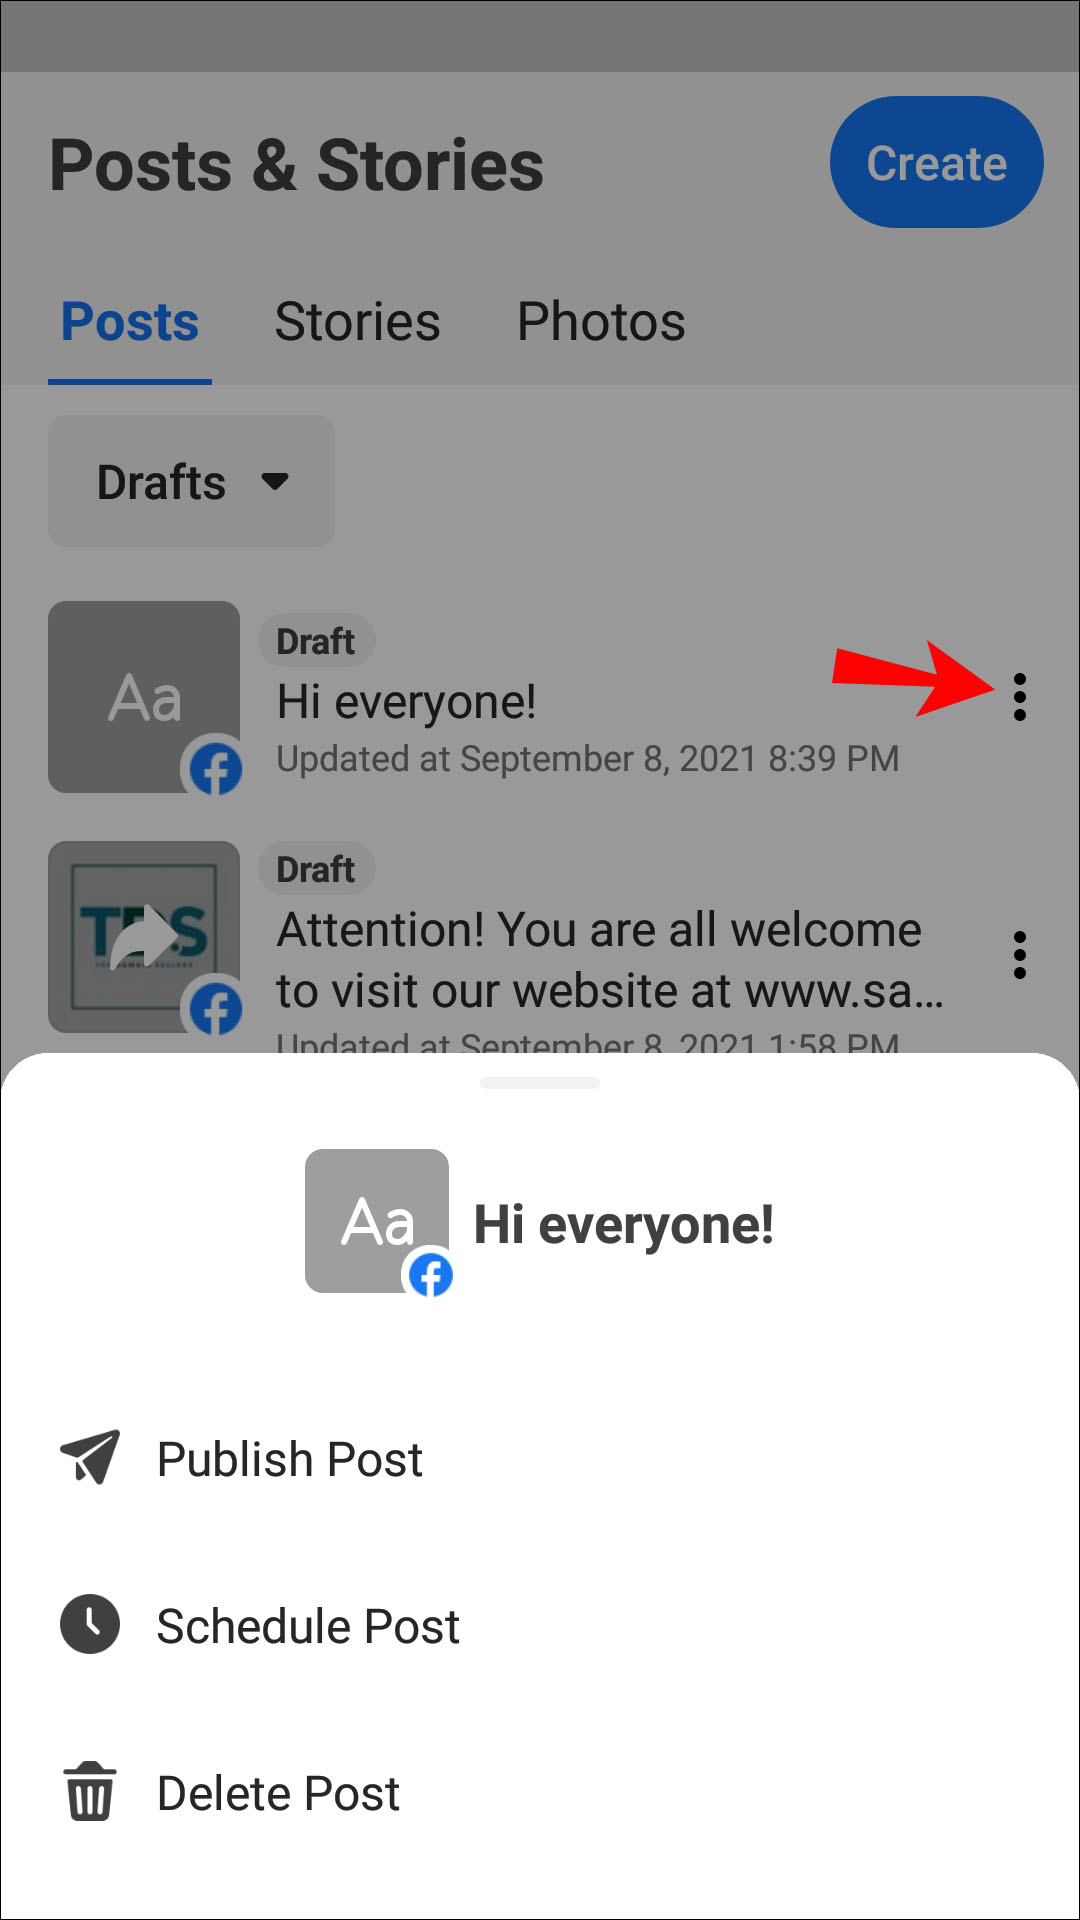
The drop-down menu gives another option to save the post as a draft. In addition to these, you can send the same post to Instagram, add your location if it’d help with visibility, and use hashtags to reach a wider audience.
With this guide, you can now find Facebook’s publishing tools easily and use them to manage your posts. If you’re using the Meta Business Suite, you’ll have access to more features in analytics for your posts.
Little Lemon is a traditional Mediterranean restaurant reimagined in a modern way. Its main audience is family people who prefer healthy food in a cozy environment.
Little Lemon has recently started accepting orders online. Adriano is the chief marketing officer at Little Lemon. He wants to regularly share the company's news on social networks in order to increase the number of orders online, but does not know where to start.
Publications in social networks allow:
Social media content consists of two main elements: text and visual content.
Visual material is a photo or video, and text is a caption to it with additional information.
Photo or video captions are an important part of any social media post. Here are some tips on how to create really interesting captions.
Write concise, attention-grabbing captions. The most important information should be placed at the beginning.
If you want subscribers to take a certain action, communicate it directly. For example, if you're putting out a weekly newsletter, in your signature you might invite people to subscribe to it.
Add hashtags, mentions, and tags related to your company to your Instagram captions. This will make it easier for people who are interested in these topics to find you. And you can expand your audience and engage the right communities.
A few tips on how to create compelling visual content for social media.
Capturing studio-quality photos and videos at home with your phone is easy.
To take a high-quality photo or video, all you need is natural light and a compact tripod, and you can decorate the stage with the simplest creative materials, such as foam or colored paper.
Follow the rule of thirds to balance the frame.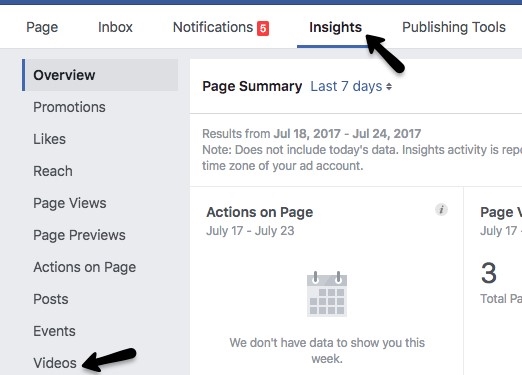 When shooting or framing a photo:
Try different angles. For example, take a close-up shot of a product, along with another product, in use, etc. Don't worry if you have a small range of products or services. With the same thing, you can take many different photos and videos.
An error occurred
The video cannot be played. To watch the video, you need to update your browser.
Learn more
Your videos should grab attention and convey the main idea in the first few seconds, even if the person is watching them without sound. But do not forget to add a high-quality audio track in case the videos will be watched with sound.
An error occurred
The video cannot be played. To watch the video, you need to update your browser.
Learn more
Most people will watch your videos on their phones, so it's best to choose a vertical format.
Enhance your photos and videos with the tools below.
The Layout application allows you to combine multiple photos into one. With it, you can breathe new life into old photos to re-post them, or show multiple images in one post. Download the Layout app for Android here and for iOS here.
The free Unfold app lets you create a stylish collage of images and text. It makes it easier for you to share news and make announcements (such as a new store opening or an exclusive promotion). Download the Unfold app for Android here and for iOS here.
An error occurred
The video cannot be played. To watch the video, you need to update your browser.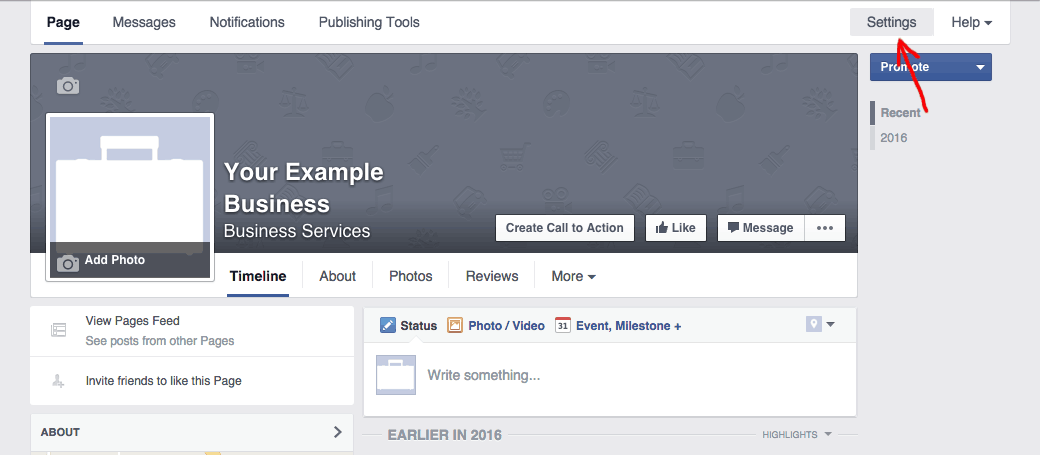
More
Boomerang is a free app for creating short videos that automatically play back and forth. It will help you to capture the bright moments of everyday life and share them. Download the Boomerang app for Android here and for iOS here.
An error occurred
The video cannot be played. To watch the video, you need to update your browser.
More
The free Mojo app turns images into action-packed videos. Use it when you need to show a selection of photos (new line of products, photos from an event, etc.). Download the Mojo app for Android here and for iOS here.
An error occurred
The video cannot be played. To watch the video, you need to update your browser.
Learn more
The free Hyperlapse app allows you to create high-quality and stylish time-lapse videos. It can be used to show the process of your work, such as styling hair or baking bread. Download the Hyperlapse app for Android here and for iOS here.
You have learned what elements make up social media posts. Now let's take a look at three categories of content that will help you spread the word about your company.
To interest the audience:
What can you tell your audience:
To encourage people to become your customers:
Now let's see what Adriano posts on social media for Little Lemon.
An example of a publication to attract attention: a photo of the Little Lemon menu. In the signature, Adriano can tell the history of these dishes (for example, that these are old recipes that are passed down from generation to generation in his family).
An error occurred
The video cannot be played. To watch the video, you need to update your browser.
Read more
Informative posting example: video of products used by Little Lemon. The caption can include the local organic farms that supply these products to the restaurant.
Sales post example: Photo of the new Little Lemon delivery service with exclusive promotion information in the caption.
BACK
NEXT
Was this page helpful?
More courses
Help Center
Using Facebook
Pages
Posting
We're updating the mobile version of Facebook.com. 9 more0016
General information
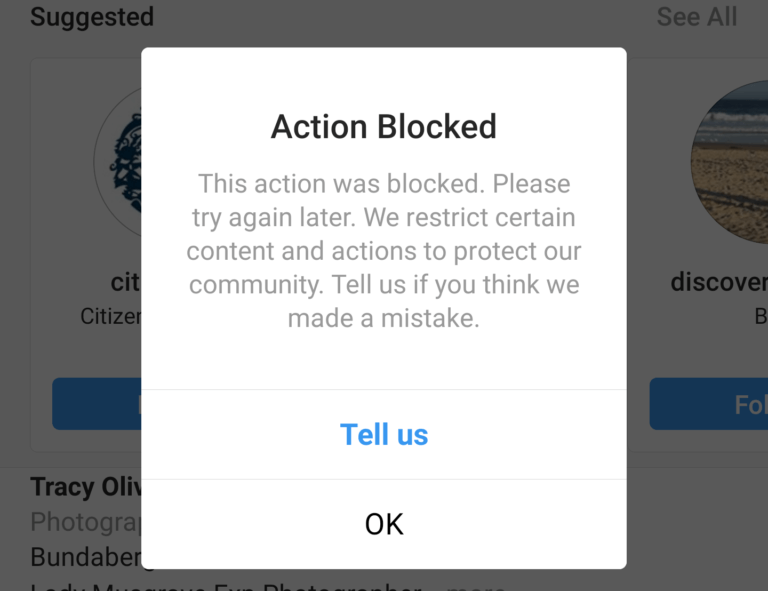
Only a person who has:
Facebook level access to the Page in the new version can like or comment on another Page's post.
Admin, editor, or moderator rights for the Classic Page.
New version of Pages
To like or comment on another Page's post for your Page:
Click the icon in the upper right corner of the Facebook window, and then select your name.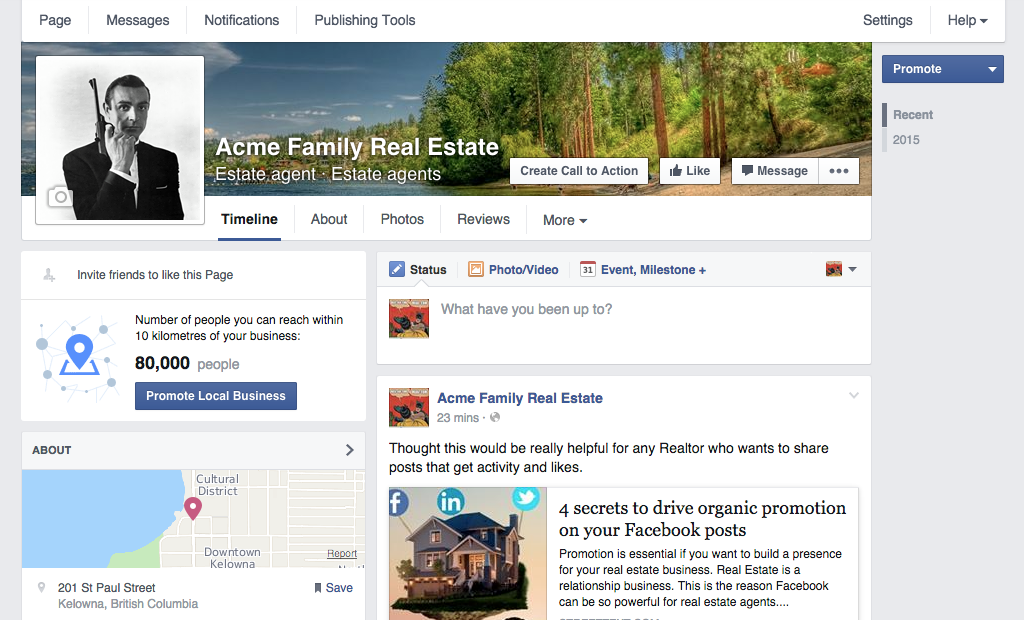
Click Switch Profile at the top right of the screen and select the desired Page.
Navigate to the desired Page post. Here you can:
Click Like to like it.
Click Comment , write a comment and click the icon to send it.
Classic Pages
To like or comment on another Page's post for your Page:
Click the icon in the upper right corner of the Facebook window.
Click Pages.
Navigate to the desired Page post.
Click on your profile photo in the lower right corner of the post.
Select the Page on behalf of which you want to perform the action.
Like the post or leave a comment.
A person's profile and a Page are not the same thing. A page can represent a brand, company, or initiative. You can post, like, or comment on another Page as your own, but you can't do so on a person's profile.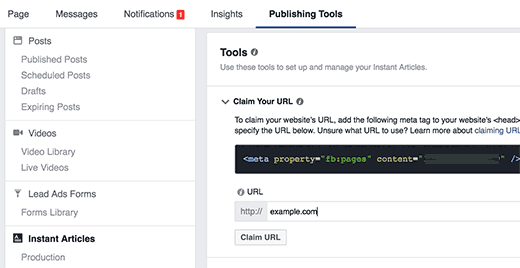
To post to your Page in multiple languages, sign in to Facebook on your computer.
You must be an administrator of your Page to create a post in multiple languages. People viewing your post will see it in the language that best matches their language settings.
How do I allow publications in multiple languages?
First make sure you can post in multiple languages:
On the menu to the left of the Ribbon, click Pages.
Go to your Page.
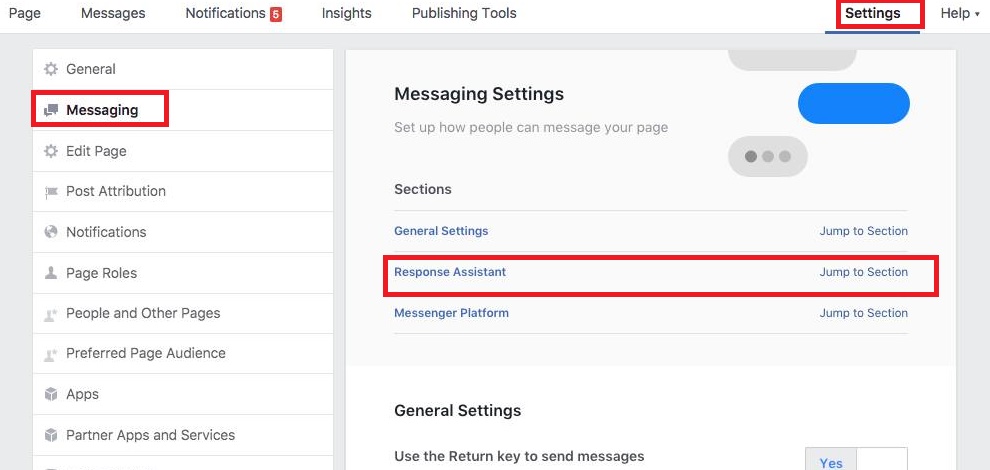
Click Settings on the left side of the Page.
In the General section, click Publications in different languages.
Select the Allow people who manage this Page to post in multiple languages check box.
Click Save Changes.
How do I create publications in multiple languages?
To create a post in multiple languages for your Page:
Create a post at the top of your Page's timeline. The language in which you created the post will be the default language for the post.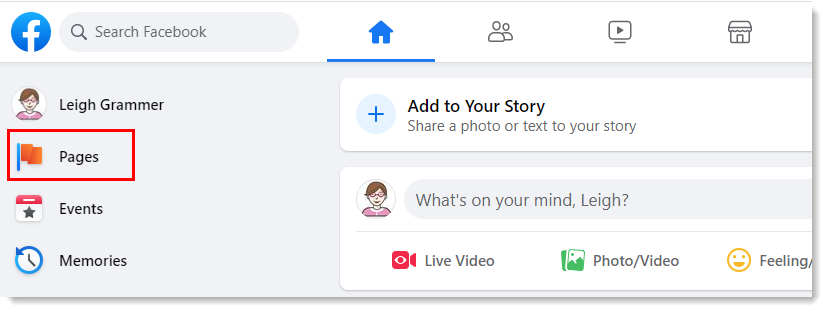
Click Publish in Another Language > Select and then select a language.
Click Publish in Another Language to create a publication in another language, or select Publish.
People whose primary language is not included in the secondary language will see the post in their default language. For example, if your post's default language is English, and your secondary languages are Spanish and French, then people whose primary language is German will see your post in English.
The Pages you manage may be using the new version. More.
New version of Pages
To share a photo on your Page:
Click the icon in the top right corner of the Facebook window, then select your name.
Click Switch Profile at the top right of the screen and select the desired Page.
At the top of your Feed or Page, click Photos.
Take a new photo or upload an existing one from your phone's gallery.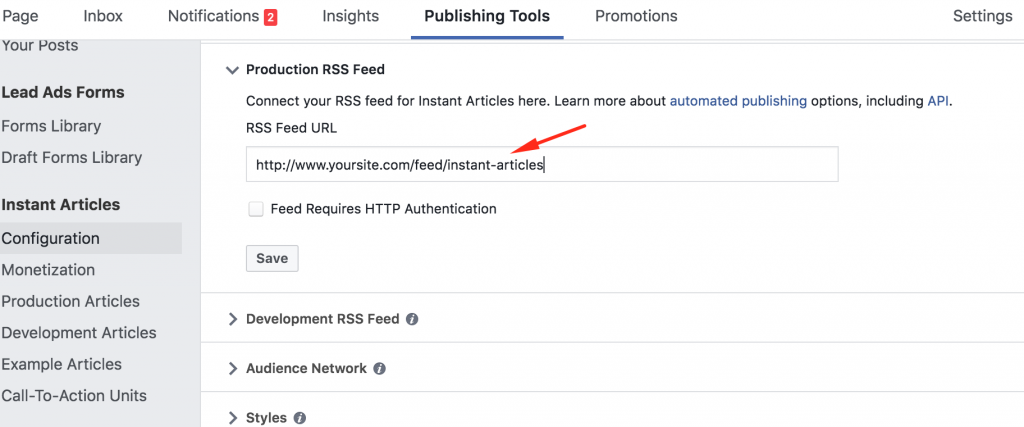
Optionally add a caption or location, or click Feelings/Actions to indicate what you are feeling or doing right now.
Click PUBLISH.
Published photos will be added to the corresponding page tab.
Classic Pages
To share a photo on your Page:
Click the icon in the top right corner of the Facebook window.
Select Pages.
Go to your Page and click Photo.
Select a photo from your phone's gallery.
Optionally, add a caption and click Publish.
Published photos will be added to the corresponding page tab.
When you share a link from your Page, you can add a preview of your post. It can contain up to 10 images with descriptions and unique landing page URLs.
Classic Pages
To share a link from your Page:
Classic Mobile
New Mobile
New Pages
Classic Mobile
a new version. More.
More.
Classic Pages
A Page administrator or editor can pin posts to the top of the Page. If you pin a post:
The post will move to the top of your Page's timeline.
An icon appears on the publication.
To pin a post to the top of a Page:
Click the icon in the top right corner of the Facebook window.
Select Pages and go to your Page.
Navigate to the desired post on your Page.
Click in the upper right corner of the publication.
Select Pin on top.
New version Pages
If you have access to the Page at the Facebook level, you can pin and unpin posts at the top of the Page.
To pin a post
Click the icon in the top right corner of the Facebook window.
Click your profile.
Click Switch Profile at the top of the screen and select the desired Page.
Click the icon in the upper right corner of the Facebook window. Go to your Page.
Find the desired publication and click the icon in its upper right corner.
Click Attach Post.
To unpin a post:
Click the icon in the upper right corner of the Facebook window.
Click your profile.
Click Switch Profile at the top of the screen and select the desired Page.
Click the icon in the upper right corner of the Facebook window. Go to your Page.
Scroll down to the Pinned Post section. Click in the upper right corner of the post you want to unpin.
Click Unpin Publication.
You can let your customers know about a discount or promotion by creating an offer on your Page. People will be able to take advantage of the offer online or in store (depending on where you provide it).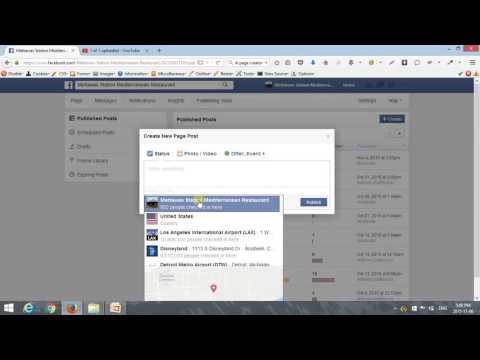
To create an offer on a Page:
On the menu to the left of the Ribbon, click Pages.
Go to your Page.
Select Offer next to Create.
Click Create Offer.
Add a description of the offer. By default, the offer is valid for a week, but you can change the duration.
Add a photo and indicate how people can use the offer (Online or In store). Optionally, you can add a promo code or terms of use.
Click Publish.
Visibility and Editing
Pages you manage may use the new version. More.
There are two ways to control who can see your Facebook Page's posts.
Set the "Restricted Audience" setting to limit the number of people who can see your post.
Enable targeting in the feed. This makes the selected audience more likely to see your post in the feed.
If your Page has fewer than 5,000 likes, make sure you turn on audience optimization for your Page's posts.
On the menu to the left of the Ribbon, click Pages.
Go to your Page.
Select Settings from the menu on the left side of the page.
In the General section, click Audience optimization for posts.
Check the box next to Enable feed targeting and the ability to limit the audience of your posts.
Click Save Changes.
Restricting the audience of a post
By restricting the audience of a post, you control who can see it based on age and location. Your post on your Page and elsewhere on Facebook will only be visible to people who are part of the audience you choose.
To limit the audience of a post:
Click the icon before posting.
Click Restricted Audiences at the top of the screen, and then select the age and location of the people you want to share the post with.
Click Save.
If someone shares your post, it will only be seen by people who are part of the audience you select.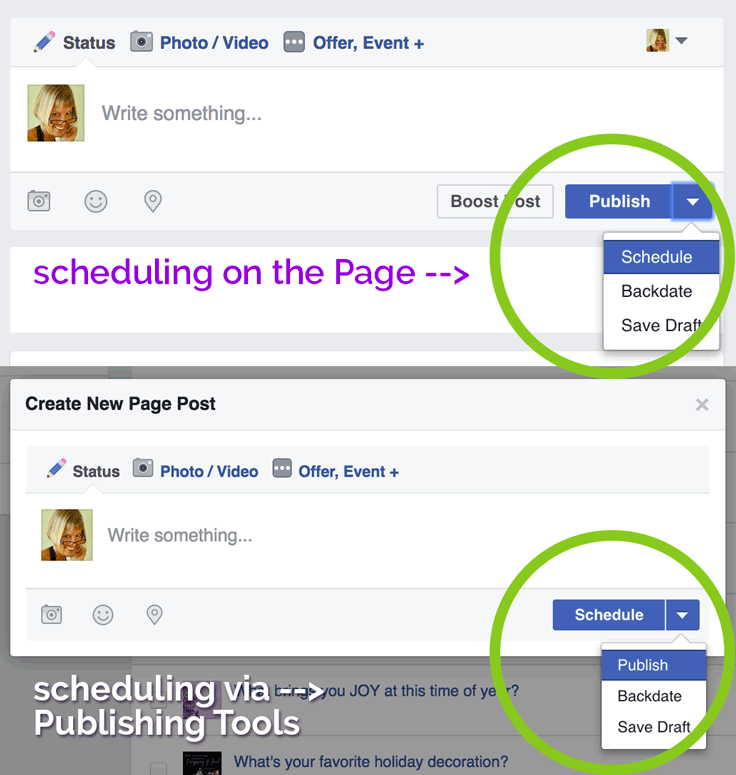
Feed Targeting
You can target specific audiences. Then people who meet the selected criteria are more likely to see your post in their Feeds. Unlike limiting the audience of a post, Feed targeting doesn't let you control who can see a post on your Page or elsewhere on Facebook.
To use Feed targeting:
Click the icon before posting.
In the Targeting section of the Feed, enter criteria for the people you want to reach in the Feed.
Click Save.
Pages you manage may use the new version. More.
You can remove posts that have been shared from your Facebook Page by deleting them. A deleted post will permanently disappear from your Page and activity log.
You can delete Page posts if you have admin, editor, or moderator rights to the Page in the classic version, or Facebook or task-level access to the Page in the new version.
Classic mobile version
New mobile version
Pages you manage may use the new version. More.
More.
The name of the author of the post appears next to Posted under your Page's title. In a Page comment, the name of the person who left it appears below it, next to the Commented text. Only people who help manage your Page can see this information.
Note. This information is only visible on posts and comments created after February 20, 2014.
Pages you manage may use the new version. More.
The instructions here are for managing Classic and New Pages with Facebook level access. People in the new version of Pages with issue-level access can edit posts in the Meta Business Suite.
Page posts can be edited by admins, editors, and people with Facebook or task-level access to the Page.
Posts that have previously been promoted or are currently being used in advertising campaigns cannot be edited.
Classic Mobile
The instructions below are for classic Pages. To edit a post or view its edit history in the new version of Pages, sign in to Facebook on your computer.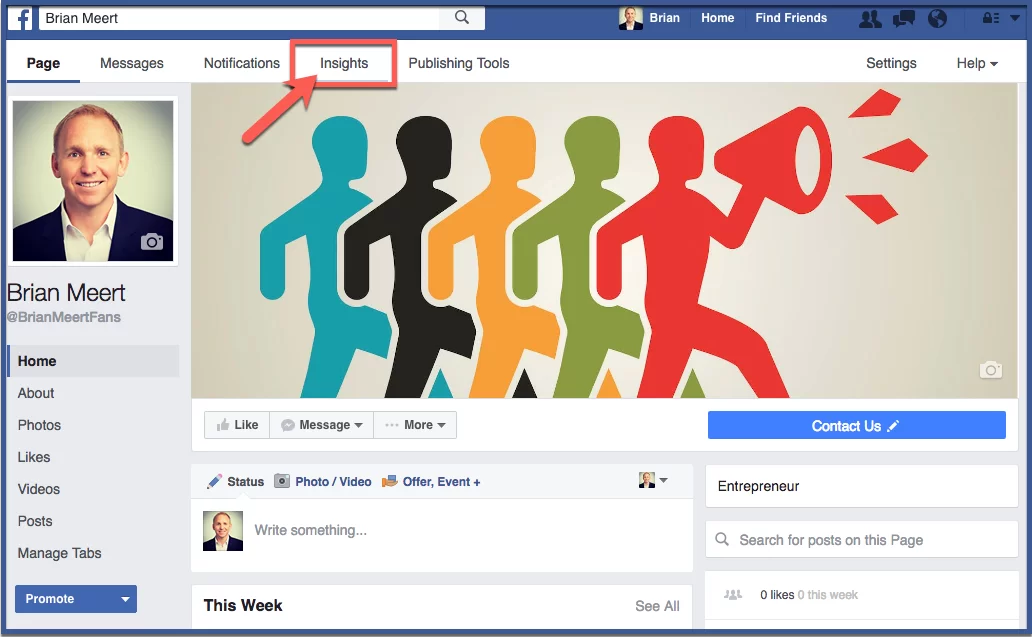
To edit a Page post:
Click the icon in the upper right corner of the post.
Click Edit Post.
Edit the post and click Save.
To see a list of the people who edited your Page's post:
Other admins and editors of your Page can make changes to posts.
To see who edited a post:
Navigate to the post and click the icon.
Select View edit history.
Here you will see a history of all edits, including changes made before the publication was posted.
All people who see the post can also see a history of all changes made since the post was posted. Only people on your Page can see who made the changes.
New version for mobile browser
The instructions here are for managing Pages in classic and new versions with Facebook level access.
To edit a Page post:
Click the icon in the upper right corner of the post.
Click Edit Post.
Edit the post and click Done.
To view the edit history of a post, sign in to Facebook on a computer.
All people who see the post can also see a history of all changes made since the post was posted. Only people on your Page can see who made the changes.
To choose when your Page's post will stop showing in News Feed, sign in to Facebook on a computer.
To choose a date and time when your Page's post will stop showing in News Feed:
On the menu to the left of News Feed, click Pages.
Go to your Page.
Select Publishing Tools in the left column.
Click Create Post in the upper left corner of the screen.
Create a publication.
Click Share Now and select Schedule.
If you want to publish immediately, turn off the Publish option.
Turn on End Distribution in News Feed, and then select the date and time when your post will stop showing in News Feed.
Click Publish or Schedule and then Schedule Publish.
When this post stops showing in the News Feed, it will still be on your Page's timeline.
Drafts and planned publications.
In the Meta Business Suite mobile app, you can create, edit, view, and post draft Page posts.
In the Meta Business Suite mobile app, you can schedule posts for your Page.
Pages you manage may use the new version. More.
If you're a Page administrator or editor in the classic version, or have access to the Page at the Facebook or task level in the new version, you can change the date posted on the Page to an earlier date.
To change the date a Page was posted, sign in to Facebook on a computer.
Once you've signed in to Facebook on your computer, follow the steps below.
New version of Pages
To change the publication date on a Page:
Log in to Facebook and click on your profile photo in the upper right corner of the screen.
Click All Profiles and select the Page you want to switch to.
Go to your Page by clicking on its name in the menu on the left side of the screen.
Find the desired publication and click the icon in its upper right corner.
In the menu, click Edit Date.
Select a new publication date and time, and then click Done.
The earliest date available for publication is 1 January 1905. You cannot change the date of a promoted post or mark it as a past date.
Classic Pages
To change the publication date on a Page:
On the menu to the left of the Feed, click Pages.
Go to your Page.
Navigate to a post on the Page's timeline.
Click the icon in the upper right corner of the post.
Select Change date.
Select the date (year, month, day, and hour) for which this post will appear on the Page's timeline.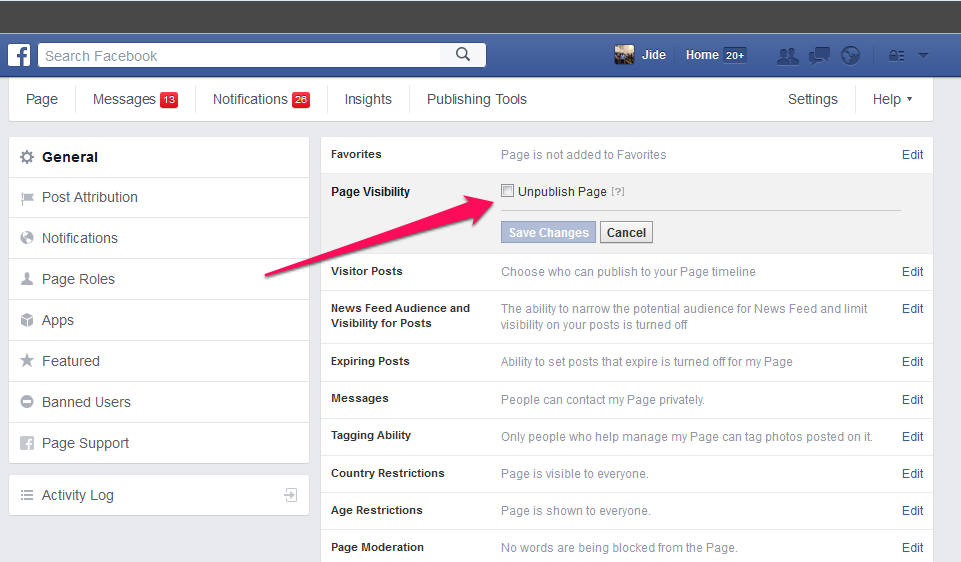
Click Save.
The earliest date available for publication is 1 January 1905. You cannot change the date of a promoted post or mark it as a past date.
You can also specify a date in the past for the new post so that it appears in the Page timeline for an older period.
To change the publication date to a past date:
On the menu to the left of the Feed, click Pages.
Go to your Page.
Click Publishing Tools.
Click Create and select Share Now and then from the drop-down menu, Change date to past.
Select a date (year, month, and day) in the past for which this post will appear in the Page's timeline.
Click Change Date to Past and then Schedule Post.
The new post date must be no earlier than the Page creation date. Learn more about scheduling posts.
Events
Pages can only create public events.
Mobile Classic
This feature is not available in Mobile Classic.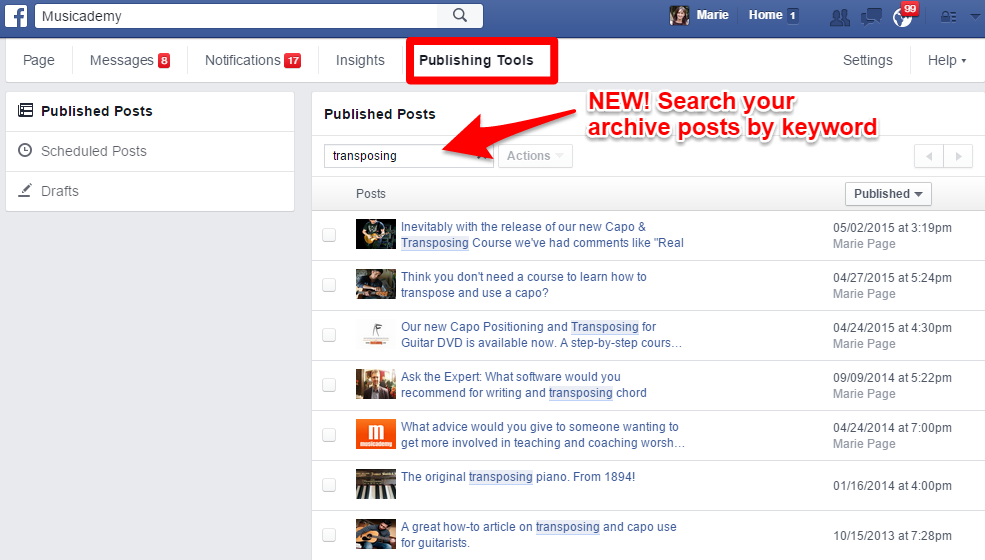
New version for mobile browser
To create an event from your Page:
Click the icon in the upper right corner of the Facebook window.
Click Pages and go to your Page.
Select Events and then Create Event.
Scroll down and click Get notified about suspicious logins.
Add event details and click Create.
Learn more about how to edit an event.
You can add public events hosted by other people and Pages to your Page. Once you add an event to your Page, it will appear in the Events tab on the left side of your Page.
Adding an event
To add another person's or Page's event to your Page:
On the menu to the left of the Feed, click Events.
Go to the event.
Click the icon and select Add to Page...
Select a Page and click Add Event.
Deleting an event
To remove another person's or Page's event from your Page:
On the menu to the left of the Feed, click Pages.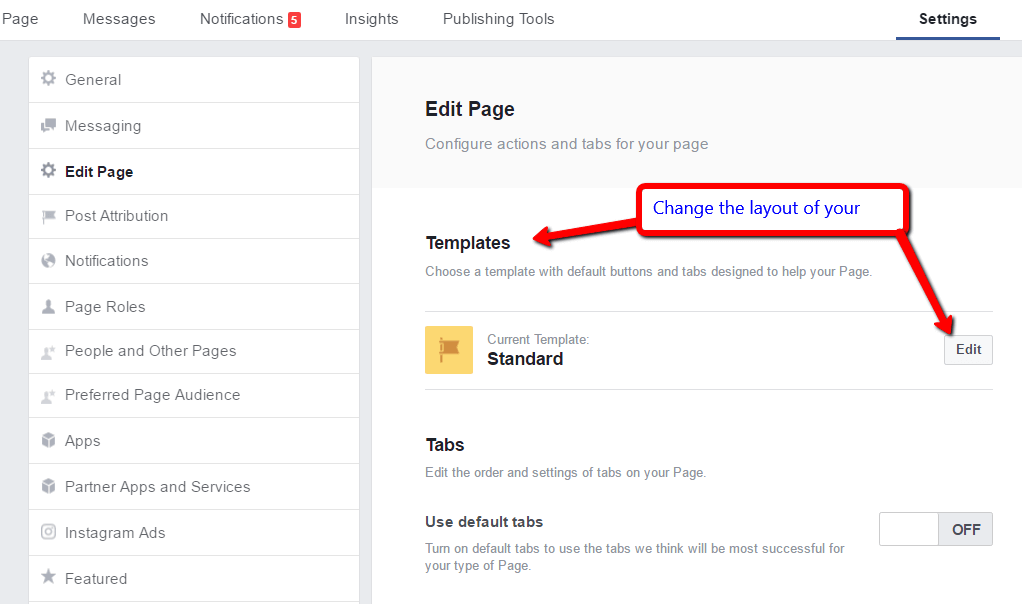
Go to your Page and click Events in the menu on the left side of the screen.
Hover over the desired event and click the x in its upper right corner.
Troubleshooting
If you don't see the option to add an event to a Page, it could be because:
An event has multiple date or time options. Recurring events cannot be added to a Page.
This is a private event. Only public events can be added to the Page.
If you can't add an event to your Page, you can ask to be co-hosted.
A page is a place where a company, brand, or public figure can connect with their fans on Facebook. If you don't have a Page, you can post a video from your personal profile.
To add a video to your Page, sign in to Facebook on your computer, or open the Facebook app for Android, iPhone, or iPad.
To edit a video on your Page, sign in to Facebook on your computer.
You can add subtitles to your Page's video to reach a wider audience. You can auto-create and edit them, write them yourself, or upload a SUBRIP (.srt) file.
To add subtitles to videos on your Page:
On the menu to the left of the Feed, click Pages.
Go to your Page.
Click Video at the top of the Page timeline and select a video from your computer.
Once it's uploaded, click Video Options in the column on the right side of the screen and select Add captions.
When the video is loaded, choose how you want to create subtitles: automatically, manually, or using a SUBRIP (.srt) file.
Click Next and then Publish.
If you choose to upload a .srt file, please check its name and format.
To add subtitles to an already posted video, find the post in your Page's timeline, tap the icon in the upper right corner of the screen, select Edit Post, and follow the steps above.
Note. Subtitles are automatically shown to people who watch videos on your Page without sound.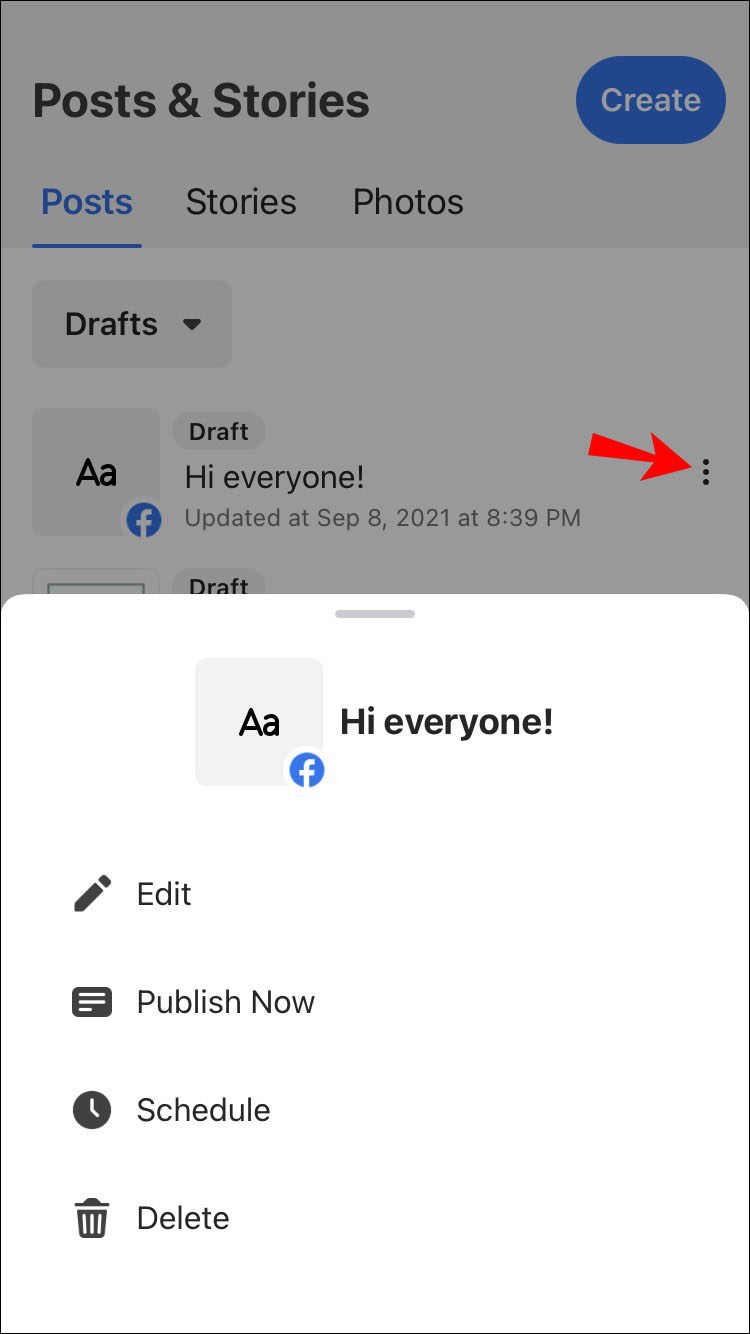 In order for subtitles to be shown in the video with sound, they must be turned on. People see subtitles in their preferred language of choice.
To set an expiration date for videos on a Page:
On the menu to the left of the Feed, click Pages.
Go to your Page.
Add a video to the top of your Page timeline.
Enter a name for the video, click Next, and select Schedule.
Check the box next to Expiry date.
Select the date and time until which your video will be shown.
If you want to delete a publication after it expires, check the box next to Delete publication. Permanently delete a post and its statistics at the scheduled time.
Click Schedule.
You can set an expiration date for a video you've already posted to your Page. For this:
In the menu to the left of the Ribbon, click Pages.
Open your Page and click the icon in the upper right corner of the post.