En español | Article highlights:
Everybody loves Facebook for staying in touch, but that doesn't mean you necessarily want to share family-related material with your friends and business colleagues. The solution: create a private Facebook group just for family members. You control access, you can allow whomever you like to share messages and photos with the group, and, of course, it's free.
Edward Bock/Corbis
Building a Facebook group page is a great way for family members to stay in touch.
For starters, you'll need a personal Facebook account (the odds are good that you already have one — more than half of 50-plus Internet users enjoy social networking today). Be sure you understand the privacy settings used to limit who sees what you post online. You'll find these controls in the drop-down Account menu at the top far right of the page, under Privacy Settings; your options are explained in detail here.
A Facebook group page isn't that different from your personal page. Members of the group can post messages, photos and video; leave comments; create events, "like" posts that appeal to them; and have live chat sessions with each participant typing messages back and forth. But there are some interesting added capabilities, too. For example, instead of sending messages one at a time to group members, you can contact everyone at once with the click of a button.
Another intriguing option is creating group documents, which everyone can work on together. Wish you had all the family recipes in one place? Create a group document and invite everyone to kick in their favorites.
You don't have to look far to find the "Create Group" option. There should be a clickable link in the right-hand column on your Home page (you may have to click "More" if you've already joined several groups). If you still don't see the link, just go to Facebook.com/groups.
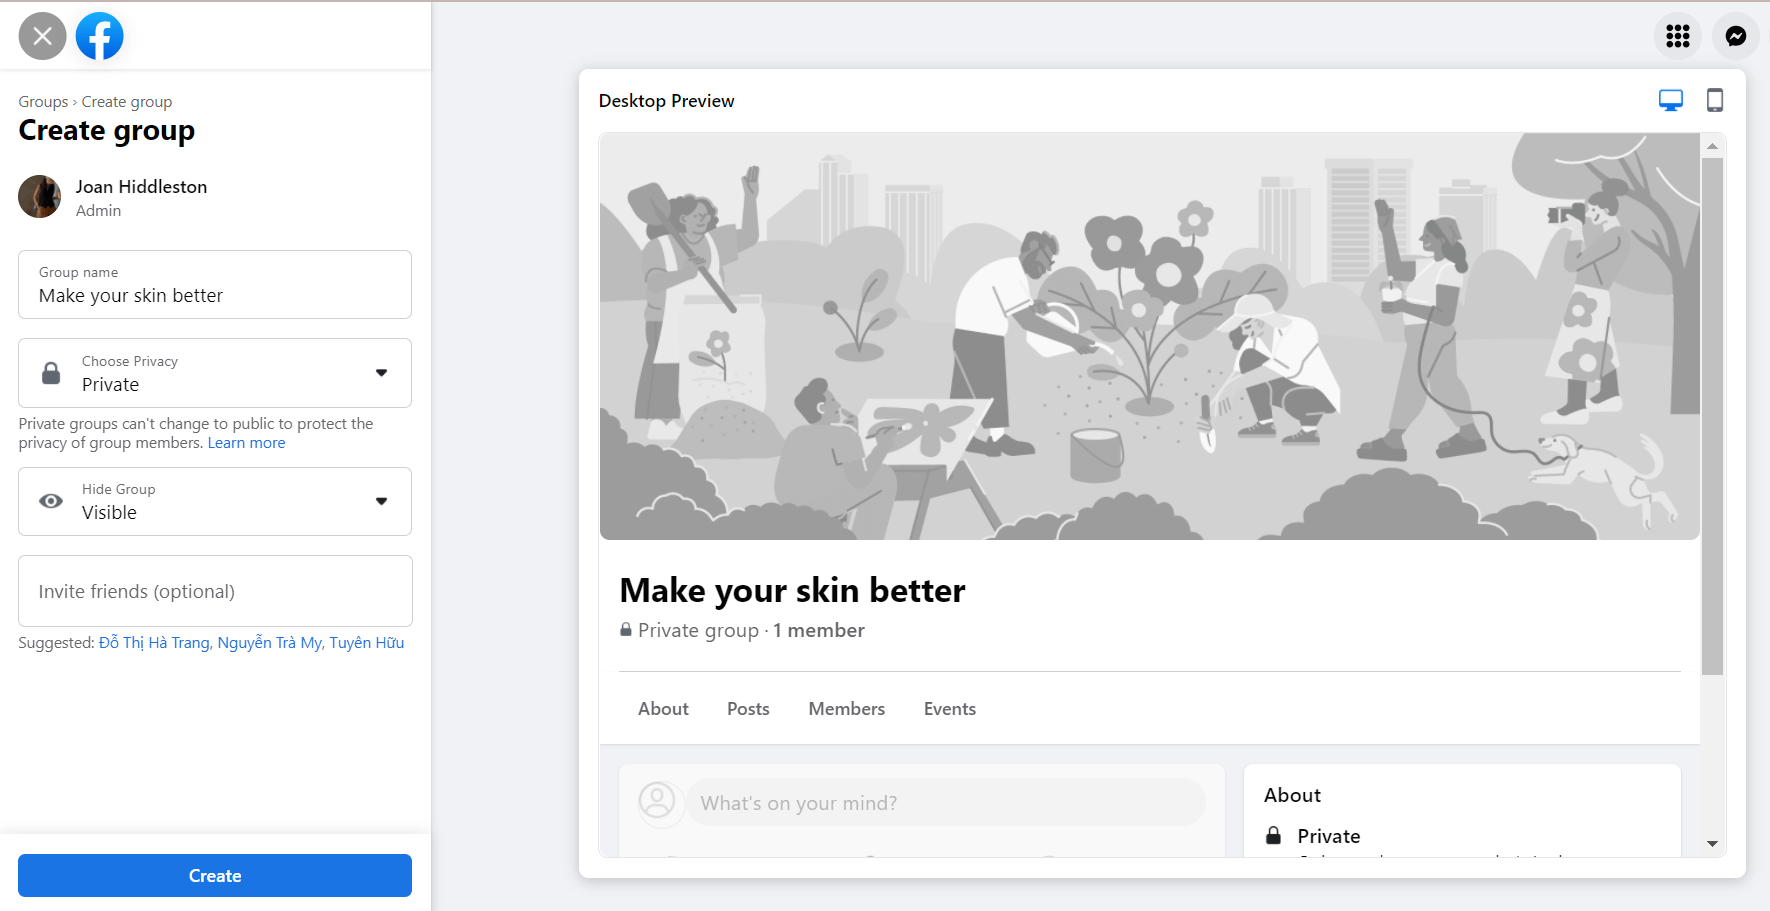
Click "Create Group" and a box pops up asking you to name the group, choose an icon, add members and set the group's overall privacy level. Let's take a moment to explore each of these tasks. And remember, you can change any of these choices after the group is created.
The icon is a little picture that shows up next to the group name in listings. There are lots of choices in a drop-down menu.
When choosing a name, you're allowed to duplicate one that's already in use, but you might want to come up with something distinctive if you want family members to find it by searching. Pity poor John Smith scrolling through page after page of Smith Family groups!
In the Members section, you can add any Facebook friend to the new group. They don't have to confirm anything (it's easy to drop out if they don't want to participate). When you start typing, a list of existing Facebook friends' names matching what you've entered so far appears, so you don't have to worry about misspellings. And, of course, you can always add more members later on.
The Privacy setting here controls the group's online visibility. If you want the group to show up in Facebook searches and be completely visible to anyone, including the member list and anything that's been posted, choose "Open" here. For more privacy, choose "Closed": Facebook members will be able to find the group, see the members list and ask to join, but they won't see the postings. To fly completely under the radar, choose "Private." That way, the group won't show up in a Facebook search and nobody but members will be able to see it — the group name won't even show up in your profile.
Now just click "Create" and — voilà — your family has an online home!
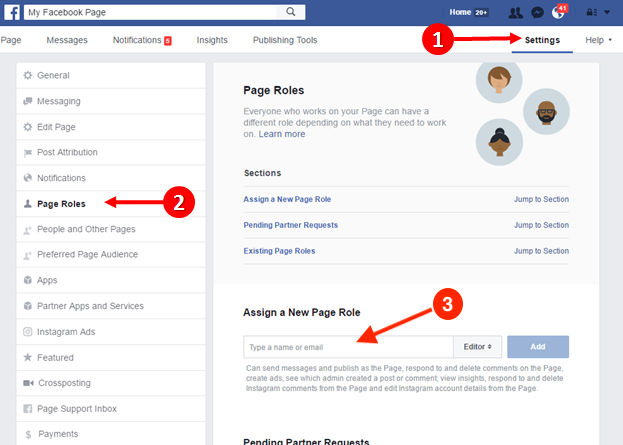
As the creator of the group, you're automatically considered a group administrator, which means you can change settings, approve new members and remove members who make nasty comments about you at a family wedding. You can share these privileges with other members by making them administrators, too.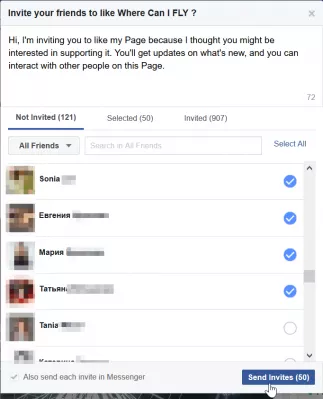 Just click "See all" next to the Members List on the group home page and you'll see the "Make Admin" option under each name. You'll also see a little "x" next to each name. Click one of these to remove a member from the group.
If you look to the left of the group name at the top of the page, you'll see a drawing of two heads in a box — boring! Click on it, though, and things get more interesting. Now you can upload a family photo or even crowd around the webcam (if you have one) and take a picture then and there. Now that photo will be the face of the group, much like the Profile Picture in your personal Facebook account.
Another feature worth setting up is a group email address (you'll find this option under "Edit Group"). You create the first part of the address (say "AARPMember" as an example) and Facebook adds "@groups.facebook.com." Now, whenever anyone sends an email to [email protected], the message will appear automatically in every group member's News Feed.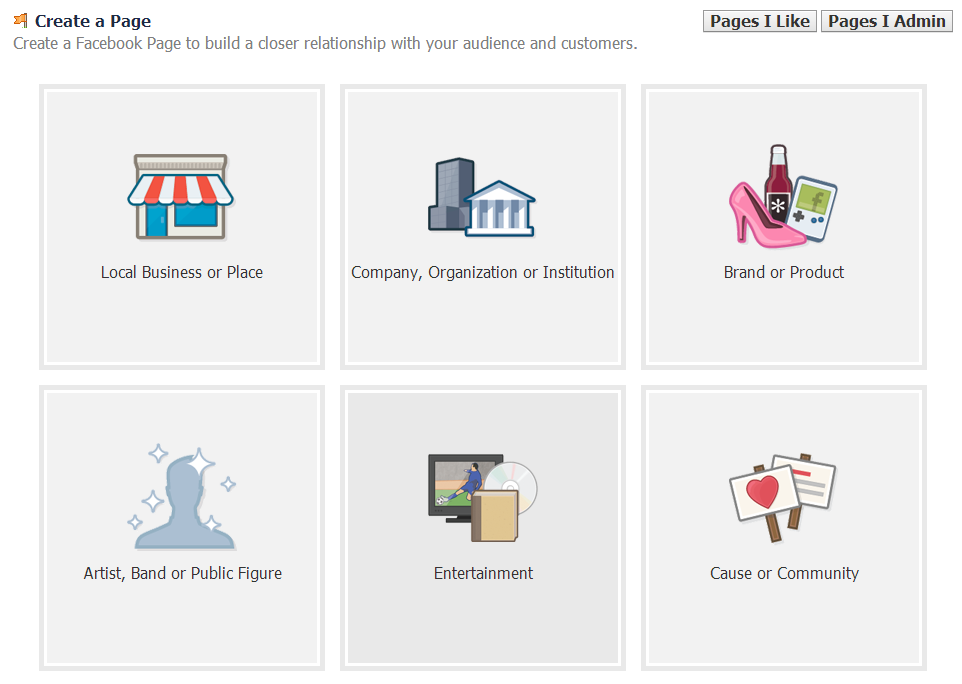
That takes care of the basics: If you need additional information, Facebook has a comprehensive help section for group features here.
And, of course, now that you have the family site under your belt, it's time to think about additional opportunities for quick-and-easy group sharing. Do you play on a sports team, or belong to a club or congregation? Are there a group of friends at work who'd like to share private messages during off-hours? Facebook lets each member join up to 300 groups, so the only effective limitation is your imagination.
By Alan Sembera
i Jack Hollingsworth/Photodisc/Getty Images
Facebook is a good way to stay in touch with family members when distance or a busy schedule make getting together difficult. Sometimes, though, you may not want to share private family photos with casual Facebook friends, even if Grandma and Grandpa can't get enough. One solution is to create a Facebook group comprised of only family members. Your family will be able to participate in group chats, upload pictures to shared photo albums and send messages that will go only to other family members. Family members must have their own Facebook accounts to participate.
Log in to your personal Facebook account and click the "Home" link on your Facebook toolbar.
Select "Create Group" from the options on the left side of the page. If you have joined several other groups, you may have to click the "More" link next to "Groups." If you can't find the option, you can navigate directly to the Groups option page (see link in Resources).
Create a suitable name for your group. If the group will include only immediate family members, something simple such as "The Johnson Family" is probably adequate. If you want to make the group visible to a wider audience, something more specific may be in order, such as "Kenneth and Meredith Johnson Family" or "The Johnsons of Poughkeepsie. "
"
Set your group's privacy settings. Setting the group to "Closed" prevents nonmembers from reading your family gossip and seeing your personal family photos. New members must be approved by a group administrator (which is you at this point). The group name will show up in search results, and other people can ask to become members. Setting the group to "Secret" hides the group from everybody but its members, and new members must be added by other members. Select "Open" if you want to let anyone see the family news.
Add at least one family member to your group by typing a Facebook username into the "Members" field. You can add several names at once by separating each name with a comma. At this stage, you can only add people who are on your Facebook friends list. Once the group is created, other members can also add their Facebook friends to the group.
Click the "Create" button.
Set up the basic appearance of the group page by clicking the gear icon at the top of the page and selecting "Edit Group" from the options.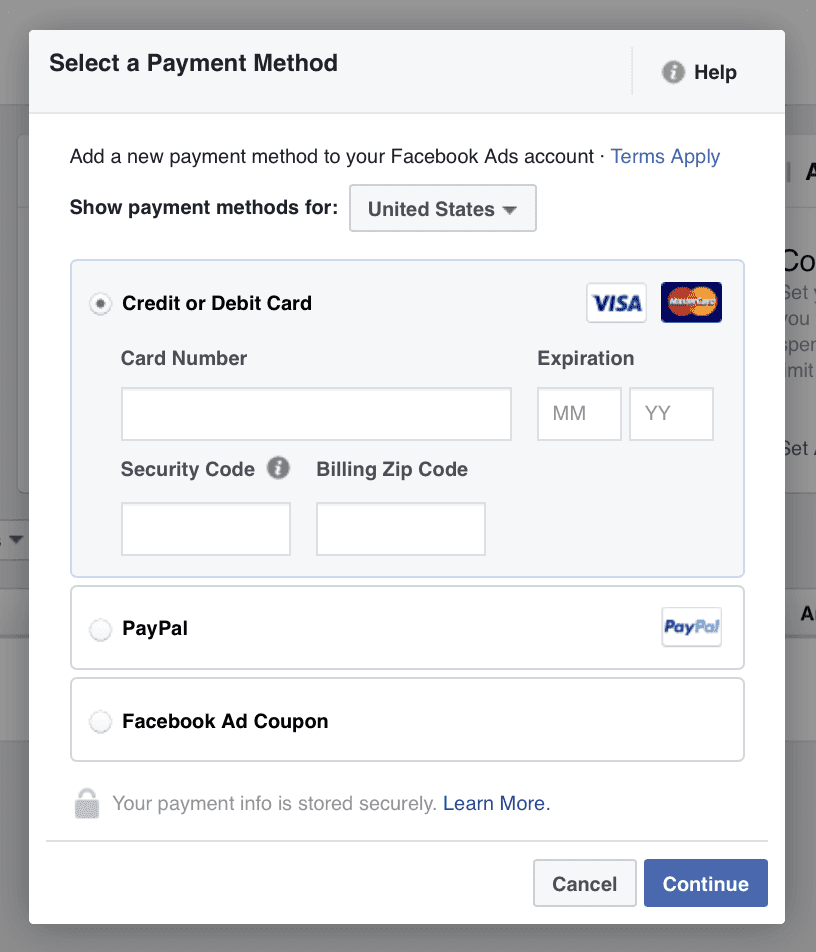 Write a description of the group page, add a profile picture and provide an email contact address. Click "Save Changes" when done.
Invite other family members to join the group. If the privacy setting is "Closed" or "Open," the family members can navigate to the group page and click the "Join Group" button on the upper-right corner of the page. The new members must be approved by a group admin. If the group is a "Secret" group, new members cannot ask to join the group, and can only be added by another member who is on their Facebook friends list.
References
Tips
 "
" Writer Bio
Alan Sembera began writing for local newspapers in Texas and Louisiana. His professional career includes stints as a computer tech, information editor and income tax preparer. Sembera now writes full time about business and technology. He holds a Bachelor of Arts in journalism from Texas A&M University.
Full instructions for setting up the FACBUK ADS Manager
To start a little statistics:
for May 2018, according to the analytical service of the STATIS Facebook capitalization amounted to 538 billion US dollars. He lost to several of the world's largest companies:
By the number of active users , as of October 2018, Facebook ranks first in the world ranking, overtaking even YouTube.
We hear this phrase so often from our customers. And how nice it is to see their surprised, joyful and slightly confused, embarrassed faces after the first test month, when the "idle" Facebook starts to bring leads, conversions, sales.
Today, targeting, and more specifically targeted facebook advertising, is not only a fashion trend, but also a really working tool, with the right settings of which you will get sales that you could not even think of.
Number of advertisers who run campaigns on a monthly basis from Q1 2016 to Q1 2018
It's time for you to stop procrastinating and start getting real income from Facebook.
The reasons are quite banal
Today we will help you overcome this milestone, cut the Gordian knot and finally start making money on Facebook.
To put all the puzzles in the right order, let's start with the very first and very important one.
Important points
Let's start in order.
When you register on Facebook, a personal profile is created with an avatar, information about you as an individual, friends, etc.
The business page is created on behalf of a personal profile and contains information about the company, contacts, contact form, posts on behalf of the company.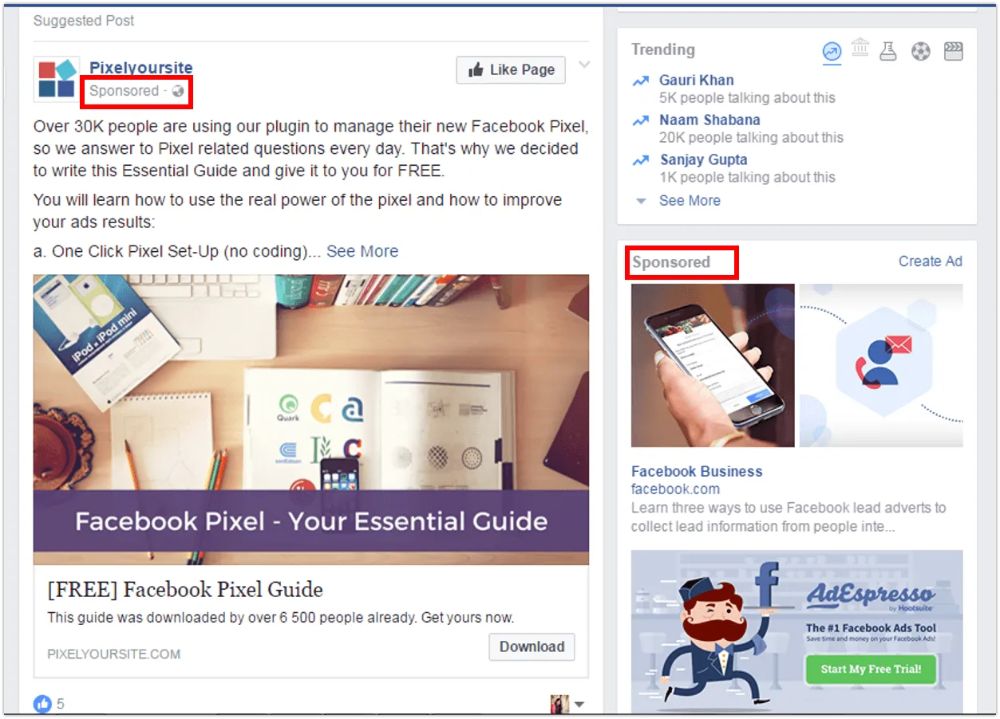 Facebook ads run on behalf of a business page, not on behalf of a personal profile.
So, go to your Facebook profile and do the following:
Things to remember when creating a page name:
Don't forget to link your Instagram account to your page.
To set up facebook targeting and start getting results, you need a Facebook Ads Manager.
To do this, go to the created business page, click on the already familiar icon in the upper right and click "Create ad".
Another way to get into Ads Manager is this link: link
You can also use the mobile application that you will find at the link: link
After that, you will immediately be taken to the page for creating an advertising campaign in the hint mode.
We wrote about how to create an advertising campaign starting from this stage here: link
The process is described using Instagram as an example. The only difference is the choice of placement. Change Instagram to Facebook and go!
To make it easier for you to navigate and start promoting on Facebook, we have prepared a mini-instruction:
Create" on the Campaigns tab.
After clicking on the "Create" button, a pop-up menu of settings will open in the quick creation mode.
The updated version of Facebook Ads Manager adds the ability to quickly create a campaign (as in the screenshot). From the name of the mode, it becomes clear that this is a fast-track edit mode, which is more suitable for experienced marketers.
We are just getting started, so let's switch to a more suitable option - the creation mode with hints.
To do this, click on the "Hinted creation mode" button in the upper right corner of the pop-up window.
After that you will be redirected to the creation mode with hints. In the process, Facebook itself will show and tell you how to create and set up campaigns, you just need to carefully choose the options you need.
First, pay attention to the left menu:
In fact, this is the algorithm by which we will create advertising. Shall we start?
At this stage, you need to be very careful and responsibly approach the choice. This is a fundamental success factor. The goal you choose determines how the Facebook ad delivery algorithm will optimize your ad delivery.
There are 11 goals in the campaign creation mode with hints:
If you switch to the quick creation mode, you will see 13 goals:
How not to get lost among so many goals and choose the right one so that facebook advertising brings profit, and not drains the budget ?
Now let's talk about your desires.
If you want as many people as possible to know about your brand, product, service or company , choose one of the following goals:
Want to find potential customers ? Your goals are:
Need to increase sales ? Take a closer look at the goals:
 Name the campaign
 Write a simple and short name so that you can roughly understand what kind of advertising it is without going inside the campaign.
After that, click the "Continue" button.
The flexibility and depth of audience selection settings on Facebook is in no way inferior to contextual advertising settings, and in many cases even surpasses them.
You can spend hours talking about the fact that the right choice of the audience is incredibly important and the success of your actions directly depends on it.
We have described detailed selection instructions in this article: Read
We recommend that you read it carefully. Here, here is a brief checklist of what you need to remember when setting up:
The choice of placement depends on many factors. Here are the main ones:
To select or remove a placement, check/uncheck the box next to its name. When you hover over the title, you will see how your ad will look in each individual display location.
If you can't decide on where to show your ad, you can refer to the Facebook help, which says this:
 In some countries, the purchasing type "Pay for impressions" is already available, but this privilege has not yet reached us. So we're using what we have for now.
 Working with the budget takes place on the "Budget and schedule" tab. There you can set the daily budget and the budget for the entire duration of the campaign, as well as set the schedule and duration of your ads.
Briefly about setting the budget on Facebook:
Daily budget:
Lifetime budget:
Facebook offers two ad options:
Each of these options has both pros and cons. In the article, we will look at creating a new publication for advertising.
The first step is to select identification data:
Next, go to the formats:
There are 5 options to choose from. The choice depends on the specifics of the offer, the availability of content and the relevance of the media to the textual content.
Remember:
Click this button and Facebook will send a preview link to the app on your smartphone.
We have compiled a detailed guide to media content formats for Facebook and Instagram. You can read it at the link: Read
After you have chosen the right design, feel free to proceed to the text.
The cost of advertising on Facebook depends on many factors, such as:
You can set up advertising with any budget and for any period. Your daily budget can be as low as $1, but remember that Facebook recommends a minimum of $5 per day.
To begin with, we note that not counting personal profiles, there are two more types of pages on Facebook:
Pages
pages-most of the pages-most of the page-most of a suitable way for brands, companies or organizations to make themselves known to the Facebook community and communicate with their target audience in their familiar territory.
Pages are a kind of tool through which a brand can broadcast its message to the audience (page subscribers).
Groups
Groups are a place for people with common interests to communicate. Sort of like an interest club. Here they exchange opinions, share information and discuss topical issues, mainly related to one topic.
An example of groups can be viewed here: see
One of the ways to promote a group on Facebook is to advertise it through a business page and vice versa. Cross-posting, informative posts about new topics and publications, and other marketing tricks will help you promote the group.
Paid advertising on Facebook is also an effective option that brings results much faster.
What about pages, you ask. There are many options here:

This is perhaps one of the most popular questions regarding effective Facebook advertising. And this is no accident. After all, the social network, with the right settings for advertising, brings real customers in the form of leads.
The principle of setting up an advertising campaign, the purpose of which is to generate leads, is the same as we described above. The difference lies in two points:
Let's explain a little about the second point.
When you advertise for lead generation, the user path looks like this:
Advertising placement (for example, Facebook feed) - ad - a form of lead generation that you have created in advance.
Why this ad is good:
 We will look at creating a form from scratch.
 One of the most effective types of advertising in general and advertising on Facebook in particular is retargeting.
Retargeting is showing ads to people who have already interacted with your content. Most often, this is showing ads to those who have visited your site.
By installing Facebook Pixel (a special Facebook code that tracks and captures the actions of your website visitors), you can set up smart retargeting with different scenarios, for example:
We have made two useful instructions:
They fully describe the process of installing and configuring a pixel and setting up advertising based on its data.
Please enable JavaScript to view the comments powered by Disqus.
Photo: Tech Insider
All the links, videos, photos, places and other content that you have bookmarked can be viewed in the Saved section of your Facebook profile. In the Facebook mobile app, this section can be found under the "More" tab.
Photo: Vimeo
In the Facebook mobile app, select your profile photo and click "Make New Profile Video" to upload a short loop video of yourself. The result is something between a GIF and a live photo from Harry Potter.
Photo: Business Insider
Facebook Instant Articles are native to the social network, which means they load directly into the app. Many digital publications use this format. According to Facebook, these articles will load ten times faster.
You'll know you're talking about an "instant article" by the small lightning bolt icon in the bottom left corner of the news thumbnail.
Photo: Tech Insider
If you don't want all videos to play automatically while you're browsing the feed, turn off autoplay.
In the right tab of the Facebook mobile app, you will find the "Settings" section. Select "Account Settings" and the "Videos and Photos" section. You can make videos play automatically only when your device is connected to the Internet directly or via Wi-Fi, only via Wi-Fi, or turn off autoplay altogether.
Photo: Tech Insider
If you want to get rid of someone's news in your feed but don't have the courage remove this person from friends, just unfollow them.
Go to the desired person in the profile, click on "You are subscribed" and select "Unsubscribe from updates."
Photo: Facebook
The On This Day feature allows you to see what you did on the social network on this day several years ago. You could say it's your personal Facebook time capsule.
All activity displayed on the Today page is visible only to you. You can find it at this link: Facebook.com/onthisday. You can hide some people in the timeline of past events so that your exes do not appear in your memories.
Photo: Business Insider
The event log records all your activities on the social network. It can be easily viewed on the website and in the mobile application.
Photo: Facebook
If you have people or favorite pages whose news you want to see in the feed in the first place, set them to appear in the mobile application Facebook.
Select Settings from the Advanced tab and click Display Priority.
Mark people and pages that interest you. Now their news will be displayed in your feed in the first place, marked with a blue star.
Photo: Tech Insider
Are you tired of people pronouncing your name wrong? Then show on Facebook how to pronounce it.
While editing your profile, go to the "Information about you" section. You can also enter your nickname or maiden name there.
Photo: Tech Insider
On Facebook, you can become someone's friend or follower.
The status of friends indicates that you have confirmed the connection between you and probably know each other. If you are someone's subscriber, then the person has not confirmed your friend request.
Your followers only see the posts you share. At any time, you can prevent anyone from following your account in the "Public Publishing Filters and Tools" section.
Photo: Tech Insider
You can share your publications with friends, friends of friends and any visitor to your page
To choose who will see your publication, select the appropriate setting item in the drop-down menu in the top right corner of the post. In the mobile app, click on "Privacy Settings" and select one of the options. On the Facebook website, you will need to click on the globe icon or user icons next to the time the post was posted.
If you want the post to be visible to everyone except some people, select the "User settings" item and specify them in the "Do not show" section.
Photo: Tech Insider
You can easily see what your profile looks like to other users and to individual friends from whom you have hidden some information.
To do this, go to your profile, click on the icon with three dots and select "View as ...".
Photo: Tech Insider
If for some reason you don't want others to see your friends list, you can hide it.
Go to your friends list and click on the pen icon to select "Manage". There, select "Edit privacy settings". You can control who can see your list of friends, followers, and people you follow.
Photo: Tech Insider
Sometimes a Facebook marital status change can backfire if your friends see it in your feed. You can set your marital status so that only you can see it, and your friends won't know about it.
Just go to the edit page of your profile, go to the "Family and relationships" section and select "Only me" in the privacy settings.
Photo: Tech Insider
If you don't want everyone to see some of your albums, but don't want to delete them, hide them so that only you can see them. The same goes for some events in your life, such as changes in marital status, job changes, and so on.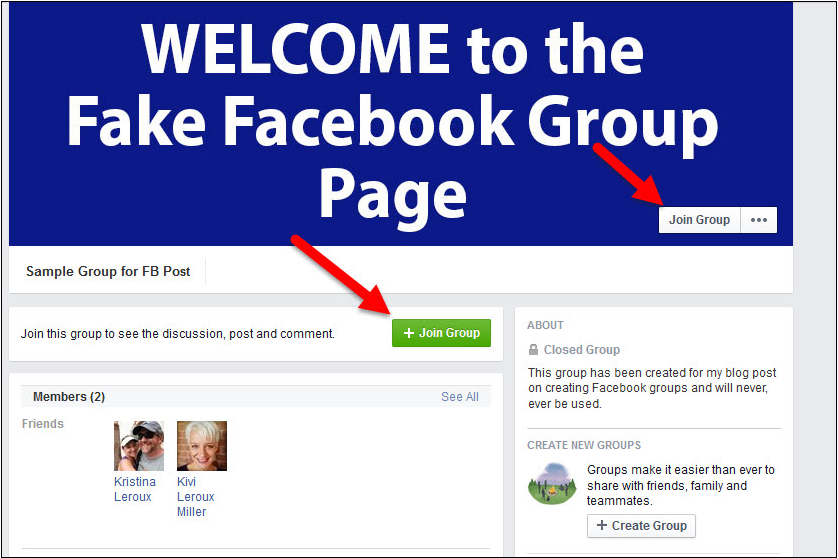
Just notice the little gray icon next to the album or post. A two-person icon means the post is only available to your friends, a globe icon means the post is visible to everyone, and a padlock means it's only available to you.
Photo: Facebook
in the form of three dots. Select "Block" from the menu that appears.
Photo: Tech Insider
In the Facebook mobile app, select the "Advanced" tab, then go to "Settings" -> "Account Settings" -> "Security" and finally "Where did you come from." Press "x" to sign out of Facebook on all devices.
You can view all devices on the Facebook website. To do this, go to your profile settings, select the "Security" section and the "Where you logged in from" item.
Photo: Facebook
In the security settings, you can turn on notifications about attempts to log into your Facebook account.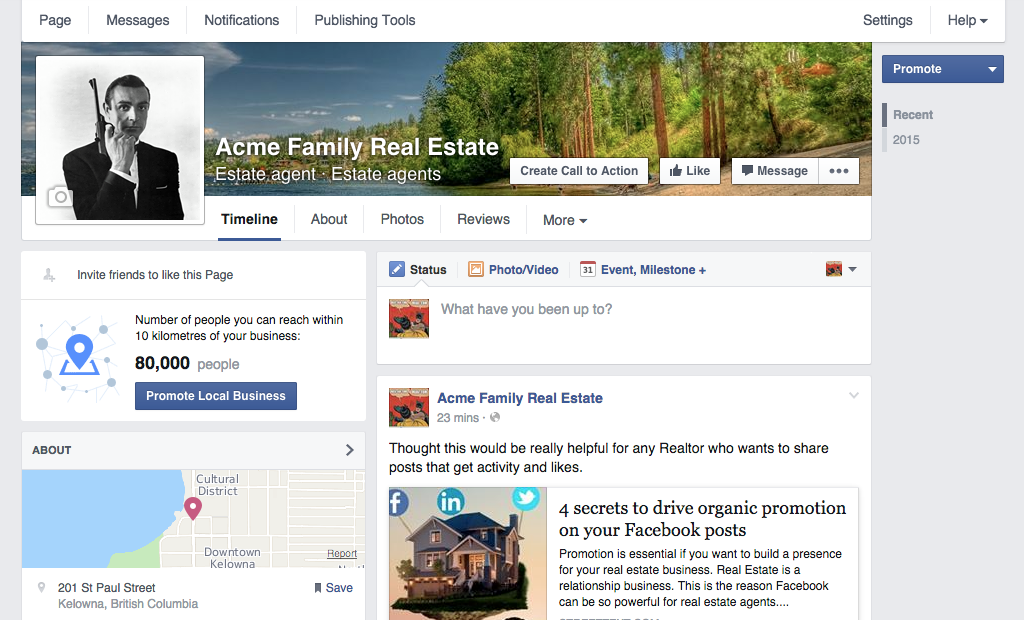
There you can set up alerts so that you receive an email or a Facebook notification each time you try to log in. If you enable Login Confirmation, you will need to enter an additional SMS code each time before logging into Facebook on a new device.
Photo: StackExchange
Choose which types of notifications you want to receive.
What's more, you can set up notifications on the site and in the mobile app in different ways. Go to the "Notifications" section and do it.
Photo: Tech Insider receive a lot of notifications about new comments.
You can unsubscribe from notifications of any activity associated with any entry. This feature will surely save you the next time your friends decide to have a political discussion in the comments.
As soon as you receive a notification about a new comment, click on the cross to the right of it and select "Disable".
The function also works in the reverse direction. You can turn on notifications for any activity on a post by clicking the arrow to the right of it and selecting "Turn on notifications for this post" from the drop-down menu.
Photo: Tech Insider
If you're tired of Facebook constantly reminding you of your friends' birthdays, turn off this feature.
In your account settings, go to the "Notifications" section and disable the corresponding item.
Photo: Facebook
If you want to keep a close eye on someone's Facebook activity, turn on custom notifications. Go to the person's profile, hover over the "Friends" button and select "Receive notifications" from the drop-down menu.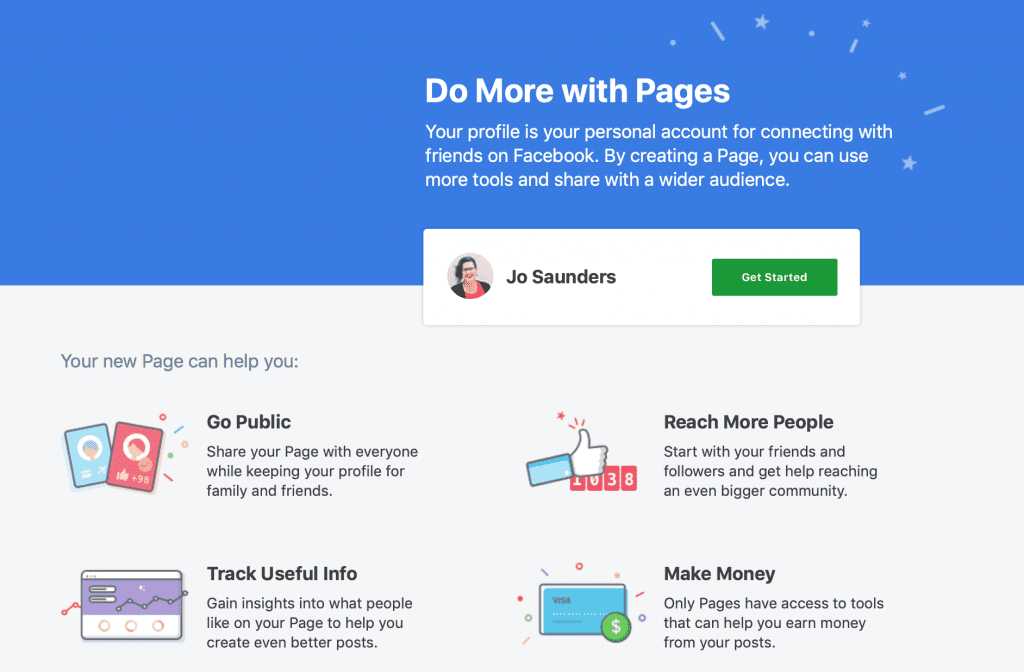
Photo: Facebook
Taking surveillance to the next level by seeing which posts have been commented on or liked by one of your friends.
Photo: Tech Insider
Facebook allows you to find more than just people's profiles.
You can find any information if it is in the public domain. If you search for "James Bond" or "iPhone 8", you'll find relevant entries from news outlets, friends, and other people's pages.
Photo: Tech Insider
This grouping will allow you to better filter information in the feed. For example, you can only see the news of your city or your classmates.
Facebook creates some default friend categories, such as city, school, etc.