Instagram was designed as a mobile platform, and the app has gone through update after update to look like the app you now know and love. It’s designed for you to shoot and edit everything on your phone.
However, many video producers and advertisers want to create original content with a traditional camera setup and video edit. This allows them to capture the best footage, control the audio, and even add graphics.
With Instagram now allowing creators to upload from their desktop and offering different platforms for videos to be hosted on (Reels, Feed, Story), there are a few different ways you can approach exporting your video to give it its best life.
To upload to Instagram, the video file can either be on your phone or your computer. Due to recent updates and improvements with the app, you can now upload your video right to your feed from your desktop. This is big for editors who no longer have to transfer videos to their mobile devices.
But, before we talk about what to do with your video, let’s be sure you’re covering all the bases for exporting from your desired editing program.
Okay, so what are the upload requirements for video? The requirements are as follows:
Those of you with experience working with Instagram may remember that the canvas size was once 640 x 640. While that holds for mobile, Instagram can now be viewed from a desktop at a max size of 1080 x 1080.
A good rule of thumb is always to use at least a 1080 canvas. Instagram will automatically convert the footage for you, so it’s best to max out the size to get the best look. Speaking of, let me quickly go over the codec required by Meta (the owner of Instagram).
The video codec required (if you need this information) is as follows:
The wider aspect ratio acts as a traditional video. Aspect ratios like 16:9 allow you to fit more information width-wise. Still, they’ll leave you cutting the composition by two-thirds to make the image vertical, which is more user-friendly for Instagram.
The downside of wider video is that you’ll not take up as much valuable retail space on a user’s phone. If you’re creating an advertisement, you’ll want to take as much screen space as possible. That’s why ads tend to use a vertical 9:16 ratio, as well as most TikToks and Reels you see on your feed.
Let’s say you’ve been given horizontal footage, or you want to take footage from another project (that’s been shot horizontally). You want to post it on Instagram or have a vertical copy for your various social channels. In the tutorial above, Mike Maher shows us how to do this in all of the big NLEs.
Anything for Instagram Reels or TikTok should be vertical, in my opinion. The vertical aspect ratio is more user-friendly for Instagram, but it crops so much detail from the sides. This format is preferred because it allows you to add more large, legible text on screen. This is perfect for videos trying to educate you on a topic.
Think of all the quick-cooking recipe videos you see. The vertical aspect ratio gives you more room to write down the steps and recipe.
Once you decide which ratio suits your project best, you’ll know what canvas size you should set up in your NLE.
The first step to editing a video for Instagram is setting up your sequence. Just make sure your final product is under sixty minutes, as that is the max time allowed by Instagram.
Quick note: 1:1 will give you a perfectly square canvas. If you’re using 1920 x 1080 footage, watch the whole clip and ensure everything you need stays in the frame.
As a regular 16:9 video is still 1920 x 1080, the following steps will focus on creating 1:1 videos at 1080 x 1080.
Now, edit your project as usual. Add any transitions, text, and graphics.
When you’re finished editing:
Now edit your project as usual, including any transitions, text, and graphics.
When you’re finished editing, you have some options with Final Cut Pro X. You can Share to an Apple Device or Send to Compressor. In this case, using Compressor is overkill since we’re only using the video file on mobile. That said, you can still use Compressor if you want.
Share to an Apple Device:
As of this past fall (2021), Instagram has now updated its features to include uploading capabilities straight from your desktop. So, initially, this article only discussed how you could bring the video to your phone once you’ve edited it accordingly. That whole step is irrelevant now that you can go right to the source from whatever computer you’re working on!
Doing this is simple, you just click on the “upload” button on the Instagram site and then find the video file’s location on your computer.
Remember what we said earlier when listing the upload requirements: “The maximum file size for videos that are ten minutes or less is 650Mb. The maximum file size for videos up to sixty minutes is 3.6GB”.
When you upload to Instagram, you’ll choose Crop settings. No matter if you used a 16:9 or 1:1 ratio, the final compressed mobile video will be 1920 x 1080—this won’t be a problem. More on that later.
Now that you have a compressed Instagram mobile file, you can also transfer the file to your phone. The best option for Mac/iPhone users is to use Apple AirDrop.
For Mac/Android or PC/Mobile, you can use Google Drive or Dropbox programs.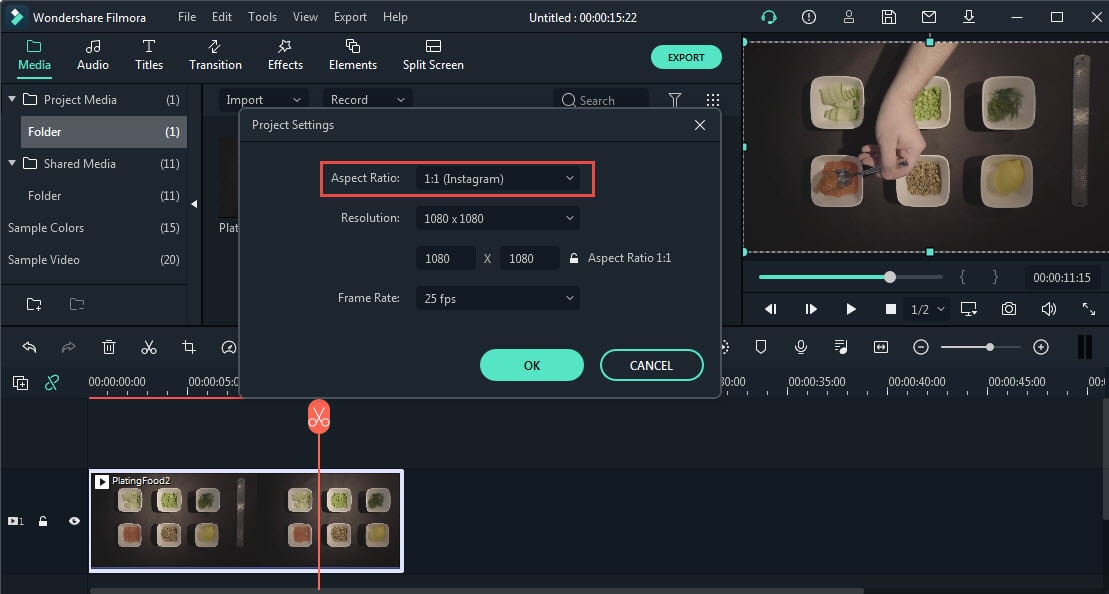 As a Mac/Android user, I prefer using Google Drive since it’s faster.
Mac users with iPhones will find it easiest to send files using AirDrop. You’ll just drag the compressed Instagram video file to your iPhone. On your iPhone, you’ll now see the file under Photos.
Google Drive works for both Mac and PC and will transfer files to iPhone and Android phones. You’ll need both a Google Drive account on your computer and the Google Drive App on your phone.
Dropbox works for both Mac and PC and will transfer files to iPhone, Android, and Windows phones. You’ll need a Dropbox account on your computer and the Dropbox App on your phone.
We’ve finally made it. It’s time to open Instagram and upload the video.
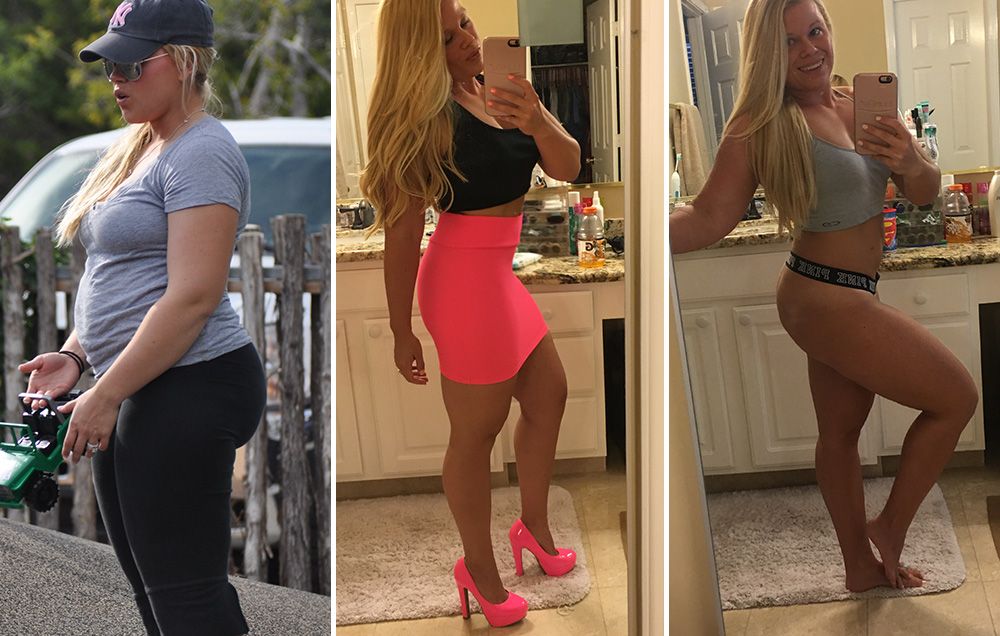
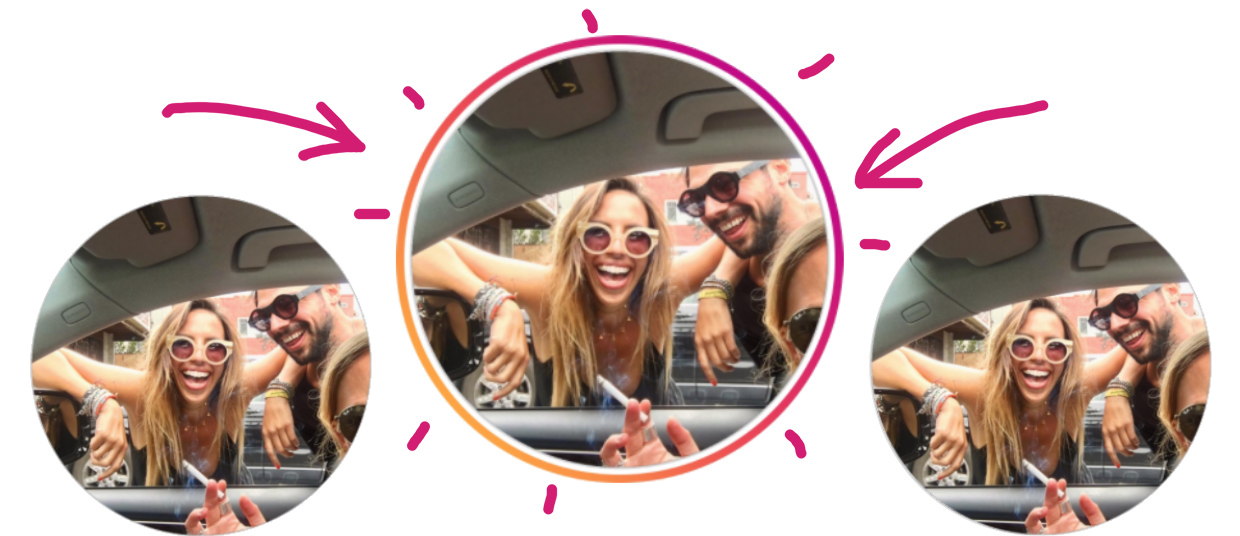
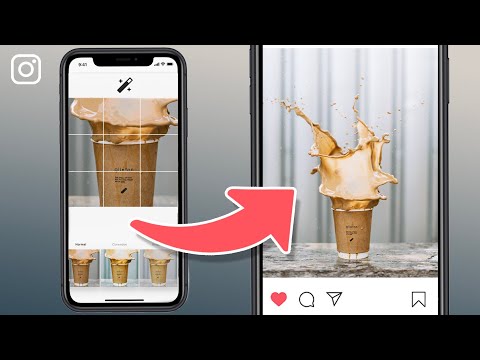
Remember how your 1080 x 1080 1:1 video file was compressed down to a 1920 x 1080 video? Instagram will automatically crop out the excess black bars on the sides, and you’ll have a perfectly square video ready to share. The result is like the middle image above.
Instagram defaults images and videos to 1:1. If you want a 16:9 aspect ratio like the right image above, you’ll need to adjust the crop.
Since Instagram Reels is arguably a more popular way to upload your videos than just straight to your feed, we can talk briefly about how to upload your videos to Reels.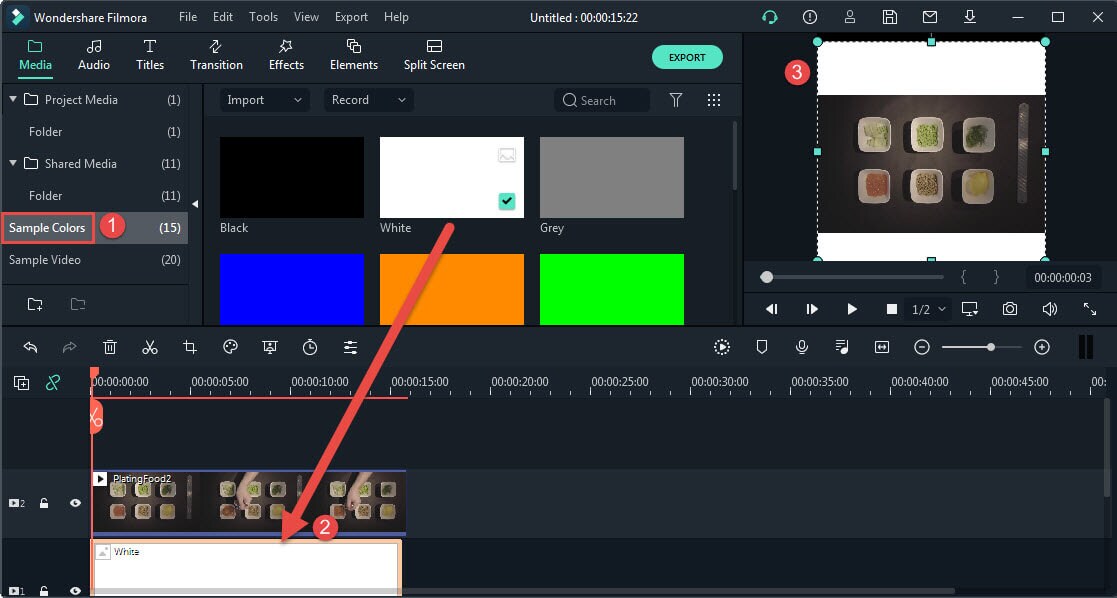
The biggest talking point: The app allows you to shoot and edit your entire video all within the app. This will enable you to add text, music, and effects all from the app. How is this relevant to us? You can then save and post that video on your feed, as well.
So, in a big way, this gets rid of a lot of past editing apps and software you might need if you’re making social videos. The creation lives and “thrives” all on the same platform.
PremiumBeat is now on Instagram. Be sure to give us a follow.
For more tips, tricks, and advice, check out these articles:
Cover image via Ascannio.
Do you still look for a method to resize the video for Instagram? No worries! In this post, you are going to learn the most effective methods to resize videos for Instagram in steps.
Wednesday January 19, 2022 11:34 AM PDT by Karen Greene
When I first started posting videos online, they were incongruous and felt out of place in weird sizes. Instagram came about and helped by providing padding in such videos, thus making them look a tad better. Instagram tries its best when we let it do its thing with the aspect ratio. Mostly it’s a failure and may adversely impact engagement on your posts.
Take back the control and resize your videos before posting on Instagram. Use editors like FilmForth to resize videos for Instagram within mins, from start to finish. It’s free, doesn’t make your pocket lighter, and there is no mandatory video editor’s watermark on the content either.
Before we get to resizing videos, let’s take a pause and get ourselves acquainted with different aspect ratios for Instagram. Aspect ratios refer to the width of the video in respect to its height. And it’s expressed in a ratio.
Recommended size: 1080px by 1080px
Ideal for: Skits, animations and Instagram ads
Instagram supports both vertical and horizontal videos. However, their square is popular amongst the users. It looks pretty in the profile grid, where each post appears as a cropped block.
Pros
Cons
Recommended size: 1080px by 1350px
Ideal for: Tutorials, vlogs, and single-hand recorded content
People hold their phones vertically for 94% of the time, according to a report of MOVR. It’s free real estate for the vertical videos. Takes up a significant portion of your screen while in the feed. Keep them up to 4:6 or 4:7, or Instagram will crop it down.
Pros
Cons
Recommended size: 1080px by 608px
Ideal for: Group, scenery, and travel videos
Landscapes are evergreen; they look great on newer displays that boast higher resolutions with better aspect ratios. Couple it with 90/120hz refresh rate, and you are all set.
Pros
Cons
The new form of short content is best consumed vertically. You watch a reel, then swipe up or down to go to the next one. It’s only natural to go all vertical.
We leave this one for you. Ideally, vertical is preferred, but some long-form content can benefit from the horizontal orientation.
For 9:16 verticals, the ideal size is 1080px by 1920px. And on the other hand, 16:9 horizontal works best with 1920 by 1080px, a resolution that is being increasingly offered on medium-range monitors and mid-segment tablets.
This is a no-brainer; go vertical, no questions asked. The other way around looks blurry and significantly reduces the space for the content. And the ideal resolution would be 1080px by 1920px
Maximum frames per second(FPS) – 30
Video length limit:
Once you have nailed the video shooting part, it’s time to resize videos for Instagram. We have taken a sample video and are going to resize it for a Reel. Remember to download FilmForth from Microsoft, and be careful when downloading from third-party platforms.
After successfully downloading FilmForth, a video tutorial is in place for your guide.
In short, the tutorial can be concluded into 4 easy steps:
Launch FilmForth, click on the New Project button to start a project for the Instagram video, and import a video by dragging and dropping one onto the timeline. The traditional Add Video/Photo clips can do the same.
New Project on FilmForth
Look above the timeline, and you will see an aspect ratio button. Click on it to access the menu. The other way to access it is from the project settings located in the project’s home screen.
Aspect Ratio Shortcut
Now, we land in the aspect ratio menu. Select the 9:16 ratio meant for IGTV/TikTok since we are resizing the video for a reel. Press the back button to access the main video edit menu.
Aspect Ratio Menu
Head to the Transform menu from the dashboard and move the Scale slider to the right until the screen’s vertical box is filled. The default value of the slider is 1.000 After that, use your mouse pointer to place the main elements inside the vertical box for inclusion in the video.
Video Resizing
Finally, head back to the main menu and click on the Save Video button for exporting the Instagram video.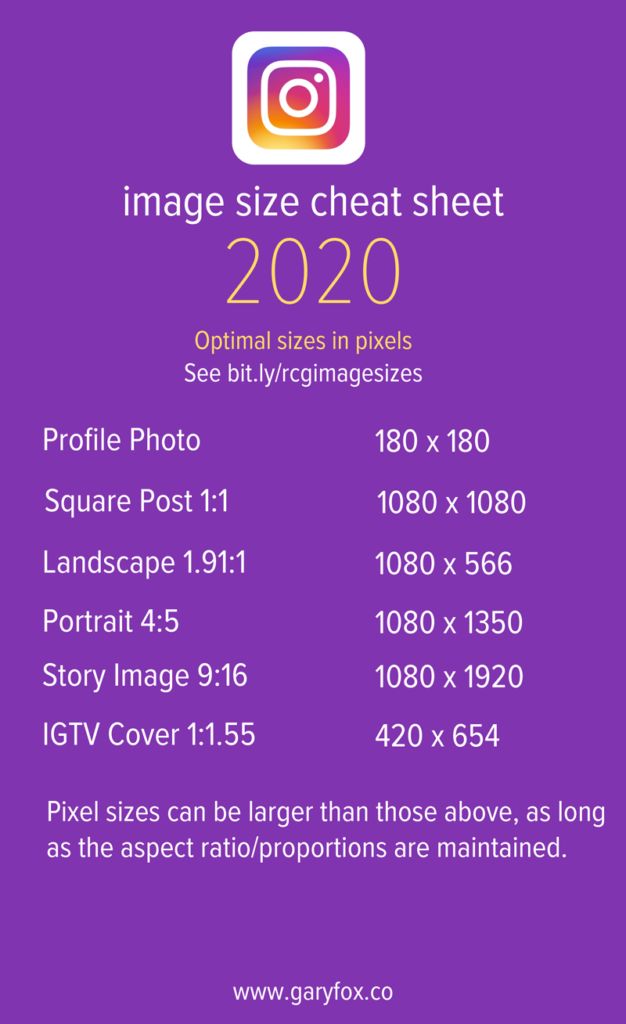
Everything looks good but keep these things in mind while making your next Instagram video.
 Get to the point in that window to see a better completion rate.
Over to you, now it’s your turn to experiment. Find what works for your audience and what belongs in the bin. It will take some effort to find the right nerve, but the organic engagement and conversion outweigh the hard work.
Instagram doesn’t auto crop the video anymore, leaving it in an awkward ratio inside the accepted dimensions. Hence, it is better to do it before uploading using FilmForth. Easy, doesn’t cost a dime, and gets the job done within a couple of minutes on a first try.
Karen Greene
Karen is a professional writer with a background in column writing who enjoys resolving complex topics and explaining them in interesting ways.
If you shoot Instagram videos with a digital camera instead of a smartphone, you will most likely need to edit them on your computer before posting. And if you need to save the same file in several formats - for example, for the feed and for stories - cropping can take a lot of time.
To make it easier, we've prepared detailed instructions on what Instagram video sizes are considered optimal, how different aspect ratios look in the feed, and how to quickly save an Instagram video in the correct size and format.
We use VSDC as the editing software. It is a free video editor for Windows that is suitable for both simple operations such as trimming and adding audio, as well as for more complex tasks such as creating a picture-in-picture effect, color correction, and working with sound.
Looking for a convenient and free video editor for PC?
Download VSDC
VSDC has special video export profiles for Instagram and other social networks in the required size. This means that you can automatically apply the optimal settings for each social platform, and adjust them if necessary.
We will show how this works in detail below. But first, let's talk about the optimal video size for Instagram.
The answer to this question depends on what type of post you are planning. Currently, you can post on Instagram:
The general requirements for any video on Instagram are as follows: MP4 format, H.264 codec, 30 frames per second - maximum frequency, resolution - 1080 pixels wide. Lower quality videos - 600 pixels wide - are allowed, however, you should understand that on a visual platform like Instagram, you should always strive for maximum image quality.
Let's move on to the aspect ratio of the video for Instagram. Here you have several options.
If your video for is a regular post in feed , you can choose any aspect ratio between 1.91:1 (horizontal video) and 4:5 (portrait/vertical mode). Naturally, if your goal is to draw attention to the publication as much as possible, we advise you to choose the second option, because it takes up much more space on the smartphone screen. The recommended settings for vertical video on Instagram are 1080 x 1350 and 864 x 1080 pixels. However, if you shot the original video in a non-portrait mode, it will be difficult to apply the optimal aspect ratio. In such cases, it is worth using square videos with a standard 1:1 ratio. The optimal resolution here would be 1080 x 1080 pixels.
The best video resolution for Instagram Stories is 1080 x 1920 pixels. And, of course, for maximum organicity, shoot video initially in portrait mode.
Finally, if you're editing a video for IGTV , you can save both a 9:16 vertical video and a 16:9 horizontal video.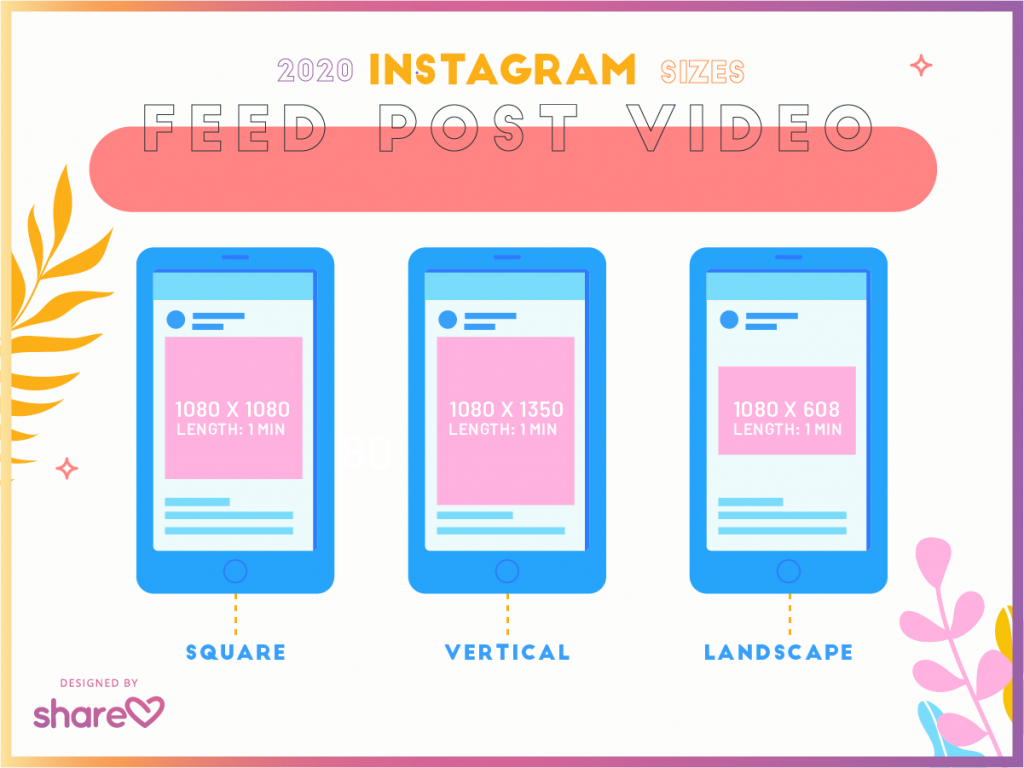 It is worth remembering that when an IGTV video is viewed in the feed, it is loaded in portrait mode, so it is again recommended to shoot vertically for optimal results.
After you have finished editing, you can save the video in the desired format and size as follows:
To change any of the video parameters - width, height or frame rate - use the "Change profile" option, this button is located below the preview window. If you need to create and save your own video export profile, see this guide.
If your video is longer than allowed, you can quickly split it into parts and post sequentially to the carousel or stories. The easiest way to do this is with cropping markers:
Saving videos in the optimal size for Instagram is not difficult if you use a program with preset export options.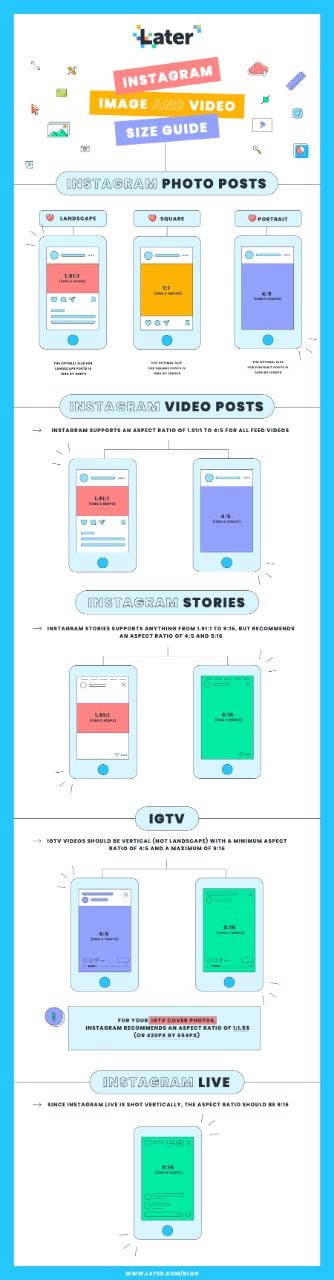 Maintaining maximum quality, however, can be more difficult. We recommend that you try the following tips:
Questions about video size settings for Instagram? Write to us on the Facebook page or send an email to This email address is being protected from spambots. You need JavaScript enabled to view it..
Download Free
Video Editor
You can learn more about the program on the product description page Free Video Editor
October 13 Social media instructions
Content:
Instagram has a limit on the size of uploaded videos. Users cannot post videos longer than 60 seconds. But there are 3 ways to get around this limitation and publish files up to 60 minutes!
MUSTHAVE services for your Instagram!
TapLike - Instagram promotion. Buying followers, likes, story views, comments. Quality Audience! 100% service safety guarantee!
Instahero - instant cleaning of Instagram account from bots! Do a profile analysis for free!
This method is suitable for publishing videos up to 15 minutes from a mobile device. And up to 60 minutes if you're uploading videos from a PC.
Before publishing on IGTV, it is recommended to create a special channel:
A function to quickly upload video files to Instagram and Facebook will become available.
We made a very detailed guide to IGTV here in this article! If you want to understand YouTube from Instagram, be sure to read :)
IGTV is a full-fledged video hosting from Instagram, it has all the possible functions for working with video:
Instructions for publishing from PC:
Instructions for downloading from mobile phone:
Another way to post a video to Instagram is to simply cut it into segments up to 1 minute long. We publish these segments in a gallery (a slider with several photos or videos inside one Instagram post).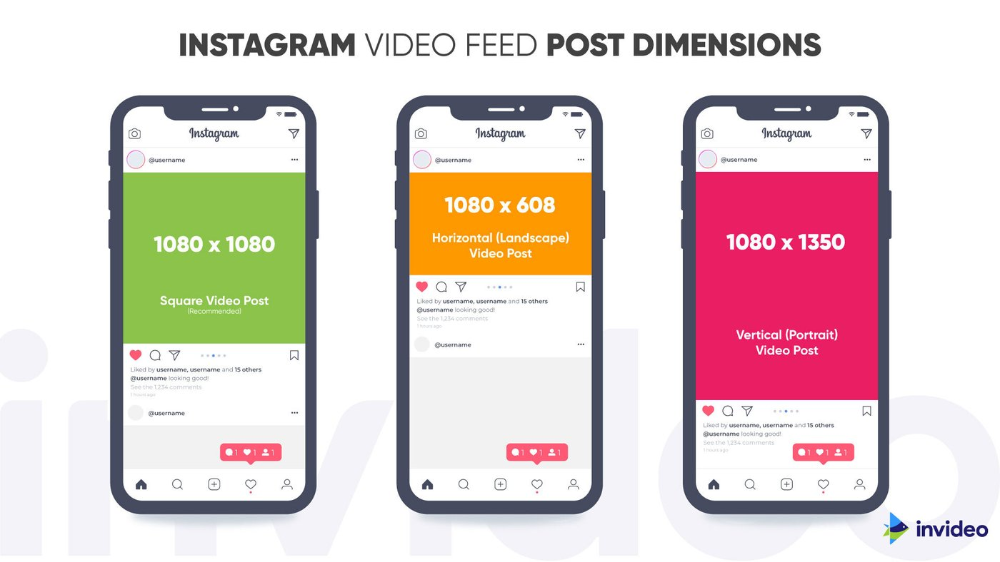
It is recommended that you copy the original video beforehand, saving the entire file. There is a possibility that one of the parts of the file will be lost in the application.
Any video editor can be used. For example, I love the InShot app - it's available on both IOS and Android.
How to cut video for Instagram carousel in InShot:
Then we can add the video again, cut another piece and save.
Or return to the draft of the original video in the INSHOT program, undo the last deletion action (the “Back” arrow in the tools), trim and save another piece.
Official video requirements for IGTV can be found in Facebook help. We will publish a link to the official source, since the requirements change periodically along with Instagram updates.
The IGTV video cover size is 420 x 654 pixels.
You can upload square (from 600 x 600), horizontal (from 600 x 315) pixels, or vertical (from 600 x 750) orientation. The size is not more than 4 GB.