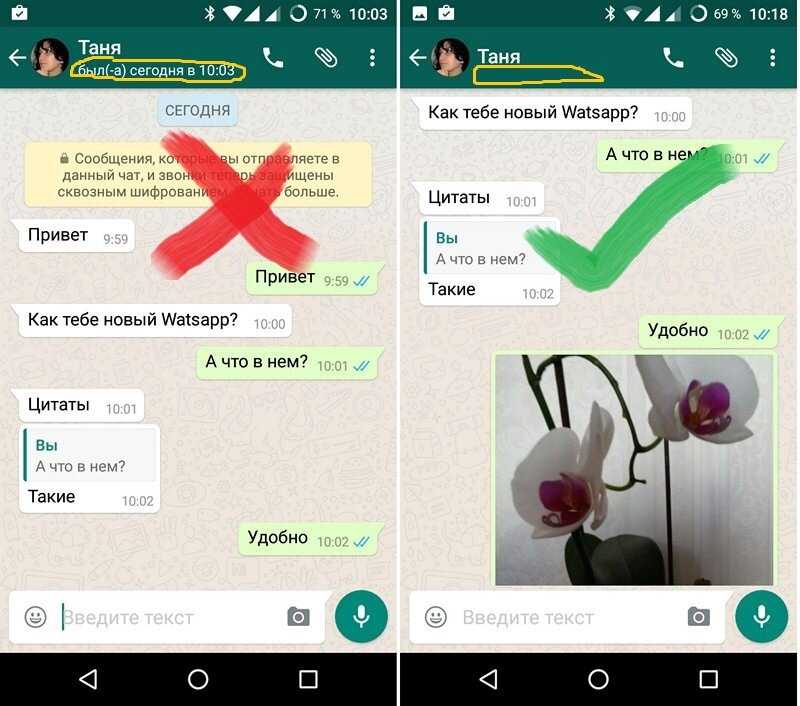
If you have an iPhone 6s or newer, you can capture live photos right from your camera app. The new-ish medium occupies the space between a still photo and video, creating a "moving" image that lets you give viewers more visual context for your images.
Instagram was one of the last platforms to support live photos, but thanks to updates and savvy workarounds, there is a way to bring that feature to your profile. It's important to note that the ease of posting a live photo will depend on whether you want to add it to your story or your photo wall.
Here's how to post a live photo on your Instagram.
1. Open your photos app and select the live photo you want to use.
2. Swipe upwards and choose "Save as video."
You can find this option underneath "Use as Wallpaper." Devon Delfino/Business Insider3. Open the Instagram app.
4. Tap the plus sign in the app's bottom menu.
The icon is located between the magnifying glass search heart icons. Devon Delfino/Business Insider
 5. Select the video you saved from your photo library.
The library will appear when you hit the plus sign, allowing you to edit your photo as you see fit. Devon Delfino/Business Insider6. Tap "Next" in the top right.
7. Add your caption.
You can also add location information, turn on social sharing, and more. Devon Delfino/Business Insider
 8. Hit "Share."
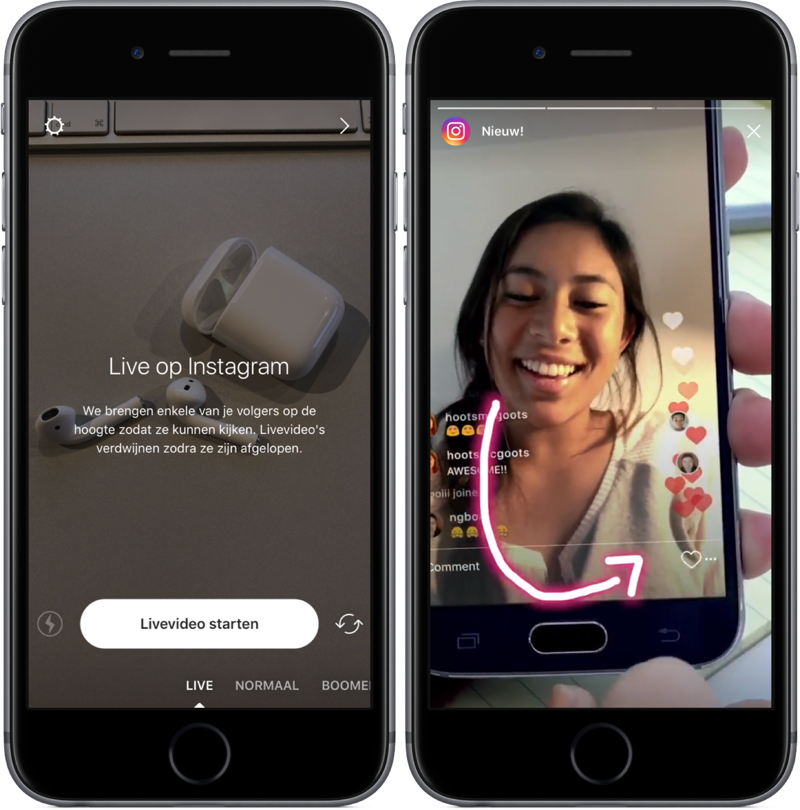
1. Open Instagram.
2. Tap the camera icon in the top-left corner of the screen to access the "Stories" section.
3. On the story screen, scroll through your bottom menu until you see "Boomerang." Tap it.
You may also be able to find this option as an infinity icon on the left side floating menu. Abbey White/Business Insider4.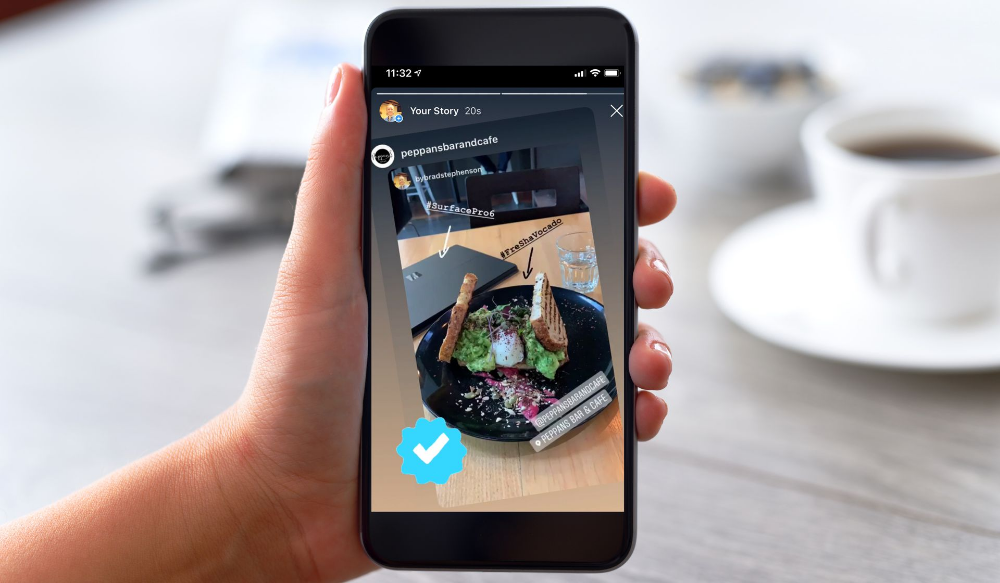 Tap the white circle on the bottom menu to begin capturing your live photo when you see the boomerang icon appear.
5. Add text or edit your live photo in whatever way you want.
6. Press "Send To" in the lower right.
The Instagram "Send To" button is white and oblong in the right bottom corner. Abbey White/Business Insider7. Select where you want to send your live photo, including "Your Story," "Close Friends," or someone you follow.
You can also add location information, turn on social sharing, and more. Abbey White/Business Insider
 8. You can press "Undo" to stop the action or press the blue "Done" link that appears at the bottom of the screen.
Devon Delfino
Devon Delfino is a Brooklyn-based freelance journalist specializing in personal finance, culture, politics, and identity. Her work has been featured in publications such as The Los Angeles Times, Teen Vogue, Business Insider, and CNBC. Follow her on Twitter at @devondelfino.
Read moreRead less
Insider Inc. receives a commission when you buy through our links.
Live photos aren’t a new concept, and they certainly aren’t a unicorn of an idea – if the newspapers in Harry Potter could feature moving scenes, then it’s not too big a step to assume that technology today is capable of a similar thing.
Live photo might seem like a glorified term for video, but this type of media has one foot in the photo camp and one foot in the video camp.
In fact, they are 12-megapixel photos that animate 1.5 seconds of motion either side of the still without you having to do a single thing.
Well, apart from clicking the shutter button, of course.
Today, Live Photos are a wildly popular feature of the iPhones 6s and above, and iPad Pros (sorry, Android fanatics).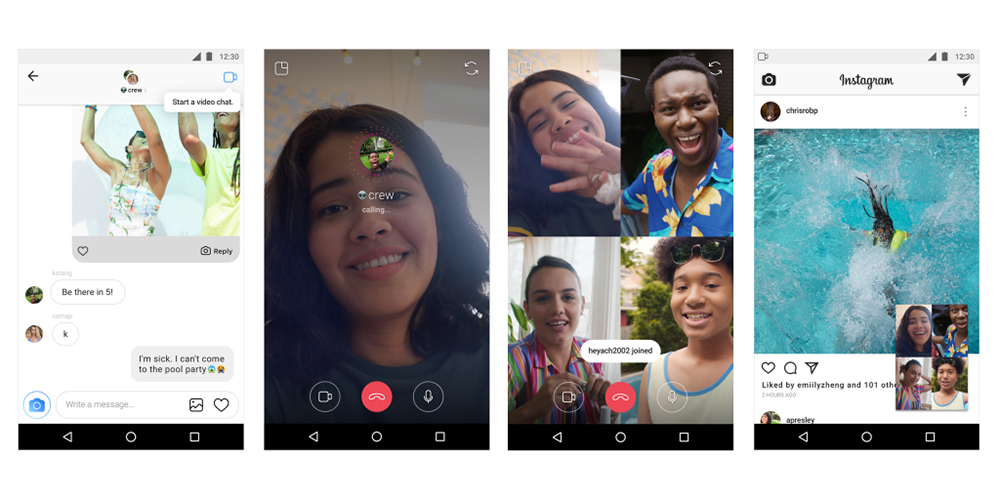
If you’ve got an iPhone, you’ve probably taken a Live Photo by accident at some point. They tend to reveal themselves when you’re scrolling through your photos folder, replaying your pre-selfie face in all its glory.
But if you haven’t dabbled in this fun feature, and you’re wondering how to turn live photo on, here’s how:
These little snippets of life that go further than a simple snapshot are doing the rounds on social media at the moment — and for good reason.
Not only do they often offer a hilarious “backstage” look at a photo, but they also bridge the gap between videos and stills.
Why Live Photos Are Perfect for Instagram
Instagram was once known as the place to post heavily-filtered images of food, sunsets, and anything else that makes your life appear more exciting than it is.
Every feed was a well-curated depiction of the life we wanted people to see, rather than the backstage shenanigans that accompanied each and every one of those sunsets and posh plated dinners.
But people want authentic these days.
They’re sick of seeing polished-to-perfection photos that make them feel bad about their own lives.
Instead, they want to see the nitty-gritty behind the shots, which is where Live Photos come into play.
For brands, Live Photos help create a deeper relationship with followers.
It’s common knowledge now that consumers actively seek out brands they connect with, and they relish in seeing the “human” side of a brand rather than polished marketing campaigns pushing them to buy, buy, buy.
So Instagram and Live Photos are a match made in heaven, but if you’re scratching your head wondering how you can easily get your moving pics onto the platform, don’t worry – we’ve got you covered.
Your Questions About Live Photos and Instagram Answered
We’ve pulled together the top queries people have about uploading their Live Photos to Instagram to kick things off.
The short and simple answer is yes. We’re going to dig into this in more detail later on, so stay tuned for a down and dirty guide.
Again, the short and simple answer is yes. Instagram released its extremely popular “Boomerang” feature back in 2015 which is how to turn your Live Photos into GIFs. We’ll show you how in a moment.
This is trickier than turning your Live Photo into a GIF, but you can use an app like Lively to do this. Simply convert your picture into a video via the in-app features and then upload to Instagram as normal.
Absolutely, 100% yes! This is one of the best ways to get your Live Photo onto Instagram, so we’ll run through how you can do that.
Ready to dive in?
How to Post a Live Photo as an Instagram Story
The easiest way to get your Live Photos onto Insta is via the Stories feature – they were practically made for behind-the-scenes snapshots.
Caveat: you have to upload Live Photos that have been shot within the last 24 hours for this to work. If you want to share a photo that was taken before that, we’ll show you some other options later on.
Here’s how to upload a Live Photo as an Instagram Story:
If you’re looking to post a Live Photo on your feed rather than on a Story that will disappear 24 hours later, listen up.
3 Ways to Post a Live Photo in Your Instagram Feed
Bear in mind that Live Photos are only 1.5 seconds long and videos on Instagram need to be at least 3 seconds long.
So, how do you get past this?
The most popular way to do this is by turning your Live Photo into a Boomerang in the Story feature and then saving it to share as a normal Insta post.
This is a great way to jazz up your Live Photos, as it reverses your pic as well for a dose of extra fun.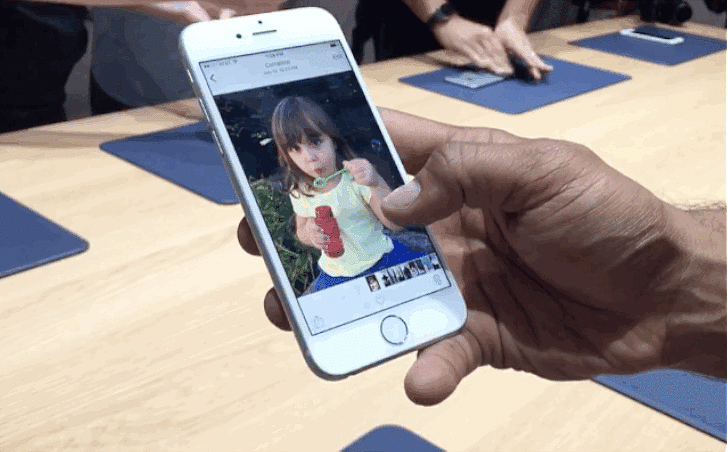
The fun doesn’t end there! If you really want to bring your Live Photo game to a whole new level, you can use Instasize to add creative elements to your saved Boomerang.
First, add a border to match your Live Photo. You can choose from Instasize’s vast collection of border patterns that range from DIY, film, minimalist, tropical, and cosmic designs. Next, add your own text! There are plenty of typefaces to choose from so you can match the font with the mood of your borders.
Then you can choose to add a filter and correct other photo elements like Exposure, Shadows, Highlights, Sharpness, and more. Instasize even recommends up to 6 filters based on your image’s colors and lighting. If you’re uploading a Live Selfie, make sure to use the Beauty Tools to retouch dark spots or acne before posting.
Instasize is your secret weapon to creating extraordinary Live Photos that’ll make your friends think you’re a creative genius! Get Instasize on the iOS App Store for free or subscribe to Premium for only $4. 99 monthly.
If you’d rather work outside of the Insta app while you prep your Live Photo, you can do so directly through the Photos app on your phone and then upload the result straight to Instagram.
Looping and bouncing Live Photos makes them run at longer than 3 seconds so they easily pass the Instagram guidelines. Here’s how to do that:
 Convert Live Photos into GIFs
So we’ve Boomerang-ed, we’ve Looped, and we’ve Bounced – what’s next?!
If none of the above options tickle your fancy, you can always run your Live Photo through an app to turn it into a GIF.
GIFs are mega-popular on Instagram at the moment – so much so, that GIPHY has now teamed up with Instagram to provide thousands of pre-made GIFs for Insta Stories.
You can use an app like Motion Stills, Lively, or Alive to quickly turn your photos into GIFs and then post them on Instagram in the usual way.
Liven Up Your Insta Feed With Live Photos
Gone are the days of pristine Instagram feeds that show the near-on impossible.
Now, we’re all about authenticity and sharing the “human” moments of our lives and brands.
This is why Live Photos are a great medium for Insta, whether you’re sharing them via your Story or in your general feed. Though it’s not yet possible to upload a Live Photo straight to Instagram, there are plenty of workarounds that we’ve highlighted here.
While Boomerangs, Bounces, and Loops all sound like crazy circus tricks, they’re actually all here to help you jazz up your Instagram feed and make a deeper connection with your followers.
Building relationships with your followers will help grow your account, boost engagement, and generally make your Insta platform a thriving community of fun and frolics.
Do you share Live Photos with your Instagram audience? Post a link if you have. I’d love to check it out!
Capturing Live Photos on the iPhone is fun and exciting, but when it comes to posting them to Instagram or Facebook, the whole live aspect disappears. Of course, if you took a moving rather than a static picture, then you want to publish it in the same form. Below we will tell you how to do it.
| Apple in Telegram and YouTube. |
♥ RELATED: A fun trick with panoramic mode on the iPhone.
If you have an iPhone 6s or later, you can take Live Photos directly from the Camera app. Live Photos in iOS is a cross between a static photo and a dynamic video, creating a "moving" image. This allows viewers to expand their perception of your images.
Instagram is one of the worst major platforms when it comes to live photo support. But now, thanks to updates and clever non-standard methods, it is possible to add this feature to your profile. nine0003
Here's how to post Live Photo on your Instagram.
♥ BY TOPIC: How to hide unnecessary application pages from the home screen on iPhone and iPad.
1. Open the Photos application, go to the Albums tab and select the Photo Live Photos section.
0020 , press the button Select in the upper right corner. Select multiple Live Photos and click the three dots button in the lower right corner . In the menu that appears, select item "Save as video" .
If you need to publish only one Live Photos on Instagram (post, story or rils), then select it, click the button with three dots in the upper right corner . In the menu that appears, select item "Save as Video" .
Note: you need to use "clean" Live Photos without applying effects (Loop, Pendulum, etc.).
3. The Photos application will create a video from the selected Live Photos .
4. Open the Instagram app. Click the plus sign on the top menu of the application. In the window that appears, select the format of the content to be created: Video Reels , Publication or History .
5. Select the resulting Live Photos video you created earlier.
Add Video to the RILS:
Add Video to Storis:
6. Follow the screen instructions to add effects, signatures, information on the location, note people, note, note people exchange through social networks, etc.
7. Share the created video from Live Photos to Instagram. nine0003
♥ RELATED: How to listen to YouTube music in the background on a locked iPhone or iPad.
See also:
Please rate article
Average rating / 5. Number of ratings:
No ratings yet. Rate first.
Capturing Live Photos on iPhone is fun and exciting, but when it comes to posting them to Instagram or Facebook, it’s all “ the living aspect disappears. Of course, if you took a moving rather than a static picture, then you want to publish it in the same form. Below we will tell you how to do it. nine0003
If you have an iPhone 6s or later, you can take Live Photos directly from the Camera app. Live Photos in iOS is a cross between a static photo and a dynamic video, creating a "moving" image. This allows viewers to expand their perception of your images.
Instagram is one of the worst major platforms when it comes to live photo support. But now, thanks to updates and clever non-standard methods, it is possible to add this feature to your profile. nine0003
Here's how to post a Live Photo on your Instagram.
1. Open the Photos app, go to the Albums tab, select the Live Photos section, and click the Select button in the upper right corner.
2. Select one or more Live Photos and click the Share button in the lower left corner. Select "Save as Video" from the menu that appears.
Note: you need to use "clean" Live Photos without applying effects (Loop, Pendulum, etc.).
3. The Photos app will create a video from the selected Live Photos(s).
4. Open the Instagram app. Click the plus sign in the app's bottom menu. Select the resulting Live Photos video you created earlier.
5. Click "Next" in the upper right corner. Add a caption to your video. You can also add location information here, tag people, share via social media, and more. nine0003
6. Click Share.
1. Open Instagram and tap the camera icon in the top left corner of the screen to open the Stories section.
2. On the history screen, scroll down your bottom menu to Boomerang. This option is also represented as an infinity icon in the pop-up menu on the left.
3. Click the box in the lower left corner to select the video created from Live Photos in the previous instruction
or record a new looped video by touching the white circle in the bottom menu.
4. Add text or edit your live photo as you see fit.
5. Press the oblong white Recipients button in the lower right corner.
6. Choose where you want to send your Live Photo. This could be your Story, Close Friends, or someone you follow. Here you can add information about your location or share a picture through social networks. nine0003
7. You can click Cancel to stop this action, or click the blue Done link at the bottom of the screen.
Posting live photos to Instagram or Facebook is easy. In order to see a moving picture published on a social network, it is not at all necessary to have an iPhone, since it will no longer be a photo, but a video.
There are several ways to post Live Photos to Instagram without losing any of the liveliness, but we'll look at one of them using Google's Motion Stills app. With Motion Stills, you can edit Live Photos and convert them into videos and GIFs. In addition, the application is equipped with a wonderful image stabilization feature. nine0003
1. Take a Live Photo and save it to Photos.
2. Download Motion Stills by Google from the App Store on your iPhone.
3. Open the app and select the photo you want to post and edit it if necessary.
4. Press the arrow.
5. Select the Share option from the pop-up menu. nine0003
6. Tap Save Video to save your Live Photos to the Photos app, or tap Instagram if you want to post the photo to social media right away.
7. Open Instagram or Facebook and publish a post and click on "OK".
That's all you need to do to get "live" photos to appear on Instagram and/or Facebook.
 Subscribe! nine0010