Last Updated | September 12, 2022
Table of Contents
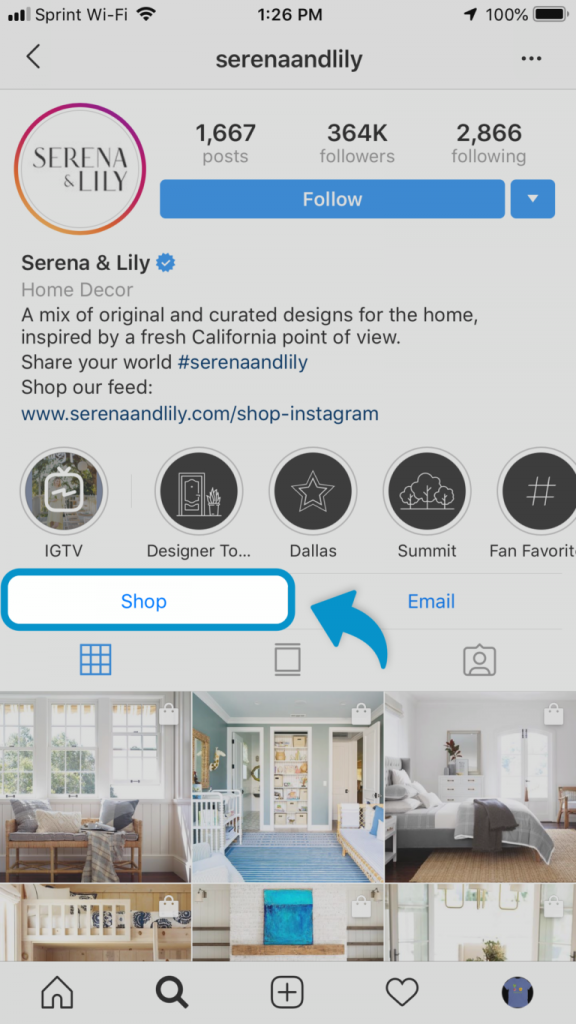
Instagram accounts in the US can now add new shopping tags to their Instagram posts from brands. Some people have seen the infamous “cannot add tag” message and some are first-timers finding it hard to set it up. Here is a step-by-step guide on how to tag products on Instagram Shopify.
During the creation of the post, you can add up to 20 products per post. You can easily tag your products in new posts and existing ones on your Instagram account. If you are having thoughts such as is shopify good for small businesses? The answer is yes, it is one of the best platforms for small businesses.
If you already use a third-party platform for managing your inventory for the shop and the business, you can also directly tag products from your third-party platform. You can add up to five products within a video or your photo feed post and tag up to 20 products in your carousel posts. On each photo or video, you can add up to 5 product tags on each video or photo.
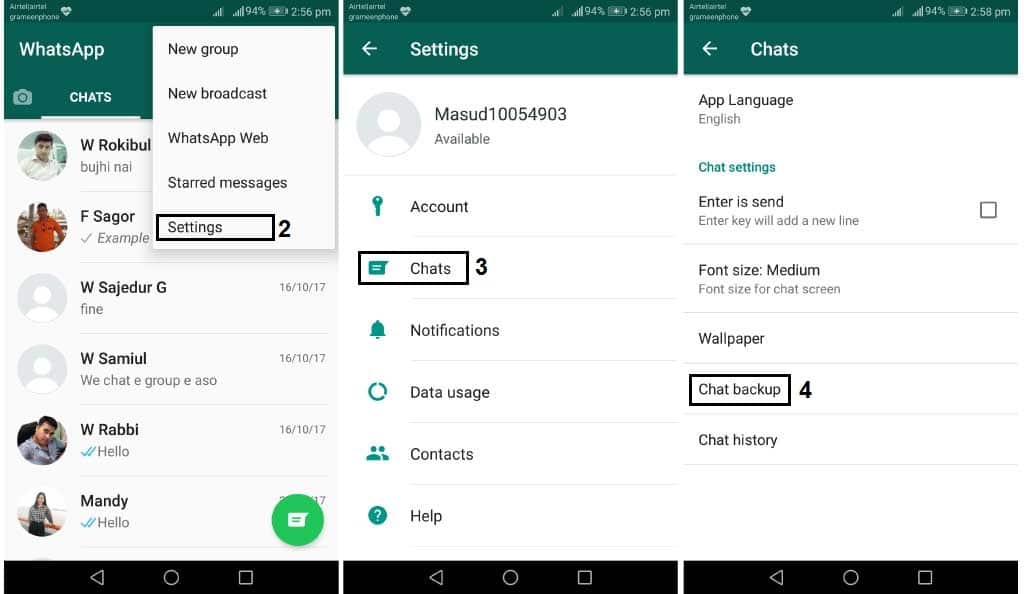
If you want to enable Instagram product tagging, you require some prerequisites. For instance, product tagging will only work if your Instagram account has already been approved for Shopping on Instagram. All Shopify store owners must also meet several requirements so that they are eligible for shopping on Instagram. If you can’t tag products on Instagram Shopify, and want to understand how to tag products to shop on Instagram? Don’t worry. This is a step-by-step breakdown of the process with the prerequisites to help you understand how to tag products on the Instagram shop.
Make sure that you comply with all the Instagram and Facebook commerce policies alongside the merchant agreements.
Your business must run in a location that lies in the supported market options. Or else you will not be able to operate as a merchant on Instagram.
You must purchase a Shopify plan or a higher one to be able to operate on Shopify.
You must make sure that you only sell physical products. As of 2022, Instagram product tagging is only available for businesses that sell physical goods. Digital products and services are not accepted as of yet.
It is a must that you have the most recent version of the Instagram application. This application must be the most recent one available in your country. Otherwise, you will not be able to enable the Instagram business settings later on.
To convert your personal Instagram application into an Instagram business profile. If you are finding it difficult to keep up with the steps due to any reason, you should hire Shopify Development Partners so they manage your business while you focus on expanding it. You can follow these steps.
Once your Instagram business profile is set up, you will then be able to use Instagram business features and have access to Instagram Insights.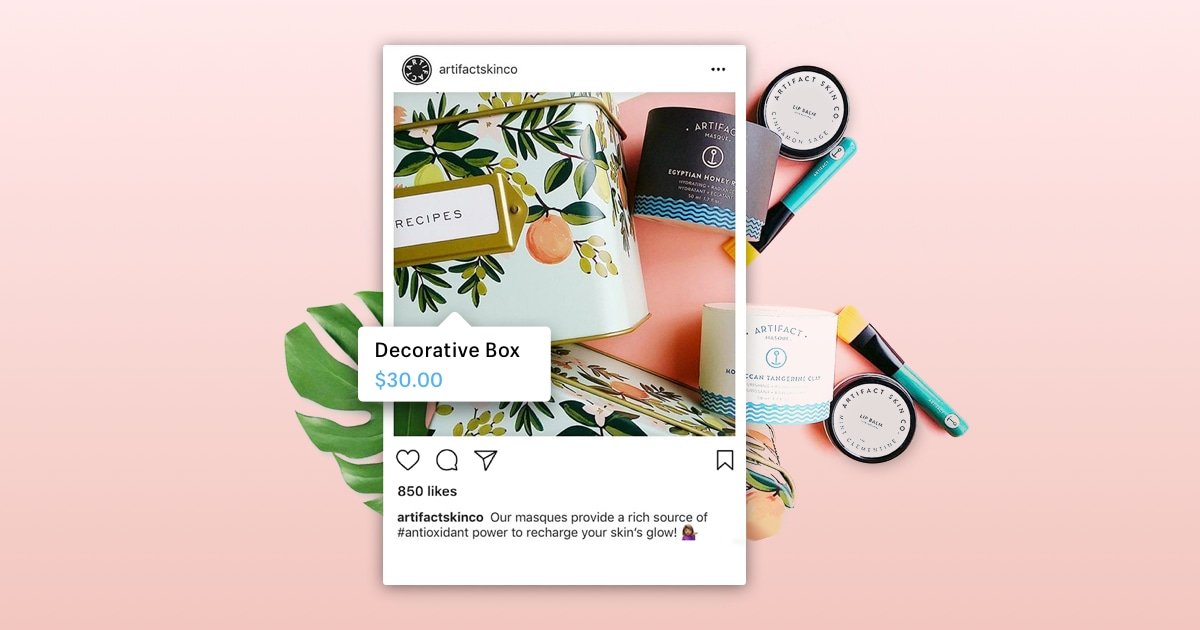 These insights are essential for business as they include impressions, likes, outbound links, reach and so much more. You could also migrate the data from another store if you want using Folio3 Shopify migration services.
Since Facebook and Instagram are now owned by Meta, you can easily integrate your Instagram business page into your Facebook business page. If you want to ensure perfect integration, you shoul hire Folio3 Shopify integration services to ensure correctness.
You can connect your Instagram business profile to only one Facebook page as of yet. Here are some most prerequisites that your Facebook page must match.
 Instagram does not support such restrictions for its application.
In general, Facebook provides two check-out options for businesses. The ‘Check out on another website’ button and the other is the ‘message to buy’ button. As of yet, Instagram does not support the ‘Message to buy’ button checkout method. Thus, your Facebook Shop must offer the ‘Check out on another website’ checkout option to the users.
If you already have created a Facebook Shop with a ‘Message to Buy’ checkout option, you must first delete the shop section. Then you must recreate it and select the ‘Check out on another website’ checkout method. If you want to provide the website option, it is best to hire Folio3 Shopify development services to make a store that attracts visitors. Since Folio3 Shopify Theme Development Company can also provide Folio3 Shopify Theme Customization for stores, it is a great option to hire Folio3 services.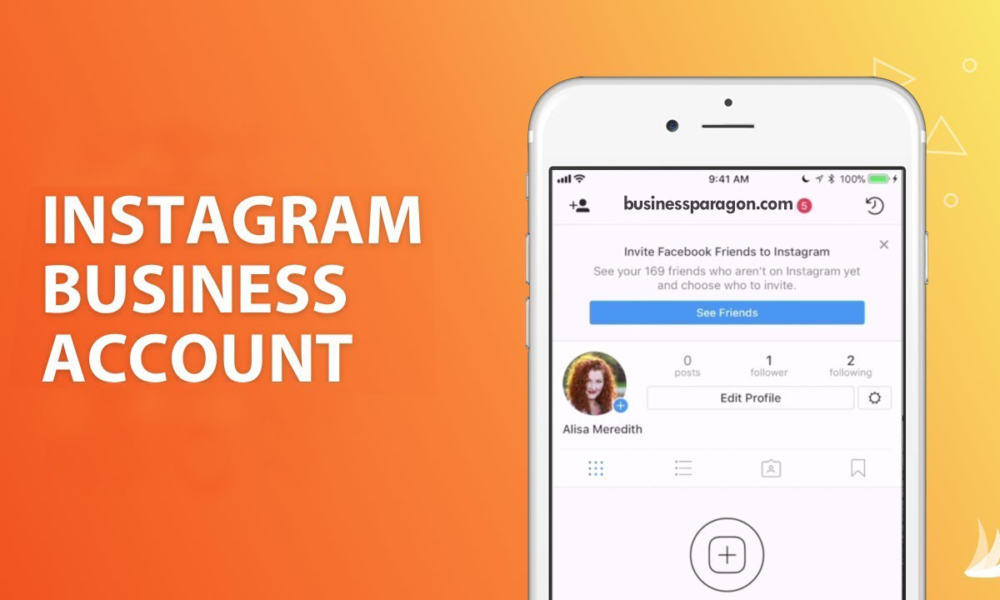
The source for this step will be the Shopify page. Your Facebook page must be the owner of your Facebook catalog. If you connect the Shopify store to a Facebook Sales Channel, a new Facebook catalog will be created automatically. However, Shopify will be the owner of that page and not you. If this is the case, you should then delete your Facebook catalog. Then create a new one and then assign your Facebook page as the administrator. Here is how you can create an empty Facebook catalog:
Now your catalog has been created. You can now add your images and information about the product to it. You will have 2 options to do this using the data feed or adding them manually. You can choose either option.
If you use the data feeds, you will have to upload the data feed that holds the product information. You can control which products will be added to the Facebook catalog and when they appear. You can then upload your data feed as per schedule for automatic uploads or upload the data feed once. It is best to upload the feed once if your inventory does not change very often. However, if you have regular changes in your inventory, then it is best to use automatic uploads. You can use the data feeds as it is a viable option if your Shopify product catalog will contain more than 50 products or if you choose to run dynamic Facebook advertisements.
You can add the products manually as well. This is a very viable option but only if your product catalog contains less than 50 options, or if you are just getting started with Facebook catalog options.![]() The solution will export products from your Shopify store and then imports them into your Facebook catalog.
The solution will export products from your Shopify store and then imports them into your Facebook catalog.
However, also note that if the schema of the Shopify export file is different from the one that is required by Facebook, you will need to make the conversion changes. You can Hire Shopify Developer from Folio3 so that they can support this custom Shopify development process for you. Once you have added the products to your Facebook catalog, it is necessary to make sure that these are properly associated with your Instagram business account via your Facebook page. To do so, you can follow these steps:
Once you have properly completed steps 1 to 8 without any errors or problems, Instagram will review your business account. They do so to check whether you are eligible for Instagram shopping. The approval process will only take a couple of days. But, there are a lot of retailers who complain that they have been waiting for months to no avail. Another confusion retailers face is that Instagram does not send any notifications during this process. Thus, if you have not received any notifications from them, it is advised that your contact Facebook and Instagram for support.
If you followed steps 1 to 8 properly, your account should be approved by Instagram for Shopping. You will then receive a notification on your Instagram business profile. Once you receive that notification, you can proceed to step 9.
To enable the business settings for shopping on Instagram, you can follow these mentioned steps.
Now you have finally met all the prerequisites that are needed to tag products on Instagram. Now you can follow these steps to understand how to tag products on Instagram Shopify.
The product tags will only contain the basic data of a product. This includes the product name and the product price. Once someone taps on the product tag on your post, they will be redirected to a much more detailed Instagram product page that will contain a product photo, a ‘view on website button’, and a product description. Once a customer clicks on the button, they will be redirected to the Shopify product page where they can easily check out the product.
Product tagging works best for clothing stores. It is one of the most profitable niches, to begin with, and utilizes product tagging very well. So if you are wondering How to Start a Clothing Business by Buying Wholesale online on Shopify Store? You can read it on the link and have a go at it. We do advise having a Shopify Development Partner on your side to help set up the business.
There can be a multitude of reasons which is prohibiting you to tag products on Instagram Shopify. You must be approved for setting up Instagram shopping. If you are 18 years or older with a qualified product, for sale on Instagram, you can tag products. You will be able to do so if you have an active account over the past 30 days and has no more than 2 policy violations. You can learn how to tag products on Instagram Shopify above or hire Folio3 Shopify Development Partners to help you out.
There may be several reasons that product tagging is not working for your Shopify account. These range from disqualification from Instagram, inactive accounts, policy violations on your Instagram page, or the most common one, which is incorrect integration on Shopify and Instagram. To make sure that there is no lacking in the setup process, it is best to hire Folio3 Shopify web design solutions that can ensure your new store looks the best and also has no integration issues.
If you’re a brand on Instagram, you know the little thrill of getting tagged in a post. Whether tagged by a long-standing influencer partner or a new fan, that @ symbol represents your social media marketing strategy taking form and new eyeballs engaging with your work.
Well, that simple tag is about to get a powerful upgrade: Tags can now link directly to product pages integrated into the shopping tab. This feature was previously limited to Business and Creator accounts but is rolling out to all US users by this summer.
Thanks to this change, it will be possible for more of your fans to shout out their love for specific products—and drive sales in the process. Not only is this a big deal for brands that want to spread the word about their goods, it also allows fans to make more direct connections with the standout items they love.
It’s no surprise that Instagram chose to highlight a makeup brand—Kulfi Beauty—for the announcement, given that beauty brands rely on Instagram as the perfect place to highlight everything from swatches to packaging to amazing full-face looks. Just ask Leslie Valdivia, co-founder of Vive Cosmetics.
“Our customers and community reviews and feedback is what really drives sales, so their posts and recommendations go a long way,” she says. “Being able to now tag products, not just brands, will hopefully make it easier for others to discover the products their friends and family are recommending online.”
Instagram couldn’t say when the feature will roll out to more markets. However, just having US users able to link to products could still have a huge impact for brands on the platform, especially in how they work with influencers.
“From an influencer perspective, working with brands directly, it’s really exciting to be able to link to a product directly within the app—it means the call to action is that much more direct,” says Ashley Buchanan, Senior Director of Product at influencer marketing agency Obviously.
In the case of Vive Cosmetics, that means a fan or influencer could post a photo wearing its bestselling Qué Matte Liquid Lipstick in Amor Eterno and tag the product. Then, someone who sees the post only needs to click the tag to be taken to a link to purchase it.
View this post on Instagram
A post shared by Vive Cosmetics® (@vivecosmetics)
Instagram influencers are already a great marketing tool because they’re able to highlight products in a real-world context—like a beauty product being applied or clothing being worn. Being able to link directly to the product lets customers find—and purchase—those products that much faster. Ashley says it’s a win for influencers, too, because it keeps their own fans on the platform rather than sending them away from the app to hunt down the product.
As an added benefit, Ashley says, the move will enable more people, even with small accounts or niche audiences, to behave as influencers or micro -influencers and direct their networks to products.
The tags also open up opportunities for influencers to be tied to not just the brand, but a specific product that fits their niche. Instead of being a social ambassador for an organic skin care brand, an influencer may be an ambassador for its rosewater face mist, because that’s what’s most applicable to their target audience.
“Being able to open up the concept of ‘everyone is an influencer’ just means infinite opportunity,” Ashley says.
The other exciting prospect is that Instagram is simultaneously testing an affiliate sales program that works with product linking. When this is rolled out more widely, participants could earn a kickback if customers shop through their product tags. That’s a game changer for affiliate marketing and a great incentive for influencers to work with brands.
I think this feature with Instagram will allow more customers to be rewarded to talk about brands and products they love.
“I think that’s huge. Being able to monetize linking products means you don’t need to be part of a formalized program to make money,” Ashley says. “Outside of the campaign context it means that influencers can be recommending products they like, and going out of their way to find brands their audience will like.”
Leslie is also eyeing the affiliate possibilities, as Vive Cosmetics currently has an existing affiliate program.
“I think this feature with Instagram will allow more customers to be rewarded to talk about brands and products they love,” Leslie says.
This is all coming at a great time, given recent news that regular hashtags don’t actually have an impact on reach. Product tagging could have the impact that hashtags don’t.
It’s worth noting that your followers probably aren’t aware of these changes. If you already work with influencers that don’t already have Creator accounts, it’s worth reaching out to encourage product tagging, or to adjust future contracts accordingly. And make sure to let your fans know they now have a very direct way to support the products they love.
📚Resources
Elena
Sergeeva Targeted advertising specialistAccording to Facebook Ads, 70% of users learn about new products from Instagram. To help sellers promote them, Instagram created the Instagram Shopping tool, which became available in Russia in March 2021. We will tell you why to connect this tool and how to set it up.
Instagram Shopping is a tool that allows you to tag products in your posts and Stories. Instagram takes information about products from the catalog that the seller uploads.
The profile with the option enabled looks like this:
There is a bag icon on the photo, which means that if you open a post, goods will be marked in it. Source: COSSeveral items can be noted in the photo. When clicking on shopping tags, users will see the price and description of the product, and will also be able to follow the link and place an order on the site.
In addition to prices and the products themselves, the user also sees additional information about them: in the description, you can specify the composition of the fabric, size, available colors, etc. The user can also view the item from different angles in the gallery or learn about other products of the online store All this without leaving Instagram.
To get to the catalog with goods, you need to click on the "View store" button. Inside the store, products can be grouped into thematic collections, such as new arrivals or gifts.
US residents can pay for items within the app using Facebook Pay. In other countries, including Russia, this option is not yet available: users follow the link on the product to an external site and pay for the order there.
 You can keep up to date with the latest from your favorite brands.
  With Business Manager, you can manage your Facebook and Instagram accounts and pages, and assign people who can work with them.
 Log in to Commerce Manager, also found in your ad account.
The system prompts you to create a shop or catalog. The store is a single storefront for Instagram and Facebook, which is available to companies with physical goods. To promote products on Instagram, click Add Catalog. Choose the type of catalog depending on the subject of your business, e-commerce is suitable for online stores.
In the next step, you need to configure the parameters and method for loading products. From the drop-down list, select the advertising account to which the catalog will be linked.
You can create a catalog yourself - by uploading a spreadsheet or by connecting a pixel - or through integration with one of the partner platforms. In the second case, the goods will be loaded from an existing online store.
Click the "Create" button - the catalog is ready.
Important : the catalog must contain exact prices and information about the availability of each item. In addition, the rules for returning goods must also be indicated - on the store's website or in the Instagram account.
To proceed with product creation, select the desired catalog in Commerce Manager and then click Add Products.
Add products using one of the following methods:
If you choose to download manually, a form will open. In it you need to add the name of the product, its description, images, link to the site and price. The system will tell you which data is not required.
After completing the form and uploading, the products will appear in your catalog.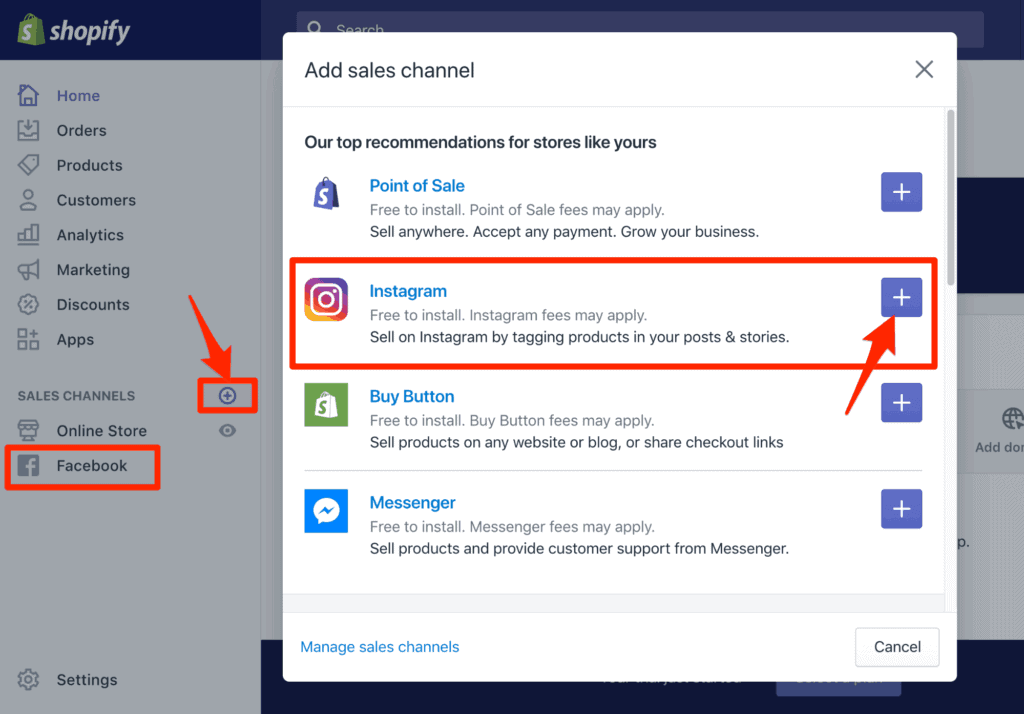
Inside the catalog, products can be grouped into collections: for example, by subject, season, upcoming holidays, etc. Collections help sellers to get to the user's interests more accurately, and users to quickly select goods.
You can create not only the standard collections, but also those that will attract more attention, such as "Top 10 coats" or "Gifts for best friends".
You can combine products into groups manually or using filters, for example, if there are a lot of products.
At the final stage, specify the name of the collection and click the "Create" button.
After creating a product catalog, you need to send an account for verification. The verification may take several days.
To add a catalog to Instagram, go to the "Settings" section in the application and select the "Company" tab.
Then click "Set up Instagram Shopping" and follow the prompts.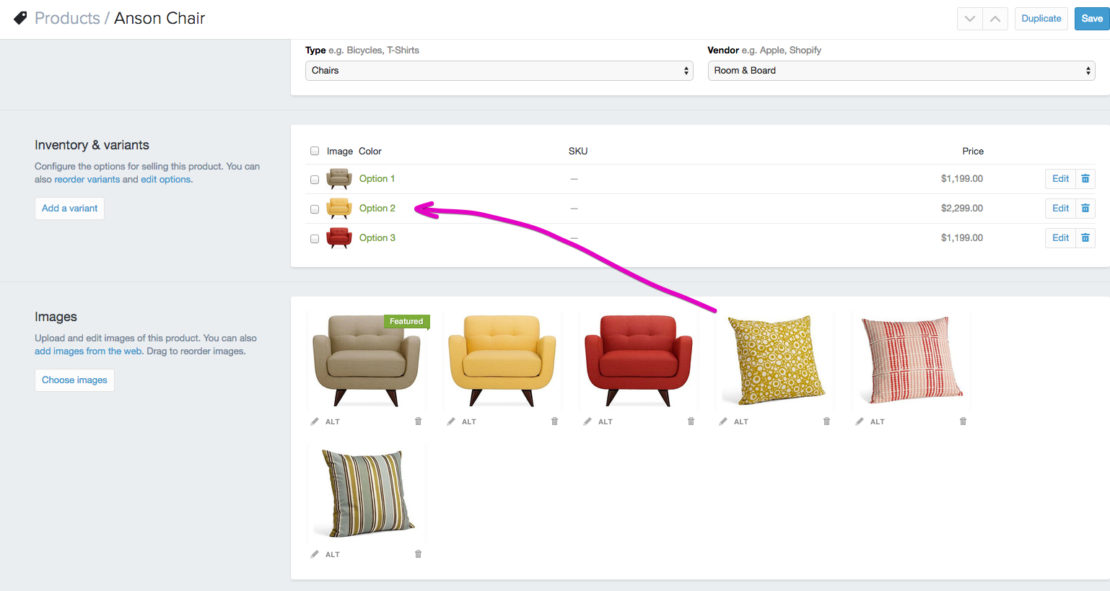
If the catalog passes the check, a "Purchases" section will appear in your Instagram account. Once your account is approved, turn on Instagram Shopping. To do this, in the "Purchases" section, select the product catalog that you want to connect, and click "Finish".
To tag an item in a post, start posting as usual - add a photo and post text, and then follow these steps:
You can also mark the product in Stories. To do this:
Up to 5 products can be tagged in one photo, up to 20 in total in the gallery. In Stories, a sticker is added to only one product, but you can change its color and text.
Instagram Shopping will increase sales and user engagement in your account. The product catalog can be used not only to familiarize subscribers with the assortment, but also to set up targeted advertising on Facebook and Instagram.
We especially recommend this tool for e-commerce: the user immediately sees the price and all information about the product. True, if a product or service involves preliminary communication with the client and a long transaction cycle, then the published price may scare the user away. Therefore, before using Instagram Shopping, consider whether the tool suits your product and the behavior of your target audience.
15+ systems in one service, tools to simplify the work with advertising, closing documents and support at every stage
Try eLama
Categories
Max Zakhozhiy
November 21 | 2018
Max Zakhozhiy
November 21 | 2018
Recently, Instagram quite often excites the e-commerce market with innovations on its platform. First, Shoppable Posts appeared, in which you can tag a product and the user goes to the site simply by clicking on the link on the product. Every month 90 million Instagram users open posts with a shopping feature.
More recently, the ability to tag products in stories and, in fact, a full-fledged search for products on the platform has opened up.
Instagram is becoming more and more like a marketplace with socialization features.
Only lazy people have not tried to set up Shoppable Posts since their appearance. But only since the beginning of September, the function has become "available" in Ukraine and now, if desired, everyone can set them up. Now we will tell you step by step how this can be done.
1. You must have a business profile on Instagram. If not, then it's time to switch to it. It is very simple to do this: go to the menu and click "switch to business account":
.
2. Now you need to link your Facebook page to your Instagram account. Instagram will prompt you to choose a link page when you switch to a business account. If this does not happen, then you need to go to the store page on Facebook, go to the settings section and select an Instagram account in the right menu. Here you need to enter your username and password. After that the pages will be linked:
3. You must have the latest version of Instagram for iOS or Android installed.
4. You must sell physical goods (not services).
5. Your Instagram account must be linked to the product catalog on the Facebook page. You can create a catalog by going to the Facebook Business Manager menu and selecting the Catalog section:
6. Your Facebook page must use the Shop theme. You can enable it in the page settings on the templates tab:
7. On the Facebook page, the "Shop" menu button with loaded products should be active. When you create a store, Facebook automatically sets you USD as the currency. To solve this, you need to delete the store and re-create it with UAH as the currency. Also, in the checkout option, you need to put the option “purchases occur on the site”. Posts won't work with the Shoppable posts option:
8. Items must be current at the time of posting. The easiest way to keep posts up to date is to upload products to the catalog using the link. You can select this option in the catalog settings:
If you did everything correctly, then after a while a notification will appear on your Instagram profile with a suggestion to connect Shoppable posts.
We accept the offer and now we can tag products in our posts.
Good news: you can tag products not only on new posts, but also on old ones. To do this, select "edit" the post and tie the product:
Bad news: you can't tag a product and a user on the same post at the same time, just one thing.
If your account still doesn't get a notification with a suggestion to try Shoppable posts, then proceed as follows: