Bestusefultips Leave a comment
Last Updated on April 28, 2020 by Bestusefultips
Stop Instagram from auto-updating 2020? Here’s how to enable or disable auto update Instagram app on the latest android phone or tablet. All smartphones get regular updates after some time, so new features automatically update if turn on auto-update apps on your android phone. You can set different settings for Instagram app updates including auto-update app over Wi-Fi only, get a notification when available updates on your latest android and Samsung Galaxy devices. Also, get a notification when we have updated the app on an android device.
It’s simple to turn off the auto-update Instagram app on your android device. Instagram is one of the most used social networking apps to upload photos, videos, and share with your friends or family member. Also, Hide your story, hide inappropriate comments, photo upload quality, and more from your Instagram account. But in this tutorial, I will show you step by step guide to enable or disable the auto-update Instagram app on your android phone.
Read Also:
Check out below given methods in your latest Android or Samsung Galaxy devices.
Stop Instagram From Automatically Updating 2020 on Latest Android devices: Android 10 &9 PieStep 1: Go to Settings.
Step 2: Tap on Apps & notifications.
Step 3: Tap on See all apps.
Step 4: Find Instagram and tap on it.
Step 5: Tap on Advanced.
Step 6: Tap on App details.
Step 7: Tap on Three vertical dots.
Step 8: Un-check the box “Enable auto-update“.
Alternative Way:Open Play Store > Three horizontal lines (More) at the upper left corner > My apps & games > Installed tab > Instagram > Three vertical dots at top right corner > Uncheck the box Enable auto-update
Relevant:
Also, check the below-given settings for the older Instagram version.
Step 1: Open the “Instagram app” on your android phone.
Step 2: Tap on the “Profile” icon from below the right side corner.
Step 3: Tap on “Three vertical dots” from the top right side corner.
Step 4: Scroll down until settings and tap on “App updates”.
You can see the above screen on your device. By default Toggle on auto-update Instagram app on your android phone.
Step 5: Turn off the toggle button of “auto-update Instagram”.
You can see this message: These give you new features right away. Do you still want to turn them off?
Step 6: Click on “Turn off” want to disable Instagram auto-update apps.
Did you find the above process to disable the auto-update Instagram app helpful? If you are facing any problems then just let us know on the below comment box, would be a pleasure to help you. Feel free to share this Instagram trick with your friends!
I'm Arpit Patel, techno lover from India. Bestusefultips is a technology website focused on latest Android news, tricks & tips related android devices, tutorials and videos.
Previous How to Fix Android.Process.Media Has Stopped Error
Next How to Set Up Fingerprint Lock For WhatsApp on Android
Social Networks
0 4.386 3 minutes of reading
These days apps are constantly changing, developers are improving and including new features all the time, but what if you want to turn off automatic Instagram updates?
The fact of deactivating automatic updates of an App is not not just an Instagram question. This happens, for example, when you want to turn off automatic updates for Google Chrome.
One of the peculiarities of applications mobiles is the capability or adjustment that allows, when a new version or enhancement is released, that it is automatically updated. Without asking.
Change is necessary, but at times or in certain circumstances, the fact that it is carried out without our consent can be a problem.
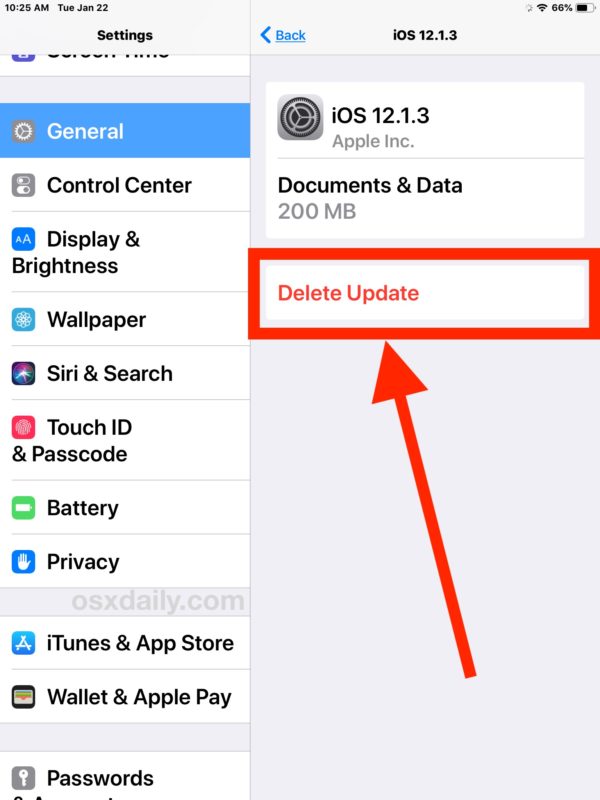
If so, below we bring the step by step to turn off automatic Instagram updates from mobile, both for Android devices and those with an iOS operating system .
The parameter that allows the bets à automatic day in iOS, the operating system for Apple computers, was implemented a few years ago and was very well received at the time.
But, nowadays, it is normal to want to prevent one of our Apple devices from automatically updating the applications, in order to check the changes it requests and accept them already well aware, even to save the mobile data. .
To achieve this, you must start by locating the section » Parameters “, Which is the classic panel for the configurations of this operating system.
Then we drag the screen view until we get or show an option called " iTunes Store and App Store “, By pressing it, we access it.
Therefore, it will display the customization options or preferences that apply to the store that contains all the applications offered by Apple, the App Store.
Now this screen has a section called " Automatic downloads “, Which shows a series of options to activate or deactivate.
The one that interests us will be obvious, since it is established as " Updates “, And has a sliding button on its right.
The latter must be placed or moved to the left side, as well as present a gray color, i.e. indicating that it is disabled.
In this way, automatic updates , including the updates Instagram , will have been disabled . And all subsequent updates must be done manually or individually.
When your own portable device is equipped with Android operating system, the procedure for removing or limiting instinctive updates is different.
First of all, and like in iOS, to disable Instagram's automatic updates , you really need to block all updates by default. The best thing about all of this is that the process is quite straightforward and completely reversible. So only the steps need to be followed.
First, the app store or Play Store must be running and have the connexion appropriate . Inside of it, the main menu button is located at the top left, which is identified by three horizontal lines parallel to each other.
The next step is to select the eighth option, the section « Parameters », Distinguished by a toothed wheel or a gear to its left.
In this way, the selected section will open, and in this there is an option called " Automatically update apps “, You have to click on it.
The result will be a pop-up window with three selectable options, in this case the last one will be chosen, which consists of " Don't update apps automatically «.
By pressing " Completed », The marked configuration will be saved, and from now on, updates to applications such as Instagram will need to be confirmed.
Keep in mind that automatic updates do not necessarily have to be completely disabled , because they are sometimes necessary and useful for the forgetful.
Another thing that can be done, in both OS, is to adjust the preferences so that they are performed ” Only via Wifi ", Where " A tout moment «.
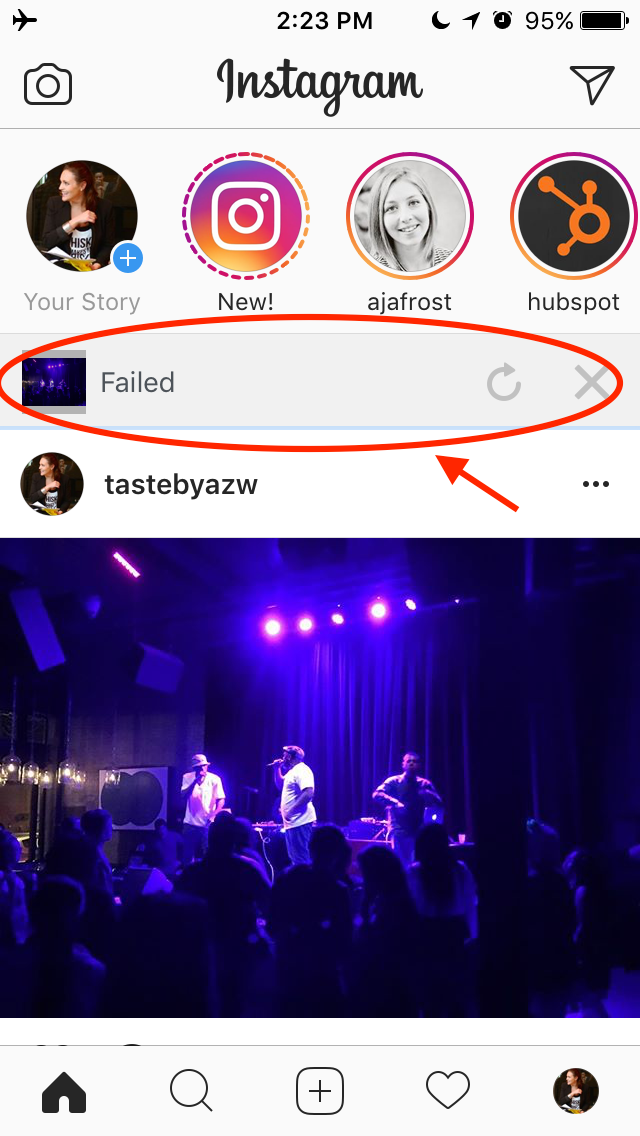
report this adInstagram is my most used social networking app, so I've noticed that the moment I open the app, my feed refreshes without even giving me a chance to view messages. I soon realized that it had to do with background app refresh on the iPhone.
This feature allows applications to continuously access the Internet and update their content, even when you are not using them. This ensures that you get the latest information whenever you open them.
But in the case of Instagram, this can be a bit counter-productive as you might miss some posts that you might want to check. Plus, it drains your iPhone's battery and uses cellular data, which you can save if you have a limited data plan.
In this article, I will show you how to stop Instagram auto-updating on your iPhone. While we're at it, we'll also look at other alternatives to saving data if you don't want to disable this feature.
Windows programs, mobile applications, games - EVERYTHING is FREE, in our closed telegram channel - Subscribe :)
 " However, this makes the apps less valuable as they don't provide you with the latest information.
 If you disable background refresh for Instagram or any other application, you will have to open it to go online and check for new information.
While this helps save battery and data, this can be inconvenient because background app refresh automatically handles many useful actions. For example, with background app refresh enabled:
Given these benefits, if you want to leave Background App Refresh enabled, you can still save battery and cellular data by using the options below.
There are two other iPhone settings you should be aware of related to background app refresh.
If conserving battery life is a priority, you can enable Low Power Mode to limit your iPhone's performance. This saves power and prolongs battery life.
It dims the screen, disables email sending, and completely disables background app refresh. This option is preferable to disabling Background App Refresh itself, because when you disable Low Power Mode, Background Refresh will be enabled again and your apps will run as normal.
Similarly, you can turn off low power mode at any time.
You can restrict the cellular access of certain applications, allowing others to work normally. For example, you can turn off cellular access for social networking and email apps, but allow news apps to work as normal.
Go to " Settings " -> " Cellular " and turn off the apps you don't want to use for data transfer.
You can turn on cellular at any time by following the same steps above and turning on apps.
Finally, you can leave background refresh enabled and turn off autoplay for Instagram videos instead, as they consume a lot of data in the background without you being aware of it.
Here's how:
This is also possible for other social media applications such as Facebook and Twitter. Let me know in the comments below if you'd like to see an article about it. Also, drop any questions you may have and I will do my best to help you.
Programs for Windows, mobile applications, games - EVERYTHING is FREE, in our closed telegram channel - Subscribe :)
Social networks
0 4.386 3 minutes to read
Apps are constantly changing these days, developers are constantly improving and adding new features, but what if you want to turn off Instagram's automatic updates?
The fact of disabling automatic app updates is not just an Instagram issue.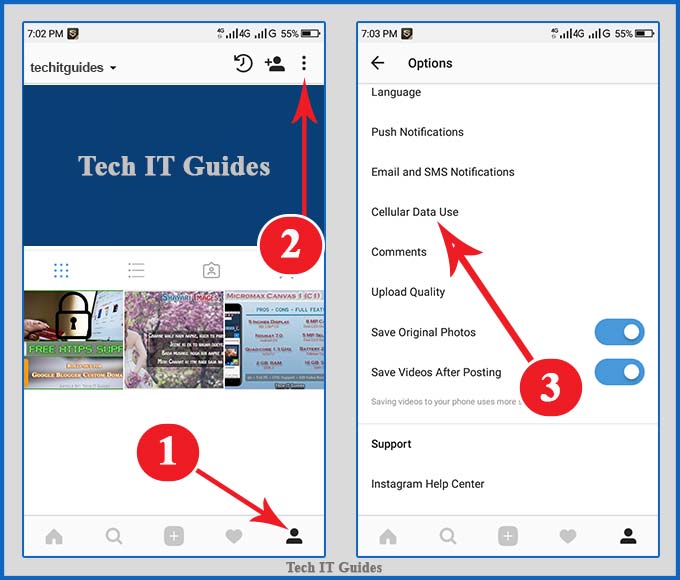 This happens, for example, when you want to disable automatic updates for Google Chrome.
One of the features of mobile apps is a feature or setting that allows you to automatically update it when a new version or extension is released. No questions.
Changes are necessary, but sometimes or under certain circumstances the fact that this is done without our consent can be a problem.
If so, here are the step-by-step instructions for disabling automatic Instagram updates from mobile devices for both Android and iOS devices.
The option to allow rates à automatic day in iOS, the operating system for Apple computers, was introduced a few years ago and was very well received at the time.
But currently it's okay to prevent one of our Apple devices from automatically updating apps to check for changes it asks for and accept them already aware, even to save mobile data.
To achieve this, you must start by searching for the section " Settings ", which is the classic panel for the configurations of this operating system.
Then we drag the screen view until we get or display an option called " iTunes Store and App Store ", By clicking on it we access it.
So it will display the settings or preferences, applicable to the store, which contains all applications offered by the Apple App Store.0003
This screen now has a section called “ Automatic Downloads ” which shows a series of options to activate or deactivate. , And there is a sliding button on the right
The latter should be placed or moved to the left side, and also be gray to indicate that it is disabled
In this way, automatic updates , including updates Instagram , will be disabled . And all subsequent updates must be done manually or individually.
When your own portable device is equipped with the Android operating system, the procedure for removing or restricting instinctive updates is different.
First of all, as in iOS, turn off Instagram automatic updates , you really need to block all updates by default. The best thing about all this is that the process is quite simple and completely reversible. So just follow the steps.
First, the app store or Play Store must be running and have connection corresponding . Inside it, at the top left, is the main menu button, which is indicated by three horizontal lines parallel to each other.
The next step is to select the eighth option, section " Parameters ”, Distinguished by a gear or pinion to the left of it.
This will open the selected section and it has an option called " Automatically update applications ", you have to click on it.