If you’ve ever scrambled to get regular content published to your brand’s Facebook Page, you’ve probably wondered if there’s a way to schedule Facebook posts ahead of time. Well, there is!
Managing a social media content calendar becomes far more efficient when you schedule Facebook posts. Scheduling in advance can help your brand post more consistently and stay on schedule. That way, you can avoid long gaps between posts with little effort.
There are two ways you can schedule posts on Facebook:
Why schedule Facebook posts?
How to schedule a post on Facebook using Facebook Business Suite
How to schedule a post on Facebook using Hootsuite
Hootsuite vs. Facebook Business Suite
5 tips for scheduling Facebook posts
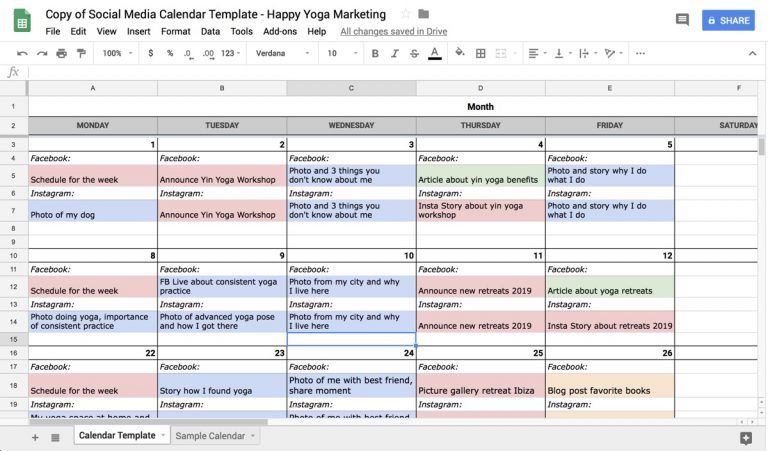
Bonus: Download our free, customizable social media calendar template to easily plan and schedule all your content in advance.
In a nutshell, scheduling Facebook posts can help your business:
First things first: You need to have a Facebook Page to schedule posts.
(Don’t have one? Find out how to create a Facebook business page in just a few steps.)
Once your Page is set up, follow this step-by-step guide to learn how to schedule future posts.
Step 1: Write your post
After opening Facebook to your timeline, click Pages in the top left corner of your dashboard to navigate to your business’s Facebook Page.
Then, navigate to Business Suite in the menu:
Now, click Create Post:
Need a little inspiration? We’ve got your back. Here are some tips on creating an engaging Facebook post.
Step 2: Preview the post
In the Placements section, select where you want your post to be published. You will be able to publish it to your Page and the connected Instagram account at the same time.
As you draft the post, you’ll be able to preview what it will look like on desktop and mobile. If anything looks off, make changes to optimize the post. This is the time to make sure those link previews are pulling correctly.
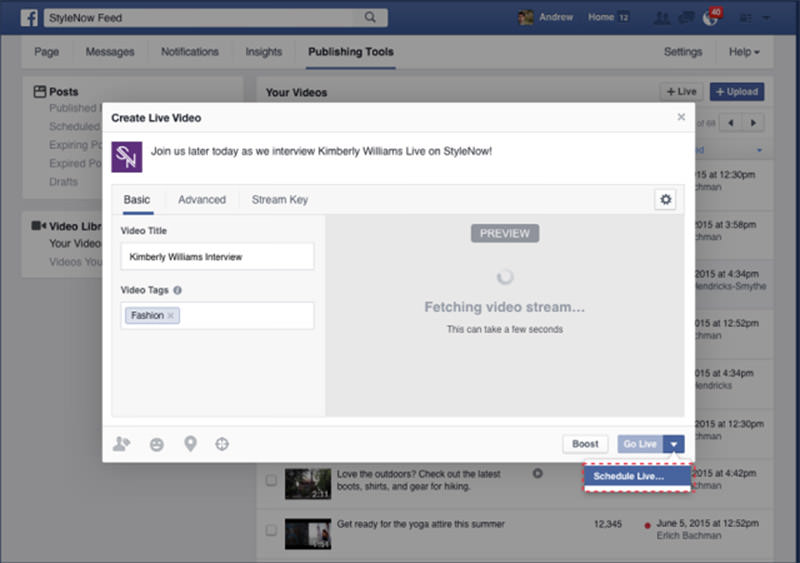
Step 3: Select a date and time
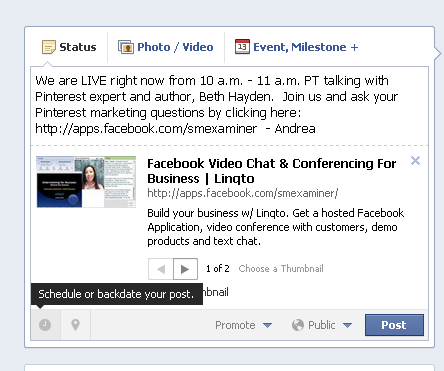
If you don’t want to publish your post right away, click on the arrow next to the Publish button at the bottom of the page.
Then, choose the day you want the post to be published, and the time it should go live.
Finally, click Save.
Step 4: Schedule your post
Click the blue Schedule Post button, and that’s it! Your post is now in the publishing queue. That means it’s ready to go live on the day and time you set.
How to edit scheduled Facebook posts in Business SuiteYou might want to edit, delete or reschedule the Facebook posts in your queue. Here’s where you can find the queue and edit it.
It’s that easy!
How to schedule a post on Facebook using HootsuiteOnce you’ve connected your Facebook Page to your Hootsuite account, this is how to schedule Facebook posts using the app.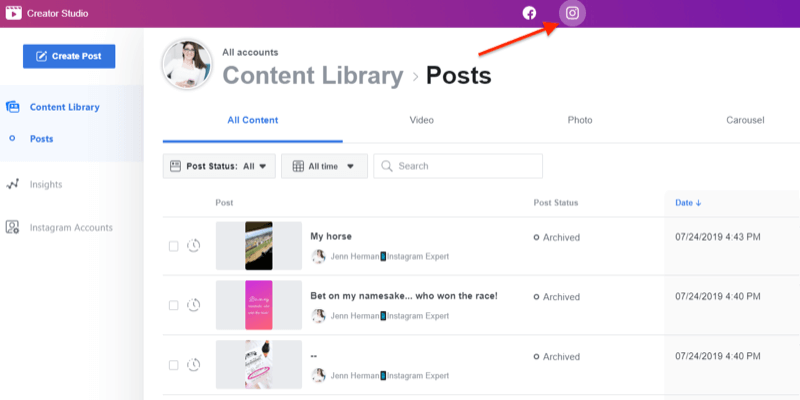
Step 1: Click Create Post
Navigate to the content creation icon in the menu on the left side of the dashboard. Then, click Post.
Step 2: Select the Facebook Page you want to publish to
Check the box next to the correct Facebook account.
Step 3: Create your post
Write the text, add and edit your image, and add a link.
Step 4: Schedule a publication time
Tap Schedule for later. This will bring up a calendar. Choose the date and time you want the Facebook post to be published.
Hootsuite’s Facebook scheduling app makes it easy to post at the best times to generate high engagement.
The Best Time to Publish looks at your past engagement data to suggest optimal times to post on every network, not just Facebook!
(If you’d like to learn more, check out how the Best Time to Publish feature works for Hootsuite’s own social channels. )
)
Step 5: Schedule your Facebook post
Click the Schedule button, and your post will be published at the exact time you set.
How to schedule multiple Facebook posts at once in HootsuiteHootsuite’s bulk schedule tool makes handling a busy posting schedule more efficient. The tool lets you schedule a maximum of 350 posts at once.
To schedule multiple Facebook posts, save your Facebook content as a CSV file.
Include these details for each post:
Note that you can’t add emojis, images or videos to bulk posts. But you can include those afterward by editing each individual scheduled post in Hootsuite.
After you upload your CSV file, the Bulk Composer asks you to review all the posts. Once you’ve made your edits and uploaded any additional media files, select Schedule.
Don’t forget that you can edit individual posts afterward in Hootsuite’s Publisher (in the Planner and Content tab).
Learn more about Hootsuite’s bulk scheduling tool here:
How to auto-schedule Facebook posts in HootsuiteWith Hootsuite’s AutoSchedule feature, you can avoid gaps in your social media calendar. The tool will automatically schedule your posts for publication at optimal, high-engagement times. Instead of manually testing different post times when scheduling your Facebook posts, let us do the math for you!
Bonus: Download our free, customizable social media calendar template to easily plan and schedule all your content in advance.
Get the template now!
Here’s how to use the auto-scheduling feature:
Step 1: Compose your post
Create your post as usual: write a caption, add and edit your image, and add a link.
Step 2: Click Schedule for later
This will bring up the scheduling calendar. Instead of manually selecting when your post should go live, navigate to the AutoSchedule option just above the calendar.
Step 3: Turn the AutoSchedule toggle to On
Then, click Done. You can sit back and relax — AutoSchedule is enabled!
How to view and edit scheduled Facebook posts in HootsuiteStep 1: Navigate to the Publisher
Head to the Publisher section of your dashboard (use the calendar icon in the left-hand side menu).
Step 2: Go to the Planner or Content tab
Both tabs will take you to your scheduled posts.
If you’re a visual person, Planner offers a handy way to get a sense of your upcoming content. It gives you a calendar view of your scheduled posts:
The Content tab shows you the same information but uses a list. Both views work for editing and rescheduling posts. The one you choose is up to your personal preference.
Step 3: Click on the post you want to edit
Here’s how this looks in the Content tab:
Step 4: Edit your scheduled post
At the bottom of the post, you have the option to either Edit or Delete your post.
To open your post and make edits, click Edit. Here, you can reschedule your post or edit its contents. Once you’re done, just click Save Edits.
The Delete button will erase the post from your content queue.
If you want to schedule and automatically post content to Facebook and Instagram, as well as TikTok, Twitter, LinkedIn, YouTube and Pinterest, Hootsuite is a great choice. It’s easy to use, and it comes with many useful collaboration features for teams. You can also use Hootsuite for social media analytics, social listening, and answering all of your comments and DMs from one place.
Here’s how Hootsuite compares to Facebook Business Suite:
Hootsuite’s Facebook scheduler also has a Best Time to Publish feature that gives you personalized recommendations for when you should post based on your account’s historical performance. Just choose the goals that matter most to you (building brand awareness, boosting engagement or increasing sales). Then, Hootsuite’s scheduler suggests post times that can help you boost visibility and performance.
With Hootsuite, you can also bulk-schedule up to 350 posts at once. Think of all the time this could save you!
5 tips for scheduling Facebook postsWhether you schedule Facebook posts on an app like Hootsuite or directly on the platform, you should follow these best practices:
1. Always stay on brand
When scheduling posts, the pressure to post immediately is off. So take the time to craft relevant content that will land with your audience.
Scheduling posts can also give you time to make sure your brand guidelines are followed when composing weeks or months worth of content. Make sure that your campaigns across Pages and even social networks are aligned with yours and your audience’s values.
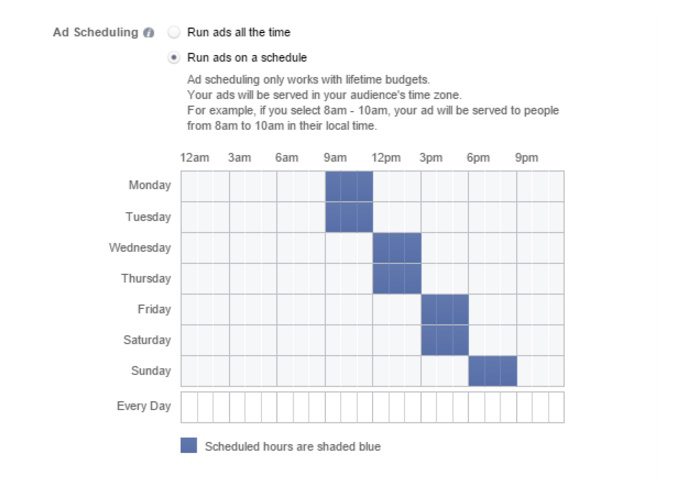
2. Carefully choose the publication date and timeAvoid posting when your audience isn’t online. Hootsuite’s Facebook scheduler comes with a Best Time to Publish feature that will help you schedule Facebook posts on days and at times when your audience is active on the platform.
The more people see your Facebook updates, the more opportunity there is to generate engagement, drive traffic and gain potential new followers.
3. Know when to pause your Facebook postsDon’t forget about the posts you’ve scheduled.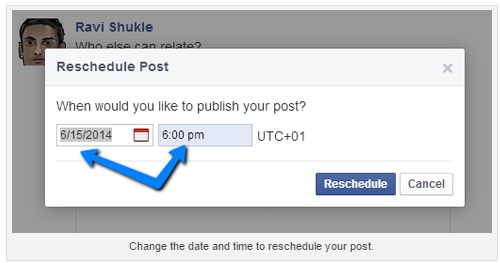 Sometimes current events can change the impact of posts you may have scheduled months ago. That means a post may become irrelevant or insensitive in ways you simply could not have predicted.
Regularly check in on your scheduled posts to track what’s coming up. That way, you can pause or delete scheduled posts before they’re published and avoid any potential backlash.
4. Remember that you can’t schedule everythingSome things you have to post about in real-time. And some types of posts cannot be scheduled at all. On Facebook, these include:
If you want to schedule Facebook messages, you may want to look into an automation tool. Facebook messenger bots use conversational AI to send messages that reach customers even if your support team is offline.
5. Track analytics and engagementA good posting schedule shouldn’t be based on guesswork. You’ll know what works best for your Facebook audience by monitoring your performance in a social media analytics tool.
Historical data will show you what posts perform well and where you could make improvements.
Use Hootsuite to schedule all of your social media posts, engage with your followers, and track the success of your efforts. Sign up today.
Get Started
Grow your Facebook presence faster with Hootsuite. Schedule all your social posts and track their performance in one dashboard.
Free 30-Day Trial
Imagine this.
*You’ve missed the timeslot for the weekly Facebook post. Now you’re running short on time. The coffee is getting cold. No time for a break. Have to post it on backdate.*
Sounds familiar? I’m sure all social media managers are familiar with this scenario where they are struggling to learn how to schedule a post on Facebook and are always trying to avoid it. Don’t worry; you certainly ain’t alone, and every digital marketer has thought to schedule Facebook posts at some point.
Sticking to a social media content calendar becomes tenfold easier when you start scheduling Facebook posts in advance. It helps you with consistency, staying on top of the schedule, and avoiding long timeline gaps with little to no effort!
Think of your Facebook page as your home page or your personal showroom. When someone comes to your home, you want to make them feel welcome and show off your personality. The same thing can be said when someone visits your Facebook page. It should be informative, interactive, and descriptive. You should never post at the same time every day. The best way to get your posts seen is to post them at different times during the day. You should also post on other days of the week, but not the same post on the same day. It’s best to have a weekly or monthly social media content calendar & then schedule Facebook posts according to it.
As a digital marketer, to stay on top of your Facebook page, I suggest the following:
Let’s see how to schedule a post on Facebook, the best practices, and the benefits of scheduling Facebook posts via Social Champ. But before diving into the process, here is what you need to know.
Facebook offers its native free tool Meta Business Suite which centralizes Facebook and Instagram in one place. It is an all-in-one solution for page management, giving marketers a single centralized location to streamline the process of managing a brand’s presence on the platform.
With this platform, you can manage all accounts you own or administrate with various tools to make controlling your business’s social media presence much easier. The best part of Meta Buisness Suite is that it is completely free and available on mobile/desktop.
To get started with the tool, you need to link up your accounts, and you will instantly have access to an overview dashboard of your Facebook Pages. Here, you will be able to do the following:
Leveraging Meta Business Suite Insights for Your Business
Meta Business Suite makes it easy to track your business accounts and campaigns across the Meta social and messenger platforms.
Here are some of the insights Meta Business Suite provides:
 If you don’t have one, then create it with the help of this guide about Facebook page.
You can now schedule a Facebook post, publish it immediately, boost your multiple posts with advertising, and connect with your customers. You can also monitor insights, notifications, and messages for your posts.
Facebook even gives you the option to add page admins. Enter their email address and assign each contact as an employee (limited access) or business admin (full access). However, if you’re running your accounts solo, you can skip this step.
Using Meta Business Suite is a quick way to schedule Facebook posts, however, due to its limitations, it may not be an effective option to use.
Related Article: 26 Simple & Practical Ways to Increase Facebook Engagement in 2022
Another tool that comes in for Facebook post scheduling is Creator Studio.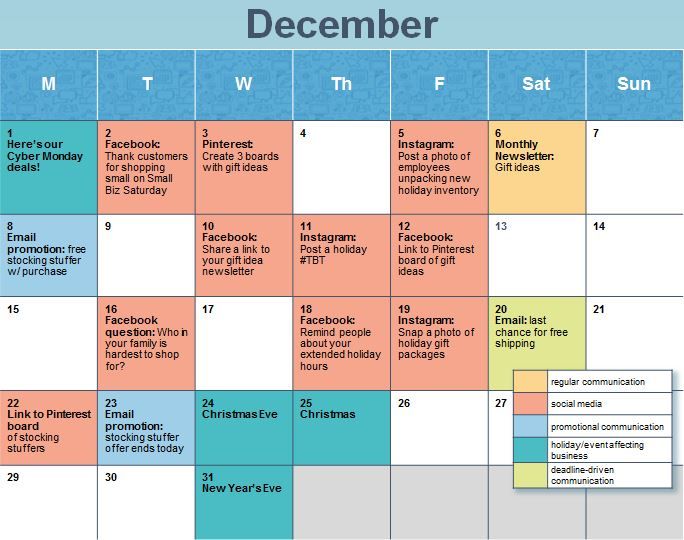 Before the launch of Meta Business Suite, Creator Studio was default choice to schedule Facebook posts. The tool was available right there, where now Meta Suite resides. But, it now became a separate tool from the Suite. However, some of the pages have reported that they are still having Creator Studio by default for their Facebook page.
Well, Creator Studio is a tool for all the creators out there who want to manage their content and grow their audience on social media. With this tool, you can share new content and analyze post-performance from one place to level up your social performance on Facebook and Instagram.
Using Creator Studio, you can schedule and publish posts, keep track of your social media community, and access data and analytics about your content and audience. You can even manage collabs and monetization!
To access Creator Studio, you need a Facebook business page. If you are using from desktop, head to the Creator Studio Facebook homepage to get started. You can also download the Creator Studio app and work on the go!
Creator Studio allow creators to monetize their online creations and helps facilitate collaborations between brands and influencers, offering creative tools such as scheduling, community management, and social media analytics. Following are the most powerful features of Creator Studio;
According to Facebook, anyone who manages a page is eligible to use Creator Studio. The Facebook pages and Instagram account you’ll have access to will depend on your page role and the accounts linked to the page. In addition, your page role will determine the information you see and the action you can take on that page and its linked Instagram account.
Creating or scheduling a post via Creator Studio is much better as it allows you to schedule posts for multiple Facebook pages.
You can schedule posts on a Facebook page(s) via Facebook’s Creator Studio using the following steps:
Facebook Creator Studio is a great way to manage your Business Pages, but there are a few things you need to keep in mind to get started with Facebook marketing and to schedule posts:

As you can see, there are a few limitations while scheduling posts on Facebook using Creator Studio. That’s why I recommend using a third-party scheduler, yes mainly Social Champ.
Scheduling Facebook posts using Social Champ is super easy and requires next to no effort. Here is how you could do it in a few easy steps:

Not just that, with Social Champ’s Analytics feature, you can monitor the performance of your Facebook posts & download a presentation-ready PDF report of your analytics with graphs & charts.
If you’re a social media manager who’s constantly scrambling to find the right content and ways to increase engagement at the right time of day & it’s taking up all your time, and you’re not sure how to fix it, I’ve got a solution for you!
Social Champ offers the fastest way to schedule social media content via Bulk Scheduling. You can schedule Facebook posts for up to one year in advance with just a few clicks.
All you have to do is go to the “Bulk Upload” tab & Download the CSV file. Fill the CSV file with your posts & time to post & save it & then upload it. You can add up to 500 posts & schedule them in one go!
Once you’ve uploaded your CSV file, the next step is to select the accounts you want to post on. Before you get your posts ready, in the last step, you’ll be asked to review your posts & check for errors if they have any.
After checking for any errors, you’re done. Ready to schedule all your posts.
You can also combine the Bulk Upload feature with the Recycle feature to make a collection of your posts & set different campaigns for different Facebook pages.
For example, you decide to post motivational quotes every Monday on your Facebook page. You can add all your quotes in one CSV file & upload them to your collection to do it smartly. Later they can be used on your social media networks on your desired timeslots with UTM tracking.
Scheduling Facebook posts can help you & your business in many ways, like:
One reason to schedule posts can be to balance the workload. Manage your daily task efficiently & focus on more important things than content posting. When all your posts are scheduled, you can use that time to work on your content strategy & community management.
Another reason can be to get enough sleep. If your business is based in Asia, but you have American customers online at 3 am in your region, the most important thing you’ll lose is your sleep. You have three options in this case:
Related Article: 25 Facebook Metrics That Are Worth Tracking in 2022 for Successful Campaigns
Now let’s talk about some differences, similarities, and updates related to all three tools discussed above!
With Creator Studio & Meta Suite, you can easily schedule posts, review analytics, and host live streams.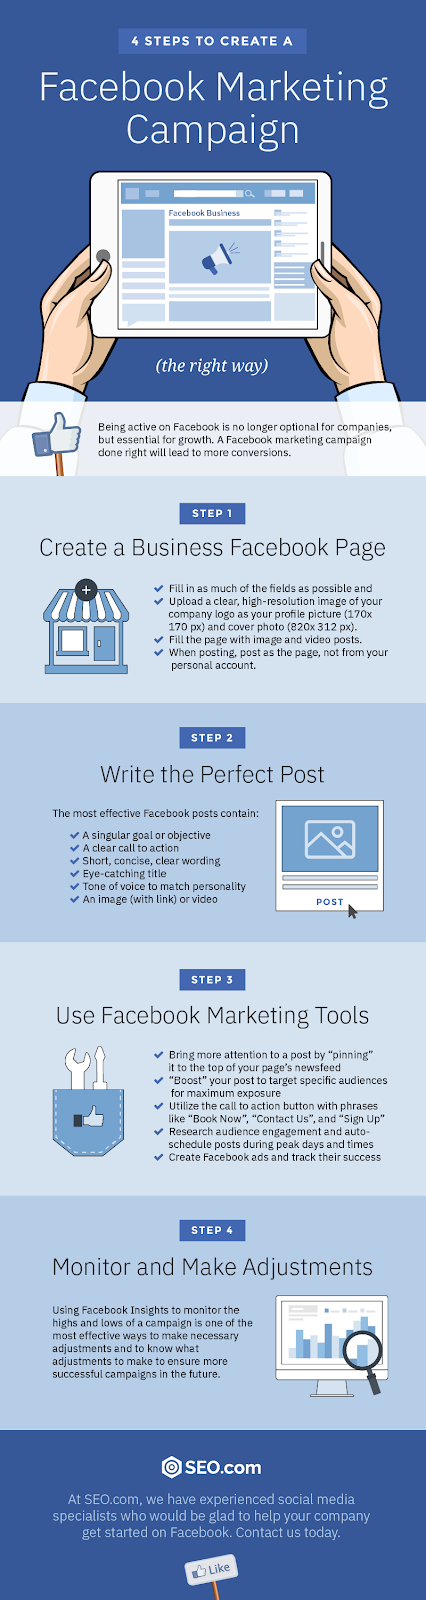 However, Social Champ offers more powerful features, including marketing campaigns and content recycling. Due to certain limitations of Meta Business Suite and Creator Studio, it is safe to say that third-party tools like Social Champ is a great choice for scheduling. Not only Instagram and Facebook, the tool targets other prominent social media platforms too and you can go with certain marketing campaigns for all those forums.
With multiple robust features, super easy scheduling process, responsive social inbox, bulk upload, recycle options, analytics monitoring, team collaboration, and Auto-RSS, Social Champ is a groundbreaking automation tool.
If you’re a business owner who runs a Facebook Page, you may wonder how to generate more engagement and reach the audience you want. Social Champ makes managing your social media profiles super convenient and easy. Here are a few more benefits of using the tool:
While there are several Facebook scheduling tools in the market, you can trust us on this. Social Champ gives you the best features at the most affordable price, including a FREE plan with all the premium features. The freemium plan comes in with unlimited posting for 3 social accounts and 1 user onboard.
Other pricing plans start from $29 per month for Champion, $99 per month for Business, and a customized package for agencies.
And it’s more than just a scheduling tool. Social Champ also offers additional features like Auto RSS, Social Inbox, Client Organization, Team Management, Analytics & Reporting, and more.
Make your social media marketing hassle-free. If you are confused about which plan is the best for you, book a live demo now or contact our support!
No matter what scheduling medium you select, either Social Champ or Facebook’s Creator Studio, you should consider these best practices:
Since you are scheduling posts in bulk, the pressure to create content in a hurry is off. So take your sweet time in planning and crafting relevant content that goes with your brand image.
Scheduling posts in advance can also help you keep your brand voice in mind while composing a week’s worth of content.
Since you are scheduling posts, there is no point in posting when you are at the office. A better approach would be to experiment a little and find the right time when your audience is active and post at that time instead.
The more people who see your Facebook updates, the better it would be for your reach and engagement goals.
Some things are just not meant to be scheduled. They should be posted in real-time with catchy, trendy captions and monitoring. Examples of such things are Facebook events, Facebook check-ins, and Facebook picture albums!
This one is a pretty important factor when it comes to Facebook analytics and also fan retention. No one likes to follow a dead page. However, make sure that you don’t overcrowd or overwhelm your Facebook page by posting on it 15 times a day!
Set up a realistic posting frequency that you can keep up with and have a good time creating content. The number of Facebook posts you curate and schedule for the month depends on page likes and your niche.
A small non-profit organization can post once a day, whereas an e-commerce site might make ten posts a day and still get a good reach!
A good social media manager would always track and monitor the posts that they schedule. This helps them know the audience and what they look forward to every day when they open your Facebook page.
Don’t base your Facebook post scheduling on guesswork and use Social Champ’s analytics monitoring feature to keep track!
Happy scheduling!
Yes, Social Champ allows you to schedule Facebook posts easily without missing any important dates.
You need to be the admin to schedule a post in the Facebook group.
Yes, Social Champ is absolutely better than Meta Suite and Creator Studio as it gives you more options than the other two and have no limitations over the scheduling and posting.
Track progress
to enter
0 of 11 completed
2 min.
Getting Started with Facebook Posts
2 MIN.
Preparation Page
2 MIN.
Image and video publishing
2 MIN.
Facebook Live
2 min.
Offers and discounts
3 min.
Create poll
3 MIN.
Product tags
3 MIN.
Job posting
3 min.
Regular publications
3 min.
Statistics Pages
3 min.
Schedule Posts
NEXT
Would you like to post to the Page a little later? Marika will tell you how to schedule posts.
Play Icon
Hello! I know you have a lot to do.
Small business owners are always short on time. So it's no surprise that sometimes you don't have time to post something on a Page. In this video, you'll learn how to schedule a post in advance, change the date to past, or create a draft.
Now I will teach you how to use these tools. Why plan to publish in the future? Great question. In two weeks, Jasper's Market, where I always buy groceries, will celebrate its anniversary. In honor of this, they will be launching hourly discounts not to be missed. But Jasper's marketers don't want to talk about it for at least a week. Using the planning tool, they can specify the desired publication date. Convenient, right? Since this is a temporary promotion, they can use the distribution schedule to specify the date and time when the publication should end. You can do that too.
Why change the publication date to the past? Great question. Posts Pages are displayed chronologically. To fix this, change the post date to past. Let's say you have a product that people forgot about. Post about it with a past date. The post will be posted immediately, but will appear in the timeline below.
If you don't have time to complete your post, save it as a draft so you can add the finishing touches when you have time. The draft can be opened in the "Drafts" tab. A very useful tool.
Let's look at a great example. Lloyd Tacos are mobile fast food outlets based in Buffalo, New York in the United States. Since day one, owner Lloyd has been talking about his business and connecting with taco lovers through his Facebook Page. For him, this is the main tool for reaching customers. The results speak for themselves. Thirty-seven percent of new customers discovered Lloyd Tacos on Facebook, with an average reach of 42,000 per week. That's a lot of tacos. Lloyd told me that Facebook helps him save 15 hours a week. If I had 15 free hours a week, I would regularly fly to Buffalo for delicious tacos or learn how to make them, which makes a lot more sense.
Go to your Page. Schedule a post. Now you can think about what to do with the remaining 15 hours of the week.
But first, a test of knowledge. Thiago has his own little company. He's on vacation but wants to keep the Company Page up and running. What should he do? Options:
A. Keep drafts of publications and post them when you return.
B. Change the publication date to the past.
or
Q. Schedule publications for specific dates and times.
Did you choose B? Absolutely right! Great job. And I have to go, I urgently want tacos. Stay with us!
BACK
NEXT
Was this page helpful?
More Courses
By putting into practice the advice I gave you in my guide on how to create a successful Facebook page, in a few months you managed to increase the number of people who follow you on the most famous social network in the world. To keep offering new content, you've created a file containing a schedule of your future posts, including the day and time you'll need to post them. However, being often involved in other activities, he skips the post and leaves the page blank for several days.
In light of what has just been said, you would like to know how to make posting your content on Facebook automatic and therefore how to keep your page active even when you don't have time. No problem: it's a doable operation, very simple, and I, with today's guide, will tell you how to do it. If you take a few minutes of your time, I can explain how to schedule posts on Facebook using smartphones, tablets and computers, first showing the detailed procedure for setting the date and time for posting content, and then, if you need it, how to schedule posting posts in groups Facebook that you manage.
How do you say? Is that exactly what you wanted to know? So don't waste any more time and immerse yourself in the subject right away. Courage: Sit back, take the time you need, and focus on reading the following paragraphs. Choose the solution you are interested in among those listed below, try to put into practice the "tips" that I am going to give you, and I assure you that planning to publish your posts on Facebook will be really very simple. Enjoy reading!
Index
Schedule posts on Facebook This is an operation that allows you to create content on a well-known social network and post it at a predetermined date and time. In particular, this feature is of great help to all users who have little time to manage their Facebook page and want to keep it active.
To schedule a post on your Facebook page from your mobile phone or tablet, launch the well-known social network app (available on Android, iOS, and Windows 10 Mobile), and if you haven't already, sign in to your account. Now press the ☰ button at the top right (on iOS it's at the bottom right) and press página of your interests visible above. If you don't see it, scroll down and tap on page to see a list of all your Facebook pages.
To create new content, click the button Public and enter your message in the field What do you think? (on iOS it's Write something ), then tap Add to your post if you want to add more content, and select one of the options available in Photo/Video , Mood/Activity , Registration , Voting and so on
press Share , click on the option Now (o Now if you use iPhone / iPad) next to the article Share and check the box next to the option Program , Then specify date y el calendar place and push buttons set date es publication schedule .
To view scheduled posts on your Facebook page, press the ☰ button and select an option. Scheduled publications . To make changes, tap the icon three points Present next to the scheduled post you are interested in and select one of the available options: edit edit the scheduled post; Rescheduling change the time and / or date of publication; Post Now Post Post Delete Post to delete the post (and therefore its schedule).
You should be aware that the same operation is possible with the application. Facebook Page Manager for Android device and iOS. The procedure is the same as described above for the official Facebook app.
If, on the other hand, you prefer to schedule a post from a PC, go to the Facebook home page and, if you haven't already, enter your details in the fields.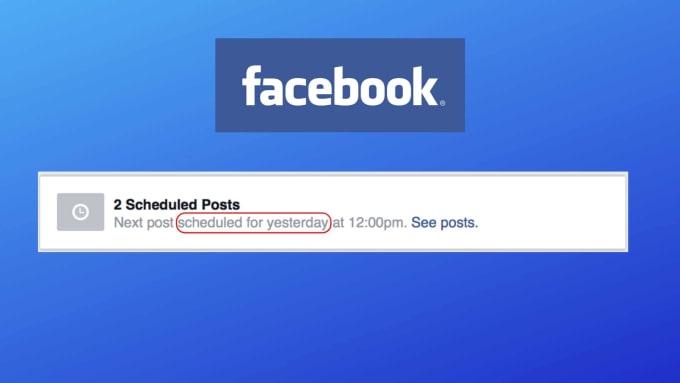 Email or phone es Password and press the Login button to connect to your account. Now click icon an arrow pointing down is present in the upper right corner and select Facebook page of your interest from the list Your pages .
On the main screen of your page, enter the content to post in the field Write a message , then find the entry News section , click the option Share now and select voice Program . On the newly opened page, make sure that the checkbox next to the option is Post click on calendar and select date where you are going to post. Then enter the calendar publication in the appropriate field and click the Program button. It will be helpful to know that you can schedule a publication for up to 6 months after it is created. Also, the schedule should not be less than 10 minutes from the time of creation.
Before scheduling a post, if you wish, you can also set your visibility by pressing Toda and selecting one of the available options ( Toda , Limited audience es Orientation in the news section ), then press the button Publication schedule And that's it.
Both page administrators and editors can schedule posts. In addition, photos, videos, and other items such as events and moods. For more information, you can read my guide to posting on Facebook.
Schedule a post to a Facebook group is a feature only available to group administrators. However, for all other users, the content scheduling procedure is not available.
To continue scheduling a post for a group you manage, launch the Facebook app, press the ☰ button, and select an item. Groups , then click the group you want to be an administrator of to schedule a post and tap Write something . Now enter the content of the message in the field What do you think? (in the Write something box on iOS) choose whether you want to insert additional items ( Photo / Video , Mood / Activity , GIF , Background color , Sell something and etc.) and touch Program .
If you have a device equipped with Android , move the lever next to item Program publication OFF a EN then select date y el calendar and touch the button Program . If, on the other hand, you are using iPhone o un iPad Select date y el calendar post content and tap save then tap Share That's right. To view scheduled posts, tap [number] of scheduled posts is present at the top of the group, then tap three points associated with the post you are interested in making changes ( Edit post ) to delete it ( delete ) to set a new post date ( Reschedule ) or publish immediately ( Publish now ).
If, on the other hand, you prefer to continue with a PC connected to the Facebook home page and log in to your account, click on item Groups is present in the sidebar on the left and select the group you are interested in, displayed in the section Groups you manage .
Ahora, ingrese el contenido de su publicación en el campo escribe algo, elija si desea agregar otros elementos ( Foto / Video, GIF, Encuesta, Estado de ánimo / actividad etc.) y haga clic en el reloj presente al lado del botón Publico.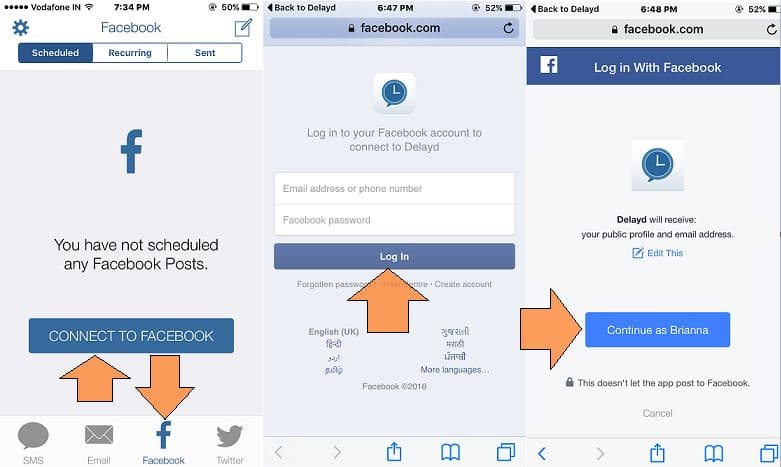 Luego seleccione el fecha y el calendario publicación, presiona el botón Programa Y eso es.
¿Cómo hago capturas de pantalla en Snapchat sin notificar al remitente?
If in doubt, you can delete or edit a scheduled post at any time. To continue, enter the group you are interested in, find article [number] scheduled publications and click on the option See publications . On the newly opened page, click the icon three points associated with the message you are interested in, and select one of the available options from Edit post , Delete post , Publish now es Move post .
If you're wondering if it's possible schedule posts on your Facebook profile Unfortunately not. In fact, this feature is not available on a well-known social network, which is also for security reasons. blocked the ability to access the platform for external applications.
By registering with services such as Postfity or Buffer, you can connect your social media accounts (Facebook, Twitter, Instagram, LinkedIn, etc.), create content, and set up a content schedule with the date and time of publication. Unfortunately, however, due to the glitch I mentioned earlier, it is not possible to schedule posts to your Facebook profile, leaving instead the ability to schedule content to be posted to Pages and Groups.
How do you say? Do you have a solution to the problem? If you've been thinking about connecting your Twitter account to Facebook to automatically post tweets to your social media profile owned by Mark Zuckerberg and then using one of the two post scheduling services I mentioned above, I have to tell you that even in this case, I can't, and the "fault" is still the access blocking that Facebook has implemented in relation to third-party applications.