How to delete archived posts on instagram
How To Delete Instagram Post Or Archive Photos And Videos [Ultimate Guide]
What I'll Learn
- Instagram Delete vs. Instagram Archive
- What Happens When You Archive or Delete Instagram Posts?
- Complete Guide to Delete Instagram Posts
- How to Delete Instagram Post?
- How to Delete All Instagram Posts at Once?
- How to Delete Instagram Posts on PC?
- How to Restore a Deleted Instagram Post?
- Complete Guide For Archiving Instagram Posts
- How to Archive Instagram Posts?
- How to Archive all Instagram Posts?
- How to Archive Instagram Posts on a Computer?
- How to Unarchive an Instagram Post?
- Is it Possible to Delete Instagram Posts From Your Instagram Archive?
- How to Delete and Archive Stories On Instagram?
- Evaluate Before You Delete
- Conclusion
- Read Next
Do you love aesthetic Instagram feed and want yours to give the same appeal? Well, the initial step is to delete Instagram posts and archive the unwanted ones!
Instagram is one of the fastest-growing social media apps with roughly 1 billion active users around the globe. In line with its reputation for being a popular and demanding app, Instagram is a platform for people to share photos and videos that the public can interact with and engage with.
If you are an active user of this immensely growing app, you can simply get enticed to post every detail of your routine on Instagram. Whether it’s food that you eat, places you visit, friends get together, or even daily small mundane habits. We all can relate to sharing every bit of our lives on Instagram.
However, sharing all these influences about what your life revolves around, your Instagram feed gets disorganized. Some content gets expired, and some do not remain up to date. In that situation, archiving and deleting Instagram posts is a good way at your disposal to organize your content and remove what you don’t need on your account anymore.
In this write-up, we have managed to provide you with a step-by-step process on how to delete Instagram posts or archive them to bless your timeline with the desired appeal.
Instagram offers a lot of useful features, and a few of them might look similar to you, but they function differently. The best example can be the most trendy Instagram delete and archive feature. When you no longer want a post on your feed, either you can delete those non-evergreen posts or achieve them from your Instagram account. They seem quite similar -no difference at all, but both the options offer user control to different extents.
The archive feature was first introduced in 2017 that enables you to hide unwanted content from your feed without having to vanish it permanently. The Instagram archive allows you to remove such posts from the timeline and public view and save them in a folder that only you can access—leading to the advantage that you can bring back your archived posts whenever you want -No data restoring issues anymore!
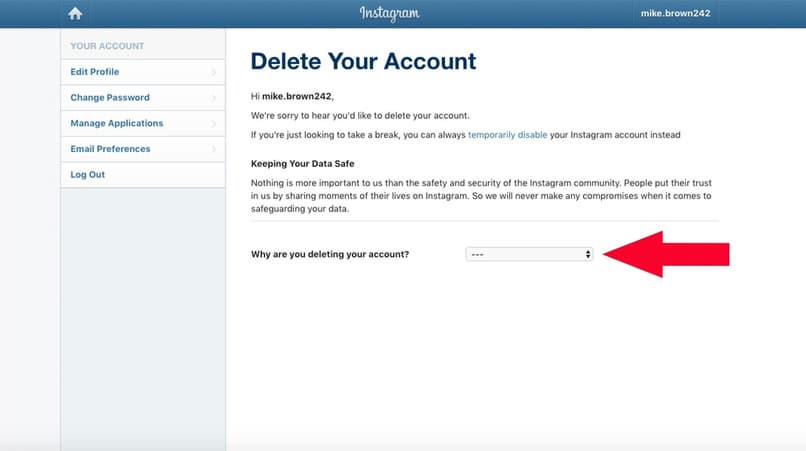
Whereas the Instagram delete option permanently deletes your post. By deleting Instagram posts, all the associated data such as likes, comments, impressions, and engagement vanishes along with it. The post is entirely and permanently removed hence, cannot be restored.
What happens when you delete a post? Where do archived Instagram posts go? Where to find your archived and deleted photos on Instagram?… All confusion is Instagram log-in to be solved right now!
When you hit the delete button on an Instagram post, you lose that content and can’t repost unless you have a saved copy somewhere else. Once a post is deleted, all the engagement, including likes and comments, will go away with that post.
With the archive option, things are quite different. Your archived posts automatically move in the safe folder, and your caption lies and comments on that particular post remain unchanged. No more worries if you have accidentally archived an Instagram post, as you can restore it anytime.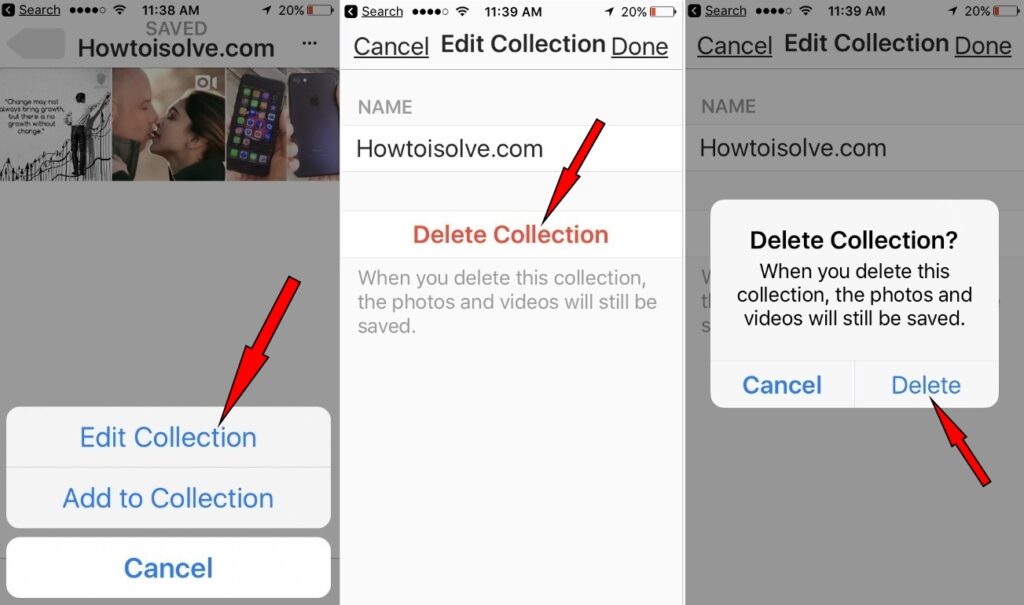 Bingo!
Now that we have taken you out of the dilemma of what happens when you archive and delete posts on Instagram, let’s dive straight into the easy process of how to delete an Instagram post and archive it to view later?
Complete Guide to Delete Instagram PostsShare
How to Delete Instagram Post?If you use Instagram to showcase your interesting life, you might have some old, unnecessary, and candid photos and videos that irk you now. Or, if you own an Instagram business account for commercial purposes, you might want to remove an Instagram post of a sale that is not valid anymore. This is when the delete option comes to save the day. With the Instagram delete option, you can delete any post you want in a glimpse.
Following are the six easy steps to help you delete Instagram posts effortlessly.
Step 1: Open the Instagram app on your Android or IOS
Step 2: Navigate to your profile and open the profile icon on the bottom right corner
Step 3: Select the photo or video you want to remove and open it
Step 4: Click on the three dots “…’ on the top right corner
Step 5: A pop-up menu will appear with many options.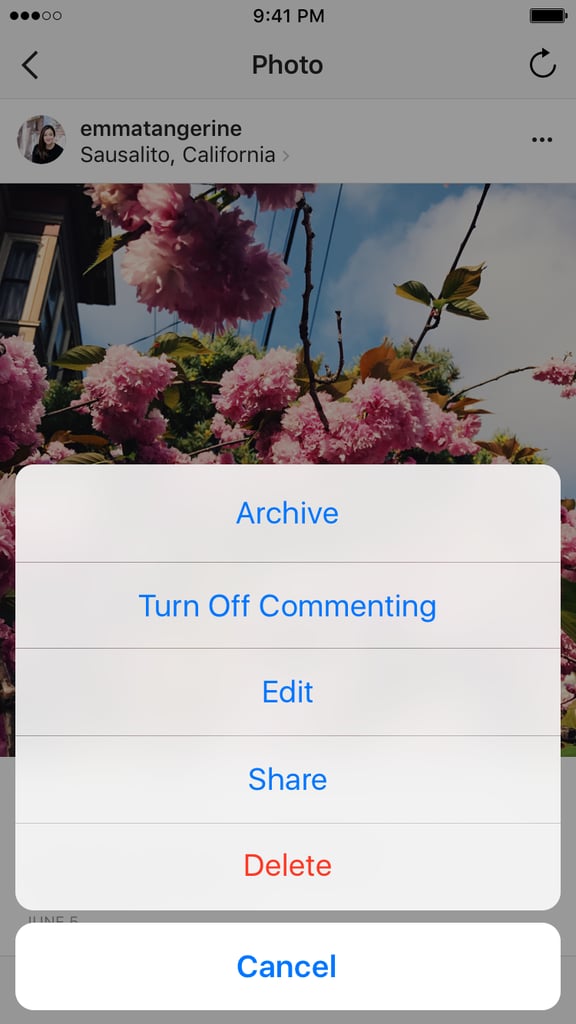 Tap on delete
Step 6: Another pop-up will appear. Click delete to confirm the removal of your post.
Remember, once you click the delete button, you will lose that post permanently.
How to Delete All Instagram Posts at Once?Removing an Instagram post one by one may seem to be a time-consuming task. Deleting all Instagram photos and videos in one go is an easier option. Unfortunately, Instagram doesn’t have any feature as such that allows you to mass delete posts.
Not to worry about as we still have a fire tip for you that you bring convenience your way—mass cleaning! For this, you have to use a third-party source—an application called Insta clean.
Here is a step-by-step process to use the InstaClean app.
Step 1: Open your Instagram account
Step 2: Enable InstaClean to have access to your Instagram account.
Step 3: Click on the media button that appears at the bottom-right corner of the screen.
Step 4: Select all the photos you like to delete.
Step 5: Hit the trash can button at the top-right corner of the screen.
Step 6: Select Delete.
IOS users can download Cleaner available at the IOS app store.
How to Delete Instagram Posts on PC?You might have noticed that when you open Instagram in a browser, there is no option to archive or delete Instagram posts on a computer, pc, or laptop. But we’ve got a trick that will allow you to do that. Follow these steps to unlock this feature on your PC:
Step 1: Browse the Instagram web, log in to your account, and open your profile page.
Step 2: Right-Click to enable more options, then select inspect
Step 3: The developer console will be opened on the side of the browser
Step 4: Click on toggle device toolbar
Step 5: Go to settings in the drop-down and select any device you like
Step 6: Refresh the Instagram profile page and click the feed icon to switch
Step 7: Click on the three-dot option on a post and press delete.
This trick works on all browsers like Chrome, Firefox, Microsoft Edge, etc., that support the developer console.
How to Restore a Deleted Instagram Post?Well, we’re about to answer one of the most confusing questions on your mind, if not on the planet!
You might be wondering if you can restore a deleted Instagram post. The answer is No! once deleted, any post can not be restored. However, there is a way to avoid such situations by enabling the original post feature in Instagram settings. This feature automatically saves all your photos and stories that you post on your account in the phone gallery.
Here is how to enable Original Post in your Instagram account
Step 1: Go to your IG profile
Step 2: Click three horizontal lines at the top
Step 3: Go to Settings > Account > Click on “Original post”
Another way to find deleted photos is in your phone gallery. Photos and videos get saved in folders named recently deleted photos and vanished after 30 days.
Share
How to Archive Instagram Posts?Archiving posts on Instagram is such a practical feature to control your feed outlay without losing any content. This is as easy as walking through the same simple process we have mentioned above for deleting Instagram posts.
Here are those simple steps for your ease:
Step 1: Open your Instagram account on the mobile app
Step 2: Select the post you want to archive
Step 3: Click the three dots “…” at the top right corner. A menu would appear on the screen.
Step 4: Press the archive option this time instead of delete.
And voila! That post will get removed from the feed and saved in a private folder that is accessible to you only.
How to Archive all Instagram Posts?You don’t have the option to mass archive the Instagram posts, but with the help of a third-party source, you can do that. You need an app to record your option that will auto-repeat it.
“Click Assistant – Auto Clicker” is the most popular app for android devices to help mass archive Instagram posts. First, download and install Auto Clicker on your android devices then:
Step 1: Open the Auto Clicker
Step 2: Nothing fancy, just press “Start Service”
Step 3: Open the Instagram app on your phone
Step 4: Now select the circle tool from the toolbar, be careful as every action will be recorded after this
Step 5: Select the posting form where you want to start
Step 6: Repeat the process mentioned above to archive a post
Step 7: Finally, hit the play option!
This app will repeat the same process with another post on your account unless you press the stop button option.
For iPhone users “Web Macro Bot: Record and Replay” application is available on the IOS app store.
There is a different way to archive because the above-mentioned trick doesn’t allow you to archive Instagram posts on a web browser as well. To perform an archive on anthem InstagramPC, you’ll have to use an emulator system that allows the same experience on a PC or laptop as on mobile.
Step 1: Download emulator system, and launch it
Step 2: Install Instagram on emulator system
Step 3: Follow the same steps that are mentioned for archiving posts on Instagram using a mobile.
How to Unarchive an Instagram Post?You can’t restore deleted posts, but you might ask what happens when you archive an Instagram Post? or How to undo an archive on Instagram? You can simply find the archive posts in a private safe folder on your Instagram account.
Follow the step-by-step process to free the post from the dungeons of the archive.
Step 1: Open the account page on the Instagram app. Tap the profile icon at the bottom right-hand corner.
Step 2: Click three horizontal lines to open up a menu on the screen.
Step 3: Tap on a circle that looks like a clock at the top, switch from archive stories to post by drop-down option.
Step 4: Tap to open the photo or video you want to restore. Open an additional option by taping on three-dot at the top right corner.
Step 5: Select “show on profile” to unarchive and move it to the main profile.
Your post will be back on the feed for the world to see.
On Android, the archive icon is right next to the three-bar menu. On the iPhone, it’s available on the left side of the screen.
Is it Possible to Delete Instagram Posts From Your Instagram Archive?What happens if you accidentally archive an Instagram post instead of deleting it.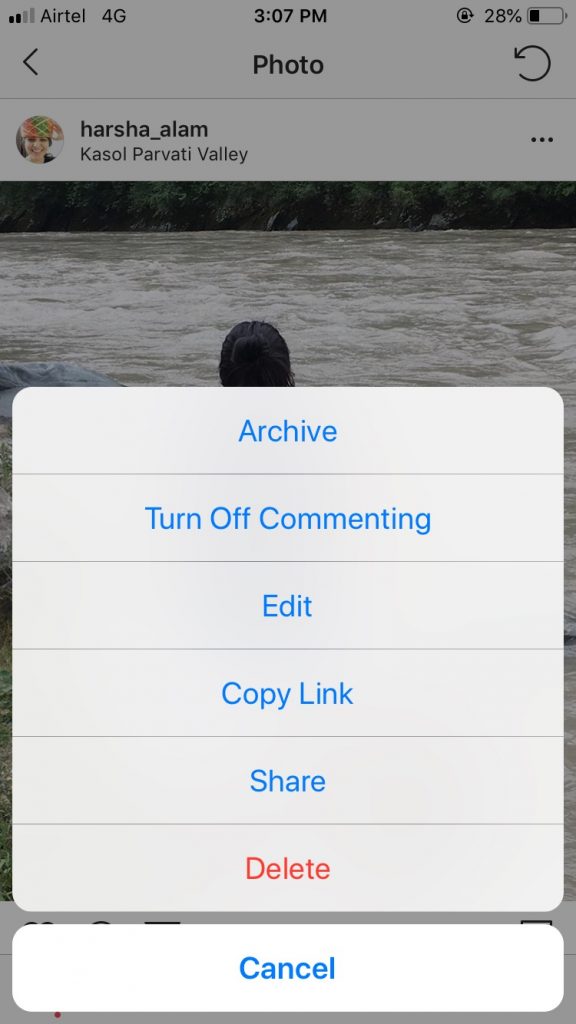 Don’t be propelled! You can always remove that post by unarchiving or permanently deleting it from the archive section. If you want to unarchive a post, you look for the solution we’ve given above. While for deleting a post from the archive section, you need to follow these steps:
Step 1: Open the Archive folder
Step 2: Click on top hand corner
Step 3: The menu will appear that allows you to edit or delete it
Step 4: Delete it forever by clicking “Delete.”
Yes! As simple as pie. However, if you accidentally delete a post, there is no way back.
How to Delete and Archive Stories On Instagram?
Share
Stories are more functional because you can save them on your phone or highlight, edit them, or share them as posts on your Instagram feed. Now, what if you want to delete or archive stories? No problem! You can do that as well.
All you have to do is:
- Go to Setting
- Enable “Save to archive” in story control
By doing so, your stories will automatically be removed and saved in the archive folder after 24 hours.
Think twice before you go ahead to delete any post that you regret later. It’s always better to archive than deleting Instagram posts if you feel like removing them from the timeline. Even when you have the option to archive it later, the thing is that the post you archive will appear in chronological order, not as a new post, so people might not notice it even after you undo the archived post.
ConclusionInstagram, the immensely growing social media app, has changed so much in competition to share the best and aesthetic-looking posts. All because of its user-friendly experience and algorithm. Gone are the days when you could capture photos with not-so-good angles and upload your unfiltered life without thinking twice. But now, things have changed drastically. The best way to make your Instagram feed look appealing is to do a general cleanup of your feed. For this purpose, we have defined an easy process to solve your quest on how to delete Instagram posts, photos, and videos and archive them to see later.
How To Lock Your Facebook Profile [via Mobile & Desktop]
How To Make A Post Shareable On Facebook?
How To Remove Shortcuts From Google Homepage?
How To See Twitter Join Date?
How To Hide Your Snapchat Score?
How To Archive or Unarchive Instagram Posts
Rather than users deleting content and losing the company’s potential revenue, Instagram offers a way to save it for later. It’s also beneficial to personal users because they can quickly bring up seasonal images or posts and adjust them. Rather than delete the post entirely, you can now archive it to remove it from the public’s eye. You can still view the post privately to use at a later date, but nobody else sees it. Live streams and stories get archived automatically, but this content is about “Instagram Posts.” Lets’ get started.
Using Instagram Archive for Posts
The Instagram “archive” feature contains a section for stories, live streams, and posts. The Instagram “Posts” category has an opt-in feature that you must use manually. Instagram does not automatically archive old or deleted posts like other systems—just stories and live streams.
How to Access Instagram Archives to View Your Posts
When you archive a post, it remains there until you manually delete it or un-archive it. As previously mentioned, Instagram Archive gets split between posts, stories, and live content. You’ll want to view your posts.
To access the Instagram archive:
- Open “Instagram,” then tap your “profile icon” in the bottom-right section.
- Select the “hamburger icon” (three horizontal lines) menu in the top-right section.
- Choose “Archive.”
- The “Archive” menu appears, showing your stories by default. To see your archived posts, tap on the “downward arrowhead” next to “Stories Archive” and select “Posts archive.
 ”
” - Your archived posts now appear.
As mentioned above, the archive is for you only and is not publicly viewable.
How to Archive Instagram Posts
- From the “Home” page, tap on your “profile icon” in the bottom-right section.
- Select “Posts” at the top next to your profile thumbnail.
- Choose the post to archive.
- Tap on the “vertical ellipsis” (three vertical dots) in the top-right section of the post.
- Choose “Archive” in the list of options that appear. This action removes the post from your profile. Followers and the public cannot view it anymore.
Your Instagram post now appears in your archives for later use.
How to Unarchive Instagram Posts
Unarchiving Instagram posts is very straightforward when you want to bring a post out of hibernation and back into your profile. Go into your Instagram archive and select the option to show it on your profile again. There is no restore option, just the choice to place the archived post on your profile. Essentially, that is the same thing in this situation.
- Open “Instagram” on your “profile page.” Select the “hamburger icon” (three horizontal lines) menu in the top right section.
- Choose “Archive.”
- Tap on the “downward arrowhead” next to “Stories Archive” and select “Posts Archive.”
- Choose the post you want to unarchive and select the “horizontal ellipsis” (three horizontal dots) menu icon.
- Select “Show on Profile” from the listed options.
The post now becomes active once more and is publicly viewable.
If you prefer to delete your archived post instead of making it public again, you can do it by selecting “Delete” instead of “Show on Profile. ” Your post gets deleted forever and is not recoverable. Sometimes that’s a good thing!
In closing, the Instagram archive feature is a neat idea that gives you control over what others see, whether for personal use or business. While we are gradually adjusting to the temporal nature of online life, some things are worth keeping for the longer term. If you don’t keep those memories close, at least you can preserve them on Instagram.
For social media savvy businesses, this is a way of using posts and media multiple times or for seasonal offers that repeat annually or regularly. Why create a Christmas offer each year if you can archive and tweak it and then make it public again? As for personal use, the Instagram archive feature lets you store posts or images you might want to reuse later, hold onto for personal reference, or even adjust them.
How to extract a post or story from the archive on Instagram
Instagram* allows you to save not only stories, but also posts.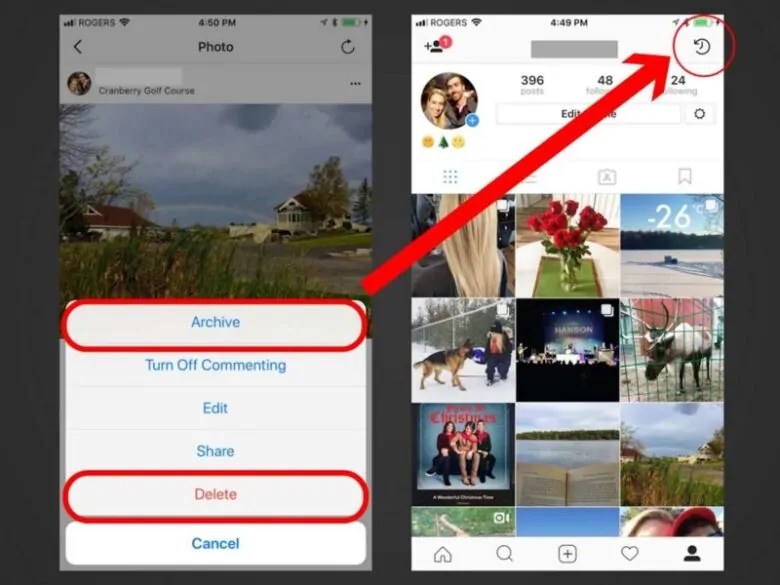 But how do you unzip a post? We understand in a series of short instructions.
Why archive posts on Instagram*
Post archiving is a useful tool that allows you to save posts, live broadcasts and stories in a separate section. Only the owner of the account can see it, the content in the archive is not available for viewing by other users of the social network.
In everyday life, the function is useful if you need to remove irrelevant posts, which, for some reason, it is a pity to delete permanently. Commercial accounts can use the tool more broadly. For example, as part of an advertising campaign, they can temporarily hide all publications in order to post one big post with a promotion. It attracts attention, conveys a sense of scale and creates intrigue.
Posts can be hidden in order to temporarily place such ads in the profile old. In order not to delete old posts, it's easier to hide them. What about stories? They are automatically saved to archives, from where it is convenient to pull them out later to save to your phone, repost or send to highlights. For more information on how albums work in general, read the separate article “How to add and change Instagram Highlights*”.
How to work with archives and restore posts - we will tell further in small and visual instructions.
How to save a post to the Instagram archive*
When archiving, the post will be saved with all comments, hashtags, tags and publication date. It will be hidden from your feed and the feed of other users, only you will see it in a special section.
How to send a post to the archive:
- We go into the application and click on the post in our feed or profile.
- Click on the three dots in the upper right corner.
- Select "Archive" from the list.
- Done, the post has been hidden from the profile and archived.
The application interface on iPhone and Android is the same, so this instruction (and all subsequent ones) is relevant for any phone.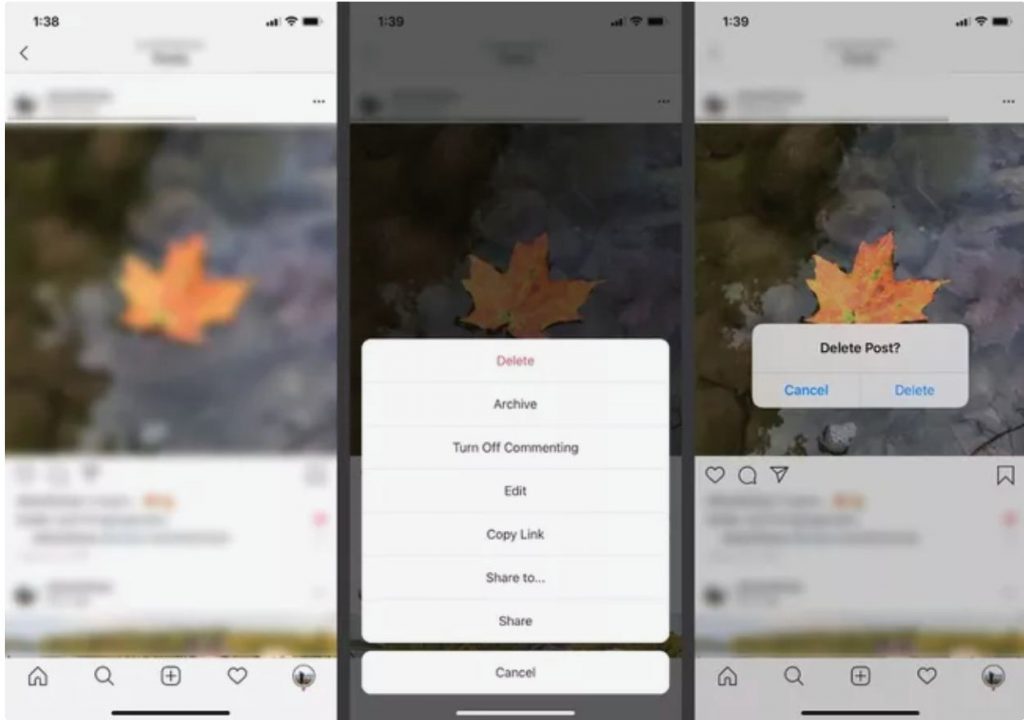
How to save stories to the Instagram archive*
The social network automatically sends stories to the archive 24 hours after publication. But if they are not displayed in the "Archive" section, then saving must be re-enabled. There are two ways: through the settings and while browsing.
Enable saving stories through the settings:
- Go to the application settings through the profile.
- Select "Privacy".
- Clicking in a new window on the "History" item.
- Activate the "Save stories to archive" function.
Enable saving stories through the view menu:
- Watch your stories.
- Click on the three dots "More" in the lower right corner.
- Select "History Settings".
- Activate the "Save stories to archive" item.
How to recover a deleted post on Instagram*
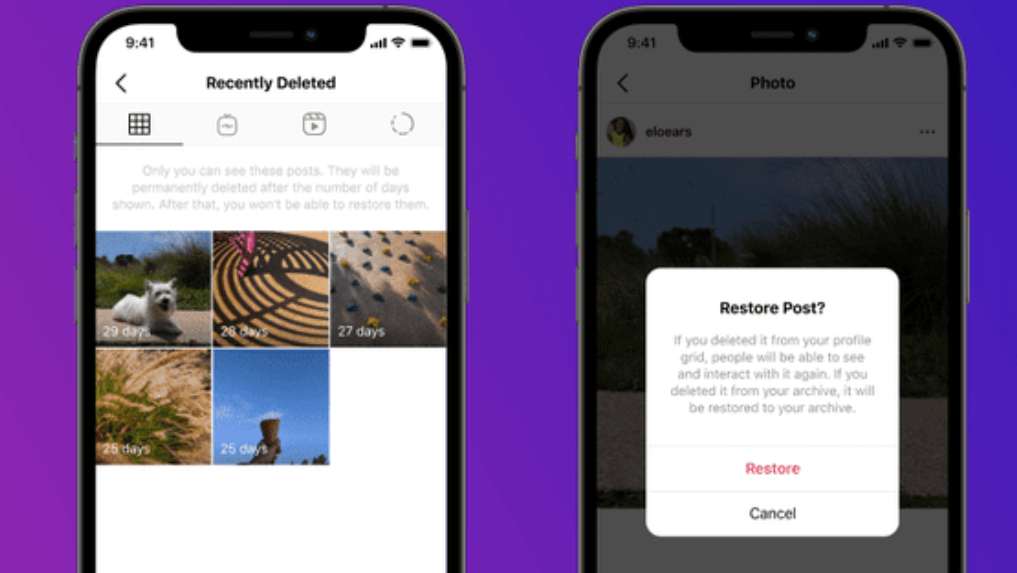
Recently, deleted posts are stored for 30 days, during which time they can be pulled back.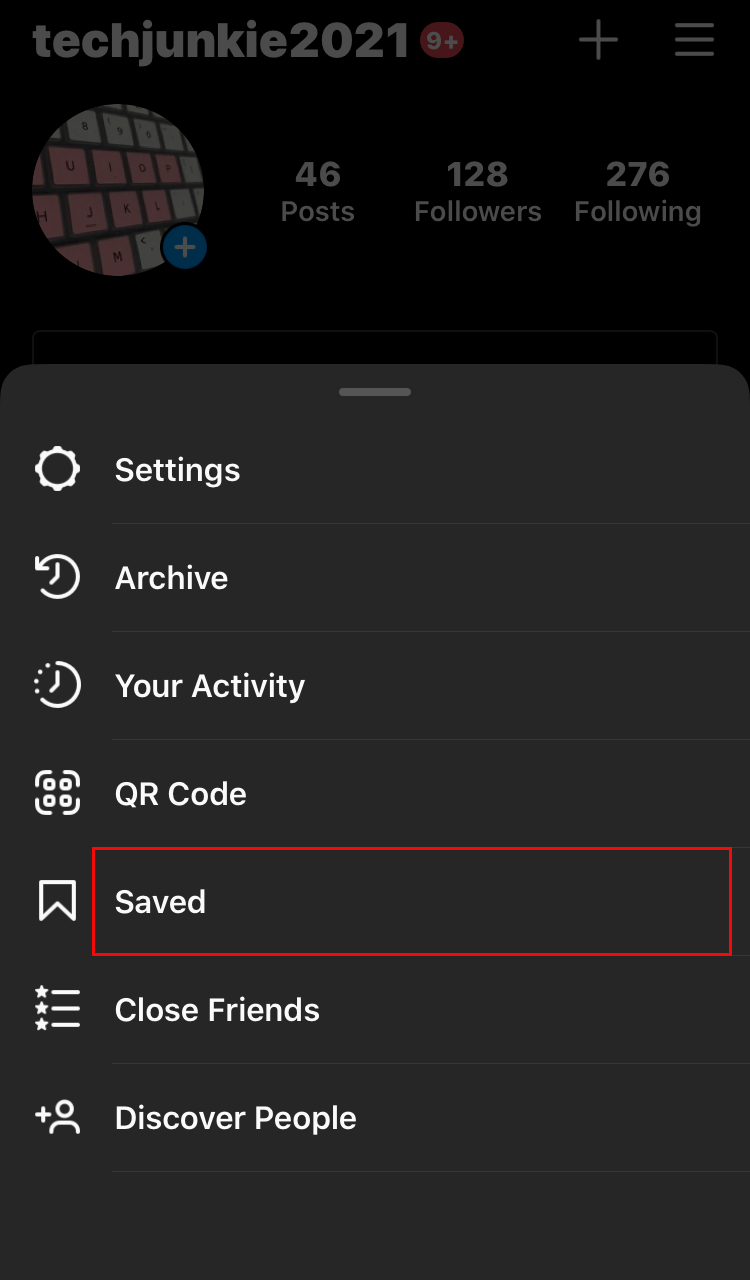 But for this you will need to verify your identity using a special code that will be sent to your email.
How to get back a deleted post on Instagram *:
- Go to Settings and select "Account".
- Click on "Recently Deleted" at the very end of the list.
- Select a post and click on the three dots in the upper right corner.
- Click "Restore" or "Delete" (then it will be permanently deleted).
- We agree with the restoration.
- We confirm the identity: a code will be sent to the mail, which will have to be entered in the application.
- After confirmation, you will need to click on the post again and click "Restore" again.
- Done: The post is back in the feed.
How to extract a post from Instagram archive*
After unzipping, the post will return to the feed with all comments and the same publication date as it was.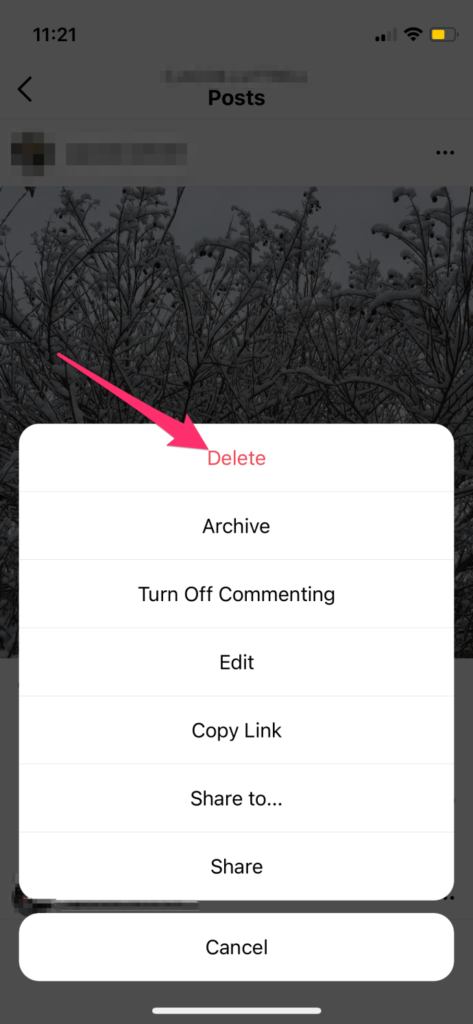 It will take the place in the feed where it was previously, i.e. it will not be re-published. As I said above, the social network does not delete posts - it rather hides them in the archive with a further opportunity to return everything as it was.
How to restore photos from the archive on Instagram *:
- Go to your profile and click on the icon with three stripes in the upper right corner.
- Click on the "Archive" item.
- We get to the menu "Archive of publications" and click on the post.
- Click on the three dots in the upper right corner.
- Click "Show in profile".
You can also remove a post from the archive on Instagram* by clicking "Delete". Then the post will go to the trash, where it will be stored for 30 calendar days. See above for instructions on returning posts.
How to unarchive a post on Instagram* There are more opportunities for unarchiving stories: you can re-publish as a repost, send to a post, save to Actual or upload to your phone in the gallery.
How to download stories from the archive:
- In the "Archive" menu, click on "Archive of publications" at the top and select "Archive of stories".
- Select a story and click on "More" in the lower right corner.
- Click "Save Video" or "Save Photo".
- The file has been saved to the phone.
For more information on how to download stories, read the guide “How to download stories from Instagram*”.
How to add a story from the archive to the Feature:
- In the "Stories archive" menu, click on the story and select "Add to Feature".
- In a new window, select existing folders or create a new one.
- Done: story saved in highlights.
How to send a story to a post:
- In the "Stories archive" menu, click on the story and click on the "More" item.
- Select the item "Share in the publication."
- Crop the photo and click "Next".
- Editing a post: applying filters, writing text, tagging people, adding hashtags, and so on.
- We publish a finished post from stories in our profile.
How to get a story from the archive on Instagram* and publish it again:
- In the "Stories Archive" menu, click on the story and click on the "More" item.
- Select "Share".
- Editing a story: adding a signature, stickers and, if necessary, deleting the "Memories" badge.
- Publishing.
In conclusion
Is it possible to return photos to Instagram* from a computer? Unfortunately, the social network site does not have a menu with archives of publications. Therefore, even if you switch to mobile layout, you will not be able to access the archives. Of course, you can install an Android emulator on your computer, download the application from Google Play and go into it, but it seems easier to use the phone.
On the other hand, posting from a computer is often convenient, especially if you have to type a lot of text on the keyboard and regularly make interactive stories. These opportunities are provided by the delayed posting service SMMplanner - where you can also put many posts and stories into postponement at once, which frees up a lot of time.
We can customize all aspects of a post: text, photo, video, hashtags, tags, comments. You can even upload a video and make a story with full functionality (stickers, polls, gifs, etc.) Of course, the service will be useful primarily for SMM-persons and those who maintain several accounts and cross-post to several social networks at once. In any case, try it - the first week is free, and during this time it will become clear for sure whether you need such wide functionality or not.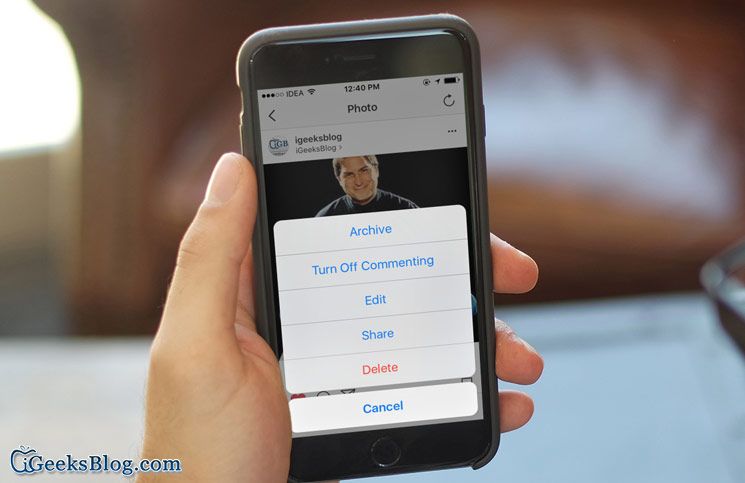
Archive or delete posts? Let's tell you what the difference is.
Promoting on Instagram means going through oceans of information every day. After all, social networks are developing at lightning speed. But you still need to devote time to business. Therefore, there are 2 scenario development options: entrust the promotion of your page to an SMM specialist or find time in 24 hours for SMM training. You won't be able to know everything and everything. But if you take the time to systematically read our new articles, you will always be up to date with the main news. And in this article we will analyze the basics of promotion. We will tell and show cases when a post should not be deleted. Namely, you need to archive. By the way, do you know what the difference is? That's what we'll talk about in this article.
What is archiving on Instagram
Every post in your newsfeed has value. For the author, this is a unique photo, text for the post, possibly likes and comments. But there are always situations that require urgent intervention in the form of deleting a post or archiving.
The difference between deleting and archiving is that once you delete a post, you can no longer view or restore it. When archiving, recovery is available. Also, while you will always have access to his statistics, likes and comments. That is, now when you hear from a client “Delete this immediately”, or decide to say goodbye to some post yourself, you first need to exhale and then decide for yourself how valuable this post is for you. Then it will be easier for you to decide on the account of permanent deletion or archiving. If in doubt, it’s better to archive and then you won’t lose it unequivocally.
How to archive a post on Instagram?
To archive a post, just click on the vertical dots on the right when opening the post. Then, in the drop-down menu, click on the "Archive" command. After that, the post will disappear from your feed and go to the archive.
Archiving can be a good source of collecting and storing information about old posts. For example, you have a store and there is a post in the feed about a product that will no longer be available. But, this post can contain a large number of comments, likes and statistics. If you delete the post, then all this will disappear forever. Archiving, on the other hand, helps save the post, along with comments and statistics, which you can return to later.
The best opportunities for archiving Instagram posts are for stores with a wide range of products. If an item is temporarily out of stock, you can simply hide it until it arrives. This way you can avoid requests that you cannot service.
How to return a post from the archive on Instagram?
You can archive both posts and stories. The only difference is that posts can be restored. Stories will need to be republished. Pulling out a post from the archive is as easy as putting it in there. To unzip the post, go to your profile and in the upper left corner click on the semicircular arrow with a clock.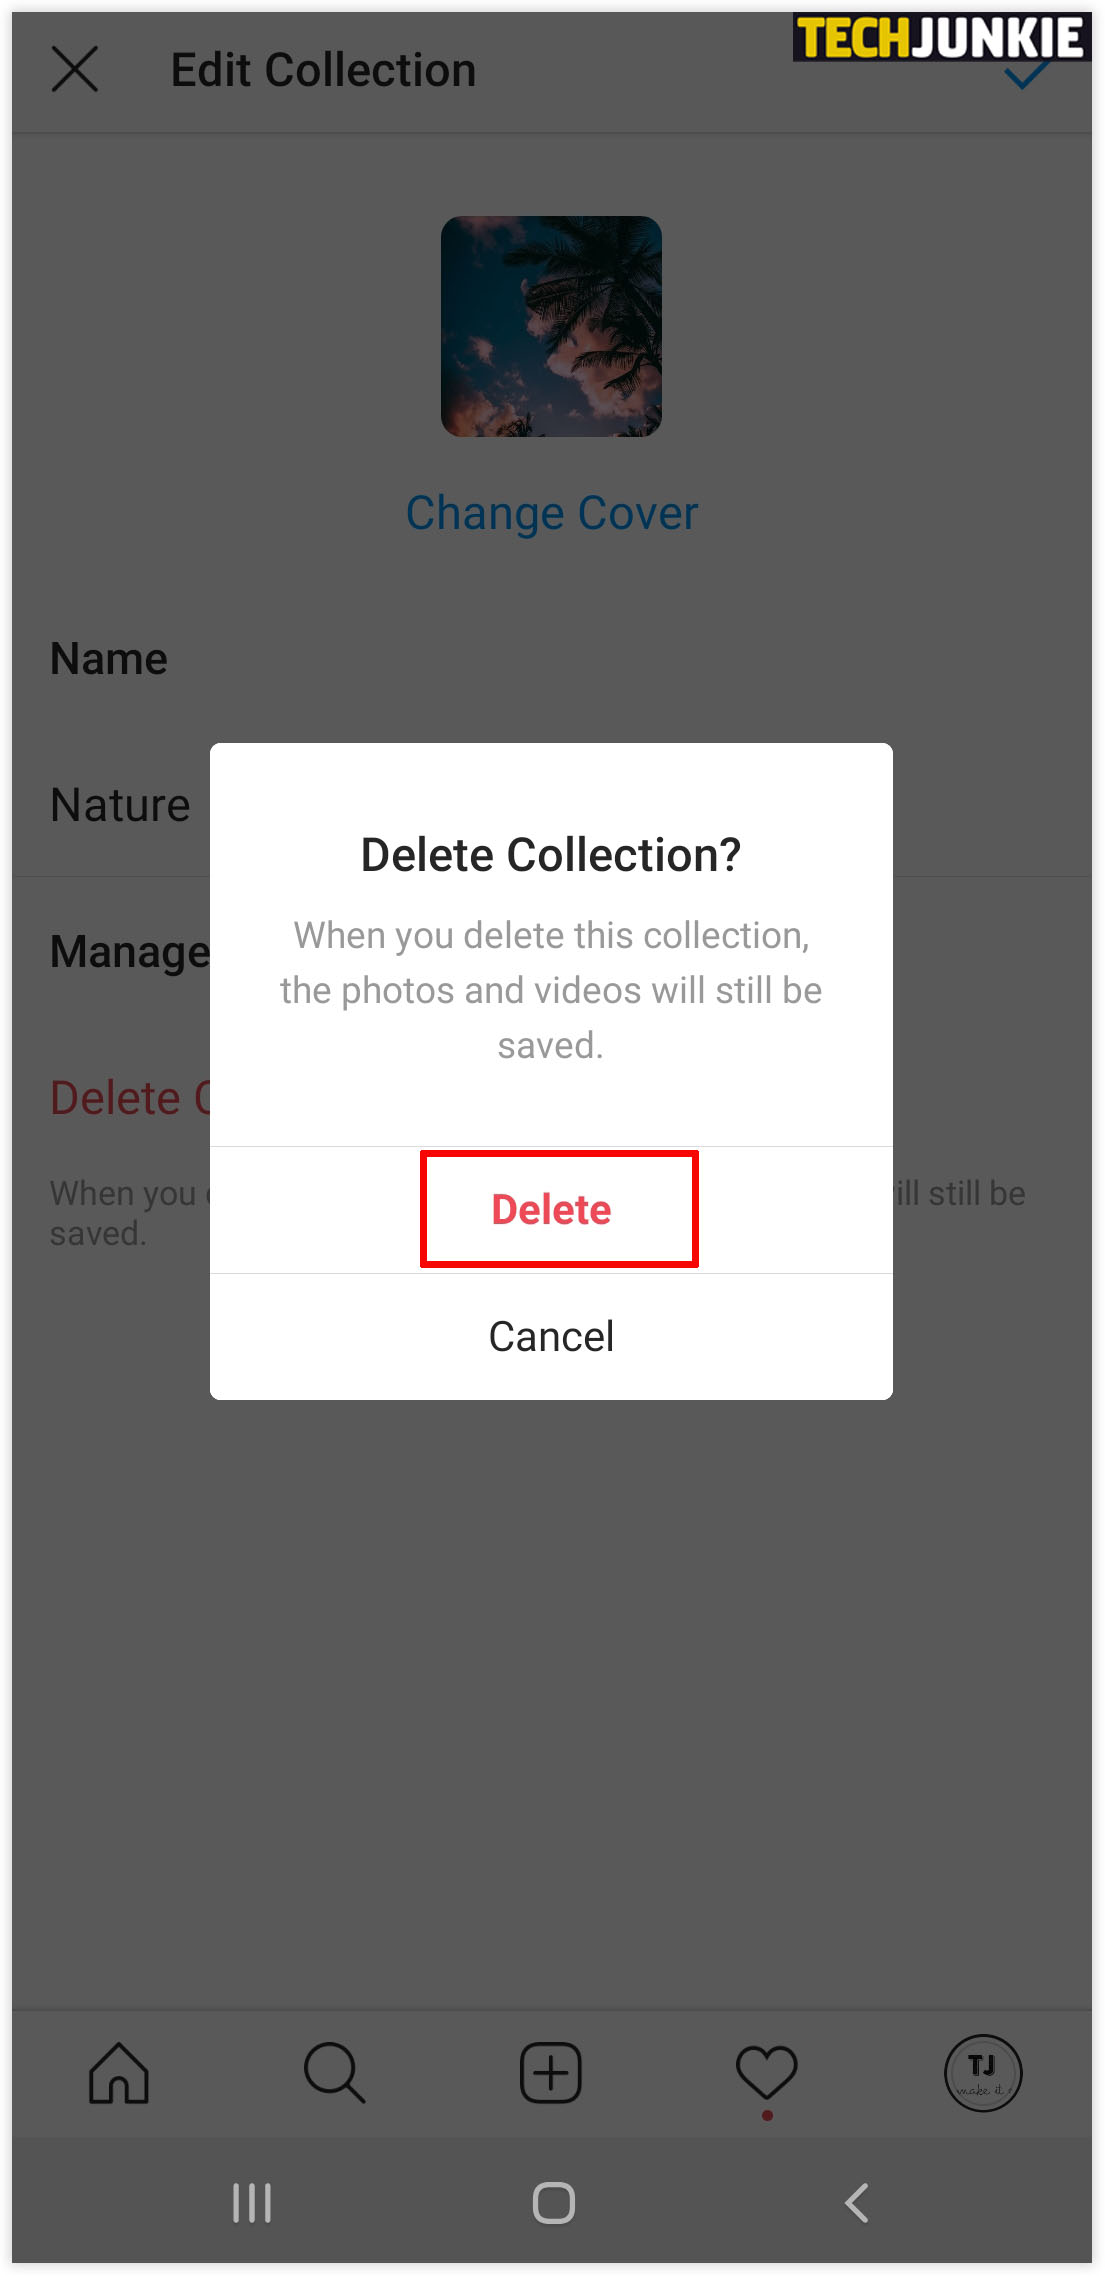
After doing these simple manipulations, you will be taken to the archive page of your posts and Stories. If you see only your archived Stories, then you need to click on the drop-down arrow next to the word "Archive" to get to the posts. In the drop-down menu, you can choose which archive to view - the archive of publications or the archive of Stories. By the way, Stories are archived automatically after 24 hours from the moment of their publication.
To return a post from the archive to the main feed, open the post archive and select the post you want to return. Click on the ellipsis in the upper right corner of the post and select "Show on Profile" from the drop-down menu. The post will reappear in your account in the same order as it appeared in the feed.
To restore a Story from an archive, select the desired Story and click on the "Share" button. This way you can re-publish a Story that ended up in the archive.
A list of situations where archiving can be useful to you
Situation #1.
 Remove urgently…
 We do a lot of work during the working day. And sometimes it happens that either you or the delayed posting service published a post for you that does not correspond to either the time or the text. The first reaction is, of course, immediately removed. But time was spent on the post, a photo was selected, a text was written, hashtags were collected. To delete a post means to lose it forever. You may have made the decision to delete in a hurry. And in order to correct the post, you just need to update the text a little and then yours will sparkle with new colors. Just archive it. And when you have more free time, come back to it again and correct it.
Situation #2. I should remind you…
This is more relevant for Stories. As you remember, they can be re-published in the feed. For example, if you do something on a regular basis on Instagram (for example, host a webinar), then it is not necessary to create a post with information every time. You can simply pull it out of the archive and publish it again while updating it with new GIFs or hashtags from the Stories functionality.
Situation #3: Our hearts demand change
For example, you have rebranded your company or decided to change the page image. For a smooth transition, you can write a dozen new posts, while gradually archiving the old ones. So irrelevant information will smoothly disappear from your page and new information will appear. By archiving all the old content, you will also keep all your old posts and sometimes you can read them at your leisure.
Situation #4: Juggling numbers
To keep statistics and pretty numbers in your profile header, it's sometimes useful to archive old posts. For example, at the very beginning of maintaining a page, you were just learning how to promote. There are almost no likes on the posts, and you didn’t bother much with the texts either. Or let's say you went on vacation. And it was before the creation of Stories on Instagram - they “freaked out” and published a dozen posts in a day. Such posts are only of value to you. But it is better to adhere to the rule "the main thing is not quantity, but quality.

