Boasting over 1 billion users worldwide, Viber is undoubtedly one of the most accomplished alternatives to WhatsApp. Features like video/audio calling and fun-loving group messaging make it spot on for seamless communication.
To prevent your photo library from being cluttered, Viber doesn’t automatically save media on your iPhone. However, if you like to store the shared stuff for a keepsake, you may want to download photos and videos shared through Viber chat threads on your iOS device. Let’s learn how to get it done!
Step #1. Launch Viber on your iOS device.
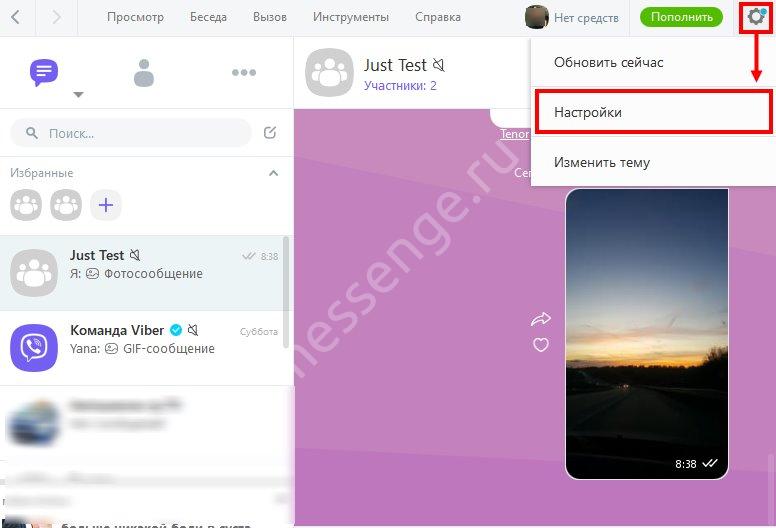
Step #2. Now, tap on More button at the bottom right corner → tap on Settings.
Step #3. Next up, tap on Media.
Step #4. Up next, you need to turn on the switch for Save to Gallery.
That’s pretty much it! Going forward, clips and pics will be automatically saved to your photo library on your device.
Later, if you wish to stop downloading media to your photo library, come to this same setting and toggle off Save to Gallery option.
On this same screen, you can choose to automatically delete media after a preferred time. Simply tap on Keep Media and select the time period.
Besides, you also have the option to prevent the app from auto-downloading photos on the cellular network and even restrict data usage. If you are using limited bandwidth, make sure to take advantage of these features.
Wrapping Up…
Of course, Facebook Messenger and WhatsApp are more popular. However, Viber is not too far behind and does have almost all the tricks to entice users.
One of my favorite features of this app is the Dark Mode (More button → Settings → Appearance) as it makes chatting with friends more convenient in the night. I wish WhatsApp also offered this feature (pretty much like Messenger ) sooner than later.
Explore the following articles as well:
What’s your take on Viber and what are the features you want to see in it? Share your feedback with us in the below comment section.
Author
Jignesh
Jignesh Padhiyar is the co-founder of iGeeksBlog.com, who has a keen eye for news, rumors, and all the unusual stuff around Apple products. During his tight schedule, Jignesh finds some moments of respite to share side-splitting content on social media.
Home > iOS Data Recovery > Two Ways to Save Photos from Viber on iPhone
Gabriel Hammond
February 7, 2017 (Updated: June 28, 2021)
9410 views , 3 min read
0 Count
Your Viber account no doubt contains a lot of memorable photos that you may want to save to your Camera Roll so you can share on other applications. If a friend on Viber has sent you a particularly memorable or important photo and you are wondering how you can save it to your iPhone's camera roll, you've come to the right place.
This article will share with you two different ways to save photos from Viber on iPhone, even you are using iOS 12 on your iPhone.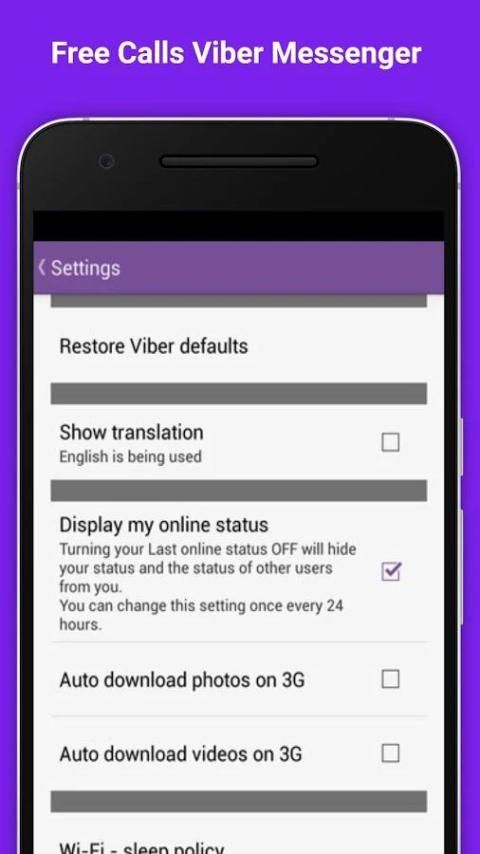 Read on to find out how to do it.
To save Viber Photos to your Camera Roll, you have to turn on the option in Viber. Follow these simple steps to do it.
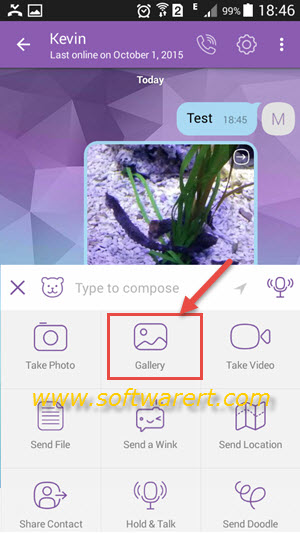
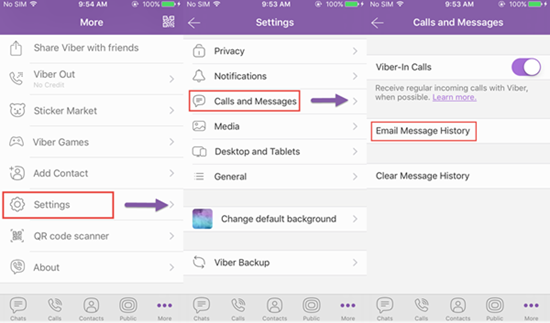
Step 1: Open the Viber app and then tap on "More" from the menu at the bottom.
Step 2: Tap on "Settings" and then "Media" and switch on "Save to Gallery".
Step 3: Now head on over to the Settings app on your iPhone at tap on Privacy > Photos and the make sure that Viber is turned ON.
All your photos should now appear on your camera roll automatically.
A better way to keep your photos safe is to save them to your computer. As a matter of fact, we have a solution that allows you to not only save your Viber photos to your computer but all your messages and call history as well. This is a good way to have a backup of your Viber activity just in case you lose some of the messages.
This solution comes in form of an iPhone data transfer tool known as iMyFone D-Back that also comes in handy when you want to backup all your Viber messages and their attachments to your computer. Some of its features include the following.
1,000,000+ Downloads
Key Features:
Here's how to use iMyFone D-Back to save your Viber messages and their attachments to your computer. The steps work for iOS 12, also.
Step 1: Download and install the program to your computer and then launch it. On the main window, click on "Recover from iOS device" and then click "Start" to begin.
Connect the iPhone to the computer using USB cables and then click "Next" once the program recognizes the device.
In the next window, select "Viber" and then click "Next." to start the scan process.
When the scanning process is complete, select the Viber messages and their attachments that you want to save to your computer and then click "Recover" to choose a location.
Download iMyFone D-Back to save all your Viber data including photos, messages, call history to your computer! The latest iOS 12 can be supported, also!
(Click to rate this post)
Generally rated 5 (256 participated)
Rated successfully!
You have already rated this article, please do not repeat scoring!
Please enable JavaScript to view the comments powered by Disqus.
Content
 4.3 Cause 3. The necessary settings are disabled
 In some situations, it is necessary to move graphic files sent through the communication application to the device’s memory. If an experienced user already knows how to perform this action, then it will be quite difficult for a beginner to understand the functionality. The answer given in the proposed material to the question of how to save a photo from Viber will help you deal with this problem.
An application designed to communicate with telephone contacts via an Internet connection allows you not only to communicate by text messages or free calls, but also to transfer various photos and pictures.
In this regard, Viber is extremely convenient. The ability to save the multimedia files transferred by the interlocutors makes the use of the program more productive
If the user wants the pictures and photos sent by the interlocutors to be automatically saved to the gallery of the mobile device or computer memory, regardless of the addresser, there is a special Viber option that allows you to implement your plan.
Using the proposed function is quite easy; in some cases, the option is enabled by default.
The advantage of this method is that there is no need to save each individual photo that came to Viber. The downside, however, is the rapid consumption of free space on the information carrier when participating in a large number of active conversations - all transferred files will be automatically saved, regardless of size and need.
If the amount of free memory does not allow using the described function, the user can disable it by following the instructions above - and unchecking the box next to the option description.
The user does not have to regularly delete hundreds of unnecessary images if only a few of the incoming files need to be saved. How to implement the proposed method?
For PC and laptop users, you can make it even easier - by right-clicking on the image, call up the context menu and select "Save As". If the download is carried out on the phone, there are no separate nuances.
If the photo that the user is interested in was sent in a conversation a long time ago, there is no point in rewinding thousands of messages in search of it. You can download photos without any problems and very quickly - even in the described situation.
This is important: if you have used hiding the conversation and unhiding it, reinstalling the program, or clearing conversations to save free space on your mobile device or computer, files sent in the conversation up to this point will not be displayed. Ask them to send them again to save.
Thus, any Viber user who has read this article will be able to save any graphic files in order to gain unlimited access to them. Choose any of the proposed methods - each of them is useful in its own way and meets the needs of all categories of Viber users.
xn——6kcbabcec6af4bqt5aqnkugrh9hrf.xn--p1ai
Viber has long been not just a messenger for messaging. People use it to send files, documents and photos. If the messenger is used for these purposes for the first time, then the question may arise how to save a photo from Viber to your phone. Indeed, sometimes it is required not only to view the image, but also to download it for further use.
Any user can copy a picture from a chat to their phone. Downloading files is available not only in personal correspondence, but in group chats. The principle of operation is the same for both cases. You can save photos to the gallery on your phone automatically or manually.
In automatic mode, photos will be downloaded without user confirmation. To enable this feature, do the following:
 The section is located in the lower right corner and is marked with three dashes. App appearance on Android >
 Important! Check the box " Auto download on GSM network " if downloading on mobile network is allowed, or " Auto download on Wi-Fi " if download is allowed when Wi-Fi is connected.
You can mark only one option or both at once. You do not need to save settings. If the user turns on automatic photo upload, then the question of how to save a photo from Viber will completely disappear. Photos are downloaded to the gallery immediately after they are viewed in the correspondence.
Important! Do not give permission to the application to download files automatically over the mobile network if the traffic is limited.
In this case, it is impossible to keep track of the size of the files and the Internet traffic will quickly end.
When there are a lot of correspondence in the messenger, automatic downloading is not always convenient, since photos take up a lot of space. Fortunately, the developers of Viber took care of such users and provided an alternative to automatic downloads. Since this function does not lie on the surface, the question may arise how to download photos from Viber to your phone manually. To manually save a file, you need:
Only selected pictures will appear in the gallery, which will save a lot of smartphone memory.
Users set a contact photo in Viber in order to identify themselves as a person in this way. The avatar for Viber is visible to all friends from the list and can be seen in full size if you go to the user information section.
Unfortunately, you can't upload a contact photo.
The application developers did not add this feature. Therefore, the only option to get a picture from the profile picture is to directly ask the person about it.
Sometimes it happens that a photo from the application is not downloaded to the gallery. This problem can occur for several reasons, but it is always easy to fix.
Especially often this happens when the application works through a mobile network, and not through Wi-Fi. To solve the problem, you need:
 You may need to top up your account.
It happens that the messenger just freezes. This usually happens due to the fact that many applications are open at the same time on the smartphone. The problem is solved by completely disabling all applications. In extreme cases, you should restart your smartphone.
As mentioned above, the user can block downloading files if the phone is not connected to Wi-Fi. You need to check the settings and make sure that all the marks are in the right places.
The smartphone has run out of space. The most common problem is not having enough memory. There are two options for downloading photos:
Conclusion
After reading this manual, messenger users should have no questions about how to copy photos to their smartphone from correspondence. Now you can save funny pictures or important photos as a keepsake. This should be done in advance, as participants may delete submitted pictures and files will be lost.
xn--8sbdcrw5aw.xn--p1ai
Greetings, readers! Viber is a great communication tool. With it, you can save information about your life, work, leave evidence of negotiations, important moments in business, correspondence with loved ones. The choice of storage option depends on the type of information. Understanding this is not always easy, and therefore on the road. Like real navigators, we will guide you through the labyrinth of viber features.
In the messenger settings there is an option to autosave received photos. When selected, her photos will be automatically saved in the gallery. You can see photos, pictures as soon as you enter the viewer.
There is a "save as" option in the PC version of the messenger.
You can use it as follows:
The possibility of automatic saving also exists for videos. You can configure the function by going to the settings in the "media data".
To view saved files:
Viber allows you to leave not only media files, but also regular correspondence.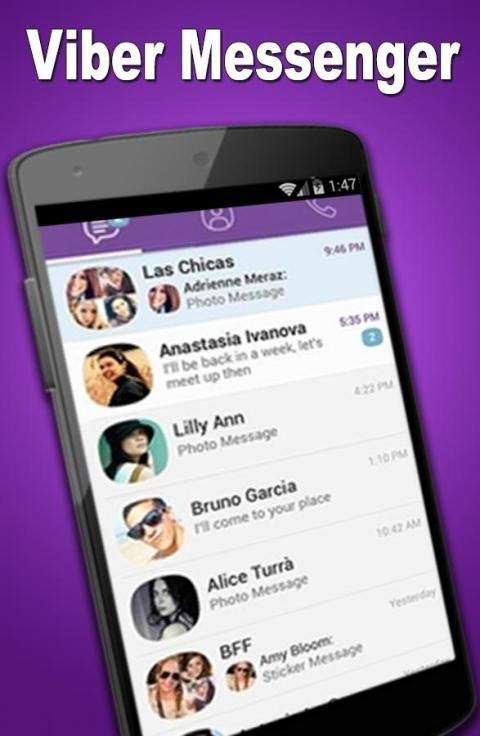 One way is to take a screenshot of your phone or computer. On a smartphone, it will automatically be saved in the gallery. On a PC, the resulting image can be opened with any graphic editor, select the location where it will be stored.
However, there are more convenient ways:
The situation is different with saving groups, public chats after reinstalling viber, installing its updates, changing a smartphone.
Your profile in general chats, correspondence will be saved automatically. Immediately after the messenger is reinstalled, you can resume using the possibilities of group dialogues in full.
All phone numbers, usernames from your contact list in viber are automatically saved in the phone's memory.
The messenger allows you to add new ones:
Although the application for the computer has fewer functions, in terms of saving audio recordings and voice messages, this is a more convenient tool.
Just open the desired message, right-click and select "save as".
This option is not available on the phone.
Viber users have the ability to save photos, videos, audio, voice messages, music and correspondence. There is no single tool for this. For each case there are special recommendations.
nashkomp.ru
Many people exchange photos and videos with their friends and colleagues, text messages and make calls. At the same time, you need to understand that the question of how to save a photo from Viber to your phone remains on the agenda. By carefully studying this issue, it is recommended to take into account the numerous nuances of using the application.
Only if you have decent knowledge, using Viber will be able to reveal all its features and advantages to you. So, what should you expect?
In fact, there are various ways to do this, and in each case, quick and easy actions are guaranteed. The most important thing is to understand in which direction it is best to act for you.
 In addition, the saving will occur automatically. To do this, you just need to go through the following pattern once: More - “Settings - Save to Gallery” .
 Now it's time to understand how to send photos and videos to your interlocutors. In fact, this option pleases with its lightness , so you can successfully learn to cope with this task.
First of all, you need to start a dialogue with the person you are interested in. After that, you need to click on the plus icon, which is located at the bottom of the dialog. Immediately after that, a menu will appear in which you can see two columns that are responsible for the sent photos.
Now you can click on "Take photo" and go to the camera.
Download the new version of Viber
After you take the desired photo, the photo will be sent to the other party. If you wish, you can send a photo that was taken a long time ago. In this situation, you need to use the gallery. As you can see, the process pleases with its simplicity.
First of all, if the program is not able to open a photo from a chat, you need to check the Internet connection. In most cases, poor internet connection prevents the download. If you want to re-look at a photo that has not been uploaded, you must find the desired message in the message history, and then click on it once.
The picture will open in full size. According to this scheme, you can see the photo set in the profile. Among the advantages, it should be noted the quick sending of pictures via Viber, since a person does not have to give confirmation upon receipt.
So, once again we will dwell on the features of downloading, because you will need to do this in practice. You must click on the photo in the chat and hold on it for a while, then select the "Save" item. Now you can understand how to save a photo from Viber to your phone if there is a need to share this type of content with your friends.
xn——7kcabbec2afz1as3apmjtgqh5hrf.com
It is quite possible to leave pleasant memories in the form of photos and videos from Viber. It is not necessary to store everything in the correspondence feed, because you can download media files to the device's memory. How to save photos from Viber to your phone? The process will depend on:

Where are photos and videos stored? When installing the messenger, separate folders Viber Images and Viber Videos are created in the gallery by default. The data from the tapes is stored there. But as soon as the user deletes a particular photo in the feed, it will also disappear from the gallery. Therefore, it is important to know how and where you can move data so that it is not lost.
In the iPhone settings there are factory-preset options for saving all media. When installing and using the messenger, the user can set the option to download media in the media storage. For this you need:
Note! In exactly the same way, it is possible to build on the placement of pictures and videos in smartphones with the Android OS.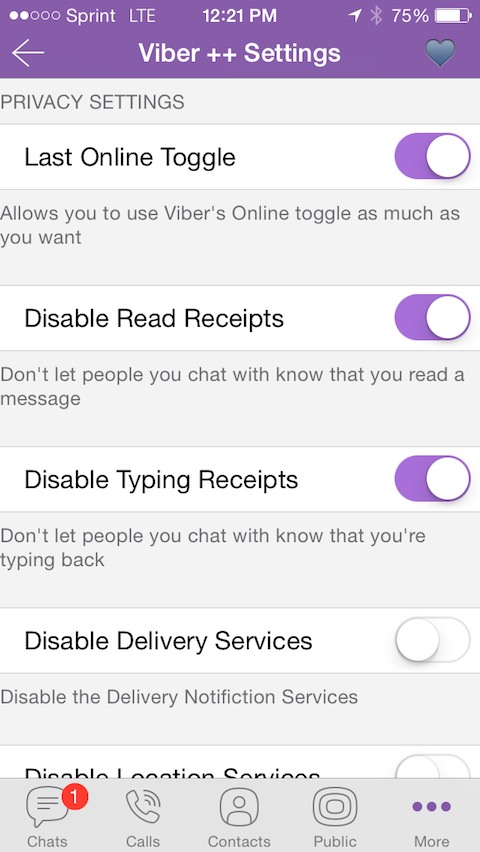 Only the name of the gallery and its cataloging will differ.
The Viber Images/Videos folder is located in the main images folder. But when removed from the tape, pictures can be deleted from there as well.
To prevent loss, you must perform the following actions:
Important to know! A more recent version of Viber (from 5.6 and higher) allows the user to independently choose the path for saving media files. To do this, a file is selected in the ribbon, and the "Save" button is pressed in the menu that appears. Next, the system prompts you to assign a storage location.
Viber installed on a computer allows you to download photos that are saved in a preinstalled folder called "Viber Downloads", "Viber Photos". How to find the path to this folder:
Method 1.
Method 2.
Method 3. Useful to save the video to the computer if Viber is not installed on the PC:

So, now the user has a large selection of methods in his arsenal, how to download photos from Viber, correctly set the path for storing it and quickly find it if necessary.
xn--7sbdcrwk5aq.xn--p1ai
Share:
×
Recommended viewing
Adblock
detector
How to save photos from Viber to your phone gallery or computer? We will tell! Below you will find detailed instructions on how to autosave or manually upload images on a computer and different smartphone operating systems. It's just a crime to ignore cool pictures, isn't it?
Similarly, you can transfer photos from Viber to the computer one by one:
You can disable saving photos in Viber on Android or iPhone by analogy.

Finally, let's see how to disable saving photos in Viber on a computer! According to the instructions above, uncheck the box "Startup". Done, now the pictures will remain in the chat.
You can also set up automatic download of any images from users:
It happens that the messenger just freezes. This usually happens due to the fact that many applications are open at the same time on the smartphone. The problem is solved by completely disabling all applications. In extreme cases, you should restart your smartphone.
You can check only one option or both. You do not need to save settings. If the user turns on automatic photo upload, then the question of how to save a photo from Viber will completely disappear. Photos are downloaded to the gallery immediately after they are viewed in the correspondence.
Users set a contact photo in Viber in order to identify themselves as a person in this way. The avatar for Viber is visible to all friends from the list and can be seen in full size if you go to the user information section.
Conclusion
If automatic saving of photos in Viber does not work, check the settings:

Please note. The setting does not work on some mobile devices. In this case, check the permissions for the application to access the device's memory. If this does not help, you will have to save the photo from Viber to your mobile phone yourself.
Downloading a photo in Viber to a mobile phone or tablet is not difficult. You can view the copied photos through the gallery. Consider how to download photos from Viber to your phone manually:
You do not need to restart Viber. Now the application will save all received pictures in the Viber section.
No confirmation required. The file will be saved to the gallery in the Viber section. To find the file, go to the gallery and open the Viber album.
How to do this is detailed in the next chapter.
To prevent the system disk from becoming full over time, autoloading of multimedia in the Viber version for the computer must be disabled manually. And here you can also set the parameters for how long to store files on the device.
Step-by-step instructions on how to save photos from Viber to your computer:
By default, when installing Viber on a smartphone, the application has optimal settings and auto-upload of photos via WiFi is enabled. That is, you just need to open the image for viewing and it is automatically loaded into the gallery. Folders viber/media/Viber Images for photos and pictures and /Viber Videos for videos are created in the system.
The principle of saving photos and videos on a PC in the desktop version of Viber is slightly different. When installing Viber on a computer, the ViberDownloads folder is created on the system drive. All media content is automatically downloaded to this folder. It is located at - C:UsersUSERNAMEDocumentsViberDownloads .
Photo opens in full size. Click on the "Save" button.
Select the three horizontal lines that are at the bottom right of the screen.
Select "Data and Media".
Click on the "Share" icon, which is located at the top of the screen.
Tap on the photo.
We see a notification that the file has been saved with an indication of its location.
Viber has been more than just a text messaging app for quite some time now, it has also been used to send documents, photos and videos. If this is your first time using this messenger, then you may have a question, how to save a photo from viber? We will talk further about how to do this manually or set up automatic saving using the example of Android and iOS phones.
First method : This option can be enabled in the messenger settings at any time. To do this, go to "Settings" (in the English version - Settings) from the menu "More" (More / three horizontal stripes or dots). In the settings you need to select "Save to Gallery" (Save to Gallery). Having done this simple path once, you will ensure that the photo is regularly saved automatically to your smartphone.
Interesting to read: How to change the language from English to Russian, read here!
The third method works for all versions of the application after Viber 5.6: the process of saving photos has been simplified in them. If you are a user of one of the new versions, you can select a photo or video clip and click the Save button. All photos are automatically stored in folders on your phones. Folder viber / media / Viber Images if the video is / Viber Videos .
The second method is convenient for one-time, not permanent downloading of photos. It works like this: select a photo or video in the chat by clicking on it. After that, click the file upload icon (a rectangle with an up arrow). Then click "Save to Gallery". This way of saving files from Viber will allow you to control the memory usage of your smartphone. Important : This method does not work on all versions of Viber.
The developers of the application have thought of several options for saving photos from a chat to your phone. You just have to familiarize yourself with them and choose the most suitable for a particular situation. The first method is to automatically save files to the gallery.
Choose the contact photo you need and then just hold your finger on it for a few seconds. When the photo is highlighted, a toolbar will appear on the screen where you need to click on the list of available functions (vertical three dots). In the options presented, select "Copy", and then the folder in which you want to save the photo. The best option is a folder on the memory card "DCIM".
The most important thing is that when exchanging photos and other files through Viber, the original quality is not lost.
If you have been sent a photo, you can set the save function on the Android OS in two modes: save only the objects you select manually or save all sent files to the smartphone's gallery.
Despite the fact that the main function of the application is free calls and sending messages, all users can also exchange files of various formats. These files include:0006
Now let's look at some of the difficulties that you may encounter when setting up Viber and saving a photo:
It can be replaced by another option "Auto download over Wi-Fi" and "Auto download over GSM network". Activate these two items. It all depends on the installed version of the program on the phone, but you can still determine the meaning of the option by the name.
Saved photos can be edited, sent to other users or modified using additional programs.
iPhone users have several options. For example, set the settings at which media files will immediately fall into the Camera Roll. To do this:
The messenger provides for sending and receiving media files. Some of them may be important for the user, and he wants to keep them not only in the application, but also on the mobile device. In such a situation, the question arises of how to save a photo from Viber to your phone. You can do it, and it doesn't take much time.
Another way is to manually save the file. In this case, only the specified photo will remain on the smartphone, the rest will continue to be stored only in Viber.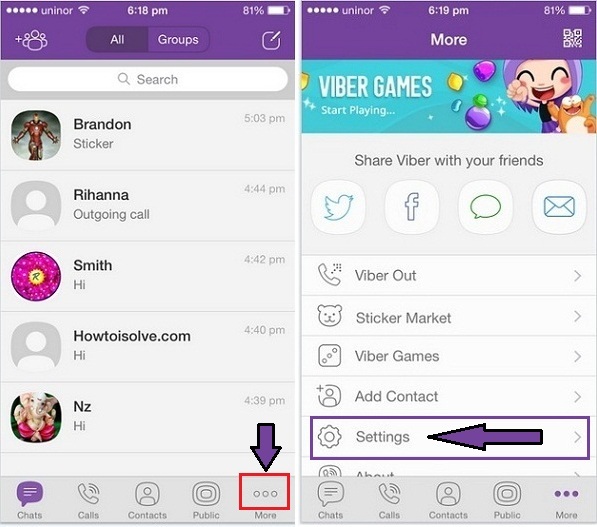 To manually save an image, click on it. Next, select the icon to send, and in the menu that opens, click the "Save to Gallery" command. It is important to note that animated pictures will not be automatically copied to the Camera Roll, even if this option is set by default.
To prevent loss, follow these steps:
Important to know! A more recent version of Viber (from 5.6 and higher) allows the user to independently choose the path for saving media files. To do this, a file is selected in the ribbon, and the "Save" button is pressed in the menu that appears. Next, the system prompts you to assign a storage location.
Viber installed on a computer allows you to download photos that are saved in a preinstalled folder called "Viber Downloads", "Viber Photos". How to find the path to this folder:
Where are photos and videos stored? When installing the messenger, separate folders Viber Images and Viber Videos are created in the gallery by default. The data from the tapes is stored there. But as soon as the user deletes a particular photo in the feed, it will also disappear from the gallery. Therefore, it is important to know how and where you can move data so that it is not lost.
Note! In exactly the same way, it is possible to build on the placement of pictures and videos in smartphones with the Android OS. Only the name of the gallery and its cataloging will differ.
Method 2.
It is quite possible to leave pleasant memories in the form of photos and videos from Viber. It is not necessary to store everything in the correspondence feed, because you can download media files to the device's memory. How to save photos from Viber to your phone? The process will depend on:
Download the new version of Viber
After you take the desired picture, the photo will be sent to the interlocutor. If you wish, you can send a photo that was taken a long time ago. In this situation, you need to use the gallery. As you can see, the process pleases with its simplicity.
Now it's time to understand how to send photos and videos to your interlocutors. In fact, this option pleases with its lightness , because you can successfully learn how to cope with this task.
How to save a photo from Viber
First of all, if the program is not able to open a photo from a chat, you need to check the Internet connection. In most cases, poor internet connection prevents the download. If you want to re-look at a photo that has not been uploaded, you must find the desired message in the message history, and then click on it once.
Only if you have decent knowledge, using Viber will be able to reveal all its features and advantages to you. So, what should you expect?
The picture will open in full size. According to this scheme, you can see the photo set in the profile.