The ability to archive posts on Instagram is a handy tool, as it hides posts from your feed without deleting them. When a post is archived, the likes and comments are preserved should you want to revisit it later or even unarchive it.
Maybe you've had an Instagram account for over a decade and want to declutter your feed from the overfiltered, low-res snapshots — or you've pivoted to using your account for business and want to hide more personal posts.
Unarchiving an Instagram post can be done in a few simple steps, which we've outlined below.
1. Open the Instagram app.
2. Navigate to your profile page by tapping your profile icon on the bottom-right.
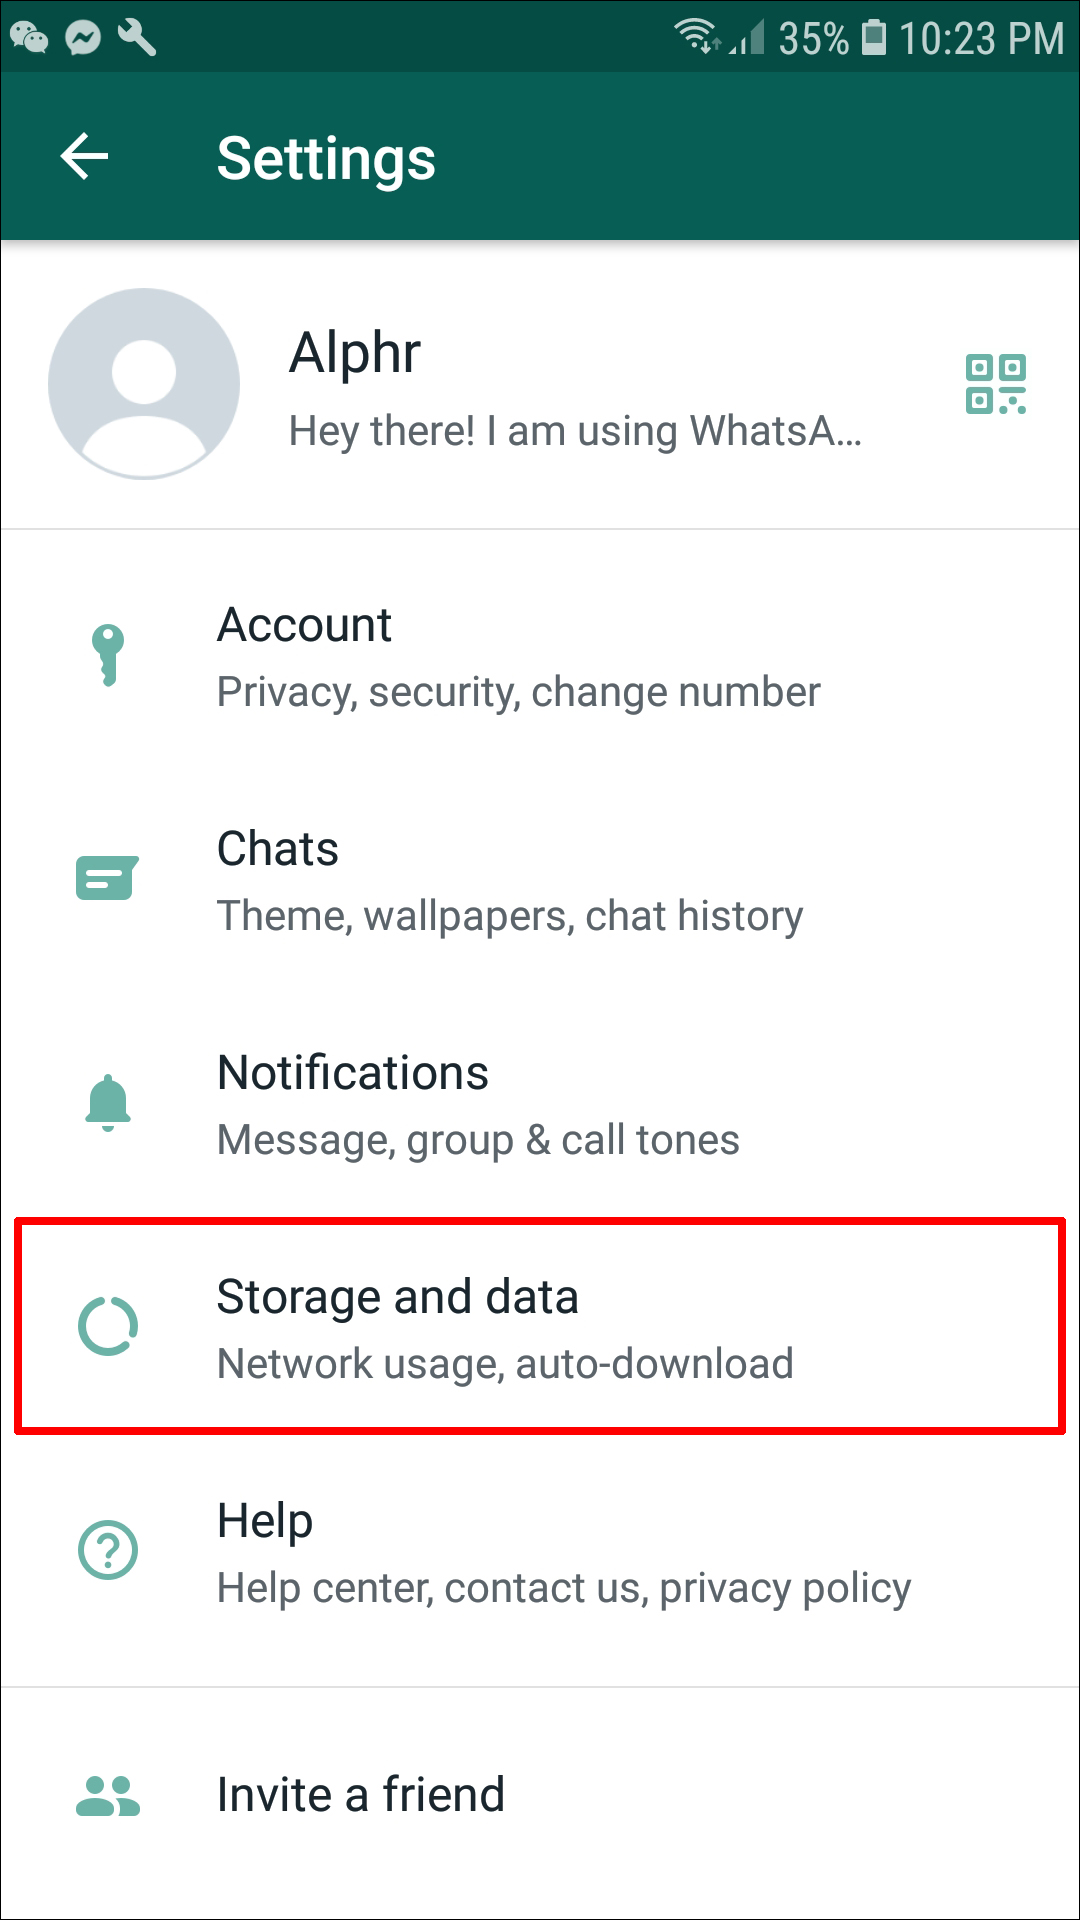
3. Tap the three lines icon on the top-right of the screen, then tap Archive.
Access profile settings and more by tapping the menu icon. Abigail Abesamis Demarest4. Under Posts archive, tap to open the post you want to unarchive.
You may need to tap the arrow at the top to navigate to the Posts archive (instead of Stories or Live archive). Abigail Abesamis Demarest
 5. Tap the three dots icon on the top-right of the post, then Show on profile.
Use the same method to archive an Instagram post. Abigail Abesamis DemarestAbigail Abesamis Demarest
Abigail Abesamis Demarest is a contributing writer for Insider based in New York. She loves a good glazed donut and nerdy deep dives into the science of food and how it's made.
Read moreRead less
Rather than users deleting content and losing the company’s potential revenue, Instagram offers a way to save it for later. It’s also beneficial to personal users because they can quickly bring up seasonal images or posts and adjust them. Rather than delete the post entirely, you can now archive it to remove it from the public’s eye. You can still view the post privately to use at a later date, but nobody else sees it. Live streams and stories get archived automatically, but this content is about “Instagram Posts.” Lets’ get started.
The Instagram “archive” feature contains a section for stories, live streams, and posts. The Instagram “Posts” category has an opt-in feature that you must use manually. Instagram does not automatically archive old or deleted posts like other systems—just stories and live streams.
When you archive a post, it remains there until you manually delete it or un-archive it. As previously mentioned, Instagram Archive gets split between posts, stories, and live content. You’ll want to view your posts.
To access the Instagram archive:

As mentioned above, the archive is for you only and is not publicly viewable.
Your Instagram post now appears in your archives for later use.
Unarchiving Instagram posts is very straightforward when you want to bring a post out of hibernation and back into your profile. Go into your Instagram archive and select the option to show it on your profile again. There is no restore option, just the choice to place the archived post on your profile. Essentially, that is the same thing in this situation.
The post now becomes active once more and is publicly viewable.
If you prefer to delete your archived post instead of making it public again, you can do it by selecting “Delete” instead of “Show on Profile. ” Your post gets deleted forever and is not recoverable. Sometimes that’s a good thing!
In closing, the Instagram archive feature is a neat idea that gives you control over what others see, whether for personal use or business. While we are gradually adjusting to the temporal nature of online life, some things are worth keeping for the longer term. If you don’t keep those memories close, at least you can preserve them on Instagram.
For social media savvy businesses, this is a way of using posts and media multiple times or for seasonal offers that repeat annually or regularly. Why create a Christmas offer each year if you can archive and tweak it and then make it public again? As for personal use, the Instagram archive feature lets you store posts or images you might want to reuse later, hold onto for personal reference, or even adjust them.
The Instagram Stories* section is amazing with so many possibilities. Among them there are functions without which the SMM manager is like without hands. Let's talk about simple but effective: how to share a story on Instagram*, post an IGTV announcement or a post there.
Let's figure out what exactly you can repost in your stories:
Let's see how it works.
When your account is tagged in a story, a tag notification will be sent to your private messages. It also contains an active "Add Story" link to click on.
How to repost stories on Instagram*: steps one and two The standard window for editing Stories will open. Optionally, you can add a link (available for accounts with more than 10,000 followers), stickers, text, and filters.
Next, send the post to your stories. Done - you are amazing!
To share your or someone else's post on your story, click on the airplane icon below the post and select "Add post to your Story". The story editing page will open, where you can add a link, stickers, and more.
Share the post in your Story and enjoyBy the way, if you don't want your stories to be reposted all in a row, disable this feature in the settings.
Find Stories in the Privacy section, manage reposts thereThe principle here is the same as for posts. If you want to share, for example, a cool live stream, start watching in the IGTV section of the blogger who hosted it, click the plane below the video and select "Add video to your Story."
Post from your Story with some kind of inscription to encourage viewing For those who like to work from a computer, the SMMplanner delayed posting service allows you to repost posts in the Stories of any of your Instagram accounts*.
Go to the "Stickers" tab and select the "Post" sticker Posts of your account have opened, select the one you need Done. Position the main image of the post and publishIf you select a project with several accounts, you will be able to announce the post of one account in the History of another.
Read more about delayed posting of Stories with cool design in the article “Delayed Instagram* Stories Constructor by SMMplanner”.
Reposts on Instagram* is a useful feature for effective work on account content:
 Use catchy headlines to keep users interested.
 The article has been updated. First published: October 3, 2018
Technology
Instagram has a function to hide content in the archive But some users then face a problem: how to unzip photos on Instagram. In practice, the process is simple to perform, and the ability to archive and restore at a convenient time greatly facilitates profile maintenance.
Taishet24 on Odnoklassniki
An Instagram archive is a data storage. You can save posts or stories. The photo archived remains the same as it was published. All comments and likes are saved. After unzipping, the post is completely restored with the old posting date. Publications in the archive can be re-read and sent to friends. The storage is for photos that need to be removed from the tape, but kept for yourself.
The archive function is useful in cases like this:
 At the same time, statistics are saved for further provision to the customer.
Posts from the feed are archived according to the algorithm:
Not only posts with photos, but also stories are removed from the archive. They should be automatically saved there after 24 hours. If this does not happen, you can change the settings: