You want to know how to upload multiple photos to Instagram from PC? Presently Instagram is being used as a source of income and by users looking to grow their accounts. For this very reason, users find it quite clear to post directly through the computer rather than transferring pictures to a phone through a desktop, which takes a lot of time.
There are various ways to upload pictures on Instagram through PC, including directly through the Instagram app, social media management tools, latelysocial.com, and browser extensions.
Do you want to grow your account and want it to perform better? Is there any way you can upload pictures through a PC with high resolution?
Read below, and you’ll find out ways to upload pictures through PC on Instagram:
The chrome extension of the desktop is quite a simple way to upload pictures on Instagram. However, you might not be able to upload several images, which are possible through other methods.
You can convert your PC screen to a mobile one by changing some browser settings in the following method. Open google chrome and follow our step by step guide to posting on Instagram.
You can upload multiple photos on Instagram by creating a free account on this app. Here are the steps to follow:
Now that you have created an account on this app, please follow the steps below to upload several things on Instagram easily.
 com.
com. This confirms that you want to upload photos to your selected Instagram account.
Now you know how to upload multiple photos to Instagram from your PC. Good luck!
Tags: GuideInstagramSoftware
Instagram made some changes recently to how you add or select multiple photos for a post. Naturally, a lot of people started wondering why Instagram won’t let me post multiple photos but worry not, we have got everything covered here. If you are looking to add more than one photo on an Instagram story but are finding the multiple pictures selection button missing or gone, then here is a small trick you need to use to be able to select multiple photos for your Instagram story.
All the fancy gimmicks aside, the core driver of Instagram’s popularity has been its minimalist scrollable feed, populated with posts from your friends and people you follow. Posting pictures and videos on the feed is how people share snippets of their lives and connect with each other.
Posting a single photo is easy enough. But if there are multiple photos, posting them one by one can feel nothing short of drudgery. Posting a flurry of photos doesn’t just ruin an otherwise well-maintained feed, but it also brings one dangerously close to spam territory.
A better alternative is to post all those pictures as a single post. Here are all the ways you can upload multiple photos to a post, be it from the app or from your PC.
No, you can easily add multiple photos to your Instagram post or story. But yes, the button to select multiple photos is undergoing some change — like it or not.
On iPhone, the multiple button is now gone but as of now (May 23, 2021), on Android, it’s ever-present. But don’t worry, you can simply tap and hold on any image of yours to get the multiple selection back. We have got it all covered below, so jump to the first guide below to learn about adding multiple photos on your Instagram post.
Adding multiple photos to a single post doesn’t just keep things simple for you but also your followers whose feeds the post is going to appear in. Here’s how you can do so from the app.
The first method is the easiest native method to add multiple photos to a post. Open Instagram and tap on the ‘+‘ icon at the top left corner.
Swipe to get to the Post tab at the bottom of the screen.
Here, tap on Select multiple. If you find the Multiple button missing on your device, then simply tap and hold any of image of yours to get the multiple selection back. Yes, it’s a tad hidden now.
This will add a little circle at the corner of the photos, allowing you to pick multiple photos for your post. Tap on the photos that you want to add.
The photos will be added depending on the number that is associated with them. But you can always unselect/select and move the order around.
Once you’re done selecting, tap on the arrow at the top right corner.
On the next screen, you can add filters to your images.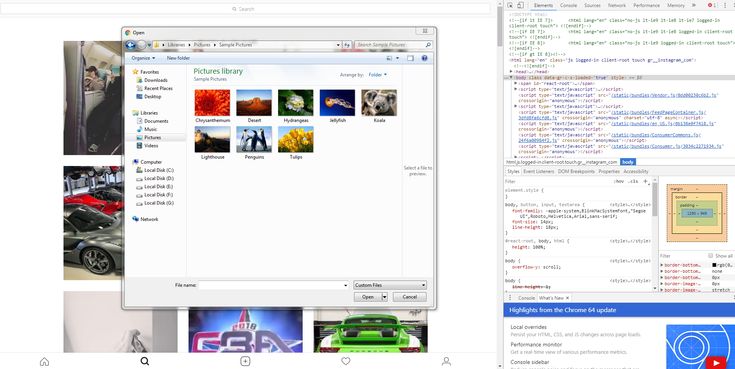
To get more edit options, tap on the white circle on a photo.
Here, under the “Edit” tab, you have a variety of options to adjust and give the image final touches.
When done with editing, tap on the tick at the top right corner.
Swipe left/right to get to other images and edit them if you want. Once done, tap on the right arrow at the top.
Now you can write a caption, tag people, and add location as you prefer. Then, to finally post, tap on the tick at the top right corner.
And that’s it, your post with multiple pictures is up.
The other way to post multiple pictures is available on your Profile page. Tap on your profile icon at the bottom right corner of the screen.
Here, tap on the ‘+‘ icon next to your username at the top.
Tap on Feed Post.
Now, you will get the same screen that lets you pick multiple pictures at once. From here on out, the steps to post multiple pictures are the same as in the previous step.
Adding multiple pictures to a post is easy enough once you know the steps. But what if you want to create a collage with multiple pictures on a single image? Instagram Stories have a ‘Layout’ option that lets one do so. But there’s no such option for posts.
There is, however, Instagram’s Layout app which can be used to that effect.
Download: Instagram Layout for Android | For iPhone
Once the app is installed, with Gallery highlighted at the bottom, tap on the photos that you want to make a collage out of. A maximum of 9 photos can be added to a single layout.
Now, it’s time to choose the layout. Drag the layout window down to expand it slightly. Then swipe left to see the layouts available to you. When you find the one that you like, tap on it.
This will lead to the Edit screen where you’ll be able to replace your photos, mirror, flip and give them a border.
Once done, tap on Save at the top right corner. The collage will be saved to your Camera Roll.
Tap on Instagram.
Then Feed.
Now, you’ll be redirected to Instagram’s New Post page. Tap on the arrow at the top right corner.
The steps from here on out are the same as before. So go ahead and edit and post your photos as you normally would.
Although Instagram doesn’t let users post photos and stories from the desktop, there are a couple of ways that unlock that potential. A simple way to add photos on PC is by enabling DevTools of your browser. But as it only lets you add a single picture at a time, we have to look elsewhere. The following are a few ways to add multiple photos to a post from your desktop.
Posting pictures through the Facebook Creator Studio method requires you to have the following:

If you meet these requirements, then you can go ahead and use Facebook Creator Studio for Instagram. Fret not if you don’t have a Creator or Business account, or don’t know how to connect your Facebook page to it. The steps for these two are given below.
Go to Facebook Creator Studio and log in. Then click on the Instagram icon at the top.
Click on Connect Your Account if you haven’t done so already.
Then log in to your Instagram. If you don’t have a creator or business account, you will be asked to switch to it.
To do so, open the Instagram app, tap on the profile icon at the bottom right.
Then tap on the three horizontal lines at the top right.
Tap Settings.
Then Account.
Scroll down and tap on Switch to Professional Account.
When you get to the Creator page, select either “Creator” or “Business”. Then tap Next.
Once you’re the creator, you will have to link your Facebook page to your Instagram. For this, tap on your Profile icon on Instagram.
Then tap Edit Profile.
Under “Profile Information”, tap on Page.
Tap Connect an Existing Page.
Check the two linked accounts, then tap Continue to set up the Accounts Centre.
Once the Accounts Centre is set up, select your Facebook page and tap Done.
Now, go back to Creator Studio on your PC and click on Try again to connect to Instagram.
You’re all set up and ready to start posting (with multiple pictures) from your PC. First up, click on Create Post.
Select Instagram feed from the list.
Now click on Add content.
Then choose From file upload.
Browse and select the pictures that you want to have in your carousel post and click on Open.
Once the pictures are uploaded, you can click on the numbers to decide their order in the post. Additionally, you can tag people, change the dimensions of the photo, or delete the photo with the options given under each photo.
Give your post a caption and then click on Publish at the bottom right corner.
And that’s it! Your multi-picture post is posted on Instagram from PC.
Using the Facebook Creator Studio also lets you schedule your Instagram post for later. This is especially useful for posts with multiple pictures as they tend to be more thought out and deliberate. It also lets you create the post now and have it published at a later, more propitious, time.
To do so, first of all, create a post in Facebook Creator Studio as shown in the previous step. Once you have added the photos, edited them, and written your caption, instead of clicking on “Publish”, click on the downward arrow next to it.
Then click on Schedule.
Specify the data and the time when you want your post to go up. Then click on Schedule below it.
Leave it to third-party developers to solve problems that cannot be solved natively. There are a few applications that let you post pictures and videos from a PC, regardless of whether or not you have a creator’s account or a Facebook page. Here is a couple of them that you may want to try out:
Later (PC and Mac)‘Later‘ is a web-based application that lets you add and schedule your Instagram posts straight from your PC as well as your mobile. For carousel posts, however, you will have to get a paid plan. Also, since this is basically a scheduler app that works via push notifications, you will have to download its mobile app as well.
Download: Later for Android | For iPhone
Uplet (Mac only)Uplet is available exclusively for Mac users. It lets you edit and upload multiple photos from your computer and is super easy to use. Simply download Uplet, log in to your Instagram, and get started.
Download: Uplet
Currently, Instagram only lets you add no more than 10 photos to a post. That means it doesn’t matter how you’re adding photos to your carousel posts, you’ll always be limited to 10 pictures. Also, you might want to keep in mind that once a post is up, you won’t be able to add more photos to it. So if you want to add multiple photos to a post, make sure you get them all in before you hit “Post” or “Publish”.
These were all the ways that you could post multiple photos or a carousel post on Instagram. Though there are some other ways to do so as well, they don’t let you post multiple pictures to a post at once and so have been avoided purposefully. Either way, we hope that you’re able to do so on both your phone as well as your computer.
The question of how to add several photos on Instagram at the same time is at the top of the list of frequently asked questions. Photo hosting is constantly evolving, developers are introducing new features, making the interface more convenient.
Until 2017, users could post one photo at a time, but then a carousel feature was added. It allows you to attach up to 10 pictures to a publication at a time. The life of Instagrammers has become easier because collages were not always convenient to use. Yes, and they looked in the profile is not quite nice.
We will find out for what purpose the carousel option was created. We will also talk about the nuances of combining several images into one post from different devices.
Contents
The function responsible for this is commonly called a "carousel", reminiscent of a slide show. It allows you to post up to 10 pictures, which users can scroll through by swiping left and right. At the stage of editing a carousel post, you can apply a filter both to one image or video, and to all at once. But, since this is one publication, text support and geolocation will have to be used one for all files. When you post the carousel post, your followers will see an ellipsis below the photo.
Is it possible to avoid putting multiple media files in one entry? Of course. But this option is convenient for owners of personal pages, travel blogs, beauty accounts, sports profiles, etc. For example, if a beauty blogger knows how to post several photos on Instagram, this will allow him to demonstrate the application of makeup in stages. People who play sports can show their workouts from different angles, lay out step-by-step cooking for proper nutrition. For owners of commercial pages, the benefits of a carousel post are as follows:
If all the photos are uploaded in one post, potential buyers will not complain that you litter their feed. Thus, you can create unobtrusive advertising for a brand or organization, promote your product.
How to add multiple photos on Instagram at the same time - we have prepared a detailed guide that will allow you to cope with this task.
First, go to your insta account from the official mobile application for Android or iOS. Immediately, we note that the execution process does not depend on the operating system of the phone. At the bottom of the news feed, in the middle, we find the "+" button. Click on it to add a new photo or video. In the lower right corner of the editing window, select the "Select Multiple" icon. It is depicted as several files combined with each other. We click on it.
The last picture you saved to the gallery will be displayed automatically. But this action can be canceled by unchecking the checkbox. We select files for one post, paying attention to the order in which they are displayed.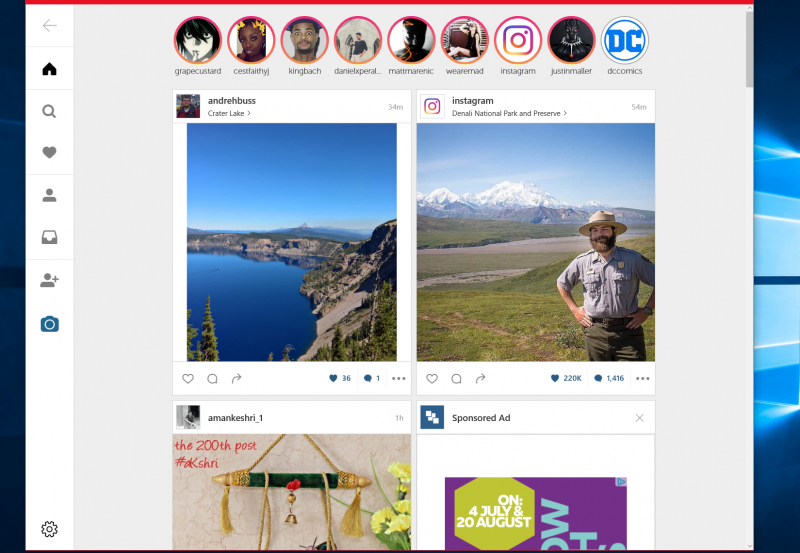 After we have selected the content, click "Next".
Further instructions on how to add multiple photos to Instagram include photo editing. You can apply a separate effect to each picture. To make all files within one post look organic, we recommend choosing one filter for all, and not for each one individually. If there is a need to remove a picture from the carousel, you need to hold it with your finger for a few seconds, and then move it to the "Urn" icon.
At the final stage, before placing the carousel post, you need to add text accompaniment or a title. The text is displayed for all selected files, so it's important that it makes sense. You can also tag people who have been photographed with you or who are otherwise related to the content. To post a post, press the share button.
Due to the limited functionality of the desktop version, users are faced with the question of how to upload several photos to Instagram from a computer. From a PC, you can only view content, leave likes and comments. But the function responsible for the placement of multimedia files is still missing. We will talk about alternative ways to combine several pictures into one publication.
For all PC owners with the Windows 10 operating system, an analogue of the Instagram social network was specially created. We strongly do not recommend installing the program on Windows 8, since it lacks the main element of the Microsoft Store. If your computer meets all the requirements, perform the following steps:
 Click "Download" and wait for the download to complete successfully.
 Further actions are practically no different from those that we analyzed for smartphones. In the middle of the bottom toolbar, click on the "+". Tap on the hint at the top and select the folder that you recently created. We click on the images that we want to combine into a “carousel”, process them if desired. Add text, tags, geolocation, and share with followers.
If you belong to the group of owners of the Windows operating system, then do not rush to get upset. Now we will open the secret for you on how to add several photos to Instagram in one post from a computer. For this, an Android emulator is designed, which can be downloaded from the link https://www.bluestacks.com/.
Once we have downloaded Bluestacks, we need to launch it and go to Google Play. This will require authorization using the email address used on the phone. We wait a few seconds until the system allows access to the software store. At the top of the screen, find the search bar and enter the query "Instagram". To install it on your computer, tap on the green key.
If the installation process is completed successfully, go to the social network and log in to your account. At the bottom of the menu, click on the “plus” already familiar to us and add files one by one. We edit them, add a signature and publish.
These steps will solve the problem of how to post multiple photos on Instagram in one post. In a situation where Bluestacks does not recognize your photos on the desktop, you need to go to "My Computer" - "Picture" - "Bluestacks". We transfer all media files set aside for publication here, and try to post the post again.
Also read: Shadowban on Instagram: what does it mean, checking an account, how to remove it, reasons for getting hit
All Instagrammers already know what a “story” is. This is an option that allows you to post content that will be available for viewing for 24 hours. As soon as a day passes, the content will go to the archive, and only the owner of the account will be able to see it. Such publications have become popular due to the fact that they allow you to keep in touch with your audience almost around the clock.
Unfortunately, one story is limited to posting only one image or video. To post more than one photo at a time, you will have to combine them into collages. If you publish more than two files within 24 hours, they will automatically be combined into one "slide show".
We already know how to add multiple photos to one post on Instagram. And to replenish stories, you need to click on your profile picture in the upper left corner and swipe up from the bottom. The gallery of your device will open, from which you need to select the files you want to publish.
Some Instagrammers have to deal with errors in the process of combining several pictures into one post. This cannot be done due to the fact that the required option simply does not exist. But the solution to the problem is simple: you need to close the insta app, and then open it again. Often this fixes the error, but if this method does not help, restart the device.
If your carousel publication has stopped loading, we recommend that you check the quality of your network connection. It is possible that due to Internet failures, it is not possible to successfully complete the process.
Posts with more than one photo get more attention. Such a function is undoubtedly useful, because it allows you not to clog both your profile and the feed of subscribers. Our tips on how to add multiple Instagram photos in one post will come in handy for owners of business pages and personal blogs. Combine content, come up with texts that will be interesting to read, and followers will follow you.
Everything useful about Instagram - instagramer.info
Official website - www.instagram.com
Many people ask themselves: "Is it possible to post a photo to Instagram from a computer?" We have collected in this article methods that give a 100% guarantee that your publication will appear in the feed if you add it from a PC. Let's move on to detailed instructions.
To post an image to Instagram from a computer, use your browser. For Google Chrome and Opera, right-click on the "View Code" option, and in "Yandex Browser" - "Explore Element". Now let's see how it looks in practice.
Go to the browser, go to the Instagram page and connect your account.
Application main pageRight-click and select View Code. We used the Google Chrome browser.
An example of how to enable "View code" in the browserIn the window that opens, select the display of the page in mobile phone format.
Selecting the page format in the browser Refreshing the page and using all the functionality of the application from Facebook.
And now we can send a picture.
An overview of working with a pictureNext, let's look at several options for loading images using browser extensions.
This application helps you quickly upload a photo without you needing any extra effort.
Installing the extension.
To access Google Chrome extensions, click on the three dots at the top of the screen, select "More tools" and then find the "Extensions" line.
An example of how to enter the extensionsAfter installation, an icon will appear in the extension bar:
Web Instagram icon in the extension barClick on it, a separate tab will open in front of you in a vertical size. Now you can work with the service, as in a mobile phone.
A separate tab with an application The screencast shows the mechanism of the application - click "+", select a photo and send the picture to the feed.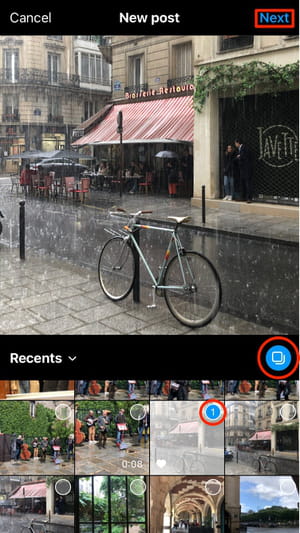 The only downside is that you will not be able to edit the image with the built-in Instagram functionality.
The second extension we are looking at allows you to add images and work with stories.
Installing the extension.
Open an Instagram account in a browser. After connecting, several icons will appear on the page: a camera - uploading images, a smartphone - opening a separate tab in the mobile phone format, a bright circle with an arrow - stories. And the last symbol allows you to download all publications.
Extension operationClick on the "camera" and select "Add to Profile" - this function allows you to publish an entry in the feed.
Selecting a button to publish to the feed The overview below shows how the extension works. You are only allowed to resize the image, tag people and make a note.
The third extension is a separate application through which you can add photos, videos and stories.
Install and run the extension.
In the browser, click on the application icon at the top right.
Application iconWhen clicked, a separate tab will open. Here you need to connect your account and work with the profile, as from a smartphone.
The checkbox for uploading photos is checked by default, as is access to the full image format. Additionally, through the Desktopify extension, you can upload videos to IGTV.
Tab with extension The overview below shows an example of how the application works when the Desktopify extension is connected. You can apply a filter to adjust a photo, but you can't edit—to change the brightness, contrast, or saturation of an image.
And now let's move on to the emulator service that displays the smartphone screen on a PC - use mobile applications or run games.
Of all the emulators on the market, BlueStacks is the most convenient. The application automatically adjusts to the screen, optimizes games and works without delay.
Download and install the emulator. In the program window that opens, connect your account to Google Play. We install the application.
Installing the application in BlueStacksGo to the main page - this is a tab located next to Google Play at the top of the screen. Open the "System Applications" folder and turn on "Media Manager".
We will need this step to upload photos that we will publish in the feed.
Important! Emulators do not have a function to open computer system folders. All images must be uploaded to the server in advance.
In the file manager, click on "Import from Windows" and select the images that we want to place in our Instagram account.
Importing photos from WindowsWe return to the application page and load the picture.
An example of how the emulator worksA feature from Facebook that allows you to work with two social networks at the same time. Let's see how to link accounts and add images.
Go to the Facebook Creator Studio page. At the top of the screen, switch to the Instagram icon.
Important! Make sure your Facebook and Instagram accounts are linked.
A page where you can link the accounts of two services After clicking on the button, a window will appear - agree to the terms and add profile data.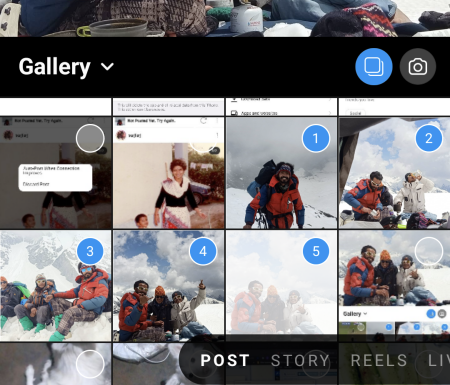
Now you can add entries: click "Create publication" and start registration.
Create Post button on FacebookThe example below shows how the service works. The only thing is that you can’t edit a photo here, but you can prepare it in advance in image editors: for example, in Canva, Photoshop or Figma.
An example of how the service worksIn the following sections, we'll look at how to set up a delayed write in the scheduling services. They are used in their work by SMM specialists, marketers and bloggers.
Important! Please note that all planning services provide free access for a limited period of 7 to 14 days. If it is more convenient for you to send photos via PC, we recommend purchasing a paid subscription.
In this section, we will look at a simple and convenient program for scheduling posts.
Go to the SMM Planner website and register.
Go to the dashboard. Select the "Accounts" tab and connect your profile to Instagram.
Steps for connecting an account in the plannerThe added profile should look like the screenshot below:
Connected account in SMM PlannerNext, go to the "Posts" tab. Here we form publications and plan the time of sending.
Desktop for working with recordsClick on the "Schedule a post" button. It will be posted on the feed. In the window that opens, add a photo and text, and check the boxes where necessary: disable or add comments, send a picture to stories or IGTV.
A window where you can arrange and schedule a publicationAfter publication, the entry will appear in the dashboard, and the post in your account.
Example of displaying scheduled posts And here we looked at a program through which you can not only publish images, but also track analytical data for each post.
Register on the Parasite website.
Parasite website home pageAdd an Instagram account.
An example of what the dashboard looks like after adding an accountClick on the green button that says "Add post" and make an entry.
Edit publicationAt the appointed time, the entry will be published.
Quiz passed - post publishedAnd here we show you how to post with a promotion program.
Create an account on the Tooligram website.
Service main pageAdd an Instagram profile. Go to the "Features" tab and find the "Delayed Posting" item.
Delayed posting in the Tooligram serviceWait until the service connects your account. Then click on "Auto Posting". You will see a window with an authorization request, agree and proceed to the registration of the record.
Dashboard with a connected account The review below shows how to work with the functionality of the service - selecting and editing an image, adding text and setting the date and time of the publication.


-3.jpeg)