Alexandra | Dec 15, 2016
I used to STRUGGLE big time when I was trying to design my Instagram feed.
Now I’m using 4 tricks every single time I make a theme:
I use Preview App to rearrange my feed. I love it because it allows you to rearrange posts using 3 different methods (and you can schedule unlimited posts for free).
I’ll show you exactly how I use the app to design my feed and to stay consistent.
Ready? Let’s go!
Click here to use it
Forget everything you know about Instagram. Let’s start fresh together.
You need a strong base when you start a theme.
The first thing you want to do is upload photos in your Preview App.
Here’s the trick:
Upload 9 photos only at the beginning.
That’s my “Rule of 9”.
It will be:
Your 9 photos are going to be the BASE of your theme.
You will be building on top of it.
If you upload too many photos, you might get overwhelmed and won’t know where to start.
Start focusing on a small grid.
I like to focus on 9 photos at a time, but you can also upload 6 or 12 photos:
Here are examples of a few themes I have started in my Preview App using the “Rule of 9”.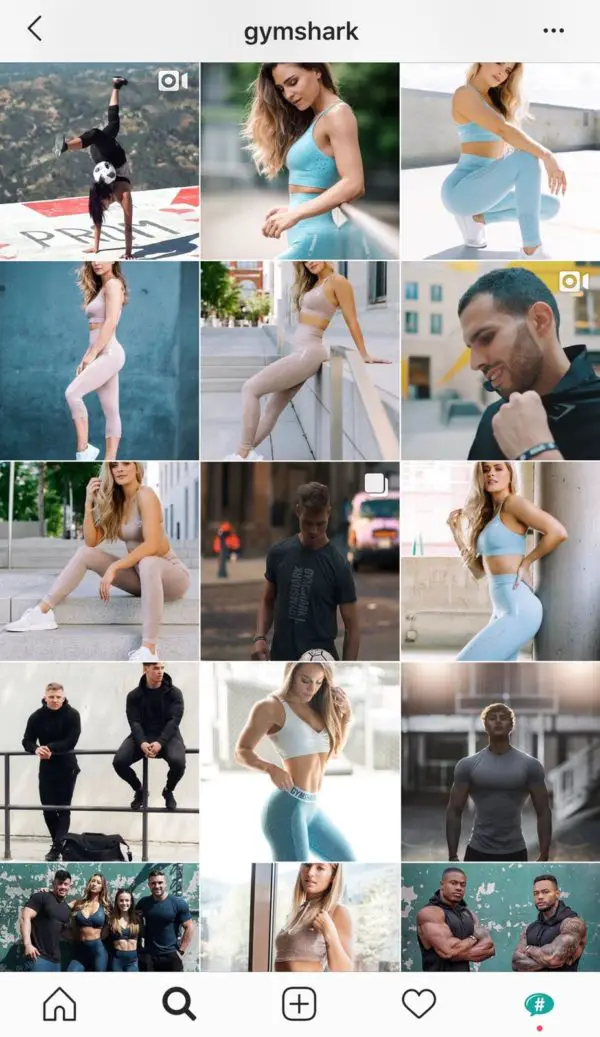 As you can see, my base doesn’t move. it means that I can easily color coordinate and rearrange my future post (next tip):
Once you have your photos in Preview, you can rearrange their order.
There are 3 ways you can rearrange photos in Preview:
My personal favorite is the swap feature because I like to take my time visualising where to move my posts. I use the drag and drop feature when I want to quickly rearrange posts. And I use the shuffle feature when I create specific Instagram grid layouts.
Now the big question is: “What photos should I put next to each other?”
Easy!
Generally, people avoid putting the same kind of photos next to each other (unless they’re posting about the same thing all the time).
The trick is to alternate your photos based on:
The goal is to balance the overall look of your feed.
Here are some examples:
When you design your feed, look at the photo that is on the right, left, top and bottom. Try not to put the exact same photos next to each other all the time – space them out.
How do you keep your theme look consistent?
Alright, now you have a strong base with your 9 photos. Don’t mess it up!
After I finish designing my grid of 9 photos, I always upload 3 photos at a time in my Preview App.
3 photos = one row = my base stays intact
Have a look to see what I mean:
I love how I can build on top of my base!
This trick makes it so much easier to visualise my overall feed, and most importantly stick to my theme. Since I have a strong base at the beginning, rearranging my photos becomes a breeze.
Every time I add more photos in Preview, this is what I automatically think about:
This trick is especially crucial for you if you want to maintain a specific grid layout.
For example, if you want to do a “white line in the middle” layout, you need to stick to the Rule of 3:
I hope you found this article useful!
If you need more help creating a cohesive feed, I share all my tips in my step-by-step guide. You can download it below.
Have fun!
Alexandra
Download on App Store
► Get it on Google Play
+400,000 Instagrammers are already using Preview App to edit, plan & schedule their feed. If you haven't tried it, you're missing out.
Sick of the way your Instagram feed looks? You can change the order of photos in a photo dump to create an entirely new look.
Instagram unveiled the option to edit a carousel of multiple images back in November 2021. Not only can you delete photos from a photo dump, but you can also rearrange your photo album by deleting and re-adding images to it. So, if you want to keep all your photos in a carousel, but want a different order you can make that happen. This hack only works for photo dumps that have more than two photos because in order for it to work you need to keep two photos in the album at all times.
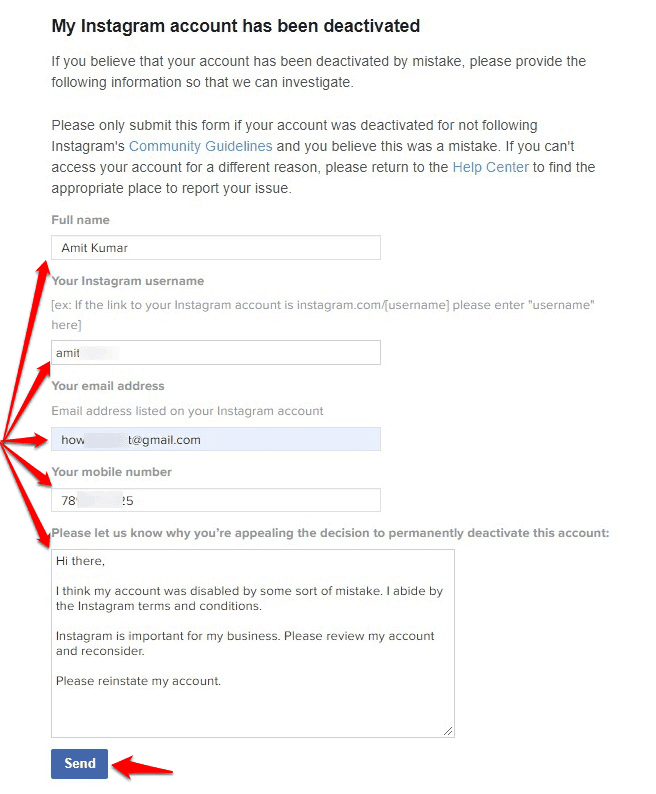
SEE ALSO: How to reactivate your Instagram account
This is a workaround, so it's a little imperfect and you'll have to plan ahead. You need to remove the photos from your dump in a strategic way so that the photos left are the ones you want to be the first and second photo, then you'll add the photos you removed back in the order that you want them to follow those first two images.
We will walk you through how this Instagram hack works.
Tap the three dots. Credit: Screenshot: Instagram
Select "Edit." Credit: Screenshot: Instagram
Tap the trash can icon. Credit: Screenshot: Instagram
Select "Delete." Credit: Screenshot: Instagram
 Tap "Done"
Tap "Done." Credit: Screenshot: Instagram
Tap the three lines. Credit: Screenshot: Instagram
Tap "Settings." Credit: Screenshot: Instagram
Select the photo you want to restore. Credit: Screenshot: Instagram
Tap the three dots. Credit: Screenshot: Instagram
Tap "Restore." Credit: Screenshot: Instagram
Tap "Restore." Credit: Screenshot: Instagram
How to disable Instagram embeds (and why you should)
How to post a photo to multiple Instagram accounts at the same time
How to clear your Instagram search history
How to post Live Photos on Instagram
How to delete individual photos from a carousel on Instagram
How to turn your social profiles into hubs for charity
How to create an "Add yours" story on Instagram
How to hide photos on Instagram without deleting them
How to see your 'Least Interacted With' on Instagram
 ru
ru In Russia, they decided to block Instagram, but people were given time to save their photos and videos. How to do this and why another social network will be banned, in the material NewsTracker.
It all started with media reports that Meta Platforms, which owns Instagram, will not allow users to remove calls for violence against the military from the Russian Federation. This caused a big scandal, and Roskomnadzor demanded an explanation from the organization. nine0003
The Prosecutor General's Office did not hesitate either, demanding to restrict access to the service on the territory of Russia. A direct consequence of which was the decision to ban Instagram in Russia.
The Russians were given time to transfer the data to other social networks and notify subscribers.
Many users began to create channels for themselves in Telegram and invite members of their groups there.
The social network has provided a tool for saving all publications. To do this, you need to request a copy of the data, this can be done from gadgets with Android and Ios systems.
This method is proven, but can take a very long time, especially if a large number of photos are published. You can take screenshots on your phone or computer and then save them to one of the folders.
On the phone, screenshots are saved in a folder with all pictures or in a separate section in the gallery. On the computer, you will be prompted to select a partition yourself.
You can use a special browser permission that will allow you to freely download content. The list of extensions can be found in the browser settings. nine0003
You need to install Instadesktop, after which a special icon will appear on the panel. If you click on it, you can download photos.
Special applications have been made for smartphones that allow you to download content. You need to go to the Play Store or the App Store, then select one of the programs:
You can even not install various programs, but use an online service. There are several popular ones that will help you upload photos and videos:
 ru
ru First you need to open a post on Instagram, copy the address from the browser bar. The resulting link must be inserted into one of the services. nine0003
#News#Ilya Ulyanov (NT)#Society
Subscribe
Bypassing promises: the Stavropol Territory demands the return of mobilized fathers of three children
December 17 08:59
Index of loss. How much has life become more expensive in the Stavropol Territory in 2022
December 16 05:06
three children from Dagestan threatened suicide
Yesterday, 10:22
The former Minister of Housing and Utilities of Stavropol was taken into custody for two months
Yesterday, 05:38
Will the economy class leave: what threatens Stavropol with an increase in the resort tax
Yesterday, 08:32 9000 How swap photos on Instagram in posts and feed
Author Andrey Instagramovich For reading 3 min
There are two ways to swap photos on Instagram: through the Feed and the Carousel. But there is no main function for this action. nine0003
Content
.
You can edit the position of some of the photos and videos in the following ways:
To delete a post on Instagram:
In the second case, the user can change the order of pictures or videos only when publishing. That is, if you need to move in an already posted post, it will also have to be deleted or archived. nine0003
In the Instagram carousel, you can rearrange photos by setting the order at creation, but without the ability to edit them in the future.
That is, if the publication has already been posted, it is impossible to edit it.
To do this, you need:
In order for the records to be in the order that the user wants, it is necessary to select photos by numbering - from 1 to 10. To cancel the selected picture in the publication, users just need to remove the number with one touch.
Or else - delete the post completely and post it again.
To swap posts on Instagram, you need to delete posts and publish them on the page. Before deleting, you need to save a snapshot and, if necessary, a description. nine0003
In order to raise an old post, you need:
Such simple actions allow you to return old posts to the leading positions or swap posts on Instagram. nine0003
To re-publish posts:
Archiving allows you to hide an old publication from all subscribers and other users without deleting it. Deleting completely erases the publication, without the possibility of restoring the data.
It is possible to swap posts on Instagram only by deleting them. If you archive a post, it can be returned to the Feed, but on the same date as when it was originally posted.