No matter what event you're putting on whether it's a wedding, product launch or a festival, creating a Facebook event is a great way to get people interested in attending or telling them of any special updates, dress codes, timings etc.
Below we explain how to create and update your Facebook event along with giving you some handy tips to guarantee you make the most out of this useful feature.
Firstly, it's important to know there are 2 types of Facebook events, private and public.
Private Facebook Events - This type of event is only visible to those people you invite; however, you do have an option to allow guests to invite their friends.
Public Facebook Event - This event type will be visible to anyone on or off Facebook.
Creating A Private Facebook Event
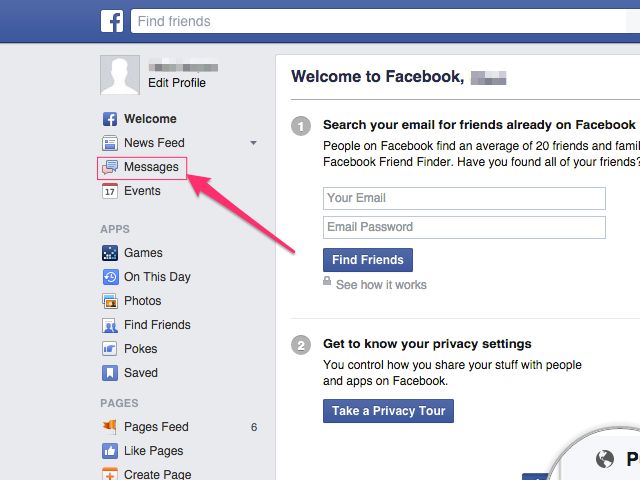
Step 1 > On your News Feed, click on Events in the left menu.
Step 2 > Click on Create New Event on the left side.
Step 3> Click on Private Event and the select Next. Remember: Once a private Facebook event has been created you won't be able to make it public in future.
Step 4 > Complete the Event Name, Location, Date, Time and Description.
Step 5 > Finally, click on Create, from here you will be able to invite guest, add a cover photo / video, share posts and edit event details.
Remember: Only Facebook business pages can create recurring events and cannot be done from personal accounts.
Creating A Public Facebook Event
Step 1> On your News Feed, click on Events in the left menu.
Step 2> Click Create Event on the left side.
Step 3 > Select Public Event, then click Next. Remember: Once you have selected public event, you will not be able to change it to a private event later.
Step 4> Now fill in the Event Name, Date, Location, Time and Description.
Step 5 > Select the Keywords that best summarise your event to help relevant users find the event better.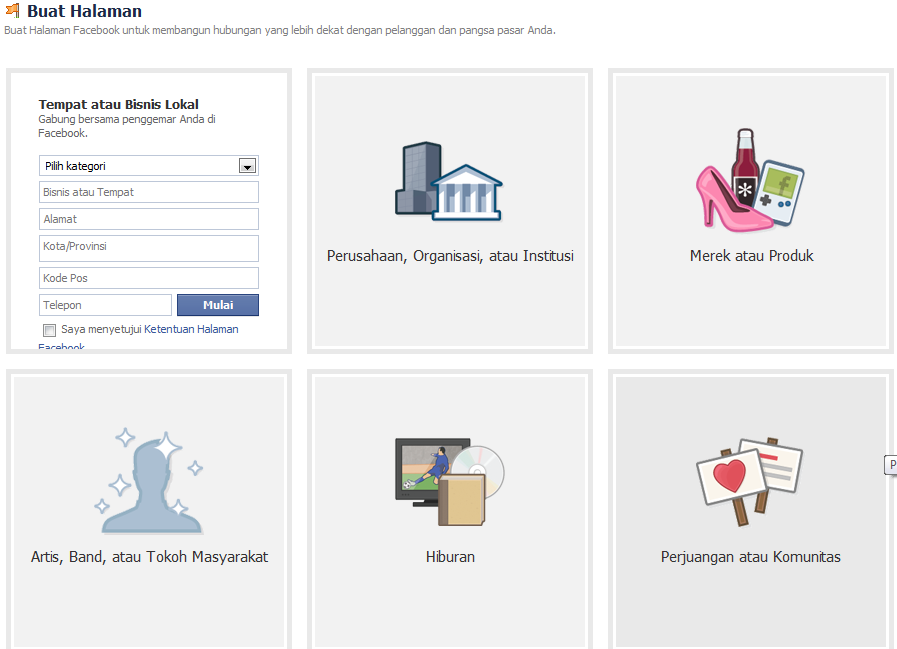 Example: Jazz Festival
Step 6 > Finally, click Create, you will now be able to invite guests, add a cover photo / video, share posts and edit event details.
Facebook Event - Tips & Tricks
Adding More Hosts To My Facebook Event
To add a co host, simply click on Edit found on the top right of the event, below Edit An Event, scroll down and click Add Co-Hosts, now type in your friend's name or page's name.
Remember: Friends you invite to co-host the event will not be sent a request and will automatically become admins of the event if they RSVP as interested or going.
Creating Facebook Event QR Codes
QR Codes (Quick Response Codes) can be used to share information with users in a quick interactive way. In this article Digital Marketing expert Neil Patel showcases 5 unique ways companies have used QR Codes.
If you're hosting a public Facebook event you can create a QR Code to promote your event. To create a code for your public event, select Events from your news feed, now click on Hosting found on the left hand side, from here found your public event and click the 3 dots found in the top right hand side.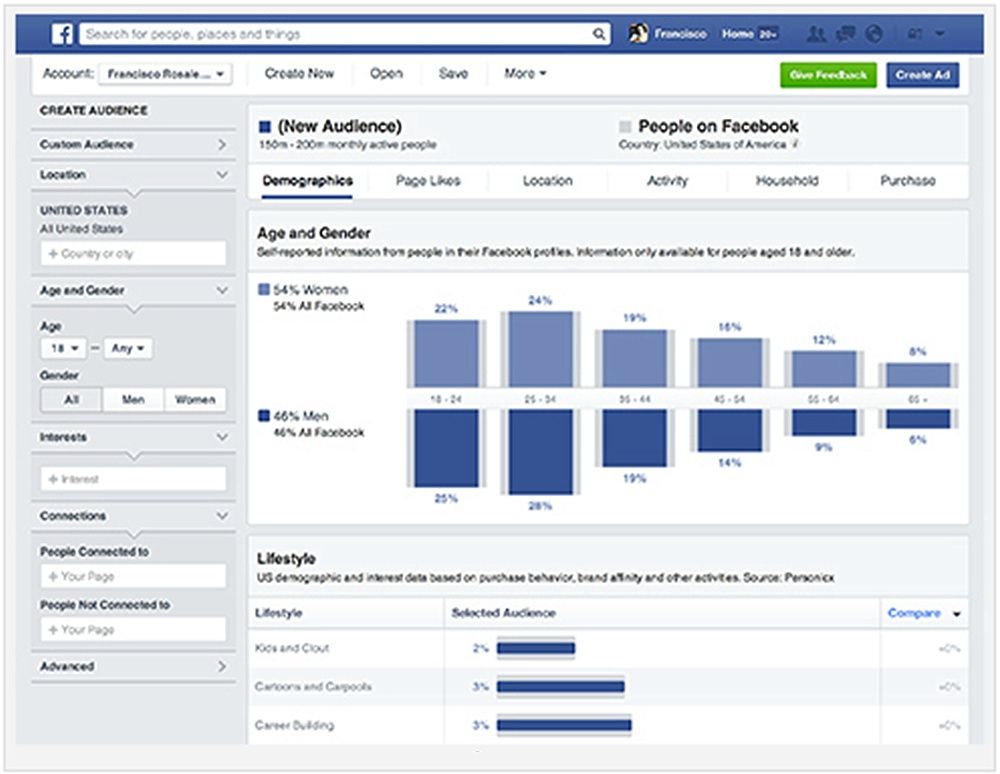 Finally, select Create QR Code and then Download.
Run Facebook Event Competitions
To generate more interest in your event try running a competition, you could do a ticket giveaway or tempt users to engage by entering a competition by leaving a comment on the events wall and doing the draw on the day of the event to make sure people turn up to the event.
How To Invite People To A Private / Public Event That Has Already Been Created:
Simply go to the event page and click Invite found below the cover photo, from here you can search for people by name, email address or phone number. After this, just click on the persons name to invite them individually or you can group them together, either by location or by those who have attended past events and click Send Events.
How To See Who Has Responded To A Facebook Event Invitation?
For A Public Event - From your news feed, click on Events in the left menu, select the event from the section marked Your Upcoming Events and click on Going, Interested or Invited to see who has responded.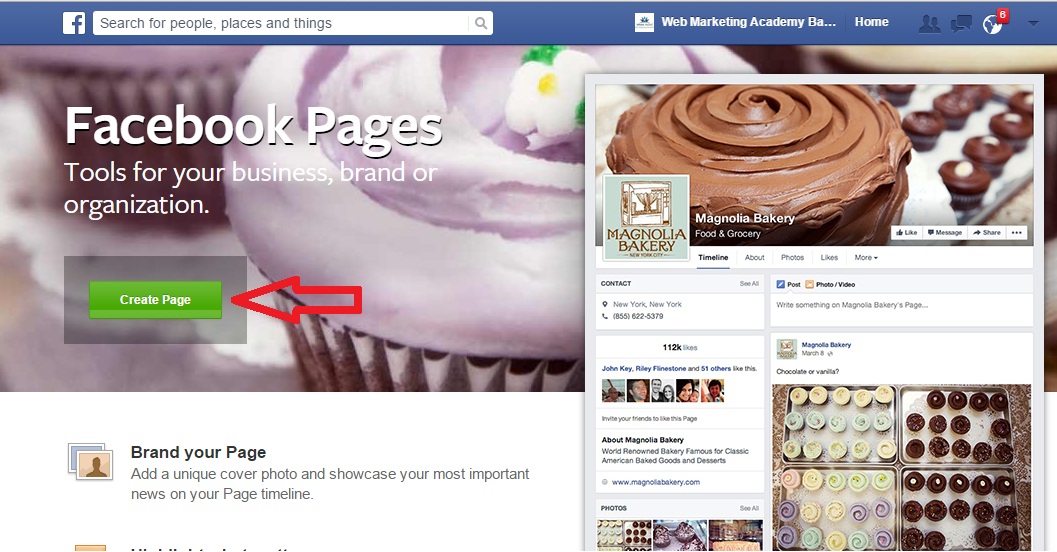
For A Private Event - From your news feed, click on Events in the left menu, select the event from the option Your Upcoming Events and click on Going, Maybe or Invited to see who has responded. Please note, for these private events, hosts and other guests can see when you have viewed an event invitation.
How Do I Remove People From My Facebook Event?
If you're hosting an event on Facebook you can remove anyone who has been sent an invitation except for the events creator.
Removing People From Public Event -
From your news feed, click on Events in the left menu, click on going or interested and simply click Remove next to the person you would like to remove. The person removed will not receive a notification about this, they simply won't get any future message from the event and it will not appear in their events list.
Removing People From Private Event -
From your news feed, click on Events in the left menu, below on the Guest List click on Going, Maybe or Invited.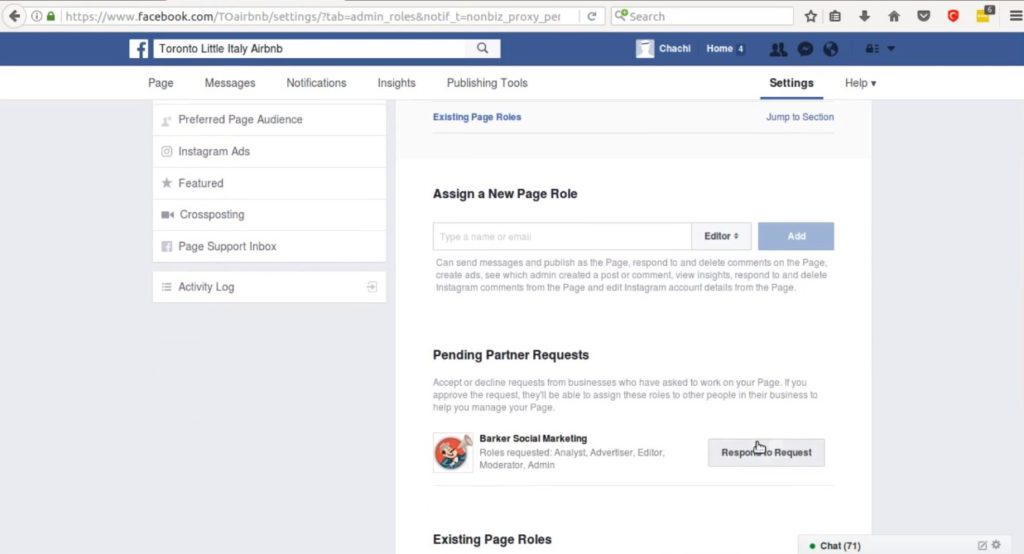 Finally, find the person you would like to remove and click on Remove next to the name of the person. If someone removes themselves from a private Facebook event they can not be added again.
How Many People Can I Invite To My Event On Facebook?
Facebook limit the number of people any one person can invite to 500 people per event. However, on Private Events you can allow guests to invite friends and on Public Events it is encouraged to share the event on your timeline to get the word out.
How To Send Messages To Your Facebook Guest List
Private Facebook Events -
Step 1 > On your news feed click Events in the left menu and choose your event.
Step 2 > Below Guest List select Message which is found next to the name of the guest you would like to message.
Step 3 > Enter a message and press the arrow symbol.
Step 4 > Public Facebook Events - For public events, you are usual not able to message your guest list especially if the event has a large number of guests. Your are recommended to post in the event discussion and to add an embed event calendar on your site.
The More Detail The Better
The more detail you can give people the better chance you have of them turning up and less chance of them keep sending across queries about the event. Include all the information you can about available facilities, parking, timings, schedule, dress code and security measures. And if you get asked a relevant question include this to the information to ensure this query is not asked again.
Clear USP's
Make sure from the very start the events Unique Selling Points are made clear, this could be anything from free drink on entry to buy 2 tickets get 1 free. With so many events taking place every week this will help yours stand out from the crowd. It is recommended you create a post showcasing these selling points perhaps showing them off with a graphic or video and pin this post to the top of your timeline ensuring this is the first thing people see when they visit your events Facebook page.
What Does Your Company Profile Look Like?
If you're a company using Facebook to promote your event it is important to remember what your actual company Facebook page looks like as people may check this out before deciding if they should attend the event or not. If your company profiles look amateurish or is not kept up to date people may be put of and decide not to attend the event.
The Power Of Video & Images
To help your guests visualise the event it is recommended to add any related videos and pictures to your events page, such as, this could be of last year's event or videos of the performers attending. Not only will this get your guests more excited about your event, it will get people talking about your event and start sharing the event with friend's. Remember though to only use high quality videos and images, as poor-quality videos and images could have a negative outcome and deter people from attending.
Location, Location, Location
The selected site is vital, it needs to be somewhere that is accessible and easy to get to for those you have invited. Remember to also add the exact location on your Facebook event so people do not get lost trying to find it.
Clear Pricing
The right price can be a make or break for many people. To be transparent make sure your pricing is clear on the event listing, this includes any special offers such as early bird deals and if the event is free make sure you shout about this.
Boost Your Event Via Facebook
If you want more people to know about your event, Facebook offers an affordable way of doing this by simply boosting your Facebook event page, it is simple to set up and means you can target people who could be interested in your event in specific locations. The great thing is you can spend as little as £1 and still reach a group of people so is a fantastic marketing tool for any budget.
Offline Promotion
Although online advertising in the future, the old-fashioned offline marketing is still effective, therefore, it should not be forgotten. You can get attractive leaflets printed for a small cost these days, so why not hand out leaflets / post through doors (when right) in the local / targeted areas of the event to attract even more people to the event, bare in mind, not everyone used the internet / Facebook frequently and if the event doesn't have a dedicated website direct them to like your Facebook page and get more information about the event there.
Sharing Is Caring
Make sure all your friends and co hosts share the event and why give those attending an incentive to share the event on their Facebook timelines, such as, a free drink for those who share the event.
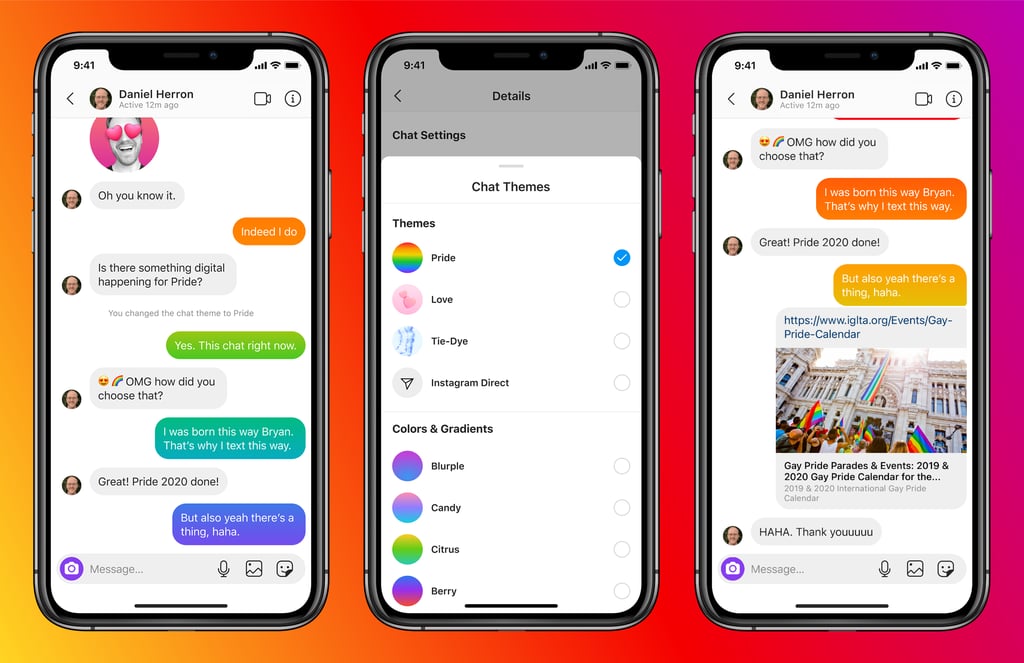
And We Are Facebook Live
Facebook Live allows you to broadcast live video to your followers / guests. During the live broadcast people can tune in, comment and like. Since launching in 2015, many event organisers have used this handy feature to show off their event, attract new followers and increase attendances for the rest of the event or the following year.
You can use Facebook Live via your iOS or Android device on the Facebook app. To use this feature, simply go to your Facebook event page and click the Live Video button and enter a description.
If you're putting an event and need portable luxury toilets and / or showers please get in touch with Wight Event Toilets today by calling 01225 281 018 or email [email protected] and remember to follow us on Facebook
Resources: Facebook / Eventbrite / Business Insider / Billetto / Sproutsocial / Social Media Examiner / Neil Patel
If you have an event to promote, you should be making the most of your social currency to spread the word and help you sell tickets. Facebook allows you to set up your own event fan page for free so you can reach out to the site’s two billion-plus members. You can also set up private event pages that will help you to invite a select group of guests. Facebook Live allows you to share your event with those who might not be able to attend.
In this guide, we’ll teach you how to create an event on Facebook, share it, and make it private or public, depending on your event’s needs. We’ll also walk you through how to use Facebook Live and the best practices on sharing live content.
A public event is visible to anyone on or off Facebook who will be able to see things like the event description, photos, event discussion, and videos. The event may also be discoverable in search.
Once you’ve chosen the event type you’d like to create, you can add all of the details in the left sidebar. This includes information such as:
If you’d like to hide the guest list from the public, or from other people attending the event, you can uncheck the box that says “Display guest list” under “Event Settings” which is found in the sidebar when you get to the “Additional details” prompt.
With public Facebook events, you can also add SEO information to help your event become more discoverable. This includes a category, description, and keywords.
For example, if you’re running an online marketing workshop, you may want to add keywords such as “marketing,” “social media,” and “online workshop.” The next time someone searches “online social media workshop,” they could find your event, helping to increase registrations. And if your event is taking place in person, make sure to include the location in your keywords, like “New York” or “Los Angeles.”
Once you’re happy, you can click “Create” to make your event, or save it as a draft to return to later.
You can also see under “Event Host” that you can choose whether to host the event from your personal profile or from a Facebook business page.
The only people who can see private events on Facebook are those who have been invited. Guests can invite all their friends to an event on Facebook if the admin allows it and, if invited, these people can view the event description, photos, posts, and videos. Note that you can’t share a private Facebook event — you can only invite people to view it.
Good to know: Private Facebook events can only be created from a personal profile. If you’re creating an event from your Facebook business page, there is no way to make the event private.
Create a personal event by selecting “Private” in the left sidebar and following the same steps described in the public event instructions above.
If you want to host the event through your business, select the dropdown and choose the business account. You can also set up an event directly from within your Facebook business page using the guide below.
Follow these instructions to create a new public event on Facebook with a business page as the host:

You can also create a recurring Facebook event. Once you’ve filled in the required details, click “Schedule Multiple Events.” Under “Frequency,” click the dropdown menu and choose whether you want your event to take place daily or weekly. You can also create a custom frequency by clicking “Custom” on the calendar and choosing your own dates. This feature works well with Eventbrite’s Multi-Event Ads campaign tool, which is a great way to bolster your marketing opportunities without increasing your budget.
Changing circumstances happen all the time, and they might mean you’ll need to edit your event listing details. To edit your event, go to the business or personal profile hosting your event and you’ll see “Events” listed on the left-hand side. This is your events manager on Facebook, where you can see a list of all of your upcoming dates. Use the dropdown next to each event to edit, share, or duplicate your event.
To add another host:
If you need to add another host to your Facebook business event:
Alternatively, share from the event page itself by selecting the Share button at the top of the event page.
Remember: private events are invite-only and the general public won’t be able to see them.
Integrating your Facebook event with EventbriteIf you’re using Eventbrite to promote your event, you can easily integrate it with Facebook — with the added benefit that attendees can buy tickets without ever having to leave Facebook.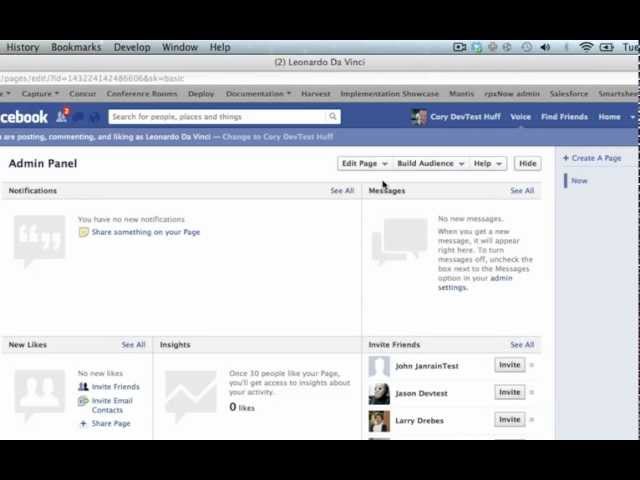 Here’s how to do it:
Eventbrite has a range of helpful marketing tools, such as Eventbrite Boost, to help promote your Facebook event and get more out of your Facebook ads.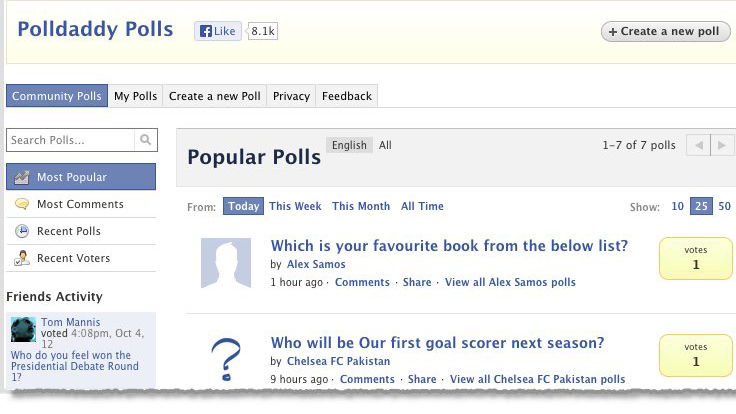
Eventbrite Boost is the all-in-one marketing platform designed for event creators. This tool makes it easy to reach new people, engage fans and followers, and grow your attendance – directly from your Eventbrite account. With Boost’s latest update, it’s never been easier to do just that. The new Eventbrite Boost features marketing plan recommendations that are personalized for you and your events, more effective campaigns and audience targeting powered by Eventbrite intel, and clearer visuals of audience insights.
Powered by Eventbrite’s exclusive data, Boost’s Smart Audiences feature allows you to find new attendees, connect with them through your social advertising, and sell out your events. Do this by adding Smart Audiences to any ad you run through Boost.
Multi-Event Ads let you market your entire events calendar quickly and effectively. Publicize your entire event calendar, spend less time and money on marketing, and rest assured that your campaigns are up-to-date and running smoothly.
Facebook Live is a video stream in real time, and anyone who’s on the Facebook app at that moment can tune in. As you broadcast, people watch and engage with you through comments and likes. It’s an easily accessible way to broadcast any event and can even cause a bump to your attendee base — 30% of people who watch an event livestream will attend the same event the following year.
How to use Facebook Live
Now you know how to make a Facebook event page and how to use it to go live. Here are four examples of events that are making the most of Facebook’s event marketing opportunities:
As soon as you arrive on the Leeds Festival Facebook event page, you’ll see the eye-catching video heading and the Book Now call to action. A clear call to action is pivotal. You’ve managed to get someone to your Facebook event page, and you’ve got them excited enough to want to purchase a ticket. Now, direct them to the ticket sales page before they can change their mind.
Egg London, a nightclub in a Victorian warehouse with multi-room DJ sets, hosts multiple events each week and expertly utilizes Facebook to promote them. Its team also uses Eventbrite Boost to update the busy events calendar, save time, and sell out shows. Egg London can manage all its social media ads on Eventbrite Boost, with the same low budget. As a result, its event marketing is more effective and more efficient: the club generated six times more revenue than when using single platforms alone and had 2,500 more clicks.
Paradise Wildlife Park has been using Facebook Live to invite its followers, wherever they are in the world, to take a look around the park. Whether it’s a lion pride or a family of otters, the team regularly livestreams the animals and interviews with keepers to keep potential customers engaged during off-peak times. The hashtag #liveatthezoo is used so that followers can easily keep track of event information. And during the livestreams, the park promotes merchandise as a way to increase revenue.
This year, The London Coffee Festival is holding a free virtual event ahead of its in-person one. With highlights including talks by influential coffee entrepreneurs and a latte art throw-down, the virtual program offers attendees a taste of what to expect at the festival. The organizers have been using Facebook to share fun coffee-themed videos and keep followers engaged. They’ve also promoted event sponsors and partners on the page, providing them with added value.
By creating a Facebook event page, you’ll be able to reach a much larger audience. But to really engage the potential attendees that visit your page and increase ticket sales, you’ll need to make use of calls-to-action, hashtags, live videos, and more. Drive even more attendees to your event page with Facebook ads.
Whether you’re connecting people in-person or virtually for poetry readings, cook-alongs, or concerts, you’ve got a lot on your plate. Lighten the load and reach new audiences directly from your Eventbrite account with Eventbrite Boost.
In the last article I shared general recommendations killer design the page, which should not be forgotten, what are the possibilities.
If you are a beginner, then this article is for you, because with this checklist you will be able to create a page on Facebook and VKontakte step by step.
Facebook has several page formats:

If you have a medium or small business, then your option is a fan page. By no means a personal profile. Facebook prohibits offering services and products on a personal page; in case of complaints, you can easily get an account ban. Therefore, it is better not to take risks, but simply turn your personal page into a business page, and transfer all your subscribers there too.
Instructions for converting a personal profile to a business page can be found here.
The company page has a number of advantages: you will have page statistics, more options for tab design, and the ability to run ads.
But which is better: a page or a group? Let's dot the "i" and find out for ourselves once and for all what these formats are.
Page is a kind of brand media that talks about services, products, shares important information about the company and the niche as a whole, and receives feedback in the form of comments, reviews, etc. In other words, the SMM manager, looking at the content plan , writes posts, shoots live broadcasts and in every possible way conveys the brand's message to the world.
Group is a community place. For example, we have a group "Effective Internet Marketers" - students and graduates of the Academy gather there, our webinars, conferences, articles are announced. We also accept content from members of the group, for example, good stories, vacancies, cases. It turns out that all members of the group publish content and are authors.
Many people create groups for their business, as there is an opportunity to add all their friends (but here it is important to remember that users do not like to be added against their will). You can only invite to the brand page, and it’s not a fact that a person will subscribe.
The group has a number of disadvantages for business: no statistics, you can't run ads. If you have a group, you can not refuse it, further develop it.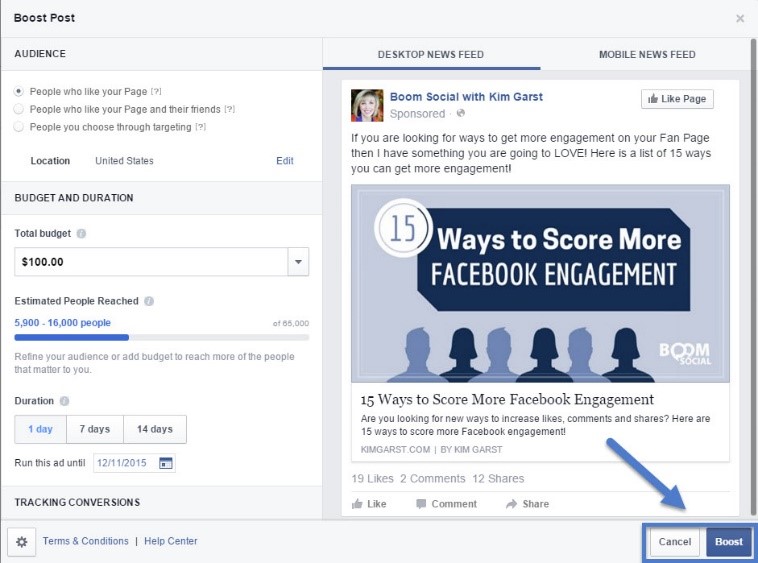 But then I recommend to go to the page. The group can be linked to the company page, in the "Groups" tab. This will allow you to moderate and make posts on behalf of the company page.
There is another format - event . Such a page is useful for those who create and promote events. You've all come across this on Facebook. There are a lot of events: concerts, conferences, webinars. The advantage of events is that Facebook invites friends of the participants to join in the feed or notifications. This creates a slight viral effect.
Business Facebook is a free platform where you can manage all of your brand's social media profiles. For example, to give people administrator rights, create, add pages and manage them, manage advertising accounts, link cards to pay for advertising, create pixels, and much more.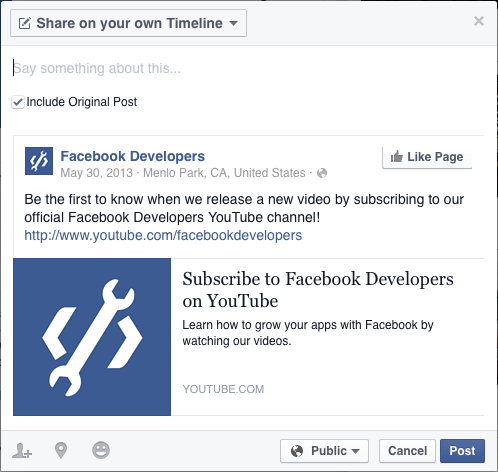 Such a control panel for your business on Facebook.
The main advantage and disadvantage of this tool is that it separates your personal profile from the company profile. That is, you will not receive notifications from the page in your personal profile. In order not to miss all important messages, you will need to regularly log into the business manager or set up email notifications.
You can also create up to ten Facebook pixels in the Business Manager. This is convenient if you have many sites, since by default only one pixel can be created in the advertising account. With the help of a business manager, this can be easily fixed by granting access to the advertising account to other pixels.
If you have a small project, one website, one Facebook page and few employees, then you don't really need this tool. If the above functions are important, then you should register there and automate your work.
To start working with the business manager, follow this link and enter your login and password from your personal Facebook page. There you can immediately create new pages, if they do not already exist, or link existing advertising accounts and pages.
Go to the business manager page and click "Create an account". If you already have it, then when you log in, you will immediately open your account or choose between several (if you have access to many accounts).
There are several categories here: Local Business and Place, Company, Organization or Institution, Brand or Product, Artist, Entertainment, Common Cause or Community.
If you are attached to a certain place, that is, you have a restaurant, a hairdresser, a massage parlor, a photo studio, select the category “Local business or place”. If your business has branches in different cities, then your option is "Company, organization or institution."
Categories can be edited. Most importantly, follow Facebook's instructions.
Company name
It is very important to name the page exactly as your company is officially called. If you are Coca-Cola - write Coca-Cola, WebPromoExperts - WebPromoExperts, Zvezdochka restaurant - Zvezdochka restaurant. People will search for you first for branded terms, so give them the opportunity to find you. Additionally, you can add a few lines about yourself, for example, "Webpromoexperts Internet Marketing Academy".
Description of the community (USP of the company)
In the "Description" field, tell us about your business, clearly indicate the USP - what makes you unique, different from everyone else. This information will help the user quickly navigate the page, understand what it is about and decide whether to subscribe or not.
Be sure to include a link to your site. If there is no website, indicate Twitter and other social networks.
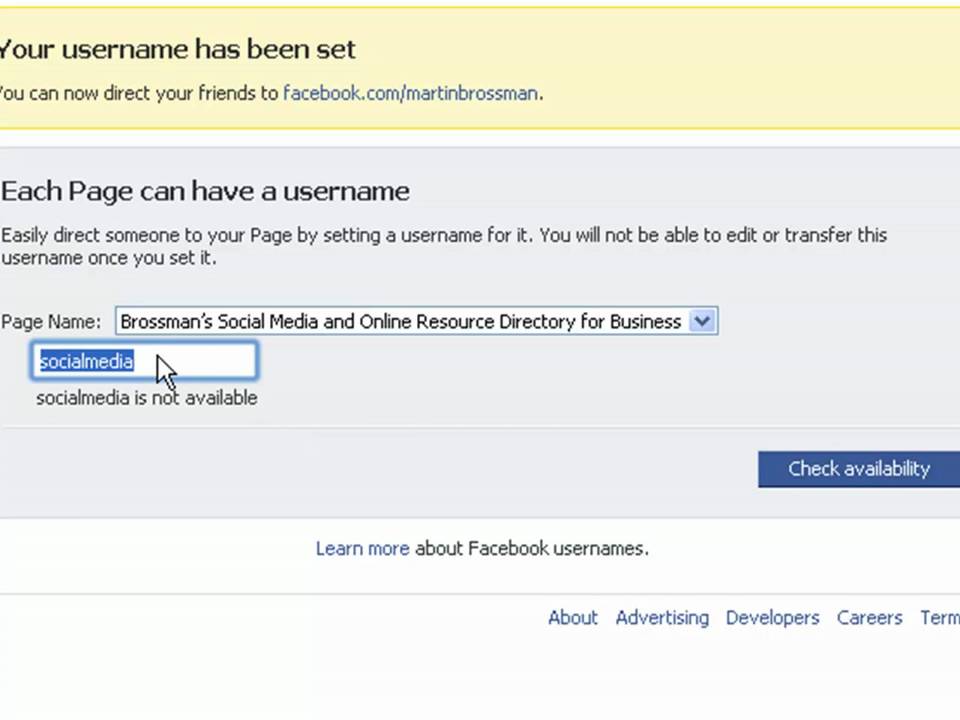
CNC address
Important note! Make a clear and beautiful url for your Facebook page - after the last slash, write a unique name. For example, https://www.facebook.com/webpromoexperts. If you do not write it, then you will only have a set of numbers in your address.
The user will easily remember this link and will be able to enter it himself. Especially if you plan to place the page address on printed promotional items.
Demographic data of the target audience
Specify the demographic data of your target audience. Facebook from time to time offers community users, given this information.
Avatar
Create an avatar with a minimum resolution of 180*180 px. Preferably just your logo (don't confuse people). This thumbnail will be displayed everywhere: in the feed, under all your posts.
Header
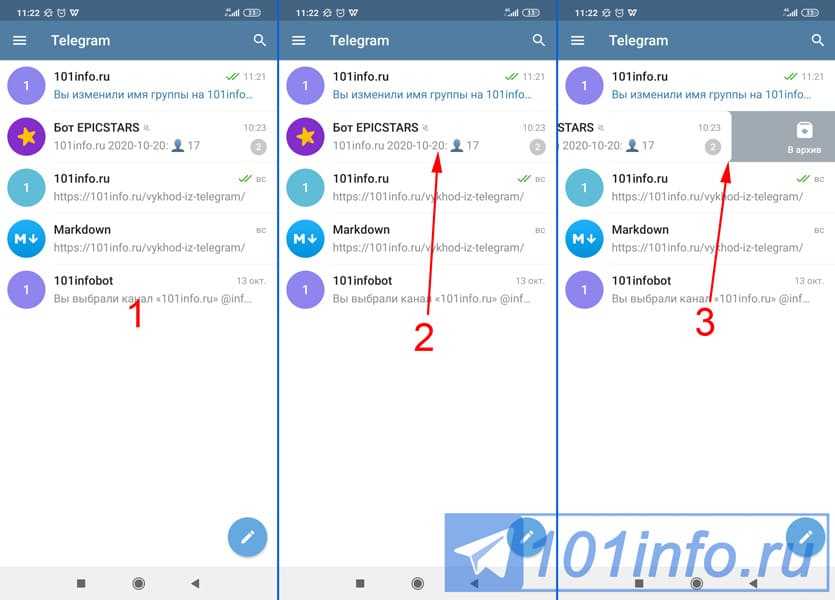
Don't forget that this area can be used for advertising and calls to action. Post useful information here, change the picture from time to time. For example, we place announcements of events in the community header.
But there is one thing to consider: on mobile devices, the text will not be displayed completely.
As you can see, the arrow in the desktop version points to "Watch video". In mobile, she clearly misses. More often I encounter the fact that the text is cut off and, in general, it is not clear what is written there. To make a universal header, you need to take into account the padding of 135px. Example:
Try to design your community so that it looks good on any screen - desktop or smartphone.
The page is your calling card. Fill in all fields: field of activity, mission, website addresses, phone numbers, emails, opening hours.
Here you can create and add different tabs to the right panel of the page: applications, videos, photos, products, events. To do this, you need to go to the "Manage tabs" menu section and select the necessary items. The order of tabs is edited by simple drag and drop.
Choose the tabs that are your priority. For example, if your focus is on videos, then give them priority. If, on the contrary, there is little video and photo content, do not highlight such tabs additionally.
You can add a button that will lead to an external website, landing page or YouTube channel. Make it noticeable and get additional traffic to the desired channel from social networks.
You can also add attachments. We have "Subscribe to newsletter" and "Youtube channel". There are many options available for online stores, such as uploading products. It is good because when you do not yet have a website, you can conduct commercial activities directly from the page.
But if you have a lot of goods, then it will be difficult for you to conduct analytics, update the range, monitor prices, relevance, availability. In this regard, an online store on a free platform like prom.ua wins a lot. There is good functionality and better indexing of pages in the search.
Fill in all the settings you need on the site: tags, country restrictions, who can leave reviews, and more. You should not particularly focus on them, but it is advisable to prescribe everything once.
If you have some content or information that you want to draw the attention of users, attach a post to the top of the page. For example, we focused on a selection of webinars.
So, creating a community on Facebook looks like this:
Go to "Groups" and click the "Create Community" button.
Write your brand name and a short description. For example, "Prague, restaurant". Choose the format of the community - group, public page, event.
Just like on Facebook, group is suitable for communication with the community. You can add your friends. Public page is a visiting card of a brand, company. Events are one-time events that users come to and choose to go or not. The advantage of this format is that before the start of the event, all interested will receive a reminder.
I recommend using the page, but on Vkontakte, business is developing well in groups as well. Until you reach 10,000 subscribers, you can choose the format yourself. When you cross this threshold, you will have to contact the support of the social network.
Name and description of the community
Enter your company name, field of activity, contacts here. Briefly describe the USP. Indicate what city you are in, whether there are branches where you deliver the goods, etc.
Avatar and cover
Here you can also make a branded avatar and cover. You can add information about the company, services, or simply upload a background image to the header. Various resolutions and formats are available.
Page address
By default, the page url looks like this: public and a set of some numbers. Write your brand in Cyrillic or Latin to make it easier for the user to remember the public.
Categories
If you select a page, you will additionally have to select a subcategory: company, artist, etc. In your case it will be a company.
It is also possible to set age limits, leave the group open or close, specify links to the site, the date of foundation of the company.
Next, you can add the necessary sections: photo albums, audio recordings, events, discussions, products, etc. The latter has the functionality of choosing a currency and a person who will receive notifications about those users who want to purchase goods.
The screenshot shows examples of the "Products" and "Video" sections.
You will be able to sort products into categories, write names, give links to the main site. I recommend creating a specific range of products that are important to you. Manually it will be very difficult to update everything. Of course, services have appeared on the Internet that allow you to automate and download goods quickly, for example, from 1C. But they are all paid. If you already have 1C, then it is better to concentrate on an online store, and just use VKontakte to collect a loyal community, get traffic to the site, and lead generation.
The Video section is useful for those who constantly generate video content. There is an “edit” item, by clicking on which you can place a specific video above all publications.
Also don't forget to enable community messages in the settings. By default, this item is disabled.
In the settings, activate the "Add to left menu" item and you will receive push notifications when users write something to you. Try to respond to these messages within a three-hour range, or at least within a day.
Recently added the ability to add applications. We have a newsletter subscription. But ticket sales, questionnaires, lead forms are also available. You can create your own application, but for this you will need to insert the html code in a special VKontakte API directory.
Vkontakte also has one great feature - wiki markup. With it, you can create a menu on the page. At this link you will find the official Vkontakte Wiki Markup community, which has manuals for setting up menus and other interesting effects.
In summary, the design of the VK community looks like this:
If you are not good at Photoshop or CorelDraw, then here is a list of services that will help you quickly create good images for posts, avatars and covers.
I love Canva. There are many different blanks, presets, images, you can upload your own pictures, substitute your information, choose fonts and more. Pixlr.com is an online alternative to Photoshop where you can try your luck and try to figure it out. It is more accessible in terms of functionality. Easel.ly is good for creating infographics.
Webinar recording:
Presentation:
If you find an error, please select a piece of text and press Ctrl+Enter
Editorial opinion may not reflect the views of the author. If you have something to add - we will be glad to hear your comments. If you want to write an article with your point of view, read the posting rules on the WebPromoExperts blog.
YouTube, Facebook, Target audience, Social network, API, CNC
Content
Events are meetings, concerts, webinars, festivals, workshops. How to attract a new audience to your event using Facebook? We will talk about this in this article.
Each user can view a list of events that will occur at a specific time in a specific location. They can be filtered by category (Art, Dance, Movie, Party, etc. ), by time (today, tomorrow, selected date) and by location.
When an event is created, it will definitely appear in this list. But you also need to prepare for a lot of competition, especially in large cities.
You can do this on behalf of a group, business page, or personal page in the Events section. At the first stage, you need to select the type - open or closed event. Only the organizer can invite to the closed one, while the open one is available to everyone.
The next step is filling the event page. What you need to fill out:
Create ad campaigns with goals:
Campaign settings are standard. However, when creating an ad, use the Facebook Event as the destination.
In your Facebook advertising account, target ads to those who are interested in the event or who attended it.