Home » Misc » How to create a location on instagram 2021
How to create a location on instagram 2021
How To Create A New Instagram Location? [2021 Update]
You are here: Home / Social Media / How To Create A New Instagram Location
by John Rosato // 56 Comments
This post was updated on Jan 25, 2021.
If you’re looking to create a new location to tag on Instagram you’re in the right place.
In this post, I share the step-by-step instructions on how to create a new location on Instagram.
Before you get started
Unfortunately this past year (2020) I’ve heard from a number of organisations that are seeing varying success with the first method below. Instagram’s official stance on the creation of new locations is “No, you can’t create a new location on Instagram.”. Unfortunately the key aspect to having your location added to Instagram is time. For businesses looking to create a location on Instagram quickly and reliably I’d recommend the second method through Business Manager & Page locations.
Let’s get started
Previously Instagram allowed users to quickly and easily create new locations as they were uploading their photos natively in the Instagram App – the good old days.
But since 2015 a lot of users and business owners have been left shaking their heads. Here we have two workarounds, using the Facebook App, to create new locations to tag on Instagram. Skip ahead to the step by step instructions below:
I just want to add a custom Instagram location
I want to add a custom Instagram location linked to my Facebook business page
Add a custom Instagram location
When the location you’re looking for doesn’t exist, move over to Facebook where we’ll create a new location in less than 5 minutes which will then allow you to tag them in Instagram.
Login to Facebook
Tap ‘Check In’ at the top of your Facebook feed
Enter the name of the location you’re trying to add – ensuring to use capitals
Tap “Add <new location>…” at the bottom of the search results
Choose a relevant category for your location
Tap Create
Post your check-in to Facebook
Search for your new ‘place’ using Facebook’s search filtering
Claim your place by clicking on the ‘Is this your business?’ tag (see below)
By following the above steps your new location should be added to Facebook – jump over to Instagram and try it out!
Note: We’ve been told of situations where this can take up to 2-4 weeks – if at all – to reflect in Instagram’s location database – make sure to ‘claim’ your page, through the ‘Is this your business?’ and work with several colleagues or friends to ‘check-in’ at the newly created location.
Add a custom Instagram location linked to your Facebook business page
One Location
Login to Facebook using the Facebook account with administrator access to your Facebook business page – this may be easier on a desktop computer
Go to your page and tap edit page
Scroll to the about section of your page and tap edit page
Tap save
Enter the name of the location you’re trying to add – ensuring to use capitals
Tap “Add <new location>…” at the bottom of the search results
Choose a relevant category for your location
Tap Create
Post your check-in to Facebook
Note: Your page may not allow an address if you don’t have an appropriate category – play around with a few that closely represent your business.
Multiple Locations
If your business operates from multiple locations follow the below instructions so that you’re able to better manage your locations through your Business Manager account.
Login to Facebook using the Facebook account with administrator access to your Facebook Business Manager – this may be easier on a desktop computer
Go to Business Manager
Click on the ‘mega menu’ in the top left and select ‘Business Locations’ under Assets – you may need to request locations access here
Click ‘Set Up Multiple Locations’
Select your main page – this should be the page that represents all locations and click continue
Follow the prompts to create your new location/s
How’d you go?
And there you have it! You’re brand new Instagram location.
Share your thoughts and questions in the comments below.
Categories // Social Media
About John Rosato
I'm leading digital marketing at Soul+Wolf and passionate about all things search, social and digital. I’ve helped brands like EnergyAustralia, Torpedo7 and Australian Outdoor Living make more money through digital.
How to Add Location On Instagram: Create a New Place in Minutes
Instagram is purely a mobile social media platform. People can only post from their phones, and the website is rather limited. So, it is used mainly on the go. This is one of the reasons why knowing how to add a location on Instagram is so important in 2020.
Unfortunately, there is not a way to do it natively from the app. Still, social media experts have come up with a workaround that allows adding funny Instagram locations in just a few minutes to help businesses boost their brands. Though there have been some doubts about whether it actually works or not, many users have reported that they could do it in 2020. This is what they did to add new places to IG.
Table of Contents
How to Create Your Own Location on IG
How to Add Location on IG Post
How to Edit Location
How To Add a Location on IG Stories
Why Instagram Uses Facebook’s Location System?
Troubleshooting
Add Multiple Locations to Instagram Through Your Facebook Business Page
How Adding a Place Tag Benefits Your Business
FAQ
Conclusion
How to Create Your Own Location On Instagram: The Secret Workaround
Though the IG team claims it is not possible to do this, there is a workaround. It is not the most reliable, but so far, it has been known to work in most cases. Having a FB business page is essential to learn how to create your own location on Instagram.
Since they are sister companies, they share a lot of software. So, when something is added on Facebook since they have the same database, it is also available on Instagram. This process is best carried out from a phone. Follow these steps to do it in a few minutes.
Check-in on Facebook
Start by creating a post on Facebook and tagging the desired locations. Type the name in the search bar and select one of the given options. It is not there, scroll down and click on the option “Add a Custom Place”.
Activate GPS Services
To create a new location, it is vital to have one’s GPS on. This can be easily done from the Settings section. Just go there, hit on privacy, and enter GPS services. Check if they are activated. This can be turned off immediately after if desired.
Use the Search Box to Create a New Geotag
Learning how to create a geotag is easy. Type the name of the new locations on the search bar and hit accept. It should start with a capital letter and contain no symbols.
Create Your Custom Location
Click on the button “Add Custom Place” and choose the description that fits it best. It can be for events, fun, business, etc. Then, the platform will ask to select where it is. Tap on “I’m currently here”. If the GPS is on, it will be added automatically.
Pick the Category
After adding it, the platform may ask to choose a category that describes the venue. Make sure to select the most suitable one, since that will make it easier to find it.
Select the Physical Place
Then, indicate exactly where the venue is. For better results, be there when doing this. Click on the “I’m here right now” button to select that locale.
Claim Your Place
Once the new location has been created, one has to claim it as his own. Just type it on the search bar and open it. Then, click on the button that says “claim this place”.
Go to Instagram App & Use It
Finally, go to IG and create a new post. Choose “Add Place” and write the name of the place. Select it and publish it! The new post will have the desired place now.
Share the New Place on an IG Post
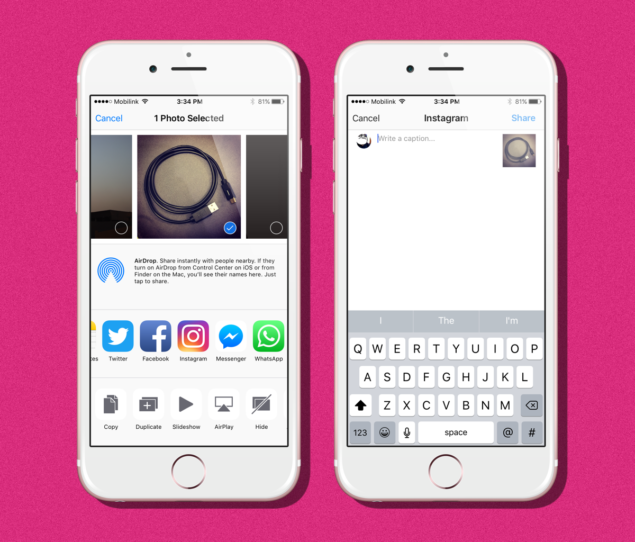
Now that the place exists on FB, it is time to learn how to add your own location on Instagram in 2020. The process is quite simple. And all that is needed is having access to the app to publish something. Follow these steps, and it will be done in just a few seconds.
Start a new post.
Look for the “Add Place” button under the text box.
Write the recently created custom location on Instagram.
Select it and share the publication.
How to Change the Location on a Post
Some users may tap the wrong option when they have to pick from the list. But do not worry, this is very easy to fix. Follow these steps to change the location on Instagram posts with just a few taps.
Look for the three dots above the post. They are horizontal in iOS and vertical in Android.
Click on the option “Edit”.
Tap the option to be changed. On an iOS phone, select “Remove place” or “Change locale”. On an Android mobile, click “Find a location…” or “X”.
After introducing the changes the users want, tap on “Done”.
How to Add a Location on Instagram Stories
Not only posts can have an Instagram custom location. It is also possible to take advantage of this feature with stories. The best thing about this is that people can just click on the tag to be taken to the blog or site of that place. In this manner, encouraging them to utilize this function is a great way to get new clients in 2020.
They will also be able to see what everyone else posted about that place. If there are many good pics, viewers will be enticed to want to visit it or buy something there. Learn how to add a location on Instagram stories to make the most out of this tool with these simple steps.
Click on the camera symbol to post a story. Alternatively, swipe to the left from anywhere on the feed.
Take the pics or record the videos that are going to be shared.
Open up the sticker section. For this, tap on the smiling face with squared edges at the top of the screen. There, select the map sticker.
Start writing the name of the place to be tagged. A list of options will pop up. Just select the right one.
The sticker can be customized to match the images or videos. One can change its size and placement, as well as write text. When this is ready, hit next to publish the story.
Why Does Instagram Use Facebook’s Location System?
Facebook bought Instagram in 2012. Though they have a different team of developers, since that moment, both platforms have been intertwined in many ways.
Many times, when they notice that something works especially well on one of the sites, they take it over to the other one too. Such was the case of the last seen message and the possibility of sending GIFs.
The same has happened with the new location feature. Since they noticed it worked so well on Facebook, the team decided to just integrate it with its sister platform, Instagram.
How to Fix Them the Most Common Issues
Learning how to create a location on Instagram may be troublesome. Yet, some common problems are easy to fix. Check out these possible solutions if any issue comes up.
Update Facebook and IG apps
Check if the latest version of both apps is installed on the phone. For this, go to the app store and search for them. If there is an “Update” button available, click on it. Then try again.
Enable GPS in Settings
Having GPS turned on is essential for this to work. Just follow these steps.
Go to Settings and look for Privacy.
A new sign will pop up. There, tap on “GPS services”.
Activate it, and then try posting again.
Be in the Exact Location
Make sure to be in the exact place that is going to be tagged. This is the most accurate and reliable way to do it. For this to work well, having done the previous step is key.
Test out Another Category
When learning how to add a custom location on Instagram, the user will be prompted to choose the category that best describes the nature of the business. If the chosen one is not working, type another one that resembles it.
Try Checking in Again
Starting the process again is a good idea if it is not working. Sometimes these apps suffer from glitches. Restarting it will probably fix the problem if it is technical.
Create a Facebook Post Using The Place You’re at
If the function to make a new location to tag on IG is not working, then trying with Facebook first could help. If using the new place on this site works, then the problem is IG. If it does not, then checking the other possible issues will help.
Give it Time
Sometimes, these platforms have problems with servers, glitches, or they may even be updating the site. Luckily, their team tends to solve this quite fast. So, waiting for a few hours will probably fix the issue.
Add Multiple Locations to Instagram Through Your Facebook Business Page
If one adds a new location to his Facebook business page, then it will be added to IG too. Companies with many stores included on FB will see the same happen on the other network too. The process is quite simple. Here is a step by step account.
Sign in to the company account. It is recommended to do this on a PC.
Go to the Business Manager.
There are three lines in the top left. Click on them to access the dropdown menu.
Look for the “Assets” option and tap “Business Locations”. A sign asking for permission to access one’s GPS may pop up.
Choose which the main page will be.
If none has been added so far, hit “Get Started”. The platform itself will show a step-by-step tutorial of how to continue.
Remember that when many places are added, Facebook will create a main page that manages all the other subpages. Then, all of them are sent to one’s IG profile too.
How Adding a Place Tag Benefits Your Business
Lately, many are starting to look for local recommendations on Instagram. They do this mainly for food, but it works for all types of services. Maybe they are looking for a place to go Saturday night or pool services. This and more can be marketed through the platform to reach more local customers.
Reach More People Locally
Adding an Instagram custom location helps give exposure to the businesses that implement it. Now more than ever, people look for shops near them on their phones. So, if this info is added to a site, then users will find them more easily.
This is exactly like with hashtags. When someone writes a phrase, all the results containing it will appear. In the same way, when they write the name of a city, street, or even “near me” and have their GPS on, users will be able to find the business.
Know What Other Instagram Users Say
Using the custom location on Instagram is a great tool to know what people have to say about a business. They can tag it the place where they did something and leave a review. Then, one can share that to show other potential customers what the experience is at that store.
Get More Recommendations
The platform tends to recommend people that they may be interested in. If they have searched for services or products related to one’s business, and they are closeby, then it is very likely that they will see it on their feeds. So, adding one’s location on Instagram is a great manner to reach new customers that were not even aware of the company.
FAQ Section
How Do You Create a Location on Instagram Without Facebook?
It is not possible to learn how to create a location on Instagram without Facebook. The team has come out to say that this feature is not included officially in the platform. There are only some workarounds, but they all need Facebook.
Why Can’t I Find My Location on Instagram?
There may be many reasons for that. Most likely, if the custom place is too new, then the database may not have been updated. Just wait a few minutes. There may also be some glitches or server problems. Try again later to see if the tech team has solved them.
Should I Make a Location on Instagram?
It depends on the objectives. But yes, this is a great tool for businesses for the following reasons.
More people will see the place on their feeds.
It allows others to tag the shop on their posts, which results in more exposure.
It makes the business easier to find on searches.
What Happens When You Create a Place on Instagram?
A tag will appear next to the post. People will be able to click on it to see what others have posted in that place. The same thing can be done with stories.
Finally! There’s a Workaround
Learning how to create new custom locations on Instagram is easy. Though it is not possible to do it straight from the platform in 2020, some workarounds promise to allow this through Facebook. Some users have tried it and claim that it works well.
Have you tried it too? Did it work for you? Let us know in the comments below your experience using this method and if it has helped boost your business!
Published: December 15, 2021Updated: June 22, 2021
Matt Robinson
Matt is an experienced technical writer and translator skilled in writing targeted texts for a variety of audiences. He has a diversified background, including social media management of various products. He is a data-driven strategist and a passionate story-teller. He posts about all social innovations and delivers high-quality research and content to our readers.
How to create a geolocation on Instagram in 5 minutes: complete instructions
* Meta Platforms Inc. (and its social networks Instagram, Facebook) is recognized as an extremist organization, its activities are prohibited in Russia.
From this article you will learn:
What is geolocation and why is it needed.
How to create a geolocation on Instagram.
How to add a geotag to a post and stories.
Let's figure out why the created label does not work.
All methods described are relevant in 2022.
Contents (expand ↴)
What is geolocation and why is it needed?
Geolocation on Instagram is a useful marketing tool that will help you promote your business. The owner of a coffee shop, bookstore (or any other establishment) can mark his offline point on the map. This will increase the reach of posts and account traffic.
Moreover, with the help of the created geotag, other Instagram users will be able to find your profile, as well as posts with reviews about the institution. Therefore, if you have an offline business, then spend 10 minutes of your personal time creating your own geotag.
The benefits of geolocation for business:
It will be easier for users of the social network to find your establishment.
Geotags can be used in stories to increase reach.
Customers and visitors of your offline outlet will tag the establishment in their posts. This is another way to increase brand reach and awareness.
The Instagram algorithm works like this: The more often users use a geotag, the higher it rises in the results in the category of similar tags.
How to create your own geolocation: step-by-step instructions
Creating a geolocation in the Instagram app will not work. To do this, you will have to use Facebook and create a location tag in this social network.
In the first step, create a Facebook business page and link it to your Instagram account.
Don't know how to link a business page? Read our article "How to link Instagram to Facebook".
Important: Before proceeding to the next step, be sure to enable geolocation on your smartphone.
Now open your business profile and click Create Post. In the opened window for creating a new post, there is a menu - it is located at the bottom of the interface. Here, select the "Mark Visit" function.
In the search bar, enter the name of the location you want to add. If this geotag is not on Facebook, the system will offer to create a new tag. To do this, click "Add" new label name "".
Now you need to select a category: home, entertainment, events, restaurant, ATM. The category depends on the type of your activity. To quickly find the category you need, use the search.
The next step is to choose a place for people to check in. Here, simply enter the city where the geotag is located.
The last section is "Create a place". Check basic information: tag name, category. You can upload a photo to illustrate this place - to do this, click on the camera icon to the right of the name.
In the "Location" subsection, enter the exact address of the point: this is a very useful option for restaurants, cafes, shops. It will be much easier for users to find you on the map. Add a zip code if you wish.
If you don't want to enter an address, activate the "I'm here now" function. The app will automatically detect your location. In this case, you must be in the created geopoint.
Geolocation settings completed - Click the Create button to complete the process of creating a new geotag.
This is important: Do you dream of becoming popular on Instagram and start making money? Do you want to attract new subscribers and customers for your business? The Zengram service, a tool for professional and safe promotion, will help with this.
The tool attracts only live subscribers - your target audience. There is a free trial period (3 days).
The first results of the promotion (new subscribers and clients) are already 2-3 hours after the start.
Start account promotion for free >>>
How to add geolocation to Instagram
Now let's add geolocation to the profile. Open the Instagram app and start posting a new post. In the "New Post" window, select the "Specify Location" option.
In the "Places" window, enter the name of your tag and set it as the geolocation for the publication.
It is not necessary to create a new post - you can edit an existing one and add a geotag to it. To do this, open the publication and go to the menu (3 dots in the upper right corner). Click the Change button.
Under the nickname is the option "Add a place". Click in this area to enter a geolocation.
Similarly, you can attach an existing geotag to a post. For example, you visited a museum and took a photo against the backdrop of a beautiful and unusual exhibit. In the publication, indicate which museum you went on an excursion to.
Can I add geolocation to my profile header?
Marking a location in Stories
To add the created geolocation to a story, start publishing a new story. At the top of the interface, click on the square smiley icon. In the widget window that opens, select "Location".
The search window will open again - enter the name of the geolocation: a tag that you created through Facebook or a previously created geotag. The geotag will now show up in your history.
Why doesn't geolocation work?
Often users encounter a problem: the created geotag does not work - it is not put in the publication, because it is simply not in the list.
We offer you 4 options for solving the problem:
Make sure you have linked your Facebook business page to your Instagram account.
Check if geolocation is enabled on your phone. It's important that while Instagram and Facebook are running, apps can track your current location.
Restart the Instagram app, or better yet, restart your phone.
Please wait 15-20 minutes - sometimes the created tags do not appear immediately.
How to create a geolocation and add a place on Instagram
26357
6 min.
Does geotagging work in 2021 and what is it all about?
Geotag or geotag indicates the location of a particular object on the map. This is an effective marketing tool for business promotion, which is able to increase account traffic and post coverage. This is not just a dot on the city map, but rather an active link where the user can find your business account, see photos or reviews of other users about your company. And yes, it works in 2021.
Today we'll figure out how to add "my place" and create a geolocation on Instagram, and also consider the reasons and actions if the geotagging does not work.
Go to www.facebook.com/bookmarks/pages.
Select the desired account to which Instagram is linked.
Then you need to click "+ Create Publication ".
Along with this add " Mark visit ".
A search bar appears, in which we enter the "name" of the page. This name will be displayed as a geotag on Instagram and Facebook for your users.
Since " name " is not familiar to Facebook, it should be added to the list. After all similar options in the list, there is an option " Add seat ". Select and click.
The next step is to enter our information. We need to specify the label name, address, city. Then " Save user location ".
Important : we recommend working from a PC or laptop, because the list of cities on mobile devices may not be fully disclosed, even if you enter the name suggested by Facebook itself.
More importantly : you need to choose a city from the list provided by Facebook. Just enter the city and drive in information from the list - not comme il faut.
Order is very important. You need to write the names of streets, avenues, alleys, boulevards, squares exactly in the format that is accepted in your country. For example:
st. Plekhanovskaya, 66
Gagarina Ave. , 20A
blvd. Yuryeva, 9
This format may also work:
Plekhanovskaya street 66
Gagarina prospekt 20 building A
But it doesn't always work with the second format. Often the geotag was simply not created. However, the reason is unknown. However, if you try again with the first format (Plekhanovskaya str., 66), the geotag will appear.
Index . You need to take only from Google Maps.
Use extreme caution when geotagging new street addresses or those that have recently been renamed. Facebook will not geotag you if any character or symbol other than the index itself appears in this field. Also, do not forget to check if you removed the space before the index (if you copied it from Google Maps, this may be the case), otherwise there will be no geotagging.
We carefully check the data and click " Publish "
It may also happen that a similar name already exists. In this case, Facebook will offer to replace it and even offer you their own options. Use them or come up with something new - it's up to you.
Important : the " Create " button starts an irreversible process: you will no longer be able to make changes to the created geolocation!
We created and share it on our page. You can make the post public or hide it by selecting the " Only available to me .
Geotagging time varies. It could be 10 minutes or it could be two weeks. But practice shows: from 20 minutes to several days, so we must be patient and wait.
When geolocation appears, it can be added to new publications or to posts that have been made previously. To do this, we use the editing functions. You can also "add to stories ".
There are situations when the geotag you created does not work. You cannot list it in a post simply because it is not on the suggested list. This indicates that something “went wrong” during setup.
There are several ways to get out of this situation:
It makes sense to wait 20 minutes, because the created marks do not always appear immediately.
Check if the Facebook business page is linked to your Instagram account.
Check phone settings: geolocation must be enabled. When working with geotagging, it's important that Instagram and Facebook track your location. Also check the app permissions.
Try restarting the application. If it doesn't work, try restarting your phone. There may be a bug in the mobile device itself.
You can create a geotag for any city, no matter where you are. However, when creating a post, the app will pull up your current location.
The process of creating a geotag is best done from a PC or laptop. On mobile devices, you may experience difficulties at some stages.
The tag appears through the creation of a Facebook business page.
Only create a business page from an employee or company work profile.


 People can only post from their phones, and the website is rather limited. So, it is used mainly on the go. This is one of the reasons why knowing how to add a location on Instagram is so important in 2020.
 It is not the most reliable, but so far, it has been known to work in most cases. Having a FB business page is essential to learn how to create your own location on Instagram.
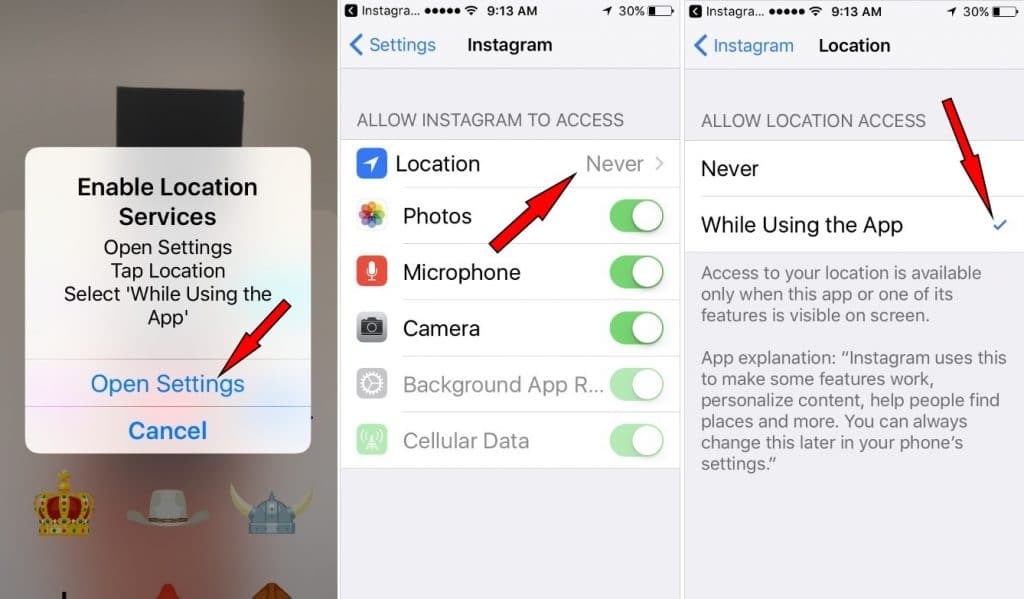 Type the name of the new locations on the search bar and hit accept. It should start with a capital letter and contain no symbols.


 Such was the case of the last seen message and the possibility of sending GIFs.

 The platform itself will show a step-by-step tutorial of how to continue.
 In the same way, when they write the name of a city, street, or even “near me” and have their GPS on, users will be able to find the business.
 The team has come out to say that this feature is not included officially in the platform. There are only some workarounds, but they all need Facebook.
 The same thing can be done with stories.
 (and its social networks Instagram, Facebook) is recognized as an extremist organization, its activities are prohibited in Russia.

 At the top of the interface, click on the square smiley icon. In the widget window that opens, select "Location".
 -3.jpeg)

-Jan-20-2022-03-30-39-36-AM.jpeg) , 20A
, 20A -Jan-20-2022-03-30-39-08-AM.jpeg)