Home »
Misc »
How to share facebook photos
How to share facebook photos
How to Selectively Share Photos on Facebook | Small Business
By Lauren Miller
The social networking community Facebook allows its users to limit the visibility of status messages and uploads including photos. This allows users such as freelance designers to privately share images with clients or colleagues who are on your Facebook friends list. This feature can be helpful when groups of people are collaborating and want to share feedback on an image.
Creating and Editing Friends Lists for Photo Sharing
-
Log in to Facebook. Place your mouse over the “Friends” link in the left column. Click the “More” link that appears. A page called “Friends” with your lists appears on the next page. It includes close friends, acquaintances, family and automatic lists based on where you live, where you work and information culled from your Facebook profile.
-
Click the “Close Friends” list. This is a list that Facebook auto-generates but you can edit it.![]() Click “Manage List.” Two options appear in the drop-down menu: “Edit List” and “Choose Update Types.”
Click “Manage List.” Two options appear in the drop-down menu: “Edit List” and “Choose Update Types.”
-
Click “Edit list.” An “Edit Close Friends” pop up box appears. Click “Friends” in the drop-down menu to show a list of your friends’ profile icons. Select the icons of the friends you want to add to the list. A check mark appears on the icon of the friends you select. If you want to remove someone on the list, select his icon and the check mark disappears. Click “Finish” to save your list.
-
Click “Manage List” and select “Choose Update Types.” Decide what types of updates -- including photos -- you want to share with this list. By default, all types are selected and have a check mark next to them. Select photos to remove the check mark if you do not want this list to see photos that you post.
-
Click the “More” link after placing your mouse over the Friends links in the left column to return to the “Friends” page of lists. For all the other lists, designate whether or not you want them to see any photos that you post. Click the name of the list that you want to edit. Click “Manage List” and then select “Choose Update Types.” Select or deselect “Photos.”
Selective Sharing When Uploading a Photo
-
Log in to Facebook. Click “Add Photo/Video” at the top of the news feed. Click “Upload Photo/Video.”
-
Click the “Public” link next to the blue “Post” button. A drop-down menu appears that allows you to choose several options for sharing your photo. They include “Public,” “Friends,” “Only Me,” “Custom,” “Close Friends” and “Acquaintances.”
-
Choose an option from your precreated lists in the menu or choose “Custom” if you want to customize visibility specifically for this photo. When you select “Custom,” a Custom Privacy pop-up screen appears.
-
Choose a sharing option from the “These people or list” drop-down menu. You can select “Friends,” “Friends of Friends,” “Specific People or Lists,” or “Only Me.” If you choose “Specific People or Lists,” a field appears where you type in the names of the friends with whom you want to share the photo. Only those friends can see the image. If you subsequently tag someone in the photo who is not on this specific list, he will also be able to see the photo.
-
Type the names of friends or lists you specifically want to hide the photo from in the “Hide this from” field. This is helpful for sharing options other than “Custom.” Click “Save Changes.”
-
Click “Choose File” to search for the image on your computer and upload it. Add a status message in the status box. Click “Post.” The photo now has sharing restrictions. You can edit the sharing restrictions of a photo at any time by clicking on the small sharing visibility icon underneath it in your Timeline or in your albums. For example, if you share the photo only with yourself, a lock icon appears. If you share it with close friends, an icon of a gold star appears.
-
Click on the icon underneath your posted photo and a drop-down menu appears with all the sharing options. If you want to edit the photo’s visibility, choose another option from the drop-down menu.
References
- Facebook: List for Friends
- Facebook: Privacy
- Facebook: Choose Who You Share With
- Facebook: I Want to Make All My of Past Posts Visible to Only Friends
Writer Bio
Lauren Miller has more than 10 years of experience as a writer and editor. Her articles on technology, small business and legal topics have appeared in magazines, newspapers and trade journals. She has a Bachelor of Arts in philosophy and is an avid gardener and sports fan.
Facebook Marketing: How to Share Your Photos and Albums
By: Amy Porterfield and Phyllis Khare and Andrea Vahl and
Updated: 03-26-2016
Social Media Marketing All-in-One For Dummies
Explore Book Buy On Amazon
The marketing strategy behind sharing your albums and photos on your Facebook marketing Page is something that you need to sit down and design. Maybe every Friday you send out a new album or every Tuesday, you post an image of your products that you found around town or in another city.
You can also share this album or individual pictures again, after publishing, from two places:
Your business Page Timeline: If you see your album or photo on the Page Timeline, you can click the Share link below the photo.
You can put a call to action in the Message field when you share, asking people to share the album with their Friends.
The album itself: The second way is to go through the album.
To share an album (or individual pictures) after publishing, follow these steps:
Go to your Page, and select the Photos app box.
Select the album you want to share.
Click the Share link below the images.
Choose where to share the album by clicking the drop-down arrow:
If you share in a private message, the link to the photo or album will go to the recipient’s Messages section. You can also send the album to folks outside the Facebook platform by using an e-mail address, but they will need to join Facebook to see the picture(s). See the following section for more details.
Select a viewing option: Public, Friends, Friends except Acquaintances, Only Me, or any of your personal lists.
Click the Share Photo button.
You can send any photo or album directly to anyone other than your personal Facebook Friends by following the steps listed above, except this time instead of selecting to send it to your own Timeline, choose In a Private Message from the drop-down menu and type an e-mail address rather than a Facebook name. Facebook sends an e-mail with a link to the photo.
If the person you send it to is on Facebook, he’ll be able to view it. If he doesn’t have a Facebook account, the link will take him to a Page with the message that he can’t view the photo unless he joins Facebook.
You also have a direct URL to each album that you can send to anyone, and those people will be able to view it. Or you can post anywhere online. To find this direct URL, follow these steps:
Go to your Page and select the Photos app box.
Select the photo that you want to share.
Make sure that you’re viewing the photo (it will be in a lightbox setting).
Copy the URL of the image from the browser bar.
Paste the URL in an e-mail message.
Send the e-mail.
If the person to whom you sent the URL to doesn’t have a Facebook account, she can view the photo anyway as long as you have viewing set to Public. An invitation to join Facebook will be there too.
This article can be found in the category:
How do I share a photo or video in a Page's story on Facebook?
Pages you manage may use the new version. More.
Your Page Story is a way to share content with your followers that will be available for 24 hours.
You can also share photos or videos in your personal profile story.
To share a photo or video to your Page's story, sign in to the Facebook app for iOS or Android.
Android
New Version of Pages
If you have access to a Page at the Facebook level, you can post photos to your Page stories on Facebook. People with Facebook Page or task access can create and manage stories using the Meta Business Suite mobile app.
To post a photo or video to your Page's story (requires Facebook level access):
Sign in to Facebook and click your profile photo in the upper right corner of the screen.
Click All Profiles and select the Page you want to switch to.
Click the icon at the top of the screen and select History.
Select a photo or video from your camera roll, or tap the icon to take a new photo or video.
Click to add a sticker, Aa to add text, or to draw on a photo or video you have taken or uploaded. Select Effects to add other creative effects or Save to save the photo or video to your Camera Roll.
Click Done and then Share Now to post the photo or video to your story.
Classic Pages
Only a Page administrator or editor can post content to a Page's history.
To post content to your Pages story:
Tap the icon in the top right corner of your Facebook screen.
Click Pages and select your Page.
Click on your profile photo.
Click Create story.
Select a photo or video from your camera roll, or tap the icon to take a new photo or video. On this screen, you can:
Tap the bottom of the screen to take a photo, or tap and hold this icon to record a video.
Press BOOMERANG to loop through a series of individual photos that can be scrolled back and forth.
Click to change camera settings for history.
Swipe left to add a photo or video with a camera effect.
Press to upload a photo from your camera roll.
Click to add a sticker, Aa to add text, or to draw on a photo or video you have taken or uploaded. Select Effects to add other creative effects or Save to save the photo or video to your Camera Roll.
Click Done and then Share Now to post the photo or video to your story.
iPhone
New version of Pages
If you have access to a Page at the Facebook level, you can post photos to your Page stories on Facebook. People with Facebook Page or task access can also create and manage stories using the Meta Business Suite mobile app.
To post a photo to your Page's story (requires Facebook level access):
Click your profile photo or icon at the bottom of the Facebook window.
Select your Page.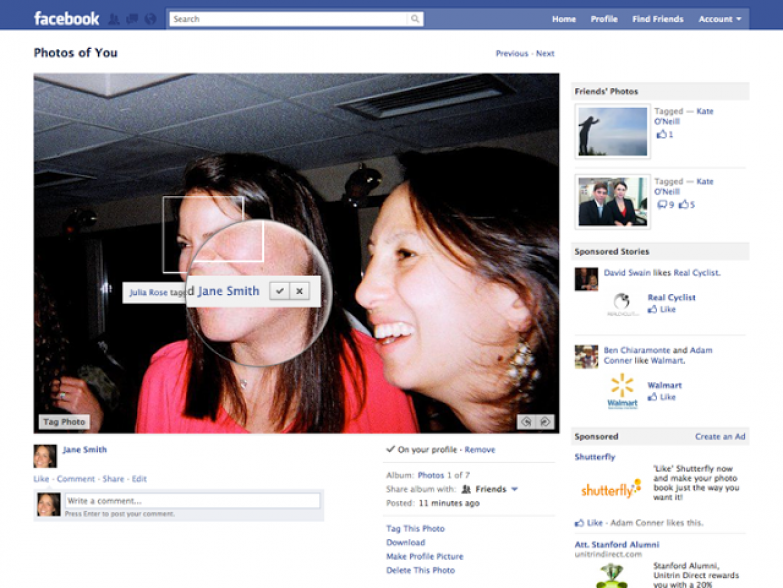 You may need to click Change Profile or Select Profile first.
Click the icon at the top of the screen and select History.
Select a photo or video from your camera roll, or tap the icon to take a new photo or video.
Click to add a sticker, Aa to add text, or to draw on a photo or video you have taken or uploaded. Select Effects to add other creative effects or Save to save the photo or video to your Camera Roll.
Click Done and then Share Now to post the photo or video to your story.
Classic Pages
Only a Page administrator or editor can post content to a Page's history.
To post content to your Pages story:
Tap the icon in the bottom right corner of your Facebook screen.
Click Pages and select your Page.
Click on your profile photo.
Click Create story.
Select a photo or video from your camera roll, or tap the icon to take a new photo or video. On this screen, you can:
Tap the bottom of the screen to take a photo, or tap and hold this icon to record a video.
Press BOOMERANG to loop through a series of individual photos that can be scrolled back and forth.
Click to change camera settings for history.
Swipe left to take a photo or video with the camera effect.
Press to upload a photo from your camera roll.
Click to add a sticker, Aa to add text, or to draw on a photo or video you have taken or uploaded. Select Effects to add other creative effects or Save to save the photo or video to your Camera Roll.
Click Done and then Share to Story to post the photo or video to the story.
How to add a photo to Facebook from your phone and computer: 3 ways
To post a photo to Facebook from a phone, the user needs to give the app access to internal storage. Through a smartphone, you can create separate albums, upload pictures to History and Chronicle.
Table of Contents
- How to add photos via phone to Facebook
- Upload pictures from computer
- Make an album on Facebook
- Why photos are not uploading
- List of problems when uploading photos to Facebook 23
How to add a photo via phone to Facebook
The profile owner can upload videos to Facebook using "Albums" or publications. In the second case, the entries will be added a separate section: "Downloaded from the phone." Photo albums can be edited, moved pictures, add privacy options and captions.
How to upload a picture from a smartphone:
- Log in to Facebook - My page.
- Publications - Photo.
- Select a picture from the Gallery to place.
- Add caption - Share.
Subscribers and page visitors will see the photo. An author can specify privacy settings before posting to the public.
The maximum number of photo cards that can be added to an entry is 80 and after the first ten they will be published as a separate album. In addition to photos, short videos are added to publications, lasting no more than two minutes.
Up to ten photos can be added and you can choose their display format: tile or single view. There is also editing of each card separately, if you select the "List" format.
Upload pictures from computer
The PC version has access to uploading photos to the feed: up to 80 photos and with additional description. When creating a text publication, a function will appear below: “Attach a photo”, clicking on which will open the storage locations of media files on the computer.
Separately, you need to consider adding photos to communities:
- Enter the group from a computer - select: "Add post".
- Photo or video - upload the marked materials.
- Bottom: "Schedule" - specify the date when the post will appear in the public domain.
After uploading one snapshot, a new tab will appear in the toolbar: "Media Files". Through it, you can view a list of previously uploaded photos, videos.
There are separate rules for pictures that were added by subscribers:
- if the owner connected the page to the community and a publication was created through a public account, the added photo or video will remain in the "Media files" section. But they are not available for viewing by subscribers;
- admin can edit posts that have been suggested to members. Delete or change photos without notifying the author.
Any downloaded content will be available on the tab: "Media Files". Posts can be moved between albums as an editor or administrator.
Make an album on Facebook
To separately add a photo on Facebook to a group or personal page, you need to create a photo album. In this way, editing is available, organizing files that are uploaded to the profile.
How to make an album from the mobile version:
- Go to the application - My profile.
- Photo - Albums.
- Create new - add a title and description.
- Specify access parameters - Save.
Next, to fill the photo album: open it - click on the button: "Upload photos". In albums, there is editing of the description of the entire collection, deletion. If you hold down on the picture, you can move among other files.
Make from the computer version:
- Log into your account - select the tab: "More".
- Photo - Create a new album.
- Fill in basic information - Add.
In the same section, the user can upload pictures and videos separately. To do this: go to the tab: "Photo" and select: "Add photo". The picture will be loaded outside the album if the author does not specify its path.
Why photos are not uploading
There are standard problems why pictures may not be uploaded to a social network. The main reason is non-compliance with technical requirements.
Rules for posting pictures on Facebook:
- Format: PNG, JPEG and JPG;
- recommended resolution: 1080x1080, 1280x720 pixels;
- maximum size: 500 Mb;
- the maximum number in the album is 10,000.

Prohibited according to the usage policy:
- spam or advertising on malicious resources;
- photographs of children under 13 without adult presence;
- erotic and pornographic materials;
- trade in illegal goods;
- discrimination based on race, gender;
- placement of someone else's intellectual property;
- adding a photo posing as a popular person.
If the picture has not been blocked by the administration, you can file a complaint against it. For example, if a picture appeared in some community without the consent of the author. You need to go to the image and select in the additional menu: "Send a complaint", select the reason and send.
List of problems when uploading photos to Facebook
There are technical problems why the photo is not added to Facebook. The list of main problems includes:
- the format is not suitable. A notification will appear that you need to change the file type;
- Maximum size exceeded.
 With the help of file compression services, you can reduce the size, with minimal loss of quality;
 - network connection is slow. Switch to a more stable one or check your Internet connection;
- resolution too small or too large. Usually, this problem does not occur, but it can occur with 4K images;
- spam. The user frequently added posts of the same type.
For example, if you upload up to twenty identical photos to a profile or group within a period of up to 5 minutes, the system will send a notification: “You often send posts.” The placement limit works if the user performs a series of similar actions in a short time.
If there are no problems with the Internet speed, but the pictures are still being processed, restart the application. Or go to the Play Market, AppStore to install the update. In case of a repeated error, you need to use a different type of connection, check access to the cache memory.
The last problem users face is the lack of permissions.