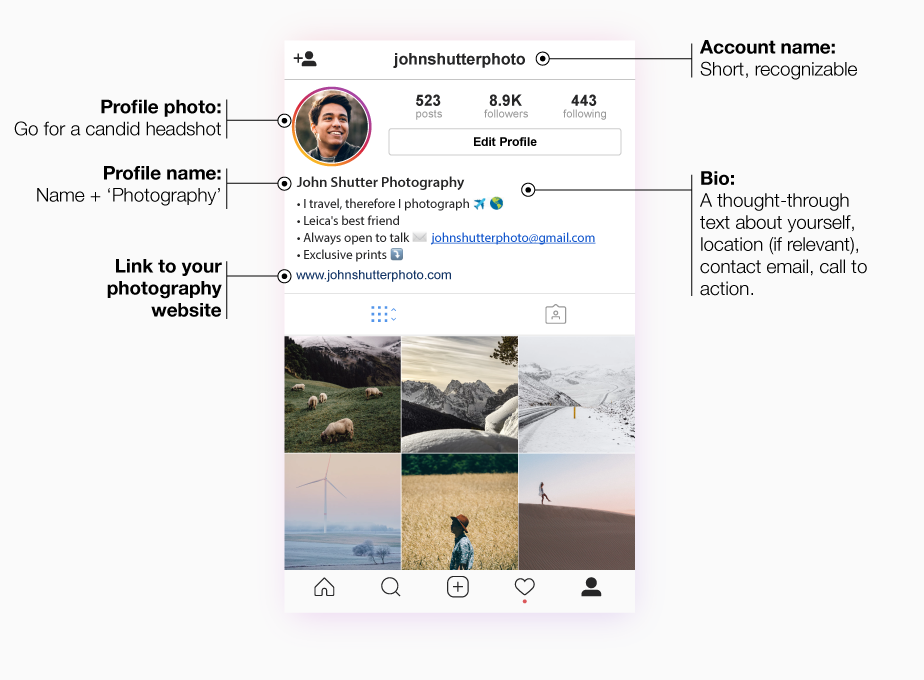
Your bio is an essential element of your profile on Instagram. Although it is limited to 150 characters, it is one of the three things that other Instagram users have to look at to gauge whether they want to follow you or not. Of course, the other two things are your username and your most recent selection of posts and stories.
One common technique used to increase the visual appeal of your bio and make it “pop” is to center or reposition the bio text. Centering/repositioning the text means inserting spaces on each line so that the overall effect is to make your bio look centered, indented, or stylish on the screen when someone looks at it.
Word-processing programs like Microsoft Word include automatic centering features that let you select a block of text and hit a button, and poof, it is instantly centered. Instagram, unfortunately, does not have this functionality. However, centering your bio is quite simple, and in this article, you’ll see a simple technique to get your bio displaying where you want it.
While you’re typing your bio on an iPhone or Android device, one handy feature is the character count that displays in the lower right-hand corner of the text box. The count shows you how many characters are left in your allowance of 150.
The PC version does not appear to include a character count feature.
Spaces count against the character limit, including nonbonding spaces—more on that later.
Yes, the spaces used to format your text count against the 150-character limit.
In the Instagram Bio text box, you’ll want to add spaces to the left-hand side of each row of text that you want to center or position differently. If your text strings are relatively short, adding about nine spaces to the left of each row will put your text near the center of the screen on most phones. You’ll want to add more or less space depending on if your text strings are longer or shorter. You’re going to run into one problem, though. Instagram insists on left-justifying every line in your bio. That means that each line starts with the first visible character, not spaces.
The only way to get your Instagram Bio lines to the center or appear where you want them to is to use nonbinding spaces. There’s no need to go into technicalities, but these gaps are essentially coded differently in HTML and will let you bypass the line glitch in Instagram’s code.
Nonbinding spaces prevent whitespace and two-part text such as “liquid-based” and “T & T Disks,” for example, from separating into the current row and next row, yet they serve as spacers in this particular case.
Nonbinding spaces used for copy/paste functionality in your Instagram Bio are not creatable in a text app, note-taker, or document creator. Sure, MS Word and Google Docs have a way to insert nonbinding/nonbreaking spaces, but it won’t work for your Bio unless you copy it from HTML, which uses “ ” (excluding the quotes) as the code. Don’t bother viewing source code or using the “Inspect element” to see the “ ” characters. They often appear as blank spaces, ironically.
Anyways, editing your Instagram Bio is simple. Using a PC is best so you can easily copy/paste the nonbreaking spaces. Still, it is also possible on Android and iPhone because we incorporated the nonbreaking spaces in the steps below, so your smartphone or tablet can easily copy them as well. Regardless, with a couple of clicks or taps, you can position your bio any way you want, including centering it. Here’s how.
 Tap the “blue checkmark” in the upper-right section to save your changes.
Centering isn’t the only type of text formatting that can give your bio some visual flair. For example, you can stagger your bio by increasing the indent on each successive line. For example:
Good Example:
Bad Example:
Notice that the second example tiered less fluidly because the last line was too short. Also, it doesn’t highlight the contact information in the same way that a centered bio would.
Think about what you want your followers and potential followers to take away from your bio, how your bio reads, and what information you’d like to highlight.
Sometimes, your profile is better served by not having a centered bio, which comes with downsides, including:
 Bios have a 150 character limit and spaces count toward that limit.
Overall, centering or staggering your bio on Instagram can definitely help make your profile stand out in the crowd. Whether you’re looking to help show off your contact information or want to make your bio look more attractive, centering and staggering text on Instagram is surprisingly easy.
Your Instagram bio is one of the most critical elements of your Instagram profile. It gives Instagram users the reason, benefits, and purpose of following you. Hence, one of the ways to make your Instagram bio catchy, stylish, or visually appealing is to center the bio text.
You may be confused about how we center the text in Instagram bio using spaces. It’s not magic. It’s simple, and it’s what you can do yourself. Here, you will know what these spaces are and how to create those.
Table of Contents
Instagram bio was designed in the way that if you add space to the left-hand side of each row of text that you want to center, it will make your bio text look awkward or disorganized after submission. The text line in the Instagram bio is left justified.
The only thing you can do is to create “nonbreaking spaces” outside your Instagram bio and paste it either on the left-hand side of each row or the right-hand side, depending on how you want your bio text to look.
Nonbreaking space is also known as “ ,” hard space, or required space. It looks exactly like regular space, but the difference is that it marks a safe place to flow text onto a new line or page. You can create nonbreaking space through these methods.
Method #1: Using Microsoft Word or Google DocsYou can create nonbreaking spaces using Microsoft Word or Google Docs either through a symbol dialog box or the keyboard shortcut method. If you want to use a symbol dialog box on Word, you have to:
The keyboard shortcut method is even easier. You just have to press ctrl + shift + space simultaneously.
Method #2: HTMLYou can create nonbreakable space by entering the code “ ” into an HTML document. Read how to create non-breaking spaces in HTML in detail from this article.

The steps to center your Instagram bio using a mobile app are similar:
It’s not a must for you to center your Instagram bio. But to make it look attractive and visually appealing, you should do so.
Though it may not look good for those using a desktop, but do not worry since the majority of users use smartphones to access Instagram.
Follow the tutorial provided in this article to center your bio. Happy Instagramming!
Learn how to customize your account with these Instagram hacks: adding line breaks to Instagram captions, creating custom places, and more Instagram hacks!
Last updated May 30, 2017
Stay on top of the biggest social media marketing trends!
There are a ton of great Instagram hacks to help you move from Insta-basic to Insta-pro!
This week, Jessica Howell of Social Studio Shop shares 6 Instagram hacks to help you conquer Instagram for your business. From creating line breaks in Instagram captions to adding custom URLs to Instagram posts, here are 6 Instagram hacks you haven't heard of yet:
Have you noticed that the old trick of creating line breaks and spaces in Instagram captions no longer works? After updating Instagram last May, Instagram removed the ability to add line breaks and paragraph spacing to Instagram captions. Luckily, there is still a way to break up content in captions!
You can still add a line break to your Instagram caption, but there will no longer be any space between paragraphs to help visually pull information together. Instead, you can use a character or series of characters to create a nice clean break.
Open the Notes app on your phone and write a caption.
When you want to add a space, press Return.
Copy and paste what's between these brackets: [_____________________] or add a series of underscores "_" while holding down the hyphen character on your keyboard.
If you need a shorter line, you can press backspace to delete any part of the line. If strings aren't for you, you can also use other characters like numbers, dots, periods, or even emoji!
Did you know that you can post your Instagram posts directly to Pinterest? Not only is this a great way to drive traffic to your Instagram posts, but it can also help you grow your Instagram following by attracting users from two different platforms! Here's how to move your Instagram posts to Pinterest:
Copy the link to share:
Navigate to the post you want to share in the Instagram app.
Click on the ellipsis button in the upper right corner of the Instagram post
Select Share and then Copy Link.
Pin your post to Instagram:
Open the Pinterest app on your mobile device and go to your profile tab.
Click on the "+" sign to add Pin
Select the "Copy link" option.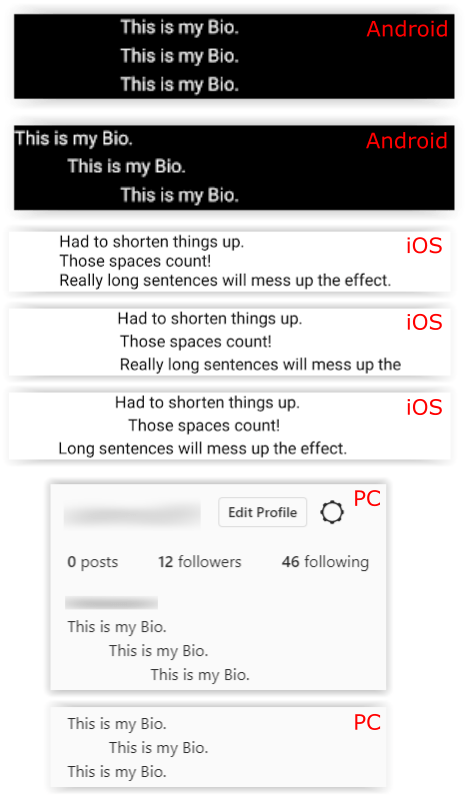
Pinterest will automatically enter the copied link from Instagram. If it doesn't show up automatically, you can just paste the link.
Select an appropriate image associated with the Pin
Edit the Pin description to include keywords optimized for Pinterest
Add a location (if possible) to maximize your Pin's search power
Select the board where your Pin will be added (you might even want to create a unique board for your Instagram posts!)0003
Pro tip: Pin your Instagram post to relevant group boards to increase the potential for repins and more traffic!
Because Instagram only gives you one clickable URL, you can use Linkin.bio to easily drive targeted traffic to your online store. With Linkin.bio, you can add links to any Instagram posts you've posted through Later, which will help direct your Instagram audience to the right content or products on your site. You can also link to multiple websites and pages without changing the link in the bio.
According to a report from Simply Measured, Instagram posts containing a location tag have a much higher engagement rate. This is why we recommend creating a custom location for your business on Instagram. In this way, you will be able to increase brand awareness as your business name will appear in the spotlight in your Instagram posts!
Creating a geotag or custom location on Instagram used to be a simple process, but with recent updates to the Instagram platform, it has become a bit more difficult. But luckily it can still be done! The steps below are for Instagram iOS app users. Android users can find specific steps here.
Open the Facebook app on your phone
Click the "Check in" button under "What's on your mind?".
You must have location services enabled for the Facebook app. If it's not enabled, go to "Settings" and then to "Account Settings". Then click "Location" to open the location settings. Finally, tap the location button under "Your Device Settings" to enable Location Settings.
Select your location by entering your desired user location in the Where are you?
Click the Add button to create your location.
Add the most appropriate category to your new location. You want to add a category that best suits your industry to help you with your search results.
Select your city, add an address and zip code, and then click the "Create" button.
After creating a custom location, Facebook will take you to a window where you can write a status with your new location. To share it on Instagram, you need to post your new location to Facebook at least once.
Next you need to check if you can find your location on Instagram. Keep in mind that it may take up to 24 hours for your custom location to become active.
Open the Instagram app, create a new post, and click Add Location. If your new location doesn't automatically appear as a suggestion, it's probably because you either haven't used the location often enough in the past, or you're too far away from where you created the custom location!
Have you ever wondered how some accounts can center their Instagram bio or add spaces to their formatting?
There are a few things you can do to make your Instagram bio stand out, but a quick and easy way is to center the text in your bio. This is a great way to increase the visual appeal of your bio and help highlight important keywords that will be easy for viewers to read.
To make your Instagram bio appear centered, all you have to do is copy the space between the arrows (make sure you are copying the space between the arrows, not the arrows themselves!) : >>⠀⠀⠀⠀⠀⠀⠀⠀⠀
Next, go to your Instagram page on your desktop (you can also do this via the mobile app, but it's much easier to do it via the web app) and click the "Edit" button. profile".
Go to the Bio text box and paste the spaces you copied above before each line of text. If your text isn't perfectly centered, you can always add or remove spaces until you get the perfect center!
It's important to remember that Instagram bios have a 160 character limit, so if you're planning on including a lot of text in your bio, the centered view might not be ideal!
After all, you want to have a good Instagram bio in general, and that includes a few things. Centered bios also don't display well on the desktop version of Instagram, but if you like the look of a centered bio and can include all of your data (including spaces) within the character limit, then you should definitely give it a try!
To add line breaks to the Instagram bio (as in the example below), you can add them by typing "Return" in the bio on the desktop version of Instagram. You can't add line breaks to Instagram bios from a mobile device.
Just like pinning your Instagram posts to Pinterest, you can embed your Instagram posts on your website or blog to increase the visibility of your posts!
People who visit your website or blog can click on your embedded Instagram posts to visit your Instagram page, which can help you get even more followers!
Finally, embedding your Instagram posts on your website can help extend the life of your posts, which means you can grab attention for your posts days and even weeks after being posted!
Open Instagram on your desktop and navigate to the post you want to paste.
Click the ellipsis button in the lower right corner (next to Add Comment...), and then select Paste.
You can enable or disable the signature by selecting or deselecting the Enable Signature button and then selecting Copy Embed Code.
Create a WordPress blog post and select the Text option to edit the HTML.
Insert embed code
Follow the first three steps above
Open Squarespace, click on "Insert" and select the "Insert" option.
Paste the embed code and click Save.
Last but not least, the best Instagram hack ever? Schedule Instagram posts! Plan your feed, save time, and manage multiple Instagram accounts for free with Later.
Are you ready for a surge in engagement on Instagram? Later makes it easy to plan, manage and schedule your Instagram posts!
If, like many others, you're trying to figure out how to center your About Me section on your profile, you've come to the right place. In this article, I will show you how to do it very simply.
To center your bio on the Instagram app, simply follow these steps:
1. Open Instagram from the home screen and go to your profile.
2. Press button Edit profile (Edit profile).
3. Click on the frame History (Bio) to turn on the keyboard and enter the text editor mode.
4. Copy all spaces in brackets below (excluding square brackets):
(If you don't see spaces in square brackets, check out the full version of this article here to find out which spaces to copy)
[⠀⠀⠀⠀⠀⠀⠀⠀⠀⠀
5. Start inserting the spaces you just copied before each line of text in your bio, for example:
6. Now the text will be positioned like this.
...but now when you save and view your profile, it looks like a disaster:
Based on the results shown above; Now you know how spaces affect text indentation on your profile.
7. Now you need to add or remove paths as needed. Adjust the required spacing differently depending on what you write in your bio:
because the distance currently displayed in the frame does not match what is displayed in your profile. So you can save it and then go to your personal page to see where you need more space or where you should remove it for easy editing.
8. When you are satisfied with your interval, click on the word Successful (Done) save.
If you add full spacing before each line, the biography section of your Instagram profile will appear in the center, as shown below.
Looks great, doesn't it?
This orientation of your bio is just a cosmetic effect as it can improve your Instagram profile.