4 min
This article shows you how to fit the whole picture on Instagram. If you have a full portrait (9:16) image or video or a landscape (16:9) image or video, you can fit the whole picture in your Instagram post by following this tutorial.
Instagram has a maximum aspect ratio of 4:5 on portrait posts (four pixels wide for every five pixels tall). Instagram’s restriction reduces the number of very tall images that take up a lot of vertical space in the feed. Although it’s nice that Instagram keeps users from publishing massive, obtrusive posts, the 4:5 limit makes it difficult to post a whole vertical picture or video that you shot on your phone.
Here's what your tall photos will look like on Instagram without added borders.If you want to fit your whole picture on Instagram but it is taller than the 4:5 aspect ratio, you need to modify your image before posting. Otherwise, Instagram will automatically crop your image to a maximum of 4:5. I recommend the Kapwing resizer as it allows you to add white space on either side to bring your image to the required aspect ratio. In this article, I’ll explain how to fit the whole picture on Instagram in three simple steps:
Start by opening the Kapwing’s Resizer tool on your phone or computer. Upload your image file from camera roll or import it from a URL. Kapwing supports images, videos, and GIFs, so you can use it to resize for any kind of media.
The video resizer tool in KapwingOnce your picture loads into the editor, you’ll be taken into the Kapwing Studio Editor where you'll see a preview of your image in the center of the screen.
In the Output Size section, select the 4:5 option. This allows your photo to take up maximum vertical space in the Instagram feed without getting sized down. There is a resizing option for Instagram, 1:1, but this shrinks your image to fit in the default square shape.
Resize the image to 4:5 using the button in the Output Size listOnce you have selected the size option, Kapwing adds white padding to either side of your image to make it fit the 4:5 aspect ratio. You can change this white background to any color you want so that it stands out in the Instagram feed.
Click the red Export Image button at the top of the screen. After a few moments of processing, Kapwing makes your resized 4:5 picture or video available for download. Whether you're using a desktop computer, iPhone, Android, or tablet you'll be able to instantly download the image to your photo gallery once published.
If you're not signed into a Kapwing account, sign in or sign up using your Google or Facebook account – once you've signed into a Kapwing account, the watermark in the lower right corner will be removed from your final image.
Open the Instagram app and upload your picture. You’ll notice that Instagram crops the picture to square by default, but you can click the expand arrows or pinch the image in the lower left to fit the whole picture on Instagram. When you publish it, Instagram will resize to image width to fit the screen, the white image background will blend in with Instagram’s white background, and your whole picture will appear on Instagram with no cropping.
Note: You can also choose a black background, if you and your followers use Instagram in Dark Mode.
This tutorial shows you a workaround for posting full portrait pictures and videos on Instagram. You can use Kapwing’s Resizer to post multiple images with different sizes on Instagram, add a thin white border around your media, and publish TikTok and Snap videos. I hope that it helps speed up your social media workflow and enables you to post your beautiful and fun candid moments to Instagram.
For more information on how to resize a video for Instagram, check out this video tutorial (we give you the best sizes for each type of video too!):
Check back in at the Kapwing Resources page or our YouTube channel for other content creation tips and tutorials! And remember to tag us @KapwingApp whenever you share your content on social media– we love to see what our creators are passionate about!
Related Articles:
The standard for posting contents on Instagram varies. Sizes differ depending on whether you are posting to your feeds, stories, or creating thumbnails for IGTV. For example, in posting a photo on your feeds there is a specific size and dimension needed. Because if you uploaded a taller or wider image you will end up having a black border or unpleasantly cropped photo. See photos below as samples:
The original photo:
Unflattering cropped image:
Photos with black borders:
To avoid this from happening, we highly suggest resizing your photo first before uploading them. And in order to resize them precisely, you must know what their correct sizes are. Accordingly, here are the types of Instagram posts and their recommended sizes.
Recommended size: 1080 x 1080px
Instagram’s first launch only supported square images with 1080×1080 px. Using its auto-cropper, one can maintain the uniformity of their feeds.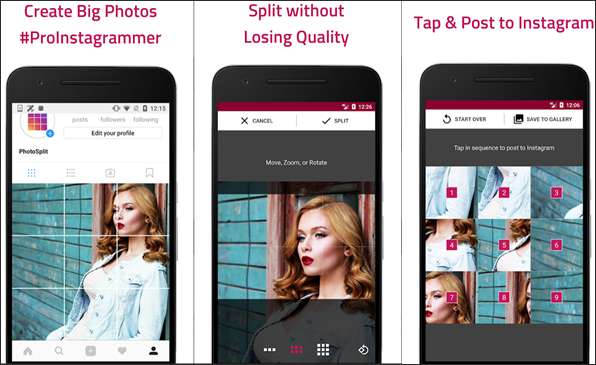 Landscape and portrait format photos, however, created a problem because this size was only recommended for iOS users back then.
Recommended size: 1080 x 608px
If you have seen a photo with black borders on both sides, then that photo has an aspect ratio of 1.91:1. The problem with this size is that mobile phones typically capture landscapes in 16:9. Consequently, most users’ posts end up with annoying borders.
Recommended size: 1080 x 1350
Portrait image with 1080px by 1350px size is the best image size for this type of content. In contrast to the previous sizes, this one is easier to use and mobile-friendly since most smartphones have this size. However, there may only be a problem if you have to post a taller image.
Recommended size: 1080 x 1920
To upload an IG story image that fits perfectly, set the image at 1080 x 1920 pixels. Additionally, you should post a vertical image so that it fills your story frame completely, as opposed to leaving it behind with a black border, which will not be pleasing to you or your viewers.
Recommended size: 420 x 654px
While IGTV is intended for videos, you also need a cover or thumbnail for it, so do not get confused. Furthermore, there are also some recommended guidelines for uploading this. In ideal cases, this should measure 420 x 654 pixels.
Now that you have the right sizes, aspect ratio, and resolution for your IG posts, you can now upload your photo without worrying to the annoying black borders around it. However, if you already have photos on your phone that don’t fit into any of the sizes we mentioned above, and you are not happy with Instagram’s auto-cropper, use a photo editor to do it for you. To that end, let me introduce to you a wonderful AI-powered tool called PicWish.
PicWish is an online photo editing app that can handle all your photo editing needs. Easy-to-use and intuitive, this tool is an excellent choice. With this app, you can crop picture online for free. In addition to its excellent image cropper, you will be surprised to find that it can resize images without cropping them. It generates the results without modifying the content by simply entering your desired sizes.
How to fit whole picture on Instagram without border with PicWish:
After learning how to resize image for Instagram without cropping, you will have an IG-worthy feed in no time. Black borders and empty parts of IG frames are no longer an issue. With PicWish, you can perfectly fit any image size to your Instagram post.
Rating:4.3 /5(based on 10 ratings)Thanks for your rating!
Have you ever felt like posting a full size photo to your story or Instagram feed? But the social network ruthlessly cut off the most beautiful area in the picture. Let's see how to resize to instagram and upload a photo in original size.
If you want to post a story, but everything is cut off, then the easiest way to resize a photo for Instagram is to take a screenshot of it from the general Gallery. Only if you upload a picture to the story, the image will have black borders.
Everything is easier with posts. And uploading a full size photo is easy. Let's see how to do it. Instagram itself has a standard function with which you can adjust the size of the photo to Instagram.
What to do:
If you're a creepy perfectionist and want all of your photos to be edited the same way, then you can use an app called Instasize . You can download it in the AppStore and Google Play (in-app purchases are possible).
Leaving the photo in full size, you can choose any frame format in the application:
The following functions are also available in the program:
Be the most stylish! Use super effects:
More life hacks, processing secrets, best filters and unusual masks. And also how to make a rainbow on the face, overlay text, correctly lay out the layout on the photo, is described in the large team article. Click on the picture!
Now you know how to edit, upload and resize photos for Instagram. Use these simple tricks to make your profile sparkle with new colors. Let your pictures collect a huge number of likes.
Thank you for your time.
Table of contents:
It's no secret that social networks are different. For some, the desktop version is the main one, while others mainly exist as an application. And this specificity greatly affects the frames in which the images we upload fit. Computer social networks have much more opportunities in this regard. It's not just about the size, it's also about the fact that computer screens are bigger and can give you a better view of your photos. For Instagram, as a service for phones, it is important to know the conditions that must be taken into account in order to create and post photos that are ideal for mobile screens. Let's talk about how to reduce a photo for Instagram.
In the past, people had to be very strict about pictures for publication. The original format of the posts was a photo from a Polaroid, a small instant camera: a square image and a border, and it was thicker at the bottom. People took pictures as a souvenir and gave them, signing their wishes below. Doesn't it remind you of anything?
Now, of course, the square format remains the main one, but such cropping is optional. You can, spreading and pinching your fingers in the picture, increase or decrease it. But, if you increase it, be prepared to cut off what will not be included in the “frame” - in this case, the publication will be exactly square.
Although it is possible to fit a picture to a post, users on a social network spend most of their time viewing posts, which means that it is important to be able to use the features of social networks for viewing.
Is it possible for us to enlarge the picture in order to see all the details? Yes. This feature has been added in recent updates. It is enough to spread two fingers in the picture to enlarge the image. If you fix your fingers and move around the screen at the same distance from each other, you can also move the photo to see certain parts of it without changing the size anymore.
As I wrote above, restrictions are imposed on users on Instagram. But now the trend is such that the framework is less and less. Previously, the social network constantly cropped uploaded photos, fitting them to the format. Now this is no longer the case, but there are still some limits.
The question is not so much about image quality in the literal sense - the maximum resolution is 1080 by 1080 for a square post and 1080 by 1350 for a vertical one. Much more important is the aspect ratio. The square entry has a ratio of 1 to 1, which is logical. Horizontal - 1.9to 1 and vertical to 4 to 5. Anything that doesn't match this will be clipped.
If this article was written in 2015, then I would give you a whole selection of applications that supposedly allow you to add "full-length" photos. But often such applications could only harm. Some of them made it possible to make an image square by adding white borders to a vertical one. Others, like many other fraudulent tools, either asked for money for zero functionality, or hacked pages. Perhaps it was this kind of fraud that provoked the introduction of the ability to upload vertical and horizontal images. Now it’s not necessary to google “How to reduce a photo for Instagram?”, Because there are now corresponding opportunities in the social network itself.
You need to do the following:
As you understand, cropping photos for Instagram in third-party tools is now essentially useless - why, if there are built-in features, and even if the aspect ratio does not suit you, the social network itself is fix. But this is sometimes not very convenient - cropping may be needed more serious than what Insta offers.
Therefore, I can offer the following tools to solve the question “How to enlarge and crop a photo on Instagram?”
 The dedicated tab for resizing and aspect ratio is quite primitive. You can use a photo editor and, for example, crop in a circle. There is also a whole series of video tutorials on using the service.
The use of social networks requires knowledge of the interface, functionality and, importantly, the restrictions imposed on users. Some of the most tangible frames affect images. Although the photo grid empowers people in this regard, cropping is often still necessary.
#1. The resolution of my photo is small, so Instagram stretches it, which makes the image blurry. What to do?
One solution to this problem is to add white borders. This way you can leave the original resolution.
#2. How to download full size photo carousel?
At the moment there is no such functionality in the social network.