Die Anleitung zeigt, wie du Fotos und Videos von deinem PC aus auf Instagram posten kannst, und du findest Tipps zur optimalen Nutzung von Unternehmensprofilen auf Instagram.
Wir sind heutzutage alle sehr vertraut damit, wie man Bilder auf Instagram postet. Du lädst deine Bilder entweder aus einem Fotoalbum von deinem Smartphone hoch oder machst deine Fotos direkt in der App. Es gibt jedoch Fälle, in denen du von deinem Computer aus posten musst. Zum Beispiel, wenn du im Büro bist oder gerade dein Smartphone nicht zur Hand hast.
Instagram hat kürzlich die Möglichkeit hinzugefügt, Fotos und Videos direkt von deinem PC aus zu erstellen und zu posten. Viele Leute greifen von ihren Computern aus auf Instagram zu, insbesondere mit geschäftlichen Instagram-Accounts. Daher ist es sehr hilfreich, von deinem Computer aus Bilder posten zu können. In diesem Leitfaden findest du einen Überblick und eine Schritt-für-Schritt-Anleitung, wie du Bilder und Videos von einem PC aus auf Instagram posten kannst.
Um mehr darüber zu erfahren, wie du von einem PC aus einen Beitrag auf Instagram erstellst, lies diesen Artikel weiter.
Wenn du jemals in der Situation bist, dass du etwas auf Instagram posten möchtest, aber dein Smartphone gerade nicht dabei hast, ist es hilfreich zu wissen, wie du Bilder von einem PC aus auf Instagram posten kannst. Befolge dafür einfach die folgende Schritt-für-Schritt-Anleitung.
Das Wichtigste zuerst: Um von deinem Computer aus auf Instagram posten zu können, musst du zunächst Instagram.com aufrufen und dich bei deinem Account anmelden.
Sobald du dich auf deinem Computer bei deinem Instagram-Account angemeldet hast und bereit bist zu posten, klicke auf das Plus-Symbol in der oberen rechten Ecke. Das Plus-Symbol findest du zwischen den Meldungen und den Kompasssymbolen.
Nachdem du auf das Plus-Symbol geklickt hast, öffnet sich ein neuer Bildschirm. Nun klickst du auf die Schaltfläche “Von Computer auswählen”, wo du dann Fotos vom Desktop deines Computers, Dokumente oder Downloads auswählen können.
Sobald du ein Foto von deinem Computer ausgewählt hast, das du posten möchtest, kannst du das Foto bearbeiten. Du kannst verschiedene Filter hinzufügen und dein Bild zuschneiden. Du kannst es aber auch unbearbeitet lassen.
Nachdem du das Foto bearbeitet hast, kannst du eine Bildunterschrift oder einen Standort für das Foto hinzufügen und/oder Personen im Beitrag markieren.
Du kannst die Einstellungen für deinen Beitrag nach Bedarf aktualisieren. Du kannst beispielsweise entscheiden, wo es geteilt wird, Kommentarfunktionen anpassen und vieles mehr. Ebenso kannst du die Beschriftung oder den Ort ändern und weitere Tags hinzufügen.
Sobald das Foto erfolgreich hochgeladen und bearbeitet wurde und du mit den Ergebnissen zufrieden bist, kannst du den Beitrag für alle deine Follower freigeben.
Wenn du fertig bist, kannst du mit deinem Smartphone jederzeit überprüfen, wie deine über den PC geposteten Bilder auf Mobilgeräten aussehen.
Nachdem du nun weißt, wie du von einem PC aus Bilder auf Instagram posten kannst, sehen wir uns an, wie von einem PC aus Videos auf Instagram postest. Das Posten von Videos auf Instagram von einem Computer aus ist dem Posten von Bildern ziemlich ähnlich. Aber hier ist die genaue Schritt-für-Schritt-Anleitungen, die du dafür befolgen solltest:
Um Videos von deinem PC auf Instagram zu posten, musst du auf deinem Computer zunächst die Instagram-Website aufrufen und dich bei deinem Kunden-Account anmelden.
Sobald du dich auf deinem Computer bei deinem Instagram-Account angemeldet hast und bereit bist, dein Video zu posten, klicke auf das Plus-Symbol in der oberen rechten Ecke. Das Plus-Symbol befindet sich zwischen den Meldungen und den Kompasssymbolen.
Nachdem du auf das Plus-Symbol geklickt hast, sollte eine neue Seite mit der Schaltfläche “Vom Computer auswählen” angezeigt werden. Klicke auf diese Schaltfläche und du kannst auf die Videos auf deinem Computer zugreifen und eines davon zum Posten auswählen.
Sobald du ein Video zum Posten auf Instagram ausgewählt hast, kannst du das Video vorbereiten. Du kannst das Video kürzen, einen Filter hinzufügen oder andere Bearbeitungen vornehmen, wenn du dies für erforderlich hältst.
Um dein Video ansprechender zu gestalten, kannst du aus der auf Instagram verfügbaren Auswahl Musik über Spotify hinzufügen. Du kannst auch ein Titelbild auswählen. Dies kann dazu beitragen, die Ästhetik deines Feeds zu erhalten, und ermöglicht es dir, einen informativen Titel oder eine Zusammenfassung hinzuzufügen. So werden deine Videos von zukünftigen Besuchern deines Profils mit größerer Wahrscheinlichkeit mehr Klicks erhalten.
Nachdem du das Video nach deinen Wünschen vorbereitet und bearbeitet hast, kannst du eine Bildunterschrift und einen Standort hinzufügen und Personen im Beitrag markieren. Wenn du möchtest, kannst du die Kommentarfunktion auch deaktivieren.
Du kannst alle anderen Einstellungen nach Bedarf aktualisieren und Änderungen am Beitrag vornehmen. Du kannst die Beschriftung oder den Ort ändern und weitere Tags hinzufügen.
Sobald du das Video vorbereitet und bearbeitet hast, musst du nur noch auf Teilen klicken und fertig! Das ist alles, was du dafür benötigst, um von deinem Computer erfolgreich ein Video auf Instagram zu posten.
Eine andere Möglichkeit, von einem Computer aus auf Instagram zu posten, ist die Verwendung der entsprechenden Chrome-Erweiterung. Hier erfährst du, wie das geht:
 Lade die entsprechende Chrome-Erweiterung herunter
Zunächst musst du die Chrome-Erweiterung für Instagram auf deinen Laptop oder PC herunterladen. Öffne den Chrome Web Store, suche nach der “Erweiterung für Instagram” und klicke dann auf “Zu Chrome hinzufügen”. Mit dieser Erweiterung kannst du Fotos hochladen sowie Fotos und Videos herunterladen.
Sobald die Chrome-Erweiterung für Instagram auf deinen Computer heruntergeladen wurde, klicke auf die Erweiterung in der Leiste oben in deinem Browser und melde dich bei deinem Instagram-Account an.
Nachdem du dich bei deinem Instagram-Account angemeldet hast, klicke auf das Plus-Symbol in der oberen rechten Ecke der Seite. Das Plus-Symbol befindet sich zwischen den Meldungen und den Kompasssymbolen. Du kannst dann das Bild auswählen, das du von deinem Computer hochladen möchtest.
Sobald du ein Foto von deinem Computer ausgewählt hast, das du posten möchtest, kannst du das Foto bearbeiten. Du kannst dem Beitrag auch eine Bildunterschrift und einen Standort hinzufügen und Personen markieren. In den erweiterten Einstellungen kannst du die Kommentarfunktion auch deaktivieren.
Nachdem du dein Foto bearbeitet und eine Bildunterschrift erstellt hast, kannst du deinen Beitrag in deinem Instagram-Feed teilen.
Du kannst Instagram-Fotos und -Videos von einem PC aus posten, aber du kannst keine Instagram-Storys, Instagram-Anzeigen, IGTV-Posts oder Reels von einem Computer aus teilen. Du kannst auch kein Live-Video von einem PC aus starten. In der Desktop-Version von Instagram bist du daher auf das Posten von Fotos und Videos beschränkt. Damit kannst du jedoch viele der Instagram-Aufgaben deines Unternehmens problemlos von deinem Schreibtisch aus erledigen.
Keiner weiß aktuell, wie wir von einem PC aus eine Instagram-Story posten können, aber man weiß nie, was die Zukunft bringt.
Neben dem Posten auf Instagram über einen Webbrowser oder die Verwendung der Chrome-Erweiterung gibt es noch einige andere Möglichkeiten, wie du von einem PC auf Instagram posten kannst, wie z. B. die Verwendung einer Planungssoftware. Du kannst eine Planungssoftware wie Mailchimp verwenden, um deine Instagram-Posts im Voraus zu planen. Eine Planungssoftware kann sehr hilfreich sein, wenn es darum geht, deine Inhalte für die sozialen Netzwerke zu verwalten und sicherzustellen, dass deine Beiträge immer zur richtigen Zeit hochgeladen werden.
Wenn du ein Unternehmen besitzt, ist es wichtig, in den sozialen Medien präsent zu sein. Aber nur in den sozialen Medien präsent zu sein reicht nicht aus. Du musst darüber hinaus auch regelmäßig auf den von dir ausgewählten Socia-Media-Plattformen posten und mit deinen Followern interagieren.
Wir verstehen, dass dies für Geschäftsinhaber mit begrenzter Zeit und begrenzten Ressourcen eine Herausforderung sein kann. Hier kann die Verwendung einer Terminplanungssoftware von großem Vorteil sein.![]() Eine Planungssoftware kann dir bei allem helfen – von der Erstellung organischer Social-Media-Beiträge bis hin zu zielgerichteten Anzeigen, sodass du alle deine Kanäle in den sozialen Medien an einem Ort verwalten kannst.
Eine Planungssoftware kann dir bei allem helfen – von der Erstellung organischer Social-Media-Beiträge bis hin zu zielgerichteten Anzeigen, sodass du alle deine Kanäle in den sozialen Medien an einem Ort verwalten kannst.
Egal, ob du ein etabliertes Unternehmen oder ein Startup hast: es ist immer sehr hilfreich zu wissen, wie man von einem PC aus auf Instagram postet. Das Posten auf Instagram von einem Computer aus ist einfach, sobald die dafür notwendigen Schritte kennst und dich mit den Unterschieden zwischen PC und Mobilgeräten vertraut gemacht hast.
Wenn du dich von all den Verwaltungsaufgaben für deine Social-Media-Beiträge überfordert fühlst, ziehe die Verwendung von Mailchimp in Betracht. Du kannst Mailchimp für dein Social-Media-Marketing nutzen sowie als Planungstool für das automatische Hochladen von Social-Media-Beiträgen zu bestimmten Zeiten.
Außerdem kannst du mit der Planungssoftware von Mailchimp einen Einblick in deine Daten gewinnen, sodass du herausfinden kannst, was auf jedem deiner Kanäle funktioniert und was nicht. Du hast Zugriff auf eine Vielzahl hilfreicher Tools, mit denen du Social-Media-Kampagnen erstellen, Anzeigen entwerfen und Inhalte für alle deine sozialen Plattformen erstellen kannst. Fang noch heute damit an und überzeuge dich selbst, welchen Unterschied die Verwendung von Mailchimp machen kann.
Want to how to post on Instagram from PC or Desktop? This step-by-step guide gives you 11 different methods for posting on Instagram from PC. Let’s get started!
When Instagram first launched in 2010, it only allowed users to post photos from their mobile devices through the Instagram app. Since then, Instagram users have been searching for options to post on Instagram from PC.
If you’re wondering “how can I post pictures on Instagram from my computer?”, we’ll cover 11 different options to post on Instagram from your computer in this article, with updates for 2022. In addition, we’ll list the pros and cons of using each tool to post on Instagram so you can choose the best option for you.
There are 6 ways to use a laptop or desktop computer and Windows or Mac to create IG posts photos and videos on Instagram.
You can grow your Instagram by planning your posts ahead of time. Using an Instagram scheduler lets you:

Hopper HQ lets you focus on content quality. With features such as bulk content creation and scheduling ahead of time, all from your desktop.
Hopper HQ is a company founded in 2014 tailored for brands, agencies, and creators to grow on Instagram. They also have an outstanding live chat to help you on the go.
You can schedule and post on Instagram from PC with the Hopper HQ desktop app. Hopper HQ allows you to visually plan and schedule your social media campaigns automatically with tailored insights, all from your computer. Scheduling your posts saves you precious time that you can use to focus on other aspects of your growth.
1. Create an account at HopperHQ.com
After logging in to your new account, you are greeted with a visual dashboard with four sections:
When you Log in to Hopper HQ from your desktop computer, you will see the Hopper HQ Dashboard | How to post on Instagram from PC.
In the left corner, you can see your Instagram handle. You can add other social networks too, such as LinkedIn, Facebook, and Twitter accounts (Stay tuned for more social networks soon 👀)
From the menu, you can create and manage your feed posts, calendar, analytics, and settings.
View your scheduled and drafted posts ready to be posted on Instagram.
Look at your Instagram feed posts, exactly how they will appear on your IG profile once published.
The hopper HQ dashboard. You can see your linked social networks, menu, posts, and grid planner.2. Create posts and upload Instagram photos, videos, stories, and reels
In the top-left corner, click “create posts” and you are taken to a window where you can upload 50 photos or video posts at once directly from your desktop browser in one swoop.
Take a look at the video uploading photos from Unsplash. As a result, fill your calendar in seconds.
3. Edit your Images
If your images are not in the correct Instagram size dimensions, a pop-up alert will take you to the photo editor with pre-set dimensions for portrait and landscape photos, and apply any filters or edits.
Add frames, text, stickers, and more to get your images looking their best from your desktop with Hopper HQ.4. Write captions and schedule your first comment with hashtags
Once you’ve made your edits, you can write captions (including emojis) for all uploads, and schedule the first comment where you will add all your hashtags.
Here is the best part, you can choose between Post Now or Schedule a time in the future.
If you decide you want to publish the same post to another social network then, you can choose to send it to multiple platforms at the same time. This includes Instagram, Facebook, Twitter, LinkedIn, and more social networks coming very soon in 2022.
5. Drag and drop grid planner
Once all your photos and video posts are in the dashboard, you can easily make changes by dragging and dropping the posts. The Instagram Grid Planner displays an accurate view of what your IG feed will look like.
Using drag and drop option to move posts | How to post on Instagram from your Windows or Mac6. Calendar View
Hopper HQ also includes a calendar view in a clean and aesthetic arrangement.
7. Monitor your social media analytics
User-friendly Analytics to measure the success of your content and stay informed about your audience demographics!
Hopper HQ Analytics Dashboard, to keep track of your growth. | How to post to Instagram from PC and Mac.Hopper HQ allows uploading up to 50 high resolution pictures or video clips while editing your posts in bulk.
Hopper HQ works on a subscription basis by the number of social accounts sets. Pricing starts at $19 monthly or $16 monthly if paying annually for 1 set of social accounts.
1 social set = 1 Instagram account, 1 Facebook account, 1 Linkedin account, 1 Twitter account.
If you are an agency or you manage multiple accounts, there is a bulk discount. 🎉
Pros and cons of using an Instagram scheduler tool to post on Instagram from PCA set of accounts include 1 Instagram + 1 Facebook + 1 Twitter + 1 LinkedIn, but if you are an agency or you manage multiple accounts, there is a bulk discount.
 Interested? Start your free trial today!
Hopper HQ does far more than post to your Instagram from PC or desktop. It is a complete social media management tool built to automate and manage Instagram and other social networks to scale. It offers a visually appealing dashboard with an easy-to-use drag and drop interface, resulting in an attractive grid and consistent Instagram aesthetic in no time.
| 🚫 Free | ✅ Hashtag Tool |
|---|---|
| ✅ Photo AND Video Posts | ✅ First Comments |
| ✅ Instagram Stories & Reels | ✅ Editing Tools |
| ✅Carousel Posts | ✅ Filters |
| ✅ Windows | ✅ Cropping |
| ✅ Mac | ✅ Tag Images |
| ✅ Bulk Upload | ✅ Tag Locations |
| ✅ Captions | ✅ Multiple Accounts |
| ✅ Feed Grid Preview | ✅ Bulk Edit |
This method changes the user agent on your browser for posting on Instagram from PC (Mac or Windows) and does not require a website or software download, plus it’s free to use. Here are the ways to use it, explained depending on your favourite operating system!
How to change the user agent in Google Chrome when using Mac?
1. Open the Developer Tools Window.
Changing the view of your browser to see as your mobile device but from your PC and Mac.2. The console will open. Then, by clicking this icon, you can change the view to a mobile device.
3. In this drop-down menu, select a mobile model from the list of devices. This will change the browser’s view to a mobile screen, and the upload button will appear.
Tip: if it does not appear straight away, navigate to a different page and come back, or refresh.
4. The upload button will automatically open your computer’s files. Select a photo. You then have the option to rotate and also to zoom out.
How to post on Instagram from PC or Mac.5. You have a range of Instagram filters available, although not the editing tools. When you’re ready, press next as you would on mobile.
6. Add a caption and location on the review page. Thereafter, click share, and the post will be published on your profile!
7. Additionally, publish to your profile using the Share button in the top right-hand corner!
How to change the user agent in Google Chrome from Windows?
If you are running Chrome, click on the ‘three dots’ icon on the top right section of your browser. Despite it for windows, actually works in Mac too. Find the steps explained.
(1) Click on ‘More tools’ and pick “Developer tools”.
(2) Go to the “Toggle Device Toolbar” option in the console window.
How to post on Instagram from PC or Mac.(3) Go up to the dropdown to pick a mobile device user agent and set the user agent to the mobile device that you wish.
(4) After that, launch IG on the browser.
How to post on Instagram while using a PC or Mac.Thereafter, you can click the + button to start posting photos or videos on Instagram from your desktop or laptop computer.
How to change the User-Agent in Safari from Mac?
This is a handy quick fix if your photos are ready to go on your desktop or USB and you don’t have time to transfer them to your phone. While this is relatively simple and free, there are many limitations.
Check out this in-depth guide where David Coleman explains “what the user agent is.”
Option 3: The Inspect methodTo post to Instagram using the Inspect method, open your browser’s search bar and type Instagram.com
Use the right-click and select Inspect; subsequently, a code screen should appear where then you can select Toggle Devices. Now, you can follow the instructions above.
Pros and cons of using the inspect method to post on Instagram from PCThis is a quick and easy way to post to Instagram from any browser. Nonetheless, this method has limitations like editing your videos and photos, scheduling in advance or managing multiple IG accounts.
With Instagram’s latest update, everyone can post from PC whether with Mac or Windows; therefore, allowing to upload Instagram posts from the web version of Instagram (Not the mobile app).
Visit the Instagram website and log in with your credentials. Once inside, click the + icon in the upper-right corner of the menu bar (next to the Messenger icon). Here, you can edit the photos, and add your caption, for instance. In addition to changing location, Alt text, and advanced settings.
Publish your Instagram Post while using your PC or Mac.Pros and cons of using the Instagram web version to post on Instagram from PC The Instagram web app allows users to add captions, locations, tags, and hashtags. Additionally, this is an option that’s easily accessible from any browser (Safari, Google Chrome, Bing, etc.)
Using the Instagram web version is beneficial if you are looking to upload one picture on the go or see your Instagram feed on a bigger screen. However, you can’t upload Instagram Stories and there is no scheduler!
Bottom line: limited and difficult to scale your Instagram account.
In August 2019, Facebook launched the option to post to Instagram on their Creator Studio platform. Consequently, users with a business Instagram profile can link to their business Facebook page and can publish posts from a desktop.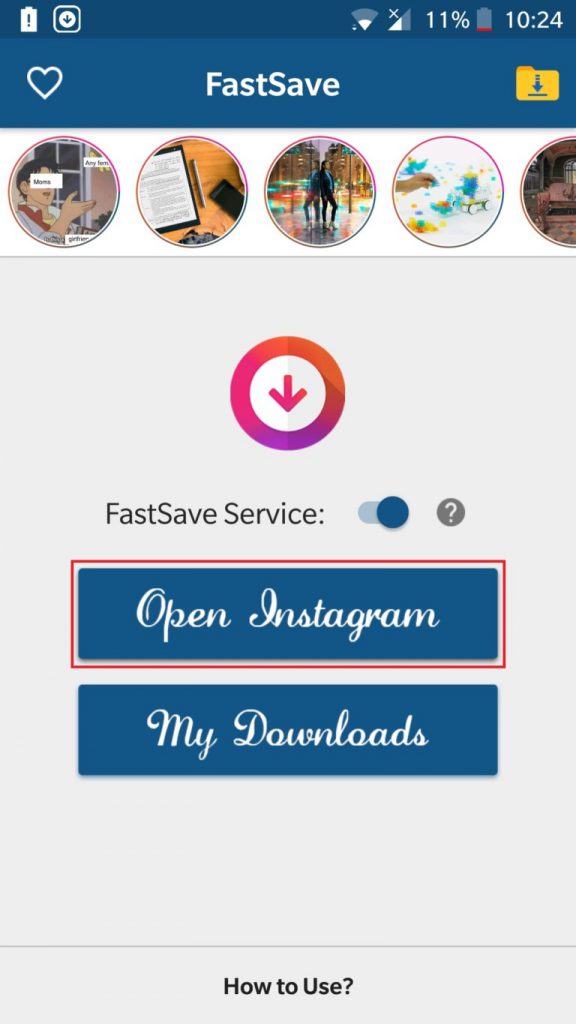
Connect to business Creator Studio by using your Facebook credentials. Then, go to the Instagram section (Instagram – camera icon) and click on it.
Introduce your Facebook Credentials using the Creator Studio to publish your photo and video posts.Pros and cons of using Facebook Creator Studio to post on Instagram from PCThis is a great free alternative to posting on Instagram from computer. However, it is limiting if you’re managing Instagram content in batch, as it is time-consuming to find workarounds.
Option 6: Using other third-party tools to post on Instagram from PCHow to post to Instagram while using a PC or Mac.
Using other tools created by independent developers is another way to create Instagram posts from PC. Keep reading for an overview of some other programs available online.
Bluestacks is an Android emulator that allows Android applications to run on PCs running Microsoft Windows and macOS. All you need is a Google account, after that, you can download a version of the Instagram Android app;
Bluestacks requires you to download an app to your computer, find their webpage, type Instagram in the search bar and click Install from their App Center. Log in and you’re ready to post on Instagram from PC.
Pros and cons of using Bluestacks to post on Instagram from PC

The verdict
BlueStacks lets you post on Instagram from your Windows or Mac PC but with limitations on working with multiple accounts and scheduling posts in advance.
Using Deskgram lets you post on Instagram from your Mac PC, as well as view comments and likes, just like the mobile app.
You need to download the app on your computer. Drag to the applications folder and upload your photos and videos to Instagram from Mac and you’re all set to use it.
Pros and cons of using Deskgram to post on Instagram from PC
The verdict
Deskgram’s $2. 99 monthly price seems fair for unlimited use on one device, but don’t forget it’s limited to use just on Mac.
This Instagram Uploader was developed by Eltima Software and, like Deskgram, works only with Mac.
You need to download Uplet to your desktop, drag it to the Applications folder and upload your photos and videos to Instagram from your Mac.
Pros and cons of using Uplet to post on Instagram from PC
The verdict
The license cost ranges from $19.95 to $49, paid as a one-time fee. Despite covering the basic options, there are some drawbacks, such as the need to download an application, lack of some features, and it only works with Apple computers.
This Google Chrome extension lets you use Instagram as you would on your cell phone. As revealed by their website in a disclaimer, this Chrome extension is not an official app from Instagram, but from independent developers.
Install the Instagram extension by searching it on the Chrome web store. Thereafter, you click on the extension icon, you will be prompted to sign in to Instagram again, allowing you to post from your PC as you would on mobile.
Pros and cons of using the DMI Chrome extension to post on Instagram from PC
The verdict
The extension allows you to send direct messages to other Instagram users, view photos, follow links from others just like the web version of Instagram. It does, however, have its limitations when it comes to uploading videos.
Whether you’re using Windows or Mac, you have plenty of options to post on Instagram from PC. Your method of choice will depend on what you’re looking to achieve; do you just want the ability to post on Instagram from computer? Or are you looking for a tool that you can use to upload, edit, and schedule multiple posts from PC?
In conclusion, based on your goals and individual needs, you’ll be able to decide on the best option for you.
Do you have a touchscreen Windows 10 computer? Find out how to post to Instagram directly from it!
Continuation of the story from
Media news2
Stories
Stories
Veronica Elkina
Ex-Story Editor
Polina Todorova
The Instagram social network has always focused primarily on mobile applications. Yes, you can view your feed from a PC or Mac, but your options there are limited. You can like photos, follow people, but you can't upload your own pictures and videos.
There are several ways to post photos to Instagram from your computer, from dedicated apps to plugins for Adobe Lightroom. But now it can be done much easier. nine0003
Polina Todorova
Instagram added the ability to publish photos to the mobile version of the site (this version is seen by the user if he enters the social network through a browser, and not through the application itself). The new feature is just one part of the big changes coming to the mobile version of the site. All of them will be made to facilitate access to Instagram in countries with severe restrictions on Internet bandwidth. nine0003
Related materials:
38 Instagram tricks that not everyone knows about
Instagram stories: how to start thinking about content and make it work for you?
How to run a commercial Instagram: instructions with examples from an SMM specialist
To post photos to Instagram from a computer, you need to install a Chrome extension that will allow you to open the mobile version of the social network on a PC or Mac. Install the extension, select your device type (iOS or Android) from the menu, and go to Instagram.com. You will see a mobile version of the site with a button to upload photos. nine0003
This is what it will look like:
However, the functionality of the mobile version of the site is somewhat limited compared to the application. So far, videos cannot be uploaded through the site, and filters, photo editing mode, geolocation tracking do not work here, and it is impossible to publish a series of photos in one post.
But still this method works. If you suddenly need to urgently post a photo on Instagram from your computer, it will be easier to use this technique than to first transfer the picture to your phone and then publish it from it. nine0003
The extension modifies the user-agent string. This line is a kind of calling card used by browsers. It tells the site information about which device the browser is running on, and the browser, in turn, adapts to this device. The extension makes the site think that you have opened Instagram from a mobile device and not from a computer.
Source.
Related content:
How to save Instagram photos without taking a screenshot
How to get followers on Instagram
Instagram allows you to save live broadcasts to your phone memory
How to make money from celebrity animals on Instagram
How to get a loyal audience on Instagram: success stories of three brands
Found a typo? Select the text and press Ctrl + Enter nine0003
 How the mobile app industry has evolved in 2021
 December 26, 2022 nine0003
Goznak Startup Lab
December 26, 2022
"Safe Internet"
December 30, 2022
Softlanding Program
All possibilities nine0003
Stories
Speakers
Archive rb. ru
ru
Speakers
Speakers
June 12, 2020 Likbez Technologies
Social network desktop site does not allow posting. But there are workarounds.
You can open the mobile version of the Instagram* website on your computer and create stories and posts there, just like in the official app. How to do this - we show on the example of Chrome, but in most other browsers the steps will be similar.
Go to the Instagram* website and log in to your account.
Open developer tools. To do this, press Shift + Ctrl + I or right-click on the page and select View Code (or a line with a similar name). nine0003
On the toolbar that opens, find the icon with a schematic representation of multiple monitors or mobile devices and click on it. If you can't find it, press Shift + Ctrl + M. One way or another, the browser should launch the site in mobile mode.
Customize the size of the Instagram* interface that is convenient for you using the buttons above the site window.
Refresh the page. After that, a publish button will appear and you can use the social network on a PC in the same way as on a smartphone. nine0003
Last year, Facebook* launched a dedicated Creator Studio section. It allows you to publish and even schedule posts on Instagram*. You can't create stories yet.
To work with Creator Studio, you need to switch your Instagram* account to a professional one (author profile or business account). To do this, go to the settings of the Instagram* mobile app, select "Account" → "Switch to a professional account" and follow the prompts. The procedure will take you a couple of minutes. If you don’t like something, you can return to the usual account type at any time. nine0003
In addition, you must link your profile to a Facebook page*. To do this, click the Edit (iOS) or Edit Profile (Android) button on your account page in the Instagram* app. Select "Page" and connect your new Facebook* page using system prompts.
Now open Creator Studio on your computer browser, select the Instagram* icon at the top and log in with your account.
To make a post, on the left panel, click the Create a post button and select Instagram* Feed. Add a photo or video using the Add Content button. nine0003
Click the arrow next to Publish and select the appropriate option: Publish Now (publish now) or Plan (schedule). In the second case, you can specify the time at which the service will publish the post automatically.
Emulators are special programs that allow you to run any Android application directly on your computer. By launching the official Instagram* mobile client this way, you can easily publish Stories and posts. You don't need an Android device for this. nine0003
Install any free emulator from Lifehacker's selection for Windows, Linux and macOS. In the screenshot example, you can see a window with the NoxPlayer interface.
Launch the emulator and enter the Google Play app store through it by clicking on the corresponding icon. Connect your old or create a new Google account to be able to download Android apps.
Download Instagram* from Google Play directly in the emulator and log into your profile. After that, you can publish videos and pictures from your computer as if you were using the social network on your smartphone.