Have you ever written a fantastic long-form caption that’s sure to wow your followers on Instagram, only to find it’s a jumbled mess of unreadable text, hashtags, and emojis after publishing? ☹️
We’ve been there, and it’s frustrating.
Long captions (even with the potential to inspire and motivate) are difficult to read without spaces.
Truth is, most of your followers will give up before they begin! 🙅♀️When that happens, engagement tanks and your follower growth slows.
Well, kiss your caption concerns good-bye!💋👋
We’re going to teach you how to make spaces in your Instagram captions SO effortlessly that this issue won’t even be on your radar anymore. 📡
You’ll be able to write easily readable captions in no time.
You could even write full microblogs as Jenn Herman does in the example on the right. 👉
The best part is, you won’t have to worry that your followers can’t make heads or tails of your content.
First, we’ll go over some common workarounds that users have found to add line breaks to an Instagram caption.
Then, we’ll show you the effortless way to add spaces that beats all of these spacing fixes! 🥇
Ready? Let’s go for it!
https://www.instagram.com/p/Bvzd_80jb0G/
1. Best Practices for Using Spaces and Line Breaks in Instagram Captions & Bios
2. 4 Methods for Adding Blank Spaces
No matter which of the four methods you use, these are some common best practices for using spaces in Instagram captions that you should know. For line break and spacing success:
 Breaking up your thoughts mid-sentence with emojis is distracting!
As you may have already realized, it isn’t possible to include a line break on the Instagram app itself.
Even if you press Enter while typing your caption on Instagram, any formatting will disappear once you hit “Post!”
You also can’t go back into your caption and make formatting changes – they won’t appear. 😩
That’s why one of the first fixes for adding line breaks is to draft your caption in Notes.
To do this, open your Notes app (or a similar app – your email drafts will also work!)
Then, type out your full Instagram caption, or even your Instagram bio with space included.
Here’s an example of how to put space in an Instagram caption with Notes!
Once your caption is complete, select the text, copy and paste into the caption field on your Instagram post.
You can do this either in the app or in your Instagram scheduling tool!
https://www.instagram.com/p/BzdaZoXlZmk/
Okay… this is where it gets tricky. 🤔
For the formatting to work on Instagram, you’ll need to remove any spaces after the period that ends the last sentence before the line break.
We habitually hit that space bar after a period.
But adding a space after your punctuation will guarantee your line break formatting won’t work. 😕
We had to try a few times ourselves to get it right!
Oh, and did we mention you can also add spaces in your Instagram bio?
The same trick will work in this section, too!
To recap, you can add blank spaces to your Instagram caption using the Notes app with these 3 steps:
Instagram Text Spacer apps are another common workaround for adding space in captions.
There are several browser versions available, like Hashtagie and Apps4Life.
You can also download apps like Insta-Space on iPhone and Android to draft your captions with spaces before posting to Instagram.
To use a line break generator app:
This workaround is useful if a little clumsy.
You’ll have to juggle a few browsers or apps at once on your phone to get your nicely spaced caption ready for Instagram!
You may not be as concerned with spacing out long captions as you are with hiding your hashtags!
Although hashtags are useful for pushing your Instagram posts or videos to relevant search streams where more users can see your posts, they make captions look cluttered.
One common workaround is to push hashtags under the visible part of the caption!
You can do this by including period “spaces” between the end of the caption and your hashtags.
This hides your hashtags under the “See More” button so that users will have to click in order to see the full caption (and your hashtags).
The downside of this workaround is that periods or other symbols make visible line breaks.
Formatting them can also be tricky because if you include a space after any of the periods, Instagram’s zero-space formatting will remove the line break. 🙄
To hide your hashtags, type your Instagram caption in the app.
Then, hit return, add a period, and hit return again. Remember, don’t hit the spacebar, or the formatting won’t work!
Keep adding as many periods as you like to reach your desired length, and then add in your hashtags. #️⃣
https://www. instagram.com/p/B0CIQXQgpRA/
However, there’s an all-in-one tool available that includes all your emojis, hashtags and line breaks in your Instagram caption draft without losing your formatting!
Plus, you can banish ugly hashtags in your captions forever by automatically hiding them in the first comment! 😍
No credit card required
If beautiful, long captions full of line breaks and emojis are a must for your Instagram feed aesthetic, then Tailwinds Post Caption editor is a must!
With this tool, you don’t need to worry about style or length. You also don’t need to remember not to hit the spacebar while penning your masterpiece. 😅
Gone are your days of switching between apps or dedicating time out of your day to struggle with Instagram caption formatting.
With Tailwind’s Instagram Planner, you can upload your picture, craft your caption, find your hashtags, and schedule your post automatically all in one place! 😱 Plus, it only takes a matter of minutes!
To include line breaks in your Instagram caption with Tailwind, do this:

Incredible, right? With our Caption editor, you’ll never have to worry over line breaks in your Instagram captions again! 🤩
You’ll save all that time you would have spent switching between apps, drafts, and tools. This creates free time to focus on big Instagram goals, like building your Instagram marketing strategy or growing your followers! 📈
Speaking of Instagram marketing strategies, we can help with that! Check out our free hour-long “Instagram 101” webinar led by social media expert Rebekah Radice.
This incredible webinar is jam-packed with tips, tricks, and actionable steps to build a content strategy, optimize your Instagram, and unlock astonishing engagement with your followers. You won’t want to miss it! 👇

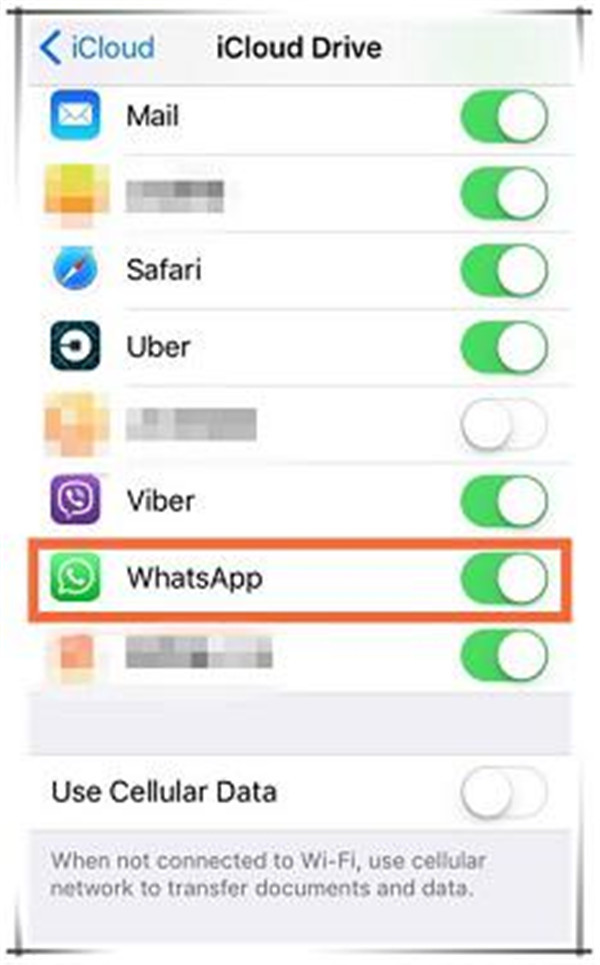
Whether you have an Android or an iPhone, a recent Instagram update made it possible to quickly and easily add line breaks within your captions — without having to copy over your text from another app.
Being able to add those kinds of breaks is important. Not only does it allow you to space things out the way you want them to appear within Instagram's feed, it also helps make your posts easier to read and understand.
Plus, it can allow you to hide long lists of hashtags that many people use to help boost their visibility. While those can be helpful, they can also be something of an eyesore, and line breaks solve that problem.
For those who aren't familiar, here's what you need to know about using the new option, what to do if it isn't yet available to you, and more tips for formatting your Instagram posts:.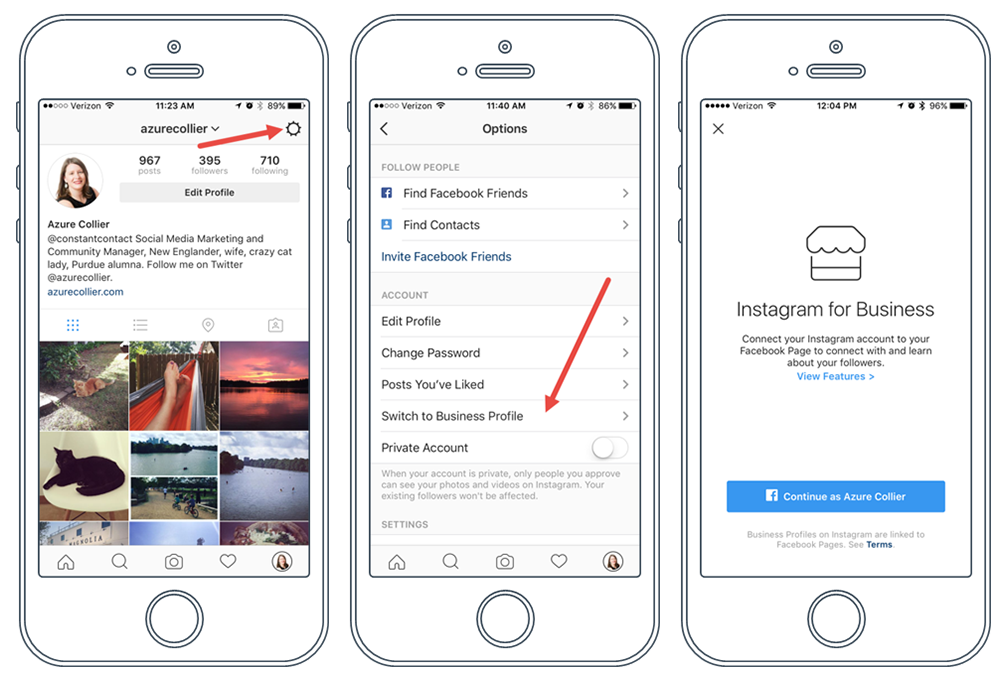
If you have the new option to add line breaks within the app, the process is simple: You just need to hit the "enter" or "return" key and format it as you'd like it to appear, creating the rest of the post as normal.
Up-to-date versions of Instagram will let you add line breaks freely. Devon Delfino/Business InsiderHowever, if you aren't yet able to use the line-break option, it may be worth updating your app. If that doesn't work, though, there is still a way to add those line breaks to your posts. Here's how:
1. Open your notes app of choice, and create a new note.
2. Add your text, then select it and hit "Copy."
You can type your caption out in another app first. Devon Delfino/Business Insider3. Open Instagram and log into your account, if needed.
4. Create and edit your new post, but don't publish it yet.
5. For the caption section, long-press on the blank space and select "Paste."
6. Remove any periods from the last sentence that precedes each line break.
Your text should then copy over, including your formatting. Post it.
Once posted, double-check that the formatting's been done correctly. If it hasn't, delete the post and try again.
Formatting can drastically change how your followers perceive and interact with your posts, so knowing different techniques is essential as a creator. Again, if you don't have the new invisible line-break option, or you just want to try something different, here are some tricks you should add to your Instagram game:
Create line breaks using symbolsYou could use a specific symbol of your choosing on the lines where you don't wish text to appear. By doing so, you give the old version of the app something that acts as a placeholder and thereby gives you the overall effect of having line breaks. But the symbols you use, of course, will still be visible. So while it's a better option that relying on huge chunks of text, it's not perfect.
As mentioned earlier, hashtag groups are commonly found at the end of captions, which can help the reader focus on what's important: Your message. However, if you don't have a long caption ahead of it, those groups can still be distracting. To get around this, you may choose to use a period placed on each line break to visually differentiate between the caption and the hashtag group.
You can create vertical ellipses to break up your text. Devon Delfino/Business Insider Try a dedicated space maker tool
If you've tried your usual note-taking apps but still aren't getting the line-break effect you desire, a dedicated tool, like TextSpacer.com, can be a solid option. With that site, you'd create and format your post as desired within the site, then click "Copy" and paste it into your Instagram caption.
Some third-party apps will add the breaks for you, too. Devon Delfino/Business InsiderDevon Delfino
Devon Delfino is a Brooklyn-based freelance journalist specializing in personal finance, culture, politics, and identity.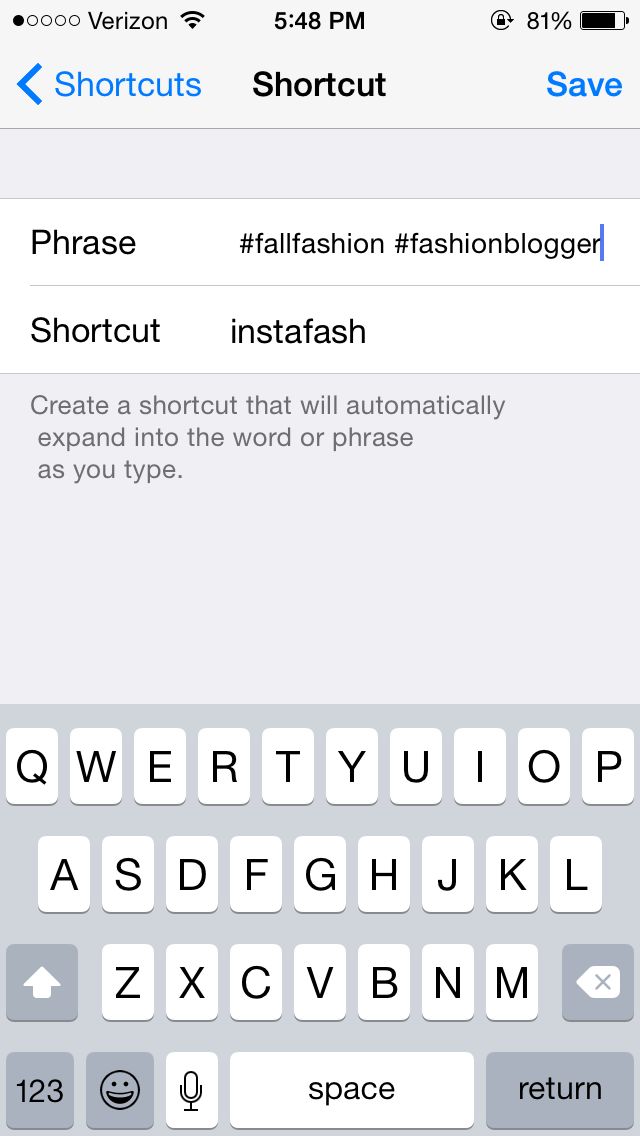 Her work has been featured in publications such as The Los Angeles Times, Teen Vogue, Business Insider, and CNBC. Follow her on Twitter at @devondelfino.
Read moreRead less
Insider Inc. receives a commission when you buy through our links.
Share!
Geolocation should be understood as a point that indicates the location of a particular object. A car in a traffic jam, a place of an appointed rest, a place where your lost cat was last seen, and much more can act as such a point. Geolocation can be used to bind a certain place to it - a store, cafe, beauty salon, fitness club, and so on, and then use this place in profile description or in posts. Thanks to this, customers will be able to quickly find the location of your points of sale.
In this article, we will look at how to create a geolocation on Instagram, add a location and specify a geotag when publishing a post.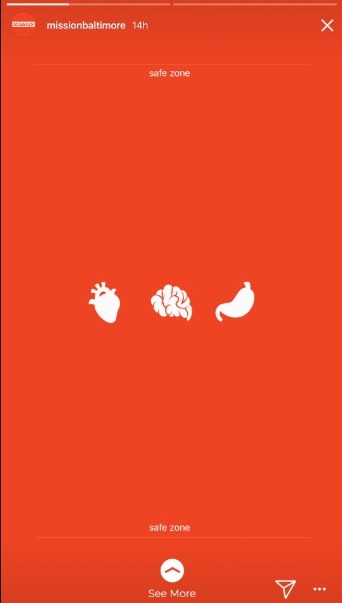
Program for promotion on Instagram - SocialKit:
Registration >>>
From the user's point of view, setting a geolocation in a post is an opportunity, no matter how trite it may be, to mark your location. Place of work, restaurant, popular resort and much more.
You can also use geolocation to promote your business. In addition to using a geotag in your profile, you can post using the most popular ones in your city. In addition, you can to collect the target audience for geolocations located in close proximity to your points of sale using the program SocialKit , and then for the collected audience launch a mass subscription .
Each user has the ability to create their own point and attach it to the post. For example, you visited a beautiful place and marked it with geodata. This place can be seen by any Instagram user. In addition to the fact that a person will be able to see the name of the place / address, he will be able to open a map where, with the help of a guide, a route to this place will be built. This option is useful not only for commercial enterprises, but also for those who travel a lot and blog on Instagram. nine0003
Who must use this Instagram feature?
It has been said before that geolocation is of particular importance for those who are promoting their company. Thus, you will not only advertise your business, but you will also be able to find it in the "Where are you" column. The recognition of the institution due to geolocation will increase significantly, and people who are or live nearby will definitely find out about this place.
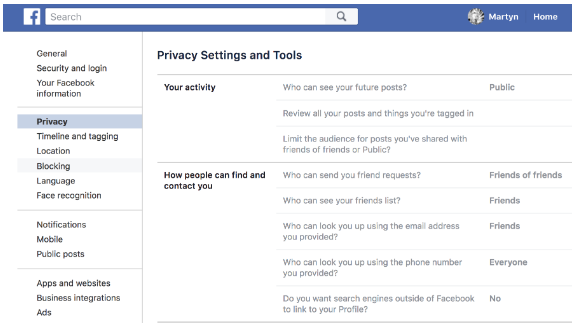
The process of creating a new geolocation is quite simple, but it is not done on Instagram itself. Since Instagram is owned by Facebook, adding space happens when you create a Facebook business page for the subsequent transition to an Instagram business profile.
If it was previously created by someone else, then you can safely use this geodata. To create a geolocation, it is best to use the phone, but there are applications that are adapted for PC. nine0003
After you have downloaded the application, you need to register a new profile or log in if you have already registered.
Next, create a business page for the company.
In the information section, enter the exact address.
This completes all the steps. The point on the map has been created, the place has been added. Now you can attach the created place in two social networks to any of your publications. nine0005
If your phone cannot detect your geopoint, then the reason is either in the smartphone settings or in the geosensor. Rebooting the device and checking the internet connection may help. If this does not help, then most likely the reason is in the smartphone settings. You must ensure that location detection is enabled, as it is mandatory.
To enable the function in question, you need to go to the phone settings. We find "Personal data" and open "Location" there. Here you need to move the slider to enable this feature. Everything is quite simple. The location is now turned on and you can see the apps that collect your location. Facebook and Instagram must be on the list of those who are eligible for this fee.
To enable the option, go to settings and find "Privacy". In the window that opens, select "Location Services". Drag the slider and that's it. Before using location data on Instagram, make sure that the permission for it and Facebook is activated. nine0003
Once a geopoint has been created, you can easily use it and add it to posts. The hotspot is available to all users and can be installed an infinite number of times. When searching for a point, drive it in exactly the same way as it was called on Facebook. The option to set geolocation is very useful for various businesses and establishments promoting themselves on Instagram.
* Meta Platforms Inc. (and its social networks Instagram, Facebook) is recognized as an extremist organization, its activities are prohibited in Russia.
From this article you will learn:
All methods described are relevant in 2022. nine0003
Contents (expand ↴)
Geolocation on Instagram is a useful marketing tool that will help you promote your business.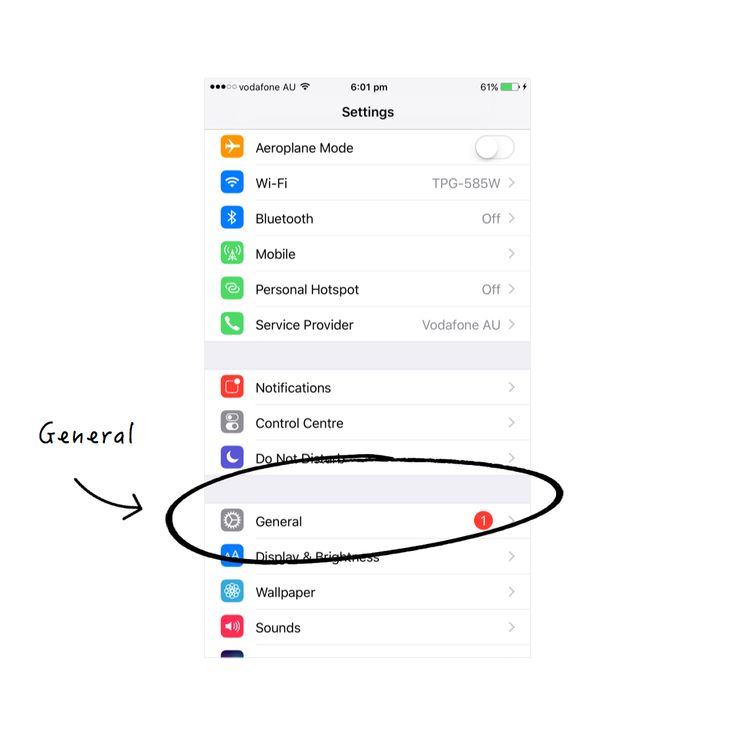 The owner of a coffee shop, bookstore (or any other establishment) can mark his offline point on the map. This will increase the reach of posts and account traffic.
Moreover, with the help of the created geotag, other Instagram users will be able to find your profile, as well as posts with reviews about the institution. Therefore, if you have an offline business, then spend 10 minutes of your personal time creating your own geotag. nine0003
Benefits of geolocation for business:
The Instagram algorithm works like this: The more often users use a geotag, the higher it rises in the search results in the category of similar tags.
nine0003
Creating a geolocation in the Instagram app will not work. To do this, you will have to use Facebook and create a location tag in this social network.
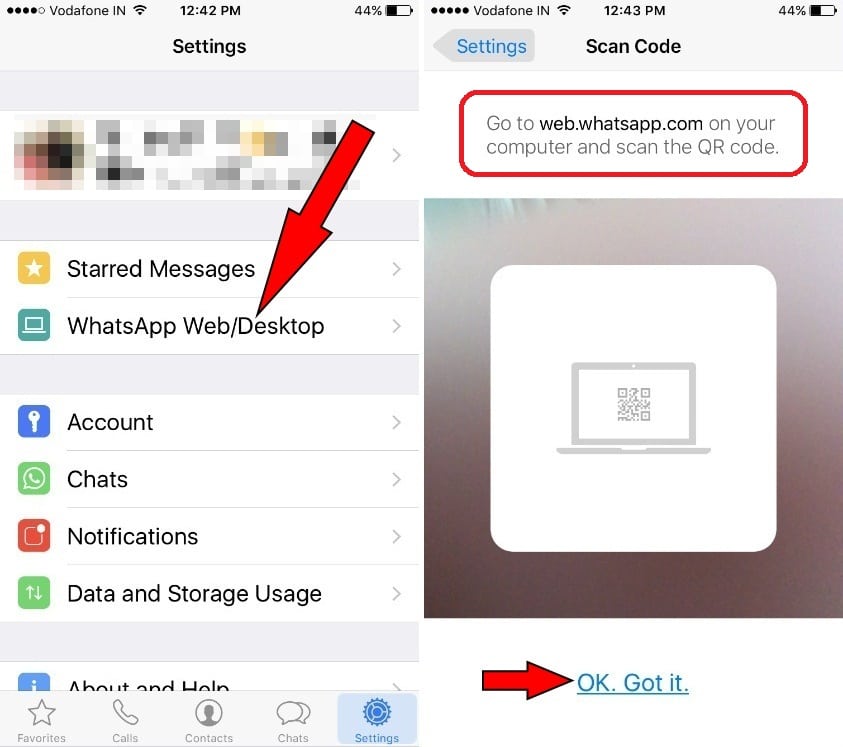
In the first step, create a Facebook business page and link it to your Instagram account.
Important: Before proceeding to the next step, be sure to enable geolocation on your smartphone.
Now open your business profile and click Create Post. In the opened window for creating a new post, there is a menu - it is located at the bottom of the interface. Here, select the "Mark Visit" function.
In the search bar, enter the name of the location you want to add. If this geotag is not on Facebook, the system will offer to create a new tag. To do this, click "Add" new label name "". nine0003
Now you need to select a category: home, entertainment, events, restaurant, ATM. The category depends on the type of your activity. To quickly find the category you need, use the search.
The next step is to choose a place for people to check in. Here, simply enter the city where the geotag is located.
The last section is "Create a place". Check basic information: tag name, category. You can upload a photo to illustrate this place - to do this, click on the camera icon to the right of the name. nine0003
In the "Location" subsection, enter the exact address of the point: this is a very useful option for restaurants, cafes, shops. It will be much easier for users to find you on the map. Add a zip code if you wish.
If you don't want to enter an address, activate the "I'm here now" function. The app will automatically detect your location. In this case, you must be in the created geopoint.
Geolocation settings completed - Click the Create button to complete the process of creating a new geotag. nine0003
This is important: Do you dream of becoming popular on Instagram and start making money? Do you want to attract new subscribers and customers for your business? The Zengram service, a tool for professional and safe promotion, will help with this.
The tool attracts only live subscribers - your target audience. There is a free trial period (3 days).
The first results of the promotion (new subscribers and clients) are already 2-3 hours after the start.
Start account promotion for free >>>
Now let's add geolocation to the profile. Open the Instagram app and start posting a new post. In the "New Post" window, select the "Specify Location" option.
In the "Places" window, enter the name of your tag and set it as the geolocation for the publication.
It is not necessary to create a new post - you can edit an existing one and add a geotag to it. To do this, open the publication and go to the menu (3 dots in the upper right corner). Click the Change button. nine0003
Under the nickname is the option "Add a place". Click in this area to enter a geolocation.
Similarly, you can attach an existing geotag to a post. For example, you visited a museum and took a photo against the backdrop of a beautiful and unusual exhibit. In the publication, indicate which museum you went on an excursion to.
Can I add geolocation to my profile header?
To add the created geolocation to the story, start publishing a new story. At the top of the interface, click on the square smiley icon. In the widget window that opens, select "Location". nine0003
The search window will open again - enter the name of the geolocation: a tag that you created through Facebook or a previously created geotag. The geotag will now show up in your history.
Users often encounter a problem: the created geotag does not work - it is not placed in the publication, because it is simply not in the list.