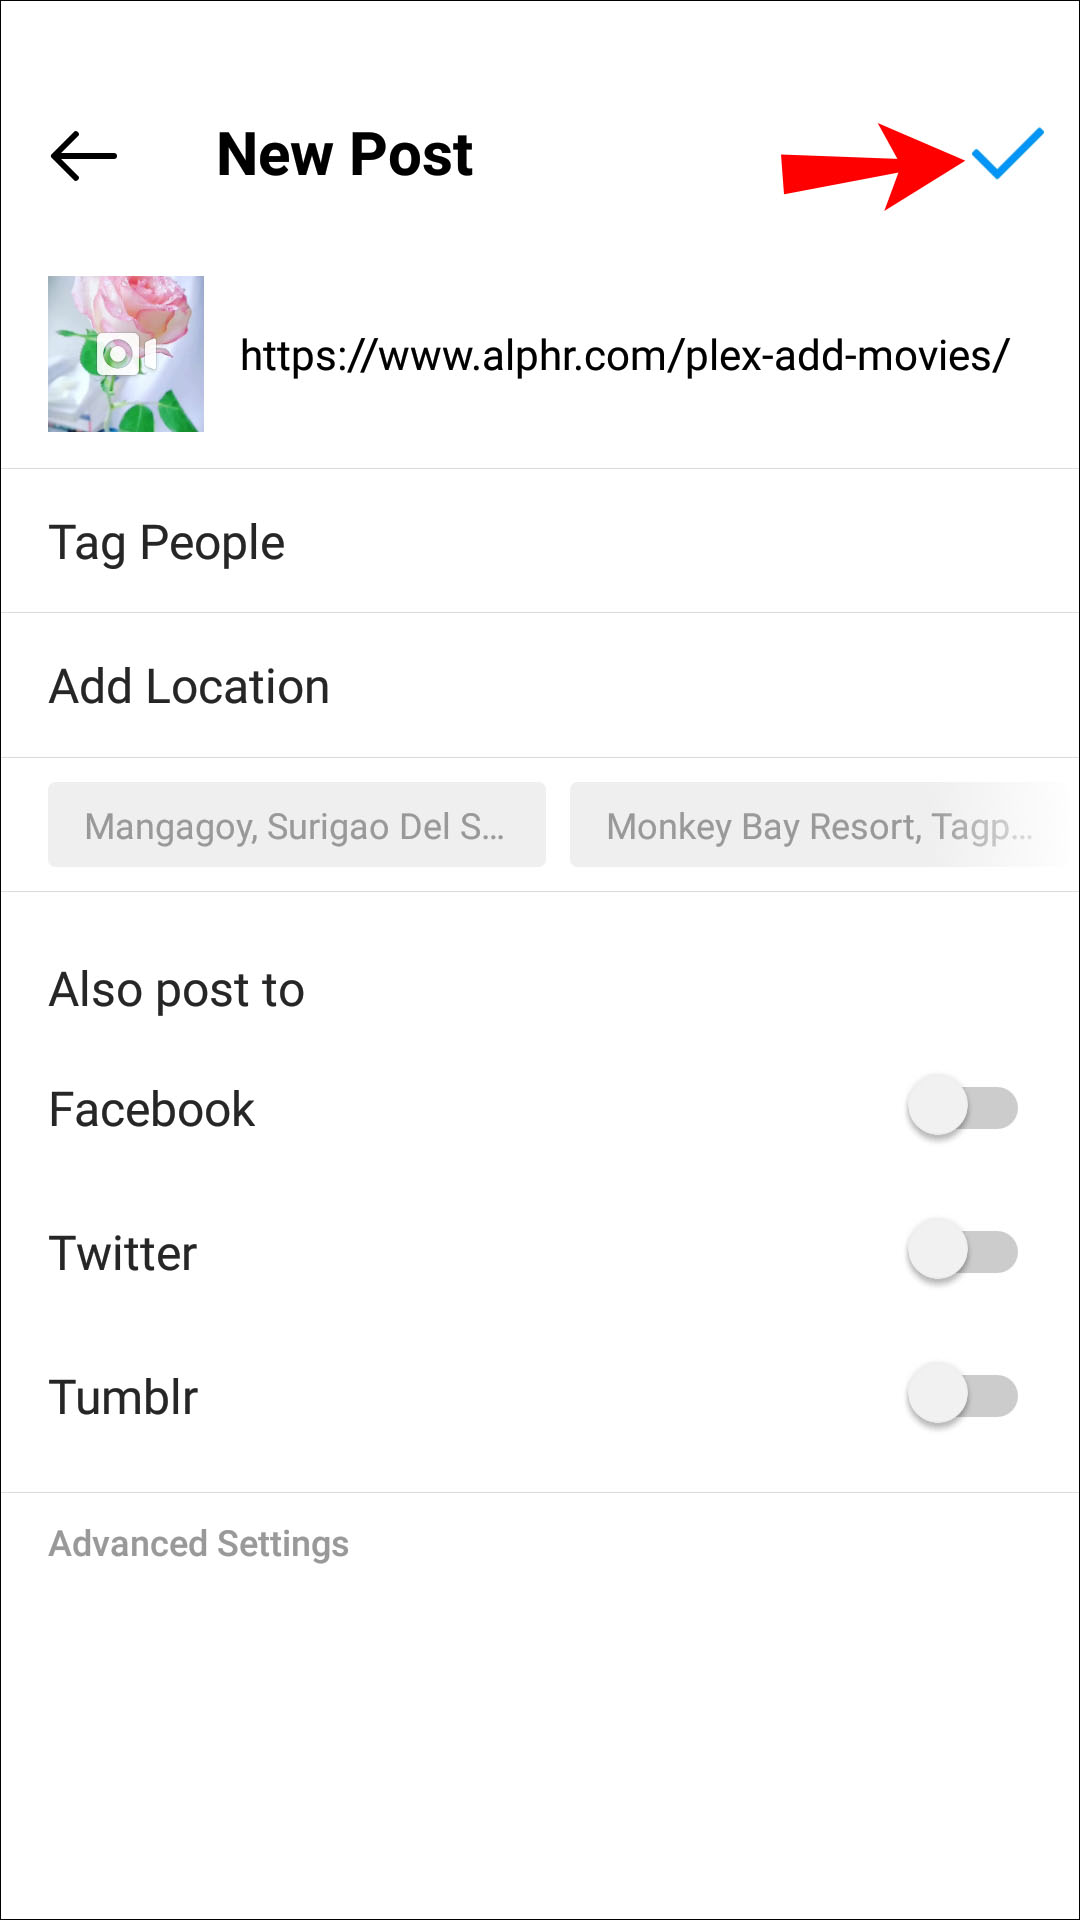
A chatbot is an automated multifunctional assistant, that can receive send and send triggered messages, and with SendPulse, your bot can save information as variables for future usage.
Follow the step-by-step instruction to create your first chatbot for Telegram messenger or connect an existing one to SendPulse for further configuration.
If you already have a bot, skip the first paragraph and take a look at the next section.
Open Telegram messenger, sign in to your account or create a new one.
Step 1. Enter @Botfather in the search tab and choose this bot.
Official Telegram bots have a blue checkmark beside their name.
Click “Start” to activate BotFather bot.
In response, you receive a list of commands to manage bots.
Step 2. Choose or type the /newbot command and send it.
Step 3. Choose a name for your bot — your subscribers will see it in the conversation. And choose a username for your bot — the bot can be found by its username in searches. The username must be unique and end with the word “bot.”
After you choose a suitable name for your bot — the bot is created. You will receive a message with a link to your bot t.me/<bot_username>, recommendations to set up a profile picture, description, and a list of commands to manage your new bot.
To connect a bot to SendPulse you need a token. Copy your token value and find more information about connecting your bot to SendPulse in the last section of this article.
Step 1. Go to the @BotFather bot and send the command /token.
You will see buttons with any bots that you have created.
Step 2. Choose the one you need a token for so you can connect it with Sendpulse.
Copy the token value.
Go to the "Chatbots" section in your SendPulse account. If you have not previously had any channels connected, click Connect.
If you have already connected bots, go to the "Manage bots" section, and click Add bot. You can also click "Connect" next to the channel.
In the "Telegram" section enter your token from the necessary bot and click “Connect.”
In the next window click the “Subscribe” button.
You will be redirected to the Telegram app, click on the “Start” button and you will be subscribed to your bot.
Once you have successfully connected your chatbot, you will receive its welcome flow, the bot will appear in your list of bots, and you can start creating welcome and triggered flows, or bulk campaigns.
Note, any existing subscribers are not imported to your SendPulse chatbot auditory. After you connect your bot you can collect subscribers with a website widget or share the link to your bot t.me/<username> directly.
Connect your Telegram bot
Last Updated: 24.10.2022
In this tutorial, I will explain how you can add a Telegram chatbot to your Telegram group and automatically reply to messages in your group.
I will show you:
P.S. In my Telegram Chatbots guide, I already explained how you can can create a chatbot (without using any code), so if you haven’t already seen that one, I highly recommend to read it 🙂
Let’s dive in!
Table of Contents
As already mentioned in the beginning, I created my own Telegram chatbot which can reply to simple questions such as “Can I order a pizza”:
So the first step we need to do, is create our own Telegram group.
If you are on a desktop, just install Telegram, click on the Pen icon in the top-left corner and select New group:
Here, you need to select the members you want to add (probably some friends/colleagues of yours), give a name to the group (for example “Bot Test”) and click on Create:
Now we’ve created our Telegram group and we need to add our chatbot.
So, you can just go to your Telegram chatbot (mine is called “Pizza-DF-Bot”) and click on the Top Bar:
Then, you need to click on “More” and select Add to Group:
And select the Telegram group you want to add the chatbot to:
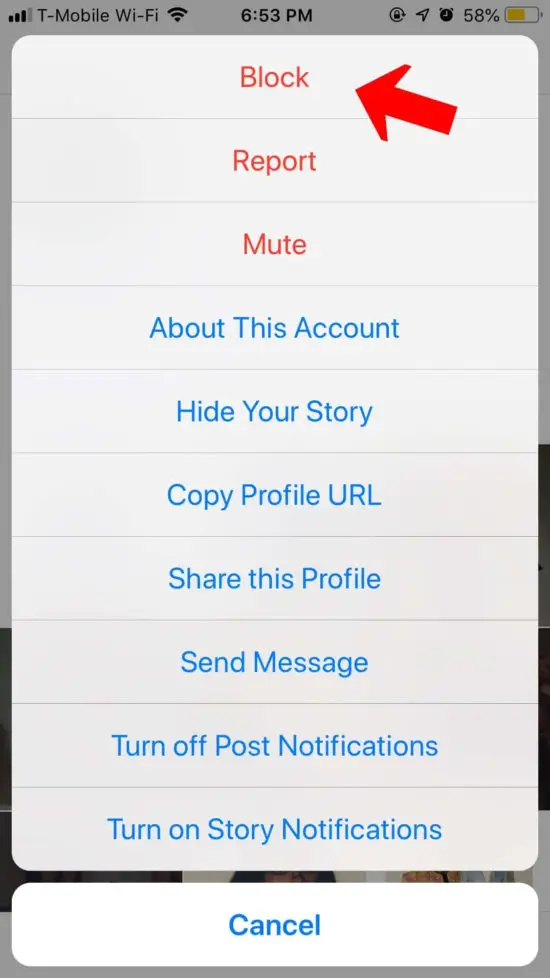
Once you’ve added your Telegram chatbot to your Telegram group, and you mention it, you will probably see that the chatbot doesn’t automatically respond:
This is because the chatbot is not an admin of the group.
So, you need to click on the top bar of your Telegram group:
Click on Edit:
And then choose for Administrators:
Click on Add admin:
Select your chatbot:
And then give it all the rights it needs:
When you’ve done this, and you will ask a question and mention the chatbot again, you will see that it is responding now:
Now, the chatbot is only responding when you mention it.
But what if you want the chatbot to respond to all messages in the group?
Then, we need to have a talk with the BotFather.
In Telegram, you need to search for “BotFather” and start a conversation with him:
The BotFather immediately gives you a list of commands that you can use to change the settings of your chatbot:
Now, you need to type “/setprivacy”, which is a command we can use to change the privacy settings in Telegram groups.
Then, you can select which bot you want to change:
Then, you will see that the privacy settings are set to Enable (by default), which means the bot only replies to commands and mentions. Now, if you just type in “Disable” or click on the button, you can disable this setting:
And if you go back to your Telegram group and say something (without mentioning the bot), you will see that the chatbot automatically responds:
And that’s how you add a Telegram chatbot to your Telegram group.
Now I have a question for you:
Do you already use Telegram Bots in your Groups? And if not, why not?
Let me know by leaving a comment below!
Publication date: 8/29/2022
5 minutes
to read
Products from this article: 9002 Chatbots are used by many businesses: they help automate routine work. At the same time, they do their job quite well. SaluteBot, for example, can not only give the user ready-made items to choose from in order to continue the dialogue, but also analyze the written text to find the right answer from the database.
In this article, we will tell you how to add a robot to a Telegram chat and how to set up its work according to a certain scenario.
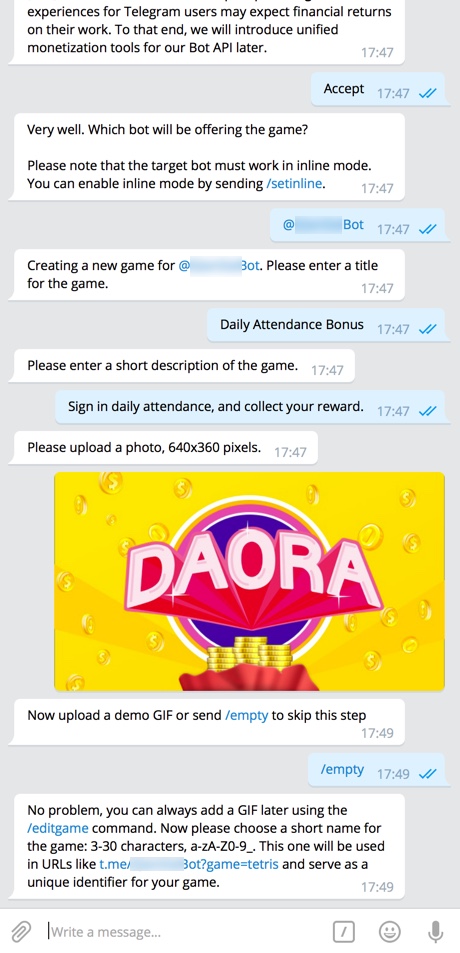
The Telegram bot is responsible for creating bots in Telegram! If you want to create a new robot, go through the following steps:
The system name must be unique, and the name can be repeated with existing ones.
When the bot is created, you will see the token. It is needed for integration with scripts. If you forgot to save the token, just write the /token command in the dialog with BotFather.
The basis for the chatbot has been created, and you can even write a message to it. But for it to work, you need to create a script for it. This can be done through the SaluteBot service.
To create your own script and link it to the chatbot, register with Studio and log in to your account. We will be using the SaluteBot tool, which helps to create a scenario in map mode. Programming skills are not needed if there is no integration with third-party systems.
After that, register in the Jivo service, which will connect the robot with the scenario. To work, you need a professional account, the first 14 days you can use it for free.
Next, the procedure will be as follows:

Here are the possibilities in the constructor:
The most common scenario for chatbots in a group is onboarding for new members and moderating messages for prohibited topics with warnings.
To use a telegram bot in a group, just select it as a new member: the robot we created is a regular separate account in the list of group members.
Here's what to do:
After the robot is added to the group, it will begin to work out the scenario that was put into it in the constructor.
In this way, you can use not only a self-created bot, but also any existing one.
In a channel, chatbots are used for delayed posts or as a channel guide. In order for the robot to create posts or otherwise act on behalf of the channel, you need to make it an administrator.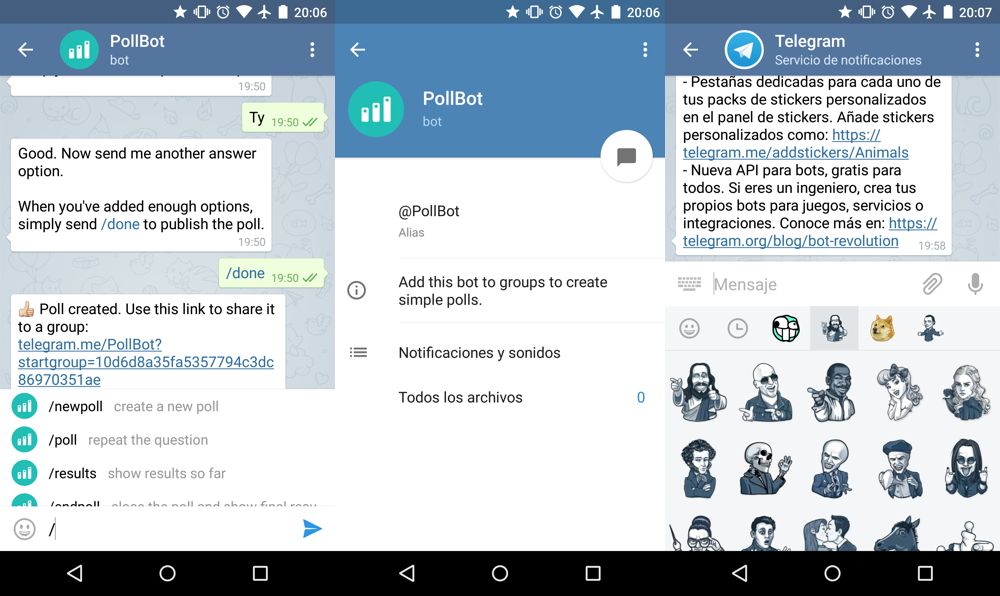 Here's how to do it:
You can add your own bot to the channel or select an existing one.
If you don't have a group or channel and don't need them for your tasks, you can use the bot in private messaging mode. This is possible immediately after it is created, you just need to write a message to it directly.
This type of use is perhaps the most demanded by businesses, because in private messaging mode the client can transfer his data, and if the dialogue is deadlocked, an operator will connect at any time.
Also, working with a bot directly allows you to test it before using it in a group or channel - this way you can check that all functions work as expected.
Products from this article:
You can not only use the Aimylogic bots to send private messages to Telegram , but also add them to Telegram group chats .
We're assuming you've already created a bot script and know how to publish it to a Telegram channel, so here we'll only cover how to send messages to a group chat.
First of all, as a start screen, add a text block to the script, into which you copy and paste: $rawRequest.message.chat.id
This screen must be topmost and leftmost for the bot to display this message first.
Also, your script must be able to send data to Telegram. To do this, they need to be written to a variable.
For example, let's add a block text to $var , with which we will write a message to the variable $message :
Link "Navigation after entering $message " to block Http request .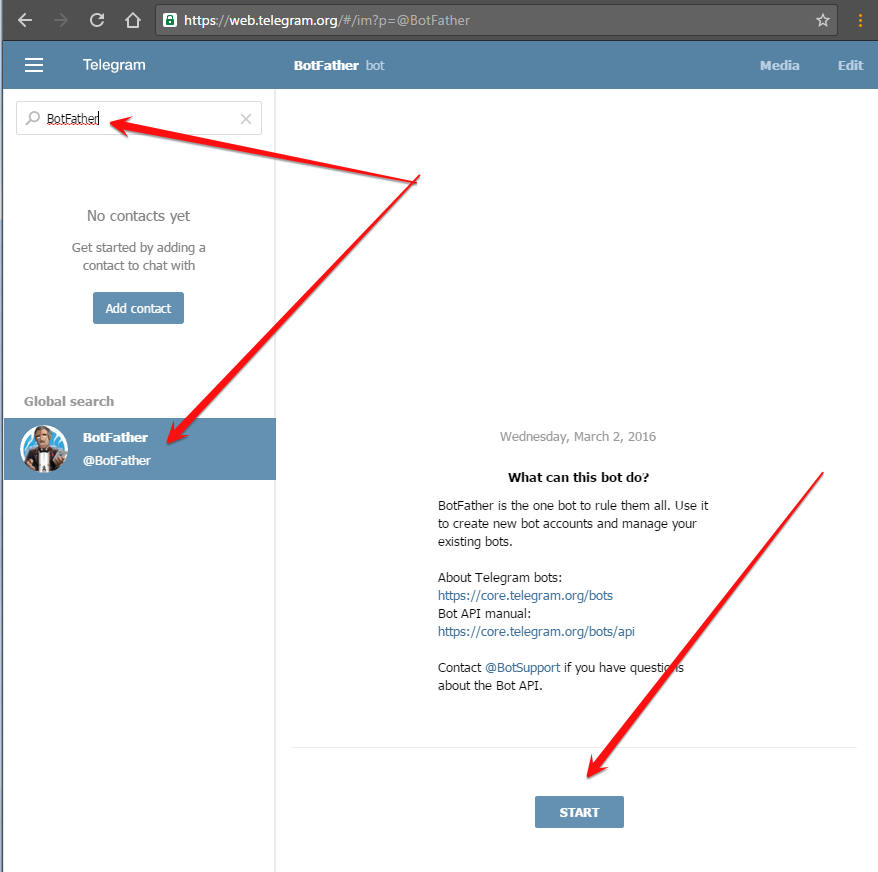 The request method is
 GET .
Now create the request URL. Instead, you will need to paste the channel token that you received in BotFather into the URL.
https://api.telegram.org/bot
In the BODY field of the request, insert the following:
{ "chat_id": chat_id_number, "text": "$message" } chat_id_number will need to be replaced with the value that you will receive at the stage of activating the bot in the Telegram group .
You can also send any other variables you receive in the script. For example, like this:
{ "chat_id": chat_id_number, text: "client name: $name, phone: $PHONE, feedback: $feedback" } If you are sending other variables, make sure that they are actually filled in the script before sending the request.
Associate the variant "Completed with an error" with the block Text , where you write error $httpStatus
Associate the variant "Completed successfully" with the block Text , in which the message about successful data submission is placed , for example Thank you, your application has been sent!
Now you need to create a group to which you want to add the bot and activate it.
Create a Telegram group by selecting Create group from the menu and give it a name:
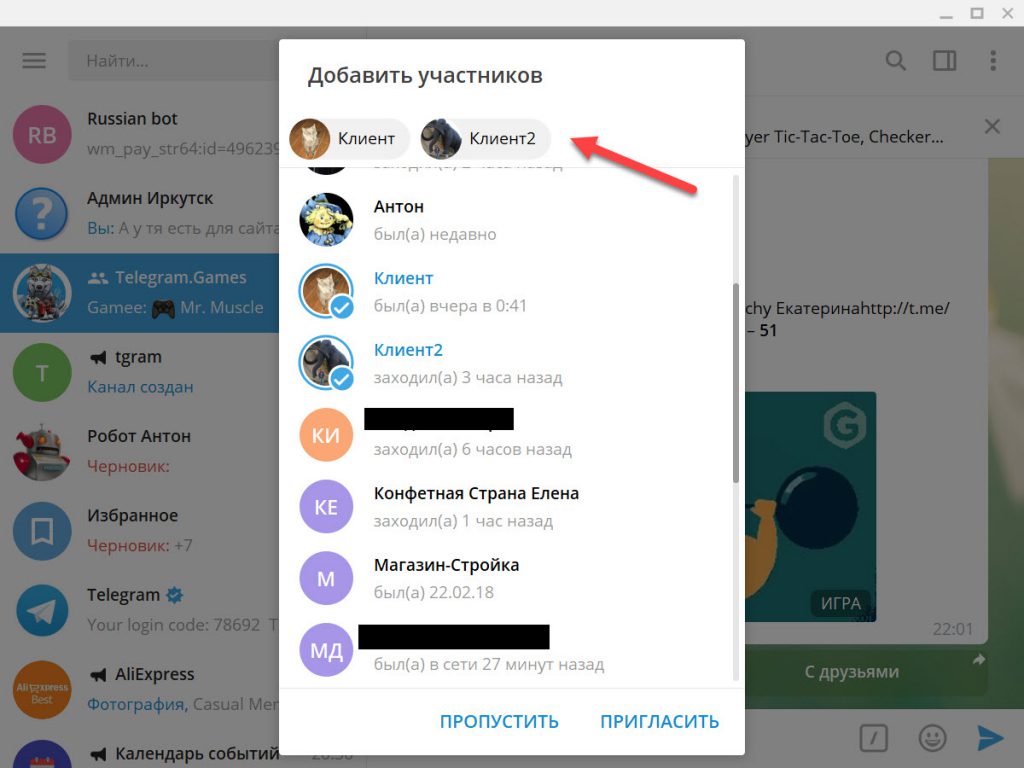
Add at least one member to the group and click Create and then add your bot to the group. To do this, press Add members . Type the name of the bot in the search, select the bot and click Invite :
Send the command /start to the group. The bot will send you a message from the character set. You will need this value, including the sign - , later:
If you already have a group in Telegram that you want to add a bot to, you need to:
 Follow directions
 /mybots Return to the bot script.
Now you can delete the block that contains $rawRequest.message.chat.id .
Publish the bot to Telegram and wait for publication:
Now write to the Telegram bot (not in a group). The link to the bot is in BotFather , in the message in which you received the bot token.
Start a new session with /start , send a message to the bot and make sure it comes to the group:
If your users write to the bot, messages from them will also be published in the Telegram group .