Last Updated on Jun 24, 2021
Learn this post with iPhone pictures on – How to stop auto Saved photo of Viber messages on iPhone, iPad, and Android?
Viber is a great App through which we can do Wi-Fi Audio, Video calling and Chat with Stickers, Send doodle, and send location. As the well-liked feature is we can share media (Photo and Video) with all Viber contacts in a group or individual. But, Have you feeling awkward from auto-saved Photos/ videos of Viber app message on your iPhone, iPad. Because all saved media is happen stored in camera roll so sometimes it creates a conjunctive situation and defiantly you feel forced to delete those photos or videos manually.
But it happens only whenever the Autosaved option has enabled in the Viber app, so you must keep disabling that option at going Media setting of the Viber app. If you’re totally unknown about it then follow at below given steps on how to stop auto Saved photo of Viber messages on iPhone, iPad.
Note: In the latest iOS update, Some user interfaces changed but the settings are the same. Follow the below steps on the latest iOS Version of the Viber app.
For android Find the Steps in the last of this tutorial.
Step 1. Launch the latest Viber app from your iPhone Home screen – if you’re already there then ignore it and go to the next step.
Step 2. Tap on More (…) Option – you’ll see that right-bottom side of the iPhone screen
Step 3. Now touch Settings look likes Gear icon – below of Add Contact
Step 4. Tap on Media – Appear at beneath of Calls and Messages
Step 5. Now you get an option Save to Gallery under Media Section, it’s been turned on by default so do Turn off/ Disable save to Gallery.
That’s it. Now whenever you’ll get media messages Photo, Video then it can’t be saved automatically so now not a question of the Viber gallery saved in the iPhone camera roll automatically.
Hope your issue is Stop Auto Saved photo of Viber Messages on iPhone, iPad has been the move away.
That’s it.
Please share your beautiful replay with our team and know us how it seems to post on how to stop auto Saved photo of Viber messages on iPhone, iPad.
Live always keep in touch with us to get more tips on popular iOS apps and Apple iPhone, iPad, iPod, and Mac OS, Android.
Jaysukh Patel is the founder of howtoisolve. Also self Professional Developer, Techno lover mainly for iPhone, iPad, iPod Touch and iOS, Jaysukh is one of responsible person in his family. Contact On: [email protected] [OR] [email protected]
“Can someone tell me how to stop WhatsApp from saving photos automatically on my phone? I have joined a lot of groups on WhatsApp, and every day I get so many unwanted photos on my phone!”
If you have a similar query about the automatic saving of media files on WhatsApp, you have come to the right place. This is a question asked by a friend of mine – but millions of other WhatsApp users also encounter a similar issue.
Presently, the default settings on WhatsApp automatically download the shared media files on the device which takes up a lot of space. If you want to de-clutter your phone, then you should learn how to stop WhatsApp from saving photos on iPhone and Android. In this guide, I will clear the same double about WhatsApp media storage in a step-by-step manner.
Part 1: How to Stop WhatsApp From Saving Photos on iPhone
Part 2: How to Stop WhatsApp From Saving Photos on Android
WhatsApp provides a smart and hassle-free solution to disable the auto-download feature for photos and videos on iPhone. A lot of times, the automatic download feature makes our Camera Roll cluttered and it even ends up consuming a lot of space on the device. Additionally, the saved WhatsApp photos on your Camera Roll can consume a lot of space on your iCloud Photo Library as well. To fix this and learn how to stop WhatsApp from saving photos on iPhone automatically, follow these easy steps:
That’s it! By following these simple steps, you can learn how to stop WhatsApp from saving photos on iPhone automatically. Not just photos, you can also disable the auto-download feature for videos, audios, and documents as well. Afterward, whenever you would receive a photo on WhatsApp, you need to tap on the download icon to save it on your phone.
Just like iPhone, WhatsApp also provides a feature to disable the auto-download option for media files on Android. The default option for this is turned on and thus, it will keep consuming your device storage or clutter your phone’s gallery. Here are different ways that you can follow to learn how to stop WhatsApp from saving photos on Samsung or any other Android phone.
1. Firstly, go to the WhatsApp application on your Android and visit its settings by tapping on the three-dot (hamburger) icon on the top.
2. Now, browse to Settings > Data and Storage Usage to find the “Media auto-download” section for different options (like WiFi, Mobile Data, and Roaming).
3. If you wish to disable the auto-download feature for WiFi, then tap on the same option and just turn off the download feature for photos (or any other media file). In the same way, you can disable the auto-download option for mobile data and roaming as well.
4. WhatsApp also allows us to not show the downloaded photos on the phone’s main Gallery. For this, go to its Settings > Chats and just turn off the Media Visibility option.
5. If you don’t want the downloaded WhatsApp photos to appear in your phone’s Gallery, then you can also go to its File System > Storage > WhatsApp > WhatsApp Images. Here, you can create a new file, name it “.nomedia” and save it. Later, you can delete the file to make WhatsApp photos appear on your phone’s Gallery again.
In this way, you can learn how to stop WhatsApp from saving photos on Samsung or any other Android device. While the process would be the same, you might encounter a slight change in the overall interface.
We all use WhatsApp to share tons of photos with our friends and family. If you also have a lot of important pictures and videos that you don’t want to lose, then consider taking a backup of your WhatsApp data on your computer. To do this, you can take the assistance of MobileTrans -WhatsApp Transfer (a part of the MobileTrans).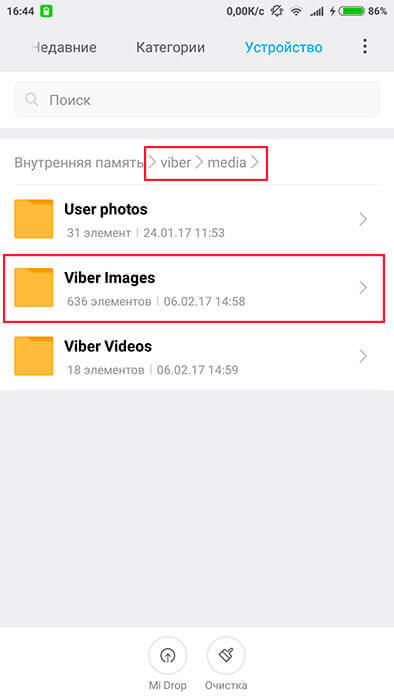 It is a user-friendly DIY tool that can back up the entire WhatsApp data to your computer. This would include its messages, shared media content, contacts, and more. Later, you can even restore your WhatsApp data to the device of your choice.
download download
1. To back up your WhatsApp data, connect your phone to the computer and launch the MobileTrans toolkit on it. From its home, you can tab the “Phone to Phone” module.
2. Under the "Phone to Phone" section, you will be presented with different options. Simply go to the “WhatsApp Transfer” once your device gets connected.
3. Click on the Backup button again and wait for a while as the application would start taking a complete backup of your WhatsApp data.
4. Simply wait for a while for the process to be completed and don’t disconnect your device in between. When the backup is stored successfully, you will be notified.
5. In the end, you can remove your device safely or view the backup. You can later choose to restore the WhatsApp backup to your phone from here as well.
That’s it, everyone! Now when you know how to stop WhatsApp from saving photos on iPhone and Android automatically, you can easily turn this feature off. The guide has listed dedicated solutions for both Android and iPhone for your convenience. Apart from that, you can also take the assistance of MobileTrans -WhatsApp Transfer to take a backup of your WhatsApp photos and chats. It can also be used to restore an existing backup or directly transfer WhatsApp data from one phone to another. If you are a regular WhatsApp user and don’t want to lose your chats, then it will be a must-have application for you!
New Trendings
Author Juli Reading 5 min Views 10k. Posted by
All Viber users can communicate unlimitedly in the application, share photos and videos, messages with pictures and stickers. Each time you click to view a picture or video in a chat, you automatically download it to the device you are using. For some of them, a constant decrease in the amount of permanent memory can be critical. Let's see if the function of saving photos is really necessary and how to turn it off.
All Viber users can chat unlimitedly in the app, share photos and videos, picture messages and stickers.
Each time you click on a picture or video in a chat, you automatically download it to the device you are using. For some of them, a regular decrease in the amount of permanent memory can be critical. Let's see if the function of saving photos is really necessary and how to turn it off.
Contents
Due to the peculiarities of the latest versions of the application, the viber saves the photo on the phone, one has only to expand it in the viewing window. All media is stored on the device by default.
You can later copy them, delete them, or use them in other programs. To do this, you need to know where the file was saved.
An application installed on an Android or iPhone smartphone places all images in the "Viber images" folder. You can find it through the device gallery. Open it, look carefully, find the album with the desired name. It stores all the photos, pictures and other similar files that you sent or received.
You can also find this folder through Explorer or a file manager at: storage/emulated/0/viber/media/Viber images.
For computers and laptops, the folder address depends on where the viber was installed. In Windows, the path is usually searched like this: C: / My Documents / ViberDownloads.
In private conversations, images are not exchanged very often. Another thing is communication in a large group, when for any reason, including holidays and birthdays, you are bombarded with demotivators, postcards and GIFs.
Many users are annoyed by this.
The most common reasons not to save photos from viber on android:
Lack of space affects phone performance. The smartphone starts to freeze, does not allow you to store data from other programs, download and install new applications.
Often, in order to select and send some content to the interlocutor, in the gallery you have to scroll through a long ribbon of pictures and postcards.
Not all subscribers connect tariffs with unlimited internet. Each photo-graphy weighs from several hundred kilobytes to ten megabytes. This can create problems, because automatic downloads consume already limited bandwidth.
If you save all media files, you can run out of memory very quickly. In order not to save photos to the gallery in viber, disable this feature. There are two simple ways to turn off for a smartphone.
To disable the function, follow the steps below:
After that, the media files will not get into the gallery until they are fully loaded, that is, click on them and view them.
If the previous steps did not give the desired result, go to the device settings.
When installed, viber asks for certain permissions: access to contacts, camera, microphone or location.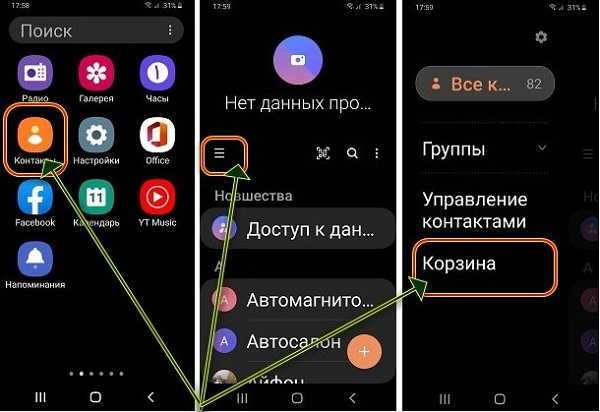 Among them, we are interested in the item that allows you to make changes to the phone's memory.
To disable saving photos in viber on android, you will need to do the following:
Please note! After turning off memory access, you will not be able to download incoming photos and videos. To save them further, return the permission for memory operations.
Despite disabling autoload, viewed photos will still end up in the gallery. In this case, they will be visible in the albums and feed.
Android can hide the display of certain albums. To do this, open the gallery, tap on the "Albums" tab and find the "Viber Images" folder. Long press on the name to bring up the menu and select "Hide".
All images from this album will no longer be visible in the gallery.
The advantages include maintaining the device's performance. You will be able to independently choose what to view from the photos, what to prohibit from downloading. You can control traffic and not worry about unnecessary images in your albums.
Of the minuses, we note the following. By hiding photos and albums from the gallery, it will not be possible to use them for sending and forwarding to contacts. We'll have to make them visible again. If you disable memory access, you won't find any images at all.
Thus, it is not difficult to disable automatic download. You can do this from the messenger itself or phone settings. Choose any convenient way.
Important: all permissions and prohibitions are also issued when trying to download Viber to the device. This eliminates the need to additionally visit the “Settings” section, to look for each function separately. In order to configure the utility during installation, you first need to download Viber for free and install it on your phone. After opening the program, requirements will appear in pop-up windows:
To customize the operation according to personal desires, specify "Allow" or "Deny" separately for each command.
Data is saved in case of loss or breakdown of the smartphone/tablet. We recommend saving data every two weeks or more often.
The most convenient way to store contacts is to transfer them to a Google account.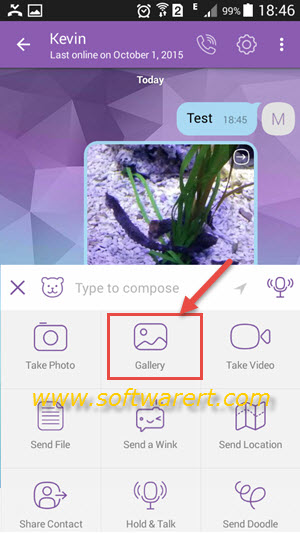 With this method, the device is configured once, and then everything works automatically. You can also save contacts to the SIM card (all contacts will be lost if the SIM card fails) or to a file (you will have to repeat the process when adding a new contact and somewhere to save the file from the smartphone).
Select the articles below to view detailed information about each method.
We recommend that you save files to your computer. This method is the fastest and does not require additional settings. Can copy all folders and files, or selectively.
Connect your smartphone or tablet to your computer with a USB cable. In the Computer folder mobile will appear device.
On some models, a request for access will appear on the device screen. Click Allow.
Open the device's internal memory via File Explorer. Now you can copy the desired files and folders to a computer. If the internal memory is empty, then the screen is locked with a pattern, PIN or password — unlock.
Google has developed a special program for Mac - Android File Transfer, use it for transfer files.
Download Android File Transfer
1. Photo and video
Open the gallery. The files in it are arranged in albums (folders).
To find out where an album is stored, open any photo or video from it.
Press the Options button (may look like three dots from the top right) and select Details (Properties).
The Path field will show the location where this album is stored. In our example the album is in the folder Screenshots, which is located in the DCIM folder.
Normally, photos and videos are stored in the folders DCIM (photos and videos from the camera), Pictures, Downloads (downloaded files), Bluetooth.
2. Music
Music is usually stored in Music, Downloads, Bluetooth folders.
If you cannot determine which folders contain the necessary files, copy all the folders that are in memory devices.
If for some reason you find it inconvenient to save files to your computer, you can store them in a cloud service. A cloud service is a "hard drive" of a certain size that is located on the Internet.
Cloud storage is offered by many companies, below you will find links to help guides of some of them.
Watch related video:
Smart Switch PC works with Galaxy devices running Android 4.3 and above. These are all devices that have been produced since about 2015.
If you have an Android device 4.2 and below, or a regular phone - use the Kies program.
How to see what version of Android is installed on Samsung Galaxy
Download Kies for Windows | Download Kies for Mac
Another way to save files and settings is with Smart Switch PC. The program will save:
Download the program and install it on your computer.
Download Smart Switch PC software for Windows
Download Smart Switch PC for Mac
Run the program, unlock the device and connect it to the computer with a cable. On some models A request for access will appear on the device screen. Click Allow.
If a message appears on the computer to download Smart Switch to the connected device, click Download Smart Switch.
Then press Yes on the device.
The device is detected on the computer. Click the More button.
Select Settings.
Select the Backup Items tab.
Select the data you want to save and press OK.
Click the Backup button.
Backup will start.
After copying, information will appear which data is saved and which is not. Click OK.
Run the program and connect the device to the computer with a cable. Click the Restore button.
The program will automatically find the latest backup. Click the Restore button.
Data recovery starts.
Information will appear which data has been recovered. Click OK.
1. Use the original connection cable! Many non-original cables have a different pinout contacts, therefore may not work with Samsung devices.
2. No additional drivers from Samsung are required to connect. The device is connected via MTP protocol, which is built into Windows. If the device does not connect to your computer, there is a problem with operating system. Make sure you have the latest Windows updates and current version Windows Media Player. More about protocol MTP on Wikipedia
3. Check that the device is in data mode for connection. To do this: swipe down twice on the main screen → connect the device with a cable to the computer → an item for setting USB will appear connection, tap on it → select This phone and Transfer files.
4. Check the device connection on another computer. Most of the difficulties when connecting arises when using unlicensed Windows XP and 7. It is recommended to use Windows 10.
To transfer data from one Galaxy to another or from iPhone to Galaxy, use Smart Switch Mobile (available in the Play Store).
If you are unable to save your data or have any other questions, please contact support service for personalized advice.