How to use Facebook Moments, a much easier way to share photos from your phone just with friendshttps://www.businessinsider.in/how-to-use-facebook-moments-a-much-easier-way-to-share-photos-from-your-phone-just-with-friends/facebook-moments-starts-by-asking-your-permission-instead-of-scanning-just-your-existing-facebook-albums-moments-pulls-from-the-photos-you-store-on-your-phone-the-app-combs-through-your-camera-roll-and-starts-making-groups-of-photos-based-on-where-they-were-taken-and-who-is-in-them-/slidelist/50539538.cms2021-07-26T12:45:54+05:302016-01-12T00:20:17+05:30
Jul 26, 2021, 12:45 IST
Advertisement
 At the top, Moments offers private suggestions on who you should send the photos to based on the faces they identify. If I want to share the photos with Jillian, I can swipe right to create a Moment or I can swipe left and dismiss it. (Or I can just as easily hit the skip and send buttons.)The Moments home screen focuses on sending photos to your friends. At the top, Moments offers private suggestions on who you should send the photos to based on the faces they identify. If I want to share the photos with Jillian, I can swipe right to create a Moment or I can swipe left and dismiss it. (Or I can just as easily hit the skip and send buttons.)
Advertisement
 The easy send option is great, but I normally hit edit to make sure I'm only sending photos that I want to share. In this set of photos, I was on a business trip and Jillian only appears in one photo. Since she doesn't need to receive every photo I took during the trip, I can edit the list to only send her the ones she wants.The easy send option is great, but I normally hit edit to make sure I'm only sending photos that I want to share. In this set of photos, I was on a business trip and Jillian only appears in one photo. Since she doesn't need to receive every photo I took during the trip, I can edit the list to only send her the ones she wants.
 If it doesn't automatically detect a face (like here with my dogs), then I can send to my Facebook friends via Moments. There's no option to share with a non-Facebook friends though.When you first log in, Facebook will go pretty far back in your camera roll to identify your photos. If it doesn't automatically detect a face (like here with my dogs), then I can send to my Facebook friends via Moments. There's no option to share with a non-Facebook friends though.
Advertisement
 There's also an option to chat within each of these in case you want to ask your friend to send along some extra photos.Below the send suggestions, the Moments you have shared are added. You can add titles to them, like a trip to the Jelly Bean factory, or they'll stay as "moments" between a friend and you. There's also an option to chat within each of these in case you want to ask your friend to send along some extra photos.
 In this case, photos of me wine-tasting were on my friend's phone and I had photos of her on mine. Moments lets you combine them into one place first before you decide to share.With any Moment, you can click and rename it to create a mini-album. On the bottom left, you can see who is participating in the moment and sharing photos to the group. This is where Moments really shines. In this case, photos of me wine-tasting were on my friend's phone and I had photos of her on mine. Moments lets you combine them into one place first before you decide to share.
Advertisement
 While most of Moments is sharing privately among friends, you do have the option of sharing the slideshows or albums to Facebook where you normally post updates.Of course, if you go to the trouble of creating a slideshow, you're probably going to want to share it. While most of Moments is sharing privately among friends, you do have the option of sharing the slideshows or albums to Facebook where you normally post updates.Of course, if you go to the trouble of creating a slideshow, you're probably going to want to share it. While most of Moments is sharing privately among friends, you do have the option of sharing the slideshows or albums to Facebook where you normally post updates.
Advertisement
 I can click though photos I've taken of friends or browse based on my location. It even has smart labels, so I can see which of my photos are group shots versus selfies.The Browse tab is an easy way to look at your sorted photos. I can click though photos I've taken of friends or browse based on my location. It even has smart labels, so I can see which of my photos are group shots versus selfies.
Advertisement
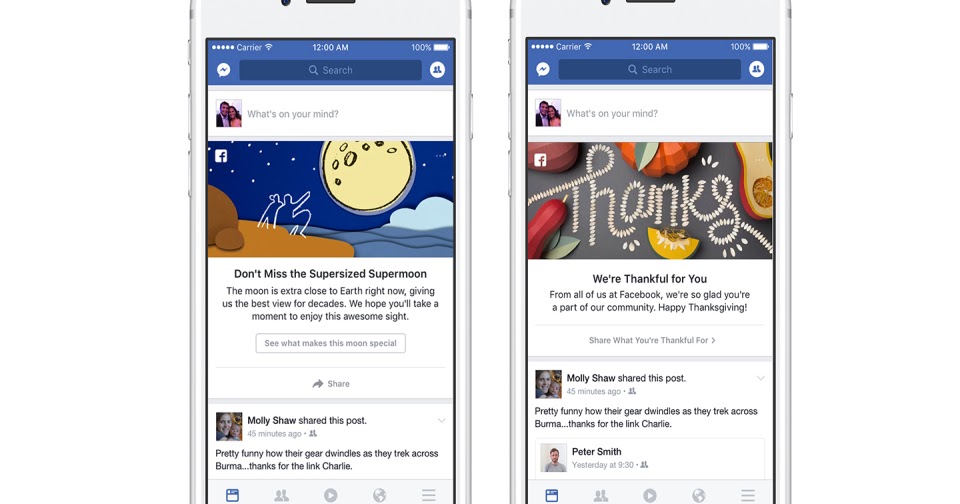
Facebook is the best social media platform to share our best moments. Once you share a pic or video. It is stored on your Facebook for years. So that Facebook you can have a look and find old memories of yours.
Unfortunately, you can’t look back to your Facebook memos for yesterday, a specific date, or a different day. But there is an alternative way to do it, please keep on reading. It is one of my favorite features on FB. People can easily look back to their old photos, videos, and lovely moments, almost everything they have shared on FB.
Back in March 2015, Facebook introduced the “On This Day” feature. It is now been more polished and fully optimized to show a memory from this (this date) day in the past. That could be status updates, videos, photos, and other cool things you’ve shared on Facebook. You can also see the content you have been tagged in for this date in the past.
Table of Contents
Looking back at your old videos and photos and other memories is easy. Note that you will only see content from this day from the past years. Please update your Facebook app to the latest version, then follow these steps
How to find old memories on Facebook: Open the Facebook app. Tap Menu (three horizontal lines). Now tap the Memories. You will see all memories over there. Also shared memos or the ones you have been tagged in on Facebook on this day.
Related for You
You can only find and see memories from the past. For example, I shared one of my vlog videos on 1st March 2018, I will be only able to see this memory on 1st March 2019. If I miss it, I can only see it next year on March 1st, 2020. Note that all the photos and videos available on this day are visible to you only until you share them.
Anyone can share their available memos in the On This Day archive. It could be a photo, video, and post you have been tagged in. To share a Facebook memory, please follow these steps
Any of your memos is not available to any of your friends on FB until you share them. Sometimes a memory may appear on your News Feed. There must be a Share button below it too, just tap it to share that memo with your friends.
You have full control over your available memory on Facebook. You can delete a memory if you want, to do it, please follow these steps:
Go to Facebook and then Menu. Now tap on Memories. Tap the three-dotted button right on the top of the memory.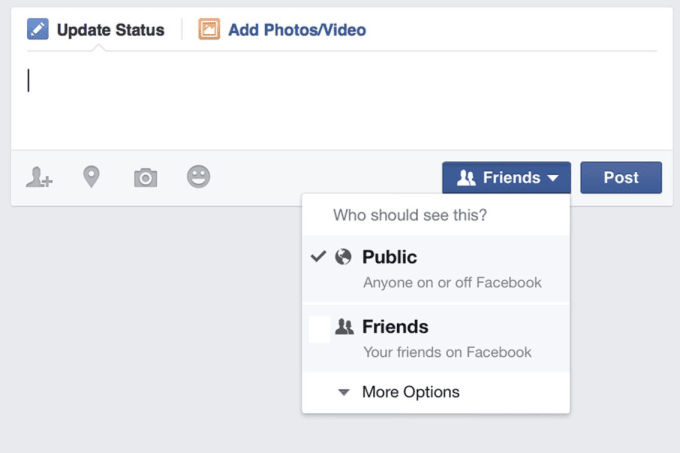 You will see three options including the Delete one. Tap the Delete option to confirm.
So that is how you can get rid of memory and stop seeing it again next year. Remember you cannot recover it, so think twice and take the decision.
To ensure to not miss a memory, you need to turn on the notification for it. I know it is kind of weird that you may need to wait for a year for a single memory to appear again in the “On This Day” archive. But thanks to Facebook it allows users to turn on the notification for our memos. Any way to do it, please follow these steps

It depends on how important a photo or video or any post from the past to you is. So the choice is yours to set the settings as per your needs.
There are two settings available to control what you see in memories (On This Day). You can hide memos that involve dates and people. To do so, please follow these simple steps
Please restart your Facebook app and then you are good to go. Now you won’t see memories from those people and dates you’ve selected in your On This Day archive.
You can look back to your Facebook posts for a specific month/year, yesterday, or a specific or different day/date. Remember this is an alternative way, not the official one. It is a good way but not the best one I think.
I know that there is no such option to look back to a specific day. There are no settings for getting memories from yesterday etc. In my opinion, this is the worst thing on Facebook. They should allow users to do so and whatever they want.
For some reason, I cannot mention every single thing that may appear in your memos. But the most common things are the following.
Please note that videos and photos etc from your phone’s gallery only appear when the settings are set to on.
If you cannot see memories on Facebook. Probably your account is not old enough or you’ve not updated the Facebook app for so long. Make sure that your internet connection is working, and close and open the Facebook app again.
Still, no luck, try clearing the Facebook app cache files. Then restart your phone. If nothing helps at, take a screenshot of your Facebook memories page, and send it to Facebook via the reports option.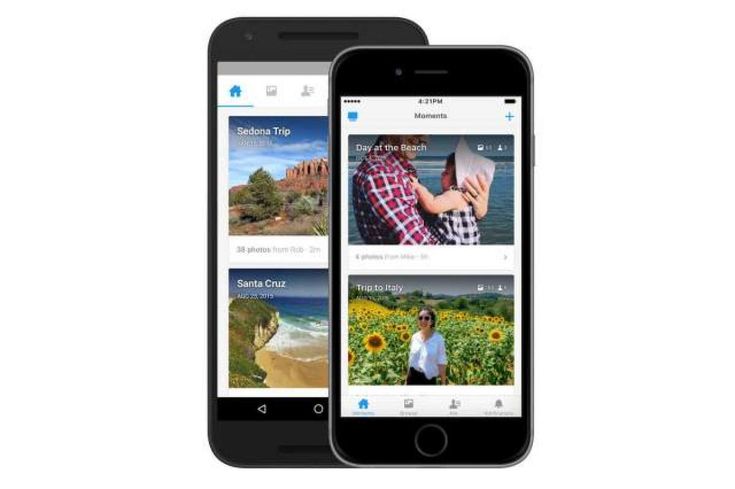 You will get it fixed automatically.
There are two main reasons why your Facebook memories not working. The one is you don’t have a memory for that specific data. The other reason your Facebook application is not up to date. You can check and confirm through the activity log if you have any posts, videos, and pictures shared on that specific.
Then if you can something in your activity for that day. Then update your application and that clears its data on your phone. It should show you the memories now.
If the problem still exists then all you can do is report the problem to Facebook. Also, try to log out and then log in to help sometimes. Also, check that your account is old enough for at least two years. If not then Facebook won’t show you memories.
Read more:
Full guide on secret conversations on Messenger.
Ignore and unignore convos on Messenger.
Facebook Stories – The Definitive Guide.
Facebook is made for sharing with friends. You can share many things like status updates, photos, links and even your location. You can also share something by posting it directly to a friend's Timeline.
Before you share something on Facebook, you need to decide who you want to share it with. You can check out our Lessons Understanding Facebook Privacy and Privacy Settings to learn more.
To share something with your friends, you will use the Publisher. You can find the Publisher in two places:
The most common way Facebook users share their status updates are short text posts that friends can read and comment on. When you post an updated status, it appears in your Timeline and your friends' News Feeds.

If you want to share something with a friend, you can post it directly to their Timeline. To do this, use the Publisher on your friend's Timeline page.
Please note that you cannot change the privacy settings for posts you post on Friends' Timelines. So if what you're about to share might be inappropriate or compromising and you don't want anyone other than your friend to see it, it's best to send your friend a private message.
Facebook allows you to share more than status updates. For example, you can share:
Once you have added your location to a publication, it can be automatically added to subsequent entries. If you don't want this, click the cross-shaped icon next to the place name in the edit mode of the post.
If you're using the mobile app, select the Location icon, then tap the cross-shaped icon at the bottom of the screen to remove the location from the post.
You can share new posts on Facebook endlessly. You can also like, comment, and share other people's posts and stories shared on Facebook by your friends.
When your friends post something on Facebook, you might like it and you can like the post using the Like button . This is an easy way to show your friends that you really like what they have shared with you.
Using the Like button, you can also tag pages of companies and organizations to keep track of their updates in your News Feed.
Remember that every page you like can appear in your Timeline and your friends' News Feeds. Depending on your interests, this can sometimes be a compromising fact.
You can comment on your friends' entries. Your comments will be seen by your friends, as well as friends of the person whose post you commented on. To leave a comment, simply type in the comment box below the post and press the Enter key on your keyboard.
Reposting on Facebook is very easy. To share any post with your friends, just press the 9 button0040 Share under the post.
You may have already noticed social plugins on various websites. These are usually presented as a small Facebook icon or Like button, which allow you to share information from the site to your Facebook page without leaving the page.
1545
9
9 Read Min
How to share a video on Facebook
During a family dinner, you prepared funny videos that you showed to all your relatives. At the end of the evening, some of them asked you to post a video on Facebook so that relatives who could not attend the dinner could see them. You gladly accepted their request, but since you don't use the famous social network much, you don't know how to upload videos to it. I figured it out, didn't I? So I don't see what the problem is: if you like, I'm here to help you and explain how to succeed in your attempt.
If you give me a few minutes of your time, I can tell you how to share a video on Facebook acting like a mobile phone, tablet and PC without missing any details: in the following paragraphs, I will not only show you the complete procedure for posting a video to your profile, but also how to share videos on any Facebook page you manage and in groups. social networks, even those that you are not the administrator of. In addition, you will also find instructions on how to add a video to your Facebook story.
If you can't wait to get more information, don't wait and dive right into the topic. Sit back, take the time you need, and dedicate yourself to reading the following paragraphs. Carefully follow the instructions that I am about to give you, try to put them into practice, and I assure you that sharing a video on Facebook will be as easy as drinking a glass of water. Enjoy reading!
Index
to share video on Facebook de mobile phone and tablet , first run the famous social network application, which is free for Android and iOS. If it's not already on your device, you can read my guide to downloading the Facebook app.
After logging into your account, to continue posting videos to your profile, tap What do you think? and select the option Photo / Video , then select the video you want to share by touching preview image and press the button final .
Now, if you like, click on the item edit to apply effects, stickers and settings to the movie, and press the 9 button0040 Venga . Also by clicking on the Add to your post item, you can tag other people, indicate where the video was taken, and more. Then enter a description of the movie in the field Write something about this video and click on the article Share to start charging. Wait until the progress bar reaches 100% and that's it.
If, on the contrary, you prefer to share videos on Facebook from Pc , connected to the main page of a well-known social network and, if you do not have automatic access configured, log in by entering your data in fields Email or phone es Password , present in the upper right corner. For details, you can read my guide on how to login to Facebook.
Now click on the option Photo / Video is present in the box Record Posts and select the movie you want to publish on Facebook. click on the button opens to start downloading and optionally enter a message in the field Write something about this video . If you want to tag a friend to notify them of the download, click the Tag friends button and select your name in the Who were you with? , then make sure News section is checked next to the item and set the video privacy by selecting one of the available options ( Toda , Friends , Only me , personalizado etc.) via the dropdown menu Who can see this content .
If you are wondering how to share a video on Facebook with just one person, all you have to do is select the option Specific friends in the video privacy mode, then check the box next to the friend you want to share the video with and click save button cambios .
After the video is uploaded, click the Share button to start processing the movie on Facebook. As soon as you receive notification Your video is ready. You can see it now , the video will be visible on your Facebook profile.
to share video on Facebook page On your mobile phone or tablet, launch the social network application, press the button ≡ located at the top right (or bottom right if you have an iPhone or iPad) and press name of your page.
On the new screen that is displayed press the button Public select option Photo / Video and touches video to charge, then press the buttons final es Share to start charging. If, on the other hand, before posting the video, you want to add settings to the video or add a title, tap the element edit and choose whether you want to add effects , glues o draw freehand with the function draw .
To add a title or description to a video, tap the item instead. Write something about this video , enter the text of interest and click the Share button (top right) to post it on your page.
To share the movie on a Facebook page that you manage with your computer, click on the icon down arrow present in the upper right corner, select your Facebook page visible under the heading Your pages and on the page that opens click on the option Photo / Video is present in the box Create Post . Then select the option Upload Photo / Video , select the movie to upload and click the button. opens start download.
On the page that opens, enter the name of the video and its description in the fields. Name your video here es Describe your video so people know what it's about. , then enter keywords in the field Label to help people find their movie and set a preview image by clicking item Image preview is present on the right.
If you wish, you can further customize the video by selecting one of the options displayed on the right: Distribución choose where to show the video, whether to allow embedding, and whether to disable comments and reactions; Subtítulos set video language and add subtitles; Surveillance add tags and make it easier to find videos and Director's Tools 360 to activate 360-degree mode and allow the viewer to control the direction of the view.
When you've finished setting up your video, click the premiere button if you want to set the video to be published as a first view, specifying the date and time of transmission. In this case, a notification will be immediately published that your video will be broadcast on the set day and time.
If, on the other hand, you want to publish the movie normally, press the button Public select one of the available options Publish now , precede es Program Yes. In the latter case, my guide on how to schedule Facebook posts may come in handy.
If you are wondering if it is possible to share the video in the Facebook group , the answer is yes, even if you are not the administrator of the group you are interested in. To continue using your mobile phone or tablet, launch the Facebook app, press the ≡ button and select an item. Groups to see all the groups you are following.
Once you have identified the group of interest, tap its name, and on the new screen that appears, tap the item. Write something , then select the option Photo/Video , click on the preview image of the video you are interested in to select it, and click the button final . Or click the camera icon to record live video. press button edit if you are going to apply filters, stickers or pictures to the video and if you want, enter text in the field Write something about this video .
Finally, click the Public button in the upper right corner to immediately publish the video; otherwise, click on item Program , move the lever next to item Publication schedule de OFF a EN (Android only), set date es calendar publish and press the button Program .
To share a video in a Facebook group from a PC connected to the main page of the social network, click on the element Groups present in the sidebar on the left under the option Explorar and select the group in which you want to share the video.
Now tap the item Photo / Video present under the option Write something , select the movie to download and click the button. opens . Optionally, enter a title or description for your video in the field Write something about this video and click the Public button.
You should know that if you are a group administrator, you can also schedule a movie to be published by clicking on the icon clock present next to the button Public . On the new screen that appears, enter date es calendar publish and press the button Program .
los Facebook stories These are collections of photos and videos that each user can share on a well-known social network and will remain visible for 24 hours in accordance with the privacy set at the time of publication.
Click the button to share the video in the story + is present in your photo top left under heading history and select the article Video to record live video, otherwise click the icon two rectangles in the lower right corner to download the video to your device. Then select video to share with your Facebook story and choose whether to apply settings such as effects ( magic wand ), writing ( AA icon top right) or stickers ( emoticon ).
After completing the video setup, press the 9 button0040 Venga , make sure that Your story is checked next to the item (you can also set its visibility by touching the item Toda o Friends submit in writing Your story ) and press the button Share now .