by Jon Loomer - No Comments
Thanks to a recent update, advertisers can now optimize for and track Facebook custom events — without needing to first create a custom conversion.
If this doesn’t make sense to you, allow me to explain…
First, when we speak of “events” in this context, I’m referring to pixel eventsPixel events allow you to track specific actions on your website that can be used for reporting, targeting, and optimization.. Publishers who install the Facebook pixel (a unique snippet of code) to their website can track and optimize for specific events that occur on their website using Facebook ads.
There are two kinds of events:
1. Standard: Facebook has predefined events that they can easily recognize for tracking and optimizationHow you optimize impacts who sees your Facebook ad. Facebook will show your ad to people most likely to perform your desired action. purposes. Examples include Purchase, CompleteRegistration, VieContent, and Search (among many others).
2. Custom: Maybe you have events that can’t be defined within “standard” constraints. You can use custom code to define “custom” events so that Facebook can track these as well. An example of a custom event on my website is the “Time on Page” event.
This allows me to send an event when someone has spent 60 seconds or more on a page. (You can read more about how I created this custom event here.)
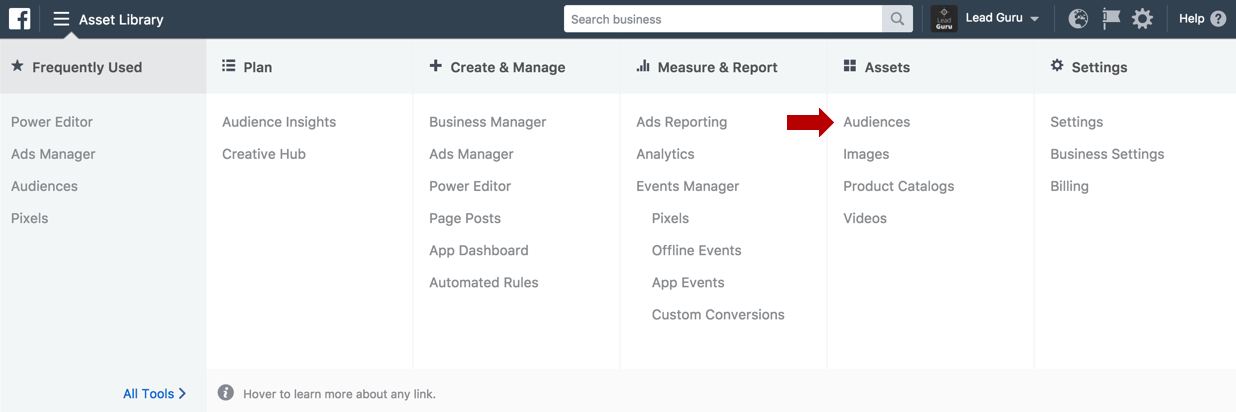
Once you create a custom event, you can create an audience of people who have performed it for targeting purposes. Here’s an example using the custom event I created for Time on Page.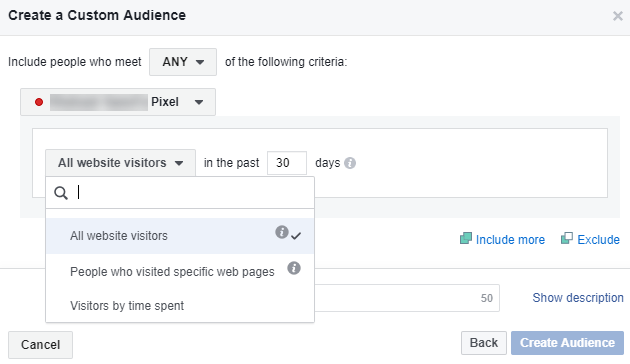
After that, however, custom events had some weaknesses. You could optimize for standard events when creating a conversions campaignThe campaign is the foundation of your Facebook ad. This is where you'll set an advertising objective, which defines what you want your ad to achieve.. You could also track standard event conversions by adding a column (if you didn’t define it as the conversion event in the ad setAn ad set is a Facebook ads grouping where settings like targeting, scheduling, optimization, and placement are determined.). But custom events needed another step.
In order to optimize for or track a custom event, you needed to first map that event to a custom conversion (since you could optimize for and track custom conversionsCustom conversions let you create rules for events or URLs so that you can better track and optimize for specific actions with Facebook ads., but not custom events).
Mapping a custom event to a custom conversion in order to optimize for or track it seemed like a completely unnecessary step.![]() And it was.
And it was.
With this update, you will now be able to select a custom event when choosing your conversion event within the ad set.
Facebook doesn’t do a very good job of differentiating between what’s a standard event, custom event, or custom conversion during this process, but there’s one indicator. Standard and custom events don’t have rules, whereas custom conversions do. You should recognize all standard events. If you are uncertain whether an event is a custom event or custom conversion, hover over it to see if rules were set up for it.
Here’s a custom conversion where rules were set up…
And here’s a custom event, showing no rules…
If you select a custom event as a conversion event, it will be tracked in the “Results” column. But, you can also now add a column for a custom event now.
Click to customize columns…
On the left, you’ll see a “Conversions” section that includes standard events, custom conversions, and custom events.
You can then add a column for that custom event, regardless of whether you define it as your conversion event.![]()
Something to consider here is that you currently cannot configure your eight ranked events to include custom events, only standard events and custom conversions. Ranked events will result in more complete reporting, assuming you have a substantial audience using iOS devices.
My assumption is that Facebook will eventually allow us to add custom events as our ranked events, but until then this is something to keep in mind.
Have you started optimizing for and tracking custom events?
Let me know in the comments below!
Tags: Facebook Custom Conversions, Facebook Custom Events, Facebook Pixel, Facebook Standard Events
Once you have your pixel set up, you can use it to capture specific events or actions that happen on your website.![]()
If you are CMS/eCommerce platform such as Shopify or WooCommerce etc. Many of these have automated plugins to install the facebook pixel and all purchase/conversion events required to track an online store.
View our brillea guide on how to setup the Facebook Pixel on Shopify
Standard events are actions that Facebook recognises and supports across ad products, such as: Complete registration, Search and Add to wishlist. You can use events to capture Conversions (such as Sales) if you add the appropriate code to your website.
Custom events are actions that fall outside those covered by Facebook's standard events. You can create and capture custom events by adding them to the website code, just like standard events. Custom events can be named anything other than standard event names.
Custom conversions allow you to segment your event information based on values, event types, custom information fields and other characteristics. This can be used for more detailed reporting in Ads Manager. You can create a custom conversion by building rules that define the unique, high-value activities that are important to your business. The most common custom conversion is a URL-based custom conversion. This means that you can create a custom conversion that tracks people who visit a specific page on your website. For example, the thank you page.
brillea tip!: For brillea, we only need you to make sure you have set up your Standard Events.
You may have chosen the option to set up standard events when you created your pixel. If you chose not to set up events at that time, you can still add them now. Note: The process to set up custom events is the same as standard events, except you add your own name or code instead of the standard event codes.![]()
To add an event code, follow these steps:
Step 1. Go into the code of your website.
Step 2. Copy the event code you'd like to add. Or, if it's a custom event you'd like to set up, add the custom code.
The important thing here is that each page of your website needs the base code (red), but different pages will have different lines of code for the standard event code (green).![]()
Step 3: Once you've added the code on the relevant pages, you’ll start to gather information on these specific events - the sooner the better on this, as the more information the pixel has the better!
If your conversion point is a Sale, you should also make sure that the Value and Currency of your event is correct. You can check how to do this here.
In one of the previous articles, we looked at various ways to install a Facebook pixel on a website. At the next stage of the work, the pixel must be configured so that this wonderful tool can fully show its usefulness and effectiveness.
This article is a step-by-step guide to setting up Facebook pixel events. Since the material is quite voluminous, and the approach to setting up depends on the level of preparation, we have divided the article into two parts.
So let's go!
First, let's briefly understand what pixel events are and why they need to be configured at all.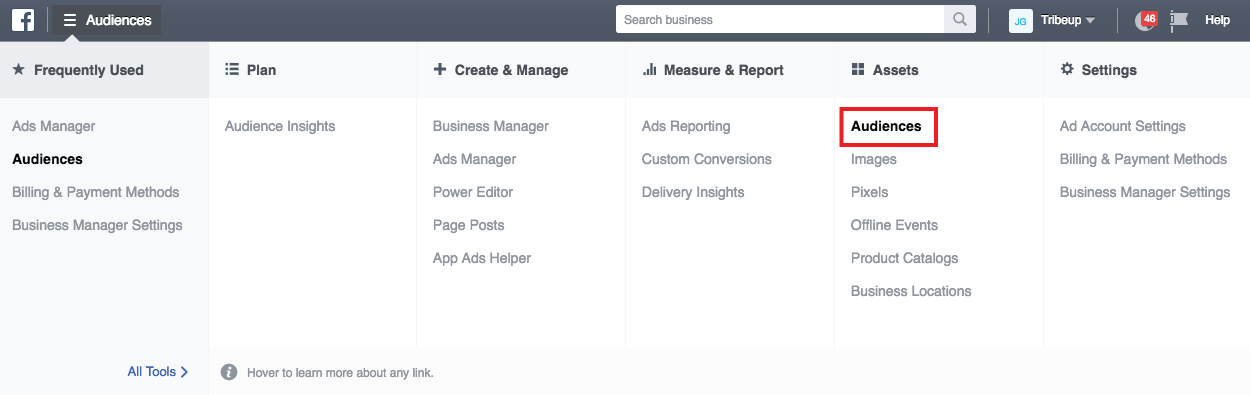
An event is any action that a visitor takes on your site (viewing a specific page, adding an item to the cart, submitting contact information, making a purchase, etc.).
The simplest example of an event is Page View , its tracking is "hardwired" directly into the Facebook pixel code itself. Thus, tracking this event automatically fires every time the page where the pixel is set is loaded. Other events must be configured manually.
But why do it at all? Setting up events in a pixel is necessary for effective targeted advertising and traffic analysis. If we use only event tracking Pageview , then this significantly narrows down our options. To draw an analogy, it is like a researcher in a laboratory who, having many instruments at hand, uses only one of them for work and ignores the rest.
Event setting unleashes the full potential of the pixel and allows you to:

Facebook pixel events are divided into two categories: standard and custom (the latter is also often referred to as custom or custom).
Standard Events are pre-defined, generic conversion actions that are recognized and supported in Facebook advertising products. The standard events configured in the pixel, in addition to analyzing user actions, can be used as targets for optimizing advertising campaigns, as well as for building audiences.
Standard events are tracked by calling the pixel function fbq('track') with a name. For example, the code for the standard event Lead (the first step of any funnel) looks like this:
and when the user performs any action (pressing a button, etc.).
In addition, along with the event itself, additional information can be transmitted to the pixel - certain event parameters , which can later be used for identification (for example, to accurately determine the audience).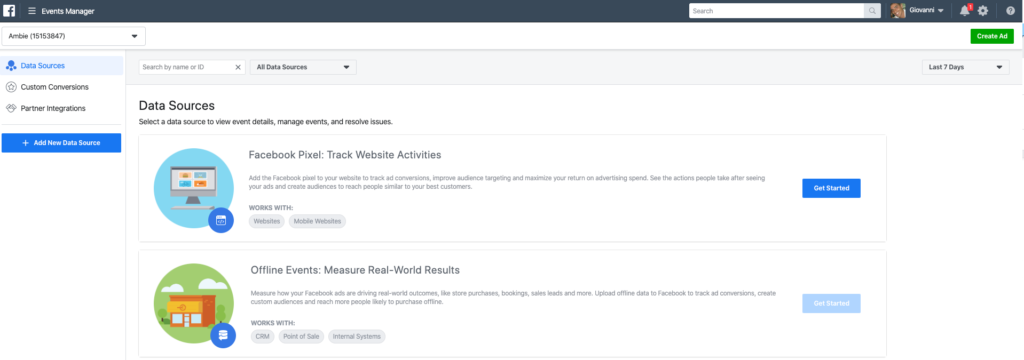
For most Facebook pixel events, the passing of parameters can be configured as desired, but for some events (related to payment or transactions, such as the Purchase event), the passing of certain parameters (Value and Currency) is a prerequisite. We will return to this nuance when we consider in more detail the configuration of event parameters in the second part of this article.
The list of standard Facebook pixel events is shown in this table:
Customized (custom) events are actions that are not included in the list of standard pixel events.
Custom events are tracked by calling the function fbq('trackCustom') with a unique event name that you can come up with to describe the action being performed (note that the name cannot exceed 50 characters).
For example, you want to track visitors who choose to share information about your promotion on a social network. In this case, the event code might look like this:
As in the case of standard events, the function fbq('trackCustom') supports passing parameters (additional information about the event), and can be called anywhere between the opening and closing
tags during page load or when the user performs some action (clicking on a button, etc.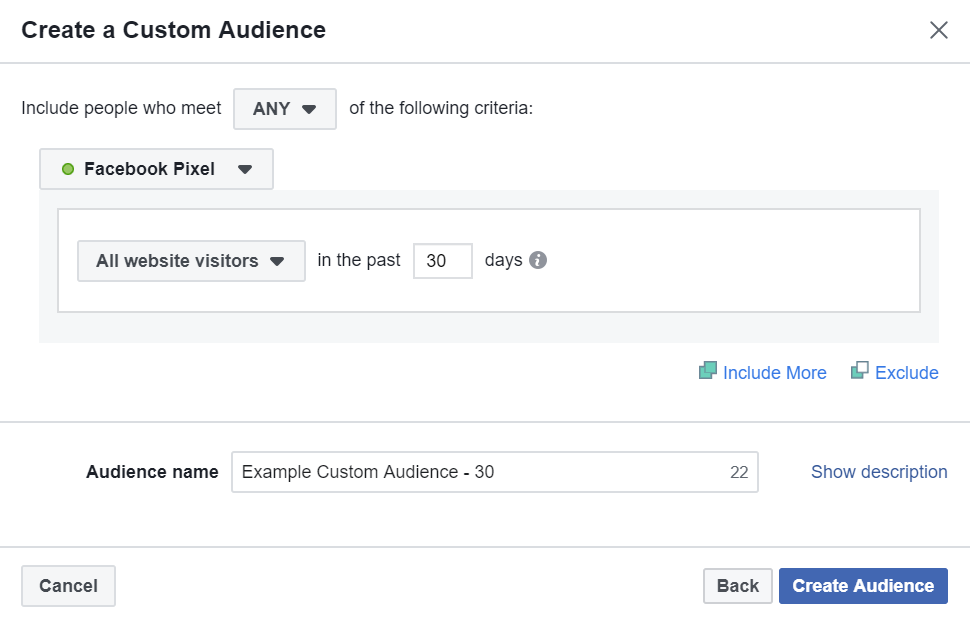 ).
). Using custom events, you can track and analyze almost any activity of your website visitors and create audiences based on them. However, a custom event (as opposed to a standard one) cannot be used as an optimization target for ad campaigns on its own unless it is mapped to a custom conversion (we'll also talk more about this in the second part of this article).
Before proceeding directly to setting up events, I want to draw your attention to a very important nuance. Naturally, all pages where tracking needs to be set up will need to have the base Facebook pixel code installed, but that's not all. For correct tracking, the pixel code must be loaded BEFORE start downloading event codes. Otherwise, the pixel will not be able to register them, and tracking will not occur. Remember this important point and be sure to consider it when setting up.
Each of these methods may be relevant in certain conditions, so we will consider them all. However, I recommend (if possible) to use the third method, since using Google Tag Manager allows you to use all the functionality and set up any number of events without the participation of a programmer without a significant impact on the page loading speed of the site.
It should be noted right away that this setting method involves placing event codes in the site page code, and if you do not have the appropriate skills, a programmer will be required.
First we need the event codes we want to track. The easiest way to get them is in the settings of the Facebook pixel itself. To do this, we need to go to the Events Manager on the pixel page, on the tab Overview , click the button Configure in the upper right corner and select item Configure new events in the drop-down menu.![]()
Then, in the event settings dialog that opens, click Add event code manually .
At the next step, for convenience, you can specify the category of your company in a special menu, after which Facebook will offer an appropriate list of recommended typical events for customization.
Next, we need to select the event we want to track. For example, let's take one of the most frequently used events - Lead. Find it in the list and click.
In the opened settings, we will see a field with a ready-made Lead event code, which we need to copy. Since we are not going to configure the sending of the parameters of this event now, the lever Send event parameters is off. Copy the event code, paste it into a .txt file and save.
After we have received and saved the event code in a file, we can proceed directly to installing it on the site, but first we need to decide how the tracking will take place. This can be done in two ways:
Instructions for installing the code for both of these options can be found right there in the event settings. If you yourself do not have the skills to work with code, you can also send instructions by e-mail to your programmer directly from the event settings by clicking on the corresponding button in the lower right part of the dialog box.
Option 1 - Track the event on page load
If your site has a Thank You page that opens after submitting contact details, then the best option is to track the Lead event when that page loads. Let's consider this configuration method in more detail.
In the upper left corner in the Lead event settings, click on the button More and in the drop-down menu select Track event while page is loading .![]()
Then, below the event code field that we copied earlier, we find the item Insert Lead event code with installation instructions.
In this paragraph, in the field labeled Edit Facebook pixel code , an approximate place in the page code is shown where you need to set the event code, which is conventionally indicated here by line insert_event_code_here As far as you can see, it should be placed immediately after or as close to the opening
tag as possible.We put our event code saved in the .txt file in the specified place in the page code, or we ask the programmer to do it. After installation, you should have something like this:
I would like to draw your attention to the fact that this example of the location of the event tracking function in the page code assumes that the pixel base code is set exactly according to Facebook recommendations, i.e. . before the closing tag.![]() In this case, the pixel is always loaded before the scripts installed after the opening
In this case, the pixel is always loaded before the scripts installed after the opening
If for some reason (situations are different) the base pixel code is set after the closing tag, then you need to make sure that it is initiated before the start of loading the event code (we already talked about this important nuance above). To do this, the pixel code can be placed in the page code higher than the event code (preferably right before it).
Another way out is to modify the base pixel code specifically for this page. To do this, we need to add our event code to it right after the pixel initiation codes and the Pageview event, as shown below:0003
This modified code should only be set on the page where we want to set up event tracking (if the base pixel code was previously set on it, it must be replaced with this modified one).
Option 2 – event tracking when the user performs an action on the page no Thank you page).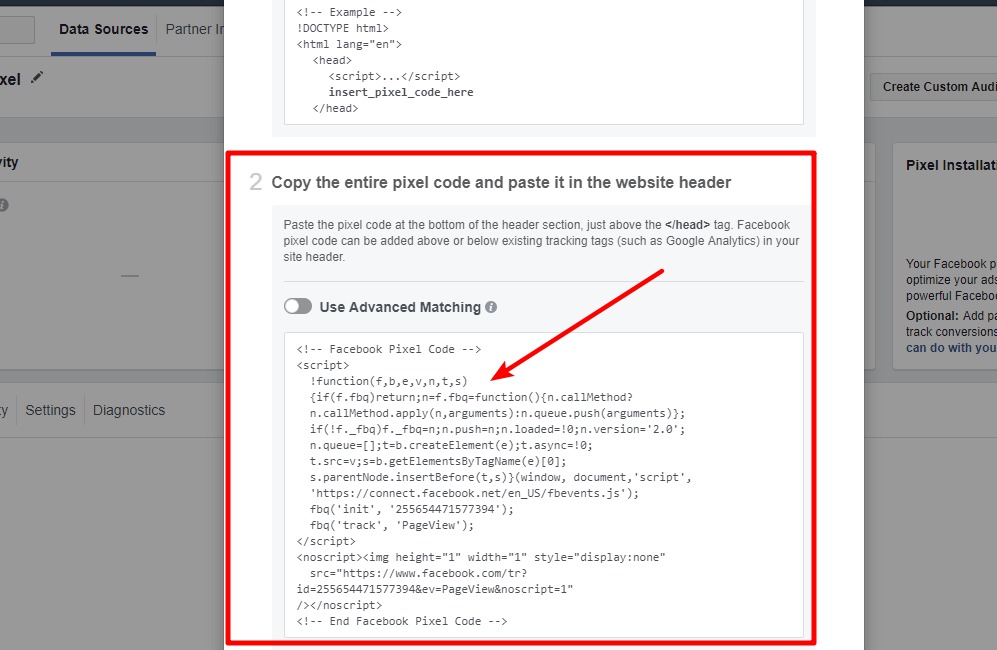
In the upper left corner in the Lead event settings, click on the button More and select the item Track the event in the built-in action in the drop-down menu.
After that, we will see that the setup instructions have changed according to the selected method.
The sample code that appears in the corresponding field associates the call to the event tracking function with a button press. The possibilities of such binding are not limited to the example given by Facebook, it can also be configured in other ways, for example, binding the event code directly to the button on onclick (or to submitting the form to onsubmit). According to the method that suits you, set the event code to the page, or have your programmer do it.
Following the algorithms described above, you can configure tracking of other necessary pixel events directly in the site page code. However, it should be noted that this method has a serious potential disadvantage - installing a large number of scripts in the code can significantly reduce page loading speed.![]() Therefore, I recommend using this configuration method only if you have a small site and not many events that you want to track.
Therefore, I recommend using this configuration method only if you have a small site and not many events that you want to track.
Relatively recently, Facebook has a special tool that allows you to add events and parameters without setting them directly in the page code (only the base pixel code should be installed on the site). It should be noted that this tool is still quite “raw”, it does not always work correctly, and its functionality remains limited at present (now only standard events can be configured through it and only two parameters: “Value” and “Currency” for events Purchase and Order Initiation). However, it has its advantages - ease of setup and no need to change the site code.
Right off the bat, Facebook prohibits the use of this tool for companies operating in the following sectors: investment banking and brokerage, insurance and financial services, retail, credit unions and commercial banks, loans, financing, mortgages, pharmaceuticals and healthcare.![]()
To use the Facebook event setup tool, you need to go to the Events Manager on the pixel page, on the tab Overview click the button 9 in the upper right corner0027 Configure and select item Configure new events in the drop-down menu (same as in the case of the previous configuration method).
Then, in the dialog that opens, follow the recommendations - click on the button Use the Facebook event setup tool .
The next step is to enter your site's URL in the appropriate field for the event setup tool to connect to it. A small nuance - if pop-up blocking is enabled in your browser, then for the tool to work correctly, you need to temporarily disable it. Then press button Open site .
The URL you entered will open in another browser tab and the event setup tool window will appear on top of it. Its interface is simple and intuitive.
The settings window may also display some of the events that the pixel recommends for tracking based on previous user activity statistics on this page.![]() In order to consider the recommended event in more detail, press the button Check .
In order to consider the recommended event in more detail, press the button Check .
The next step will require you to either confirm tracking the recommended event by checking the I accept box and then clicking the Confirm button, or click Reject to return back to the main setup window (in the screenshot below, you can see, that the recommended event is already tracked in the site code).
If the pixel doesn't recommend anything in the settings window (or you don't want to track recommended events), then you can set up tracking of the required events yourself.
Let's consider configuring the event tracking Lead on page load Thank you. To do this, you must first enter its address in the browser line and go to it. Then in the tool window, press the button Track URL .
After that, the following settings will open:
In the top drop-down menu, select the event that you want to associate with viewing this page.
Then, in the lower menu, select the URL match category and press the button Confirm .
This will confirm that the event was set up successfully in the lower right corner of the screen and it will be displayed in the Facebook tool list.
If we need to set up a button click event on the page, in the settings window click Track new button .
After that, a window with the inscription Click on a highlighted button to set up your event will appear at the bottom of the screen.
You need to scroll through the page and check if there are buttons on it that are highlighted in color (this will indicate that these buttons are defined as trackable).
It must be said here that Facebook has strict technical requirements for the buttons it can track (read more in the help). Therefore, in practice, it happens that the event setup tool cannot determine the buttons to be tracked.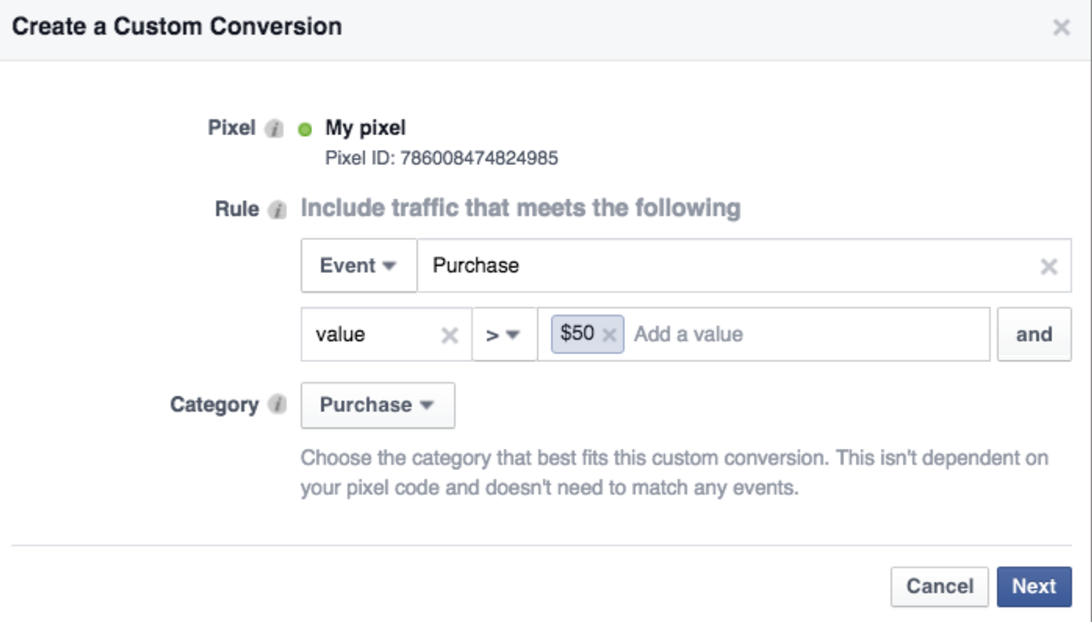 In this case, you need to either adjust them to Facebook's technical requirements (which is not always possible), or set up events for them manually (directly in the site code or through Google Tag Manager).
If a highlighted button is found on the page, then you just need to click on it. Then, in the settings window that opens (similar to the way described above in the URL tracking method), you must select the standard event in the drop-down menu that you want to associate with pressing this button, and then click the button Confirm .
As you can see from the above, Facebook's event setup tool can be very useful in certain situations. With its help, even a person who does not have special knowledge and skills can set up the simplest necessary events.
However, the disadvantages of this method include limited functionality (you can configure only standard events and only two parameters) and technical requirements of Facebook, which do not always allow you to track button clicks.![]() As mentioned above, this event setup tool is a recent addition, and it is likely that it will become more advanced in the future.
As mentioned above, this event setup tool is a recent addition, and it is likely that it will become more advanced in the future.
Compared to the previously described methods, setting up events using Google Tag Manager (GTM) has a number of advantages, the main of which are the absence of the need to interfere with the site code and the ability to track a large number of any events without significant impact on page loading speed.
First, we need to get ready-made event codes in the pixel in the way described above (copy the codes of the events we need and save them in .txt files). Then we go to the GTM container installed on the site (let's look at examples on a container in which we have already installed the Facebook pixel), go to section Tags and click the button Create .
In the tag configuration settings, select Custom HTML .
Then copy the code of the desired event saved in the .txt file (for example, let's take the same Lead event) and paste it into the corresponding field:
After that, you need to define a trigger that will activate sending the event to the pixel. We go down and click on the field Triggers , and then on the page that opens, click on the button " + " in the upper right corner.
If we need to track the Lead event when the Thank you page is loaded, then select option 9 in the trigger settings0027 View page .
Then set the checkbox to Some pageviews , in the settings we specify the URL of the Thank you page, give the trigger a name (for example, Thank-you_page) and press the button Save .
As we can see, the created trigger was automatically added to the custom event, which we also need to give a name (for example, FB_Lead).
Now everything is almost ready, but do not miss one important nuance. When the page loads, GTM tags are loaded asynchronously, and it has already been mentioned several times above that for correct tracking, the pixel code must be loaded before the event codes.
To achieve this, we click on the field Tag configuration , expand Advanced settings and then Tag activation order . Check the box Activate tag before FB_Lead tag and click Select tag .
On the page that opens, select the Facebook base pixel tag.
As a result, we get the following settings.
Now when the Thank You page is loaded, the pixel will always load before the Lead event and tracking will work correctly. Save the event tag.
Done, the event is set! It remains only to press the button Send and publish the container.
If we want to set up tracking for the Lead on button click event, we will need to set up the corresponding trigger for our tag. Let's consider this using the simplest example (we will definitely talk more about setting up various triggers and tags in GTM in future articles).
First, we need to define some attributes of the button with which we can "hook" to it. To do this, on the tracking page (in the Google Chrome browser), we find the button that we want to track, right-click on it and select View code .
This will open the developer console and show the information about our button highlighted in the page code. In our example, we see the element class - form_button and the text on the button - Register via email .
Next, we need to return to GTM, go to section Variables and press the button Configure .
In the configuration settings that open, check the boxes next to the corresponding variables, as shown in the screenshot below.
After that, go to section Triggers , create a new trigger, and select All elements in its settings.
Then we set the trigger activation conditions. We put a tick Some clicks and in the corresponding fields we define the attributes of the button that we found earlier in the page code - the class and text on the button (Click Classes and Click Text).
Give the trigger a name and save.
Now go to the settings of the FB_Lead tag and associate its activation with the created trigger.
After setting, it is recommended to check the operation of the tag. For this purpose, GTM provides a convenient preview mode, which can be activated by pressing the corresponding button on the top panel.
After turning on the preview mode, go to the site and click the button to be followed. The configured tag should be activated and displayed in the GTM panel.
It would not be superfluous to also check the sending of the event using the Pixel Helper tool, which we talked about in the article about setting the pixel. If configured correctly, the checkmark next to the sent event should be green.
If everything works, congratulations! The event has been successfully configured. You can now exit preview mode and publish the container. Let's summarize the first part of the article.
Without this setting, clicks and page views are just clicks and page views. By comparing pixel events with them, we endow them with meaning and assign a certain stage in the sales funnel to each of them, which opens up wide opportunities for us to analyze and improve results.
In the second part of this article, we will continue to talk about setting up Facebook pixel events at a more advanced level.
Effective SMM
Subscribe and stay tuned for new articles in our monogram
Still have questions?
Didn't find the answer to your question? Or did not find the article you are interested in? Ask questions and topics of articles that interest you in the comments.
Facebook Pixel Events allow you to make your social media campaign more effective by signaling a desired action on your site. Thanks to the Google Tag Manager installed on the site, it will be possible to record almost any action.
If you need to track not only visits to the thank you page, add goods to the cart or open a form, then just use the ready-made Facebook tool. You can start the setup by clicking on “Setup” - “Set up new events”.
Next, select the main item "Use the Facebook Customization Tool".
Now in the Site URL window, enter the page where we would like to track events and open the site.
On the site that opens, you will need to read the instructions (opens on top of the site).![]()
When viewing the site, the "Facebook Event Setup Tool" window for setting up conversions will appear in the upper left corner, which, if necessary, can be moved to another convenient location.
Next, we set up conversions, which can be of two types: Buttons and View URL.
For example, we want to track a click on the “Callback” button, for this we click in the Facebook Event Setup Tool window “Track new button”.
Now the system will show a hint at the bottom of the screen that we can scroll the page and click on the element we would like to track.
Click on the desired element, for example, "Callback" and select the desired category.
When you select certain targets, the system will offer:
If the price of a service or product is indicated on the page, then select the second item and the system will again prompt you to select the item in which the value is transferred.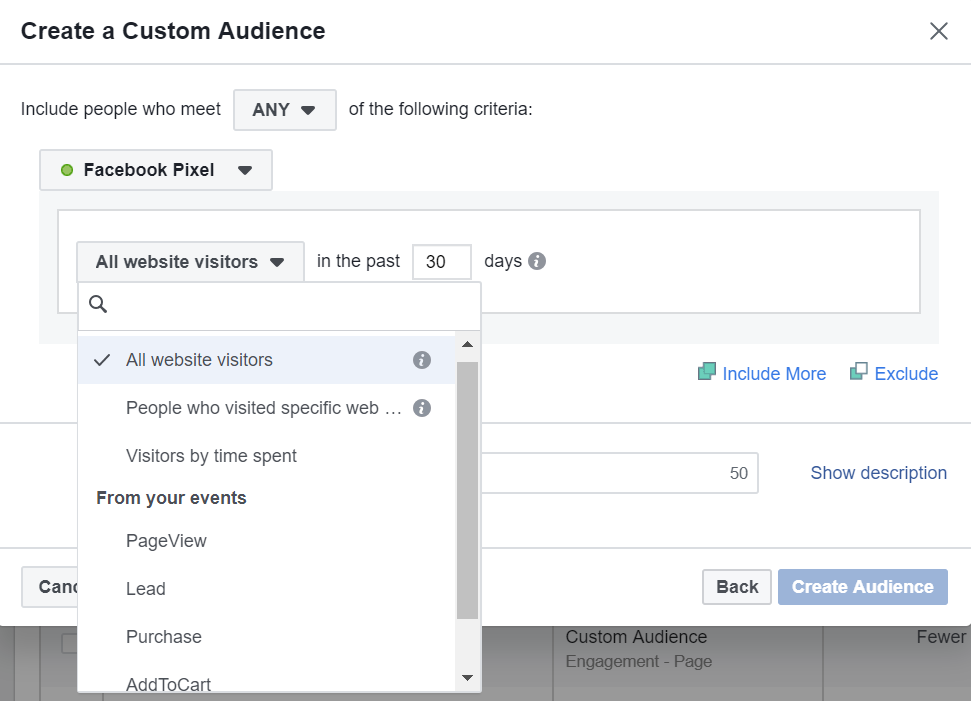
After selecting the desired item, the value will appear in the tool, where you also need to select the currency (by default, always US dollar USD).
Everything is ready, the conversion has been created.
In the goal setting tool, click on Track URL.
Then select the event category in the same way.
And select the trigger rule:
If necessary, also select the conversion value and complete the setup (“Finish Setup” button).
The tool will offer to remove unnecessary conversions (or test ones) if necessary.
The system will now prompt you to test the events.![]()
In some cases, tracking a page visit or element click is not enough, and more complex rules must be used to fix the conversion, for example:
For these purposes, you will also need to click on "Setup" - "New events", but then go to "Add code manually".
In the window that appears, select the business category and below the desired conversion type.
Important! The data you enter below may vary depending on the target you choose.
For example, select the standard "Lead".
Enter:
Copy the code below.![]()
Next, go to Google Tag Manager and enable "Preview".
Go to the site and perform the necessary action on the site, for example, submit a form.
We see that when the form is submitted, the "lead" event fires. Which we will use as a trigger.
We return to GTM in the "Triggers" tab and create a new one.
Give it a name and select its type.
In our case, this is a "User Event".
Enter the event (lead) we need.
Go to "Tags" and create a new one.
Give the tag a name, for example Facebook lead and select its type.
In the list that appears, click on "Custom HTML".
Copy the code from the Facebook Pixel settings to the window that opens and go to the Trigger settings.
Select the previously created trigger with a custom event.
Save the tag
Publish the new version.
Everything is ready, now when you perform the desired action (in the example, this is submitting a form), a new conversion will be recorded in the Facebook pixel, which you can target with advertising campaigns.![]()
You can use this method by going to the Partner Integrations tab.
In this case, free software (modules, plug-ins or add-ons) is provided that allows you to automatically set up data transfer to the Facebook pixel. Among them:
In this case, for example, by selecting Opencart, a module will be provided, by installing and configuring which the site will independently transfer sales data (including value) to the Facebook pixel, and you will not need to enter data manually.
You can use two main methods to test customized conversions
To do this, go to the testing section and select the "Browser" item.![]()