Instagram has been around for a long time now, having evolved, changed and gained cool new features along the way. Unfortunately, for whatever reason, Instagram still doesn’t allow for users to edit their photos and save them without posting. Currently, the only way to edit and save a photo to use elsewhere is to post the image to your profile first, doing this saves a copy to your gallery which you can use anywhere. If you just want to use Instagram as a photo editor without having to post anything, this guide will show you a clever little exploit you can use to do so.
How to Reply to Instagram Stories with your Own Photos and Videos.
You might be thinking what’s the point, why not just use another image editing app? Now, this is a pretty good alternative and there are plenty of good options available for editing photos on your Android and iOS devices. The only real issue is that as good as they all are, they just don’t have the signature Instagram Filter look or feel. If you are searching for an alternative though, you can check out our article on alternative Image editing apps below.
Four of the Best Free Android & iOS Photo Filter Apps.
Saving photos to your gallery/camera roll without posting them to Instagram is quite simple to do and doesn’t require you to download and install any third party apps. All you will need is your Instagram app and Airplane mode. It doesn’t even matter what version of Instagram you are using, the trick is universal. Basically, you will be tricking Instagram into thinking your image has been or will be posted.
In order to do this, start the process of uploading a photo to Instagram follow all the normal procedures, select your photo, crop it, apply your filters and make any other changes you need, then go to the next screen.
Here, on the screen that allows you to enter a description, add a location and a few other things you will need to enable airplane mode. You can do this from the Settings menu on both Android and iOS devices. Or you swipe down on the notification menu on Android and up from the bottom of the screen on iOS. Once airplane mode is active on your device, you can go back to Instagram and tap the Share icon.
The photo will now be saved on your device and the post will be sitting waiting for your internet connection to resume. If you look closely at your screen you will see the pending post on your screen that says “Photo Wasn’t Posted” tap the three dots at the far right of the image and choose discard post. This will now cancel your image from being posted to your Instagram feed.
You can now disable airplane mode, the image you created will be saved to your phone’s gallery, most likely in the Instagram folder.
It’s surprising that Instagram hasn’t adopted a small tweak that would allow users to edit and save images without having to post them to Instagram first. It seems like an easy way to keep users inside the app and not using other Image editing apps to make changes to images they would like to keep or send via text or messenger.
Your Quick Answer:
To save edited photos from Instagram without posting, open the Instagram app and click on the ”+” icon on the top right side, to select > ‘Post’.
After that, as per your choice, click the picture or choose from the gallery and tap on the blue ‘Arrow →’ on the top right corner.
Next, swipe left at the bottom to add filters, and again tap on the blue ‘Arrow →’. With this, you will reach the ‘New post’ tab. There, write a caption in the given space and add the location, just to complete the posting process.
Now, turn ON the airplane mode and turn OFF the WiFi, i.e., completely cut off the internet. Come back to the ‘New post’ tab, and tap on the ‘tick mark’ icon to post.
This will bring you to the home page where you will get the notification > “Will auto-post when possible”. Look straight in front of this notification and click on the ‘three dots.’ Select > Discard. Confirm it and close the app. Go to your photo gallery and find the edited, saved photo.
Another method is to use a story filter and save the photo. For that, first of all, open the Instagram app and slightly pull the screen to the right, to open the Instagram camera. Tap on the big white circle in the middle and click the picture.
Next, tap on the ‘Three-star’ icon and slide the screen to left, and there you will get a variety of filters. Simply, tap on the filter and it will get added to it. Hit the ‘Done’ button, on the top right corner.
Now, to save, click on the ‘Three dots’ on the top right corner of the screen. From the appeared options, select > “Save” and the photo will get saved to your device’s gallery.
Contents
Instagram story filters are as amazing as Snapchat. Instagram offers a wide range of aesthetic, funny, and colorful filters to add to the photos you click using its camera option.
And the most wonderful thing is, it is not at all necessary to post edited photos to save them. You can click a picture on Instagram, add filters to them and easily save it to your gallery.
First of all, open the Instagram app on your mobile phone and log in to your account if you haven’t done it yet. After logging in to your account, stay on the ‘home’ page.
Next, on the home page, you have to slightly pull the screen to the right, in order to open the Instagram camera. When you will pull the screen, the camera will get open.
After the camera gets opened, click the picture. Focus the camera onto the object you want to capture and then, tap on the big white circle in the middle of the camera screen. With this, your photo will get captured and ready to add filters.
Now, after capturing the picture, click on the ‘Three-star’ icon on the top of the captured photo screen. Tap on it and filters will appear on the bottom portion of the same screen. Slide to left and you will get a variety of filters. Tap on the filter you like and wish to add to the photo. Simply, tap on the filter and it will get added to it.
Once you are done with adding the filter to the photo, hit the ‘Done’ button, given on the top right corner of the filter option screen.
Now, to save, click on the ‘Three dots’ on the top right corner of the screen. From the appeared options, select > “Save” and the photo will get saved to your device’s gallery.
Close the Instagram app and head towards your gallery. Under the ‘Instagram’ folder, you will find this photo.
In this way, you can use the Instagram story filter and save the photo without posting it.
Saving edited photos from Instagram without posting them, is not a big deal. It is all rubbish that you cannot save without posting it.
Follow the steps below, to save the edited photos without posting them on Instagram:
To start with, open the Instagram app on your mobile device and put in your username and password to log in. After logging in, be on the home page of your account.
Look at the options on the top right corner of the home screen. There you will see an icon with the “plus (+)” symbol in it. That icon is the option to post photos and videos on Instagram.
To edit a photo, you need to take a photo. So, hereafter hitting this + icon, you will get two options, one to click a picture using an Instagram camera and the second to choose a photo from the gallery. Do as per your requirement.
So, tap on the “plus +” icon on the top right corner of the screen and select > ‘Post’. After that, if you want to click pictures, tap on the ‘Camera icon’, given on the right side, just below the photo.
Whereas, if you wish to choose from the gallery, then, tap & swipe up below the photo and choose the photo you want to edit. Simply tap on the image you want to edit and it will appear on the screen.
After capturing or choosing the photo from the gallery, tap on the blue ‘Arrow →’ on the top right corner of the screen. With this, you will land on the ‘Filter & Edit’ tab. You will see the selected photo in the upper section and below it, the various filters.
Swipe left to see more filters. Tap on the one you liked and want to add to your photo. On the bottom, to the right, you get an option of ‘Edit’.
If you wish to edit your photos, such as adjusting the brightness or contour, then click on it and do the editing.
Once done with adding a filter and editing the photo, click on the blue “Arrow →” on the top right corner of the screen to go to the next step.
Now, you will be on the ‘New Post’ tab, where you to write a caption and add a location. This is just to complete the posting process, that’s it. You are free to write a random caption and add a location.
Click on the space where it is written, > ‘Write a caption…’ in front of the photo and type a caption. After that, below the photo, tap on ‘Add location’ and select the location you want to add.
From here, be careful about the steps.
After writing a caption and adding the location, next what you do is, shut OFF the internet. Posting is not possible without the internet; hence, you need to switch it OFF.
For this, swipe down the screen to bring up the quick settings box, and from there, turn ON the ‘Airplane’ mode and turn OFF the WiFi. Your device should not be connected to any kind of internet network.
Once done with this, swipe up the quick settings box and come back to the Instagram ‘New Post’ tab.
Next, what you have to do after switching OFF the internet, is tap on the tick mark icon > “🗸”, on the top right of the screen. And with this, your photo will go for posting.
But unfortunately – fortunately, it would be pending due to the internet network. You will see a notification stating, “Will auto-post when possible”. This means the photo is ready to post and is waiting on the internet.
However, in the next step, will discard (Delete) the post. So, even after switching ON the internet, the photo won’t get posted.
When you will click on the tick icon to post, you will fall back on the home page of your account, where you will be getting a notification saying > ‘Will auto-post when possible’. Look towards the extreme right corner, in front of this notification, you will find, ‘Three dots.’ Click on those ‘Three dots’ and select > “Discard”. Once again, click on “Discard” to confirm the deletion of that post.
Now, even though having an internet network, the photo would not get posted on Instagram.
After you discard it, close the Instagram app and open your phone’s gallery. In the photo gallery, find the edited photo under the Instagram folder.
Find that edited photo and then you can peacefully, turn OFF the airplane mode and switch ON your internet.
And that’s all to edit and save photos.
Also Read:
Unfortunately, there is no built-in method to save edited photos to Instagram without posting them first. However, with this neat trick, you can add Instagram filters to your photos and save them locally to your phone without actually hosting them.
RELATED: How to use multiple Instagram accounts nine0011
RELATED: How to rearrange filters on Instagram (and hide the ones you don't like)
While you can just use a photo editing app or built-in tools on iOS as well as Android Instagram makes the whole editing process quite easy and fun to edit and add filters to photos.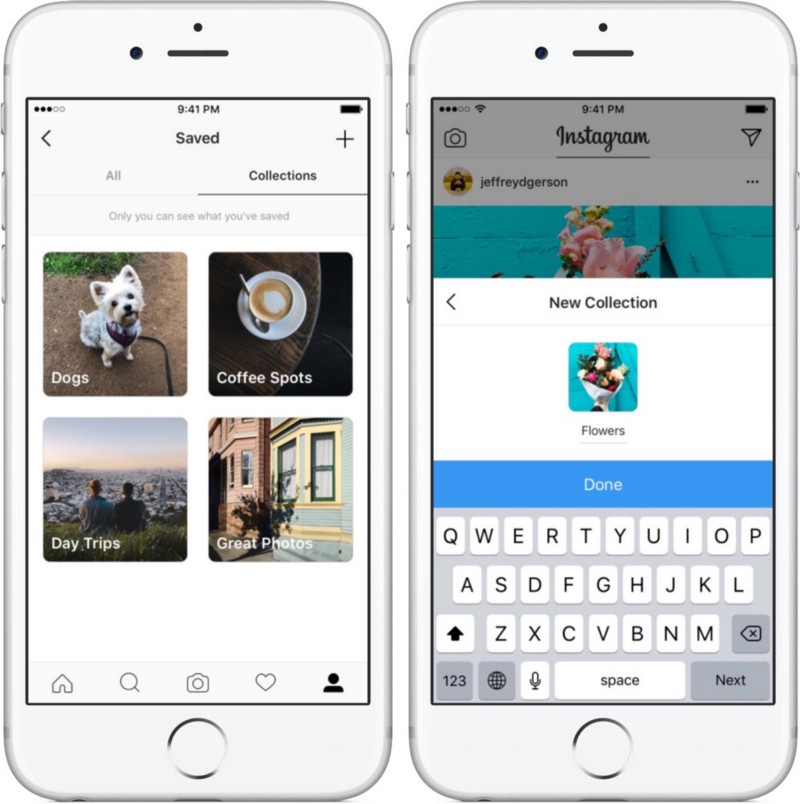 Also, there may be a special Instagram filter that you like and want to use for some of your photos, but it is not necessary to post those photos on your Instagram page. nine0003
With that said, there's an easy trick you can do if you want to use Instagram's own tools to edit some photos but don't want to post them.
To do this, you need to temporarily enable airplane mode on your phone. You're still technically posting the photo to your Instagram page (or at least trying to), but enabling Airplane Mode will result in an upload error. However, the photo will still be saved locally on your phone, as long as there was at least an attempt to publish it. nine0003
To do this, select the photo you want to edit and make changes (or add a filter to it) as usual, and then click "Next" in the upper right corner of the screen.
When you get to the screen where you can enter a description, add a location, and more, turn on Airplane Mode. You can do this on iPhone by swiping up from the bottom to open the Control Center, or swiping down from the top on Android to access switching shortcuts. nine0003
Go back to Instagram and click Share.
Obviously the photo won't post successfully and you'll see a small banner that says "We'll try again when the connection improves". After that, the edited photo will be saved locally on your phone.
Then just click the "X" button to the right of that little banner to completely cancel the download.
Then click "Delete" when the pop-up window below appears. This will prevent you from trying to download Instagram again after turning off Airplane Mode.
After that, you can turn off Airplane Mode and enjoy your Instagram edited photos without having to post them to Instagram.
The social network Instagram quickly gained popularity due to its simplicity. The user just needs to take a photo on a phone or tablet, process it using the tools built into the application and upload it to his account so that the whole world can enjoy it. nine0003
Many people use Instagram to view the profiles of celebrities, big stores or just interesting users. Sometimes you want to save an Instagram photo to your computer in order to add it to your collection, but you can’t do it in the standard way (by right-clicking on the photo and selecting the appropriate item). The developers of the service in a similar way take care of the copyright of users on images. At the same time, bypassing this limitation is quite simple, and in this article we will consider several ways to do this. nine0003
Contents: 1. How to save photos from Instagram to a computer without third-party services and applications - Video instruction 2. Saving photos from Instagram on a computer using third-party services 3. Extensions and plugins for saving photos from Instagram
Installing additional applications and extensions on a computer, as well as using unfamiliar services on the Internet, is always dangerous, given the number of viruses and scammers.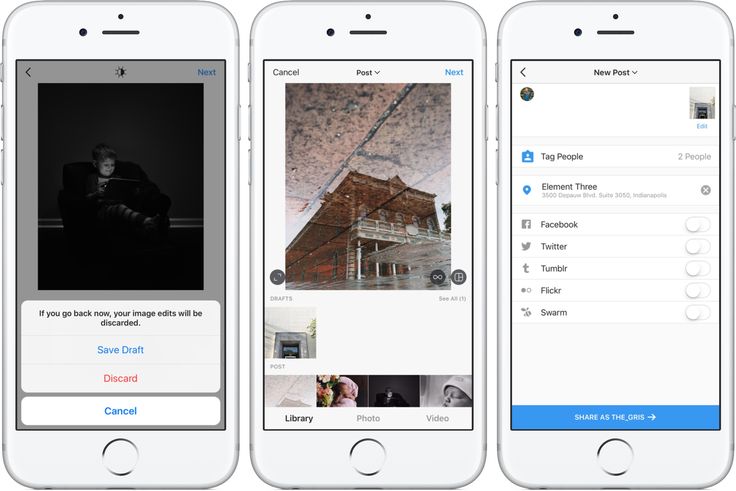 At the same time, most often such basic actions as saving information from a page can be done without third-party intervention, for example, saving a VKontakte audio recording. nine0007 You can also save a photo from Instagram to your computer through the page code, and for this you need to do the following:
The instructions above are for the Google Chrome browser, but similar actions can be done in any other browser by defining the button for viewing the HTML markup of the page.
Interesting fact: When you open a photo in a new window, you will notice that the favicon in the browser tab is the icon of the social network Facebook, not Instagram. This is due to the fact that Facebook has completely bought Instagram, and it is on its servers that all user photos are located. nine0011
There are dozens of sites on the Internet that allow you to save a photo from the Instagram social network to your computer without any problems. Such services can be arranged in different ways:
 The user will be able to upload new photos, like photos, subscribe, unsubscribe and save images. nine0082
 Above are not the only services for saving photos from Instagram. But it is important to remember that for such actions it is better to use trusted sites so as not to lose access to your social network account. If you do not need to bulk upload photos, you can use sites that download photos to your computer from the corresponding link from Instagram without authorization.