Something I noticed when posting to Instagram from my desktop was that the image quality was significantly worse than the version I had uploaded, with the blurred image inevitably getting less than favourable engagement. After some thorough research though, I’ve managed to compile some reasons as to why Instagram might be reducing the image quality on your posts.
There are a few reasons why the image quality is reduced when uploading directly from your PC, one of which is that you are not following Instagram’s max resolution guidelines, which is currently set at 1080 x 1350px. Any image that is greater than the said resolution will be made smaller by Instagram and thus may affect the quality of the image.
Secondly, it also depends on the format of the image that you are using. Instagram’s default format for images is JPEG (.jpg), meaning that any image that is uploaded in PNG (.png), BITMAP (. bmp), or anything other than JPEG, will be converted to JPEG and as such loses some of the quality during the conversion.
When you consider the number of images that are being uploaded to Instagram every single day and the server power that is needed to run the platform, you’ll soon forgive Instagram for reducing file sizes where possible. Try to keep your image file size to a minimum (without affecting image quality) to avoid having it be poorly compressed by Instagram.
Last but not least, Instagram is predominantly a mobile-based app, and as such prioritises uploads from mobile (or tablet) devices when it comes to quality. This means that images uploaded via your desktop, such as with the developer tools method, can sometimes see a reduction in image quality when uploading to Instagram.
For many people, who take pictures of themselves, their dog or the local beach, image quality doesn’t really tend to matter. However, if you’re a creative like me who designs content for their business and wants to establish themselves as a professional, then maintaining quality with your uploads is very important.
I like to create my Instagram content using Photoshop, but the same principles will apply to whichever photo editing software you are using. In Photoshop you will want to set up a new file or artboard and set it to Instagram’s maximum resolution (1080 x 1350px). Once you have created your design, you need to go to File > Export > Save For Web (Legacy)…
For those that don’t know, saving in this way will allow you to alter the quality and file size of your final image. In the top right of the Save For Web window, under Preset, you will want to select JPEG as the file type.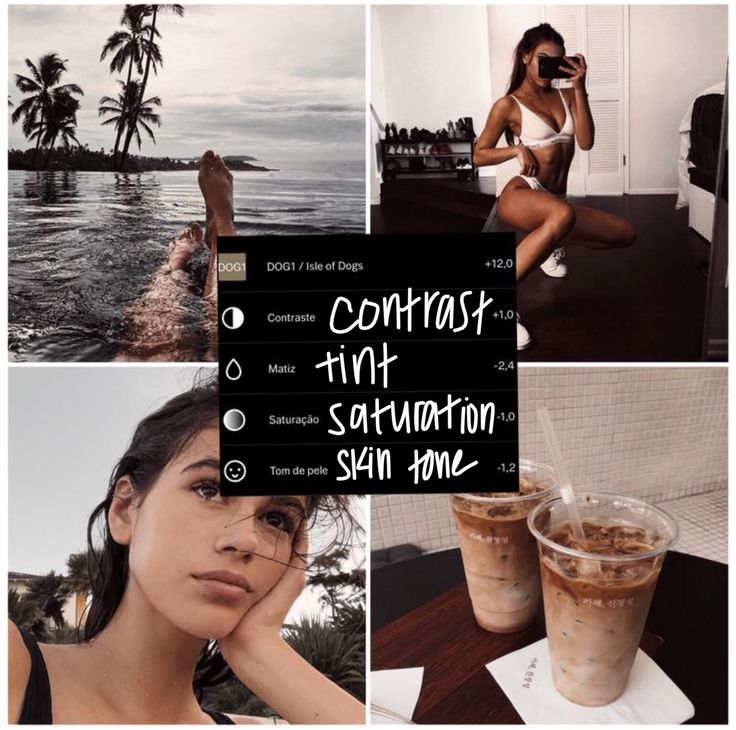 Below that, you can change the overall quality of the image, starting from Low all the way up to Maximum.
Again, the reason for lowering the quality of the dropdown is to reduce the file size of the image and thus avoid Instagram taking the compression into their own hands. You can monitor the size of the image in the bottom left (above example: 837.8K).
A lot of the time, you will actually find that the Very High or High setting reduces the file size significantly; without actually affecting the sharpness of the image itself. You will want to choose the setting that achieves the best balance between the two.
Once you’re happy with the image file size and quality, you can hit the save button to save it to your computer. Following that, you will want to upload your new image to Google Drive where you will then download it to your mobile (or tablet) device. You can then upload the image directly to Instagram from your mobile.
If you really want to make the most of your post and get as much engagement as possible, then you’ll want to also check out this ultimate guide I wrote for using hashtags on Instagram.
Instagram can often reduce the quality of your images during uploads for a wide number of reasons, but if you’re looking to maintain quality then you should look to upload a high-quality, compressed JPEG file (max resolution: 1080 x 1350px) directly from your mobile or tablet to avoid any further compression by Instagram.
You can follow me on Instagram here!
Have any feedback or questions about this post? Let me know in the comments below!
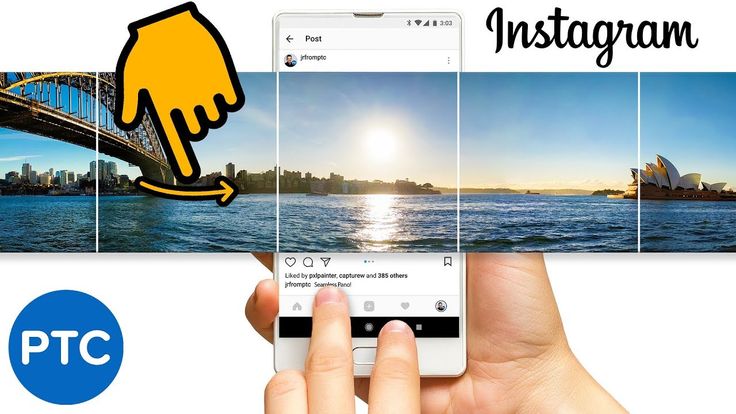
Did you find this post on improving the image quality of your Instagram posts helpful? If so, I would be very grateful if you could pin this image to Pinterest!Instagram has always been about effortless photo sharing, never about uncompromised image quality. Your 12-megapixel iPhone photos may look nice on Instagram but look closer, and you’ll realize that all your uploads have been downscaled to fit 1080 pixels horizontally. The same goes for Instagram’s desktop app, which displays your uploads reduced to just 640 pixels wide.
If you want to avoid compression that occurs when uploading an image to Instagram in an unsupported resolution, follow the instructions laid out in this step-by-step tutorial.
According to the Instagram Help Center:
When you share a photo on Instagram, regardless of whether you’re using Instagram for iOS or Android, we make sure to upload it at the best quality resolution possible.
Things are a bit more complex than that, though. In Instagram talk, “the best quality resolution possible” really means up to a width of just 1080 pixels. Yup, 1080 pixels. You read that right.
If you upload a photo between 320 and 1080 pixels, no resizing will take place. As long as the aspect ratio is between 1.91:1 and 4:5, it’ll appear on Instagram without compression. Share a higher resolution image, and the system will size it down to 1080 pixels horizontally.
If the aspect ratio of your photo isn’t supported, it’ll get cropped to fit a supported ratio.
 91:1 and 4:5).
This can all be very confusing, but don’t worry about a thing as we have you covered. Just follow along with us as we explain how to avoid compression when uploading your Instagrams.
In order to avoid triggering Instagram’s downscaling algorithm that may result in compression artifacts, you must first resize your photo to Instagram’s preferred width of 1080 pixels and an aspect ratio between 1.91:1 and 4:5. Otherwise, Instagram will recompress and resize your image.
There are plenty of options on the App Store for resizing iPhone images. For the purpose of this tutorial, we’ll be using the free Image Size app, but you can use any app you like.
1) Open the Image Size app and tap the big white frame to add your desired picture from the Photos app.
2) Make sure pixel is selected and in the width and height box, enter one of the following:
 91:1 (800 x 418)
As you can see that we aren’t exceeding Instagram’s maximum width of 1080 or maximum height of 1350, its compression algorithms should leave it untouched.
3) Tap the save arrow button to have the final Instagram-perfect resized image in your iPhone Camera Roll.
And that’s it, you now have the correct version of your original image in the Photos library conveniently sized down to a width of 1080 pixels. All that’s left to do at this point is fire up the mobile Instagram app on your iPhone and share the resized image.
Because the image now fits the required dimensions, no compression will take place.
Of course, nothing prevents a power user from using pro tools on their Mac or Windups PC, such as Adobe Photoshop, Pixelmator, Affinity Photo, and so forth, for image resizing. Upon saving the sized-down version to the computer, you could quickly transfer the file to your iPhone via AirDrop, ready to be uploaded to Instagram.
If you’re the type of person who cares a lot about image quality or you manage a business account on Instagram, a little bit of planning will go a long way toward ensuring your Instagrams look their best rather than exhibit those ugly compression artifacts.
Check out next:
Many people say that Instagram compresses photos and degrades the original quality of images. If you use the platform only to chat with friends, then the decrease in clarity may not interfere with the publication of frames. However, detail is important when you are promoting a brand and business, posting photos from photo shoots, and creating a beautiful feed. Today we will tell you what determines the clarity of the picture and how to upload a photo to Instagram without losing quality. nine0003
In order for photos to be displayed without cropping or compression, you must set the appropriate photo format and size. The rules of the social network spell out the required frame proportions and resolution for posts, stories, and even profile photos.
You can post photos in different orientations in the feed. You can upload a vertical, horizontal or square image. In the profile, all content will be displayed in the form of a square, but when you open a picture, Instagram will show the original frame without cropping. nine0003
To ensure that images do not lose quality, you need to set the correct aspect ratio:
What happens if I upload an image "as is" without setting the resolution? When posting photos with a width of less than 320 pixels, Instagram will automatically increase the image resolution. Because of this, digital noise and pixelated areas will appear in the photo. nine0003
When uploading large photos, the social network will reduce the width to 1080 pixels. In this case, the detail and contrast of the photo may decrease.
How publications will look in different layouts
In Stories, for the correct display of the image, you need to publish content with a vertical orientation. Horizontal or square footage will either be framed with black borders, or they will adjust to the predominant color of the image.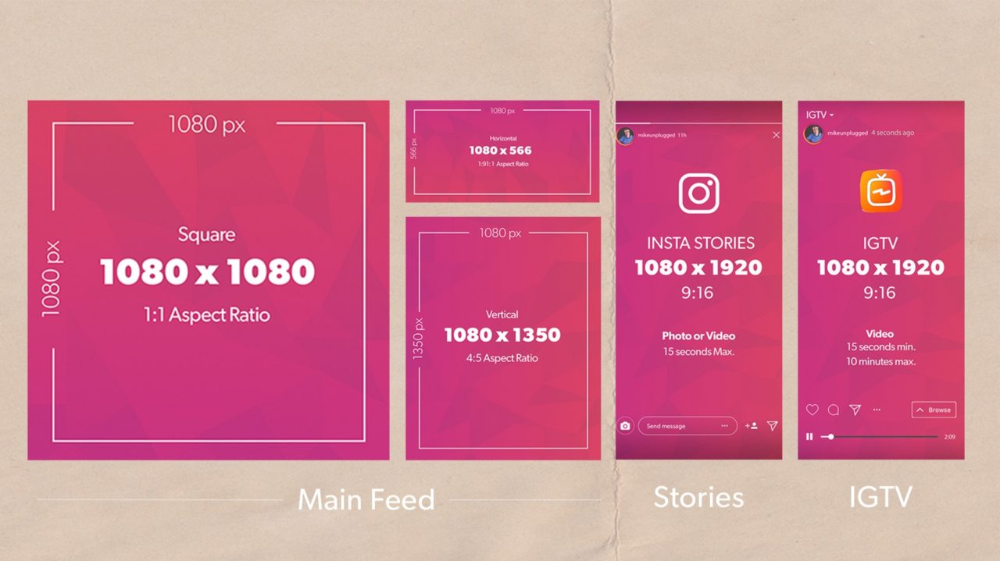 nine0003
Required properties for stories:
And by the way, photos will be displayed in stories for 5 seconds. You won't be able to change the media duration.
How pictures look in different positions in Stories
The profile avatar in the social network is displayed as a circle, but a square picture is uploaded to the server itself. It's best to crop the shot yourself, as the platform automatically removes the edges of the image and can cut off important parts of the frame. nine0003
The size of the avatar depends on where the profile is opened:
Automatic cropping of photos with different aspect ratios
Basically, the quality depends on the original resolution of the image. Also, the following criteria affect the clarity of the photo:
To optimize the image from your phone, you can use special applications. Good options for Android and iPhone would be InstaSize and NoCrop . For Android users, there is also a good software A Better Camera . All these utilities allow you to maintain the original proportions and upload pictures without white borders, help you avoid blurring the picture and scale the photo correctly.
We will look at how to post photos on Instagram without losing quality, using the example of the application A Better Camera . It will allow you to expand the standard capabilities of the main camera, set the appropriate aspect ratio and get high detail. nine0003
You can download the application for free from the Google Play Market. Then we act according to the algorithm:
1. You need to launch the application and swipe from top to bottom. In the menu that opens, select "Settings" and go to the "General settings" - "Shot size" section. Here you can choose the appropriate resolution for Instagram.
The higher the Mpix value, the higher the resolution.
2. Next, you need to go back and open the Screen Settings tab. You can display additional items in the start menu: battery power, grid, various modes, etc. nine0003
Options will allow you to control the quality of the photo
3. Then you need to exit the settings and swipe down again. Open the "Scenes" tab and specify the desired option: portrait, landscape, sports, etc. The software will automatically set the appropriate exposure, contrast and exposure settings. In fact, you need to choose a thematic filter in order to better convey the atmosphere of the frame and avoid graphical defects.
Available scenes
4. Click on the "Focus" option. If you need to shoot small objects, it is better to switch to the "Macro" mode. For other situations, "Auto" is suitable. nine0003
Available options
5. Next, you need to return to the start menu and click on the modes icon in the lower right corner. Here you can select automatic shooting, create a panorama, a tool for removing unwanted objects, applying an HDR effect, or night mode.
The option is marked on the picture
6. After saving all the settings, you need to tap on the screen in the place where the lens should be focused. Click on the camera icon to take a photo. The result will be saved to the gallery. Now you can upload it to the platform through the Instagram mobile app. nine0003
Now it's clearer how to upload photos to Instagram without quality loss. The original low resolution affects the clarity of the pictures. In such cases, Instagram will automatically enlarge the image and make it blurry and pixelated. A large image will in turn be reduced, and this can reduce the detail and contrast of the photo.
Before publishing, be sure to adjust the aspect ratio in the software, otherwise the frame will not be displayed correctly in the feed. You can use InstaSize, NoCrop and A Better Camera. To find other useful applications for working with photos and not only, it is necessary to read reviews of programs. So you can find the best solution for various tasks and get acquainted with all the features of the software. nine0003
If you follow the requirements of the social network, use special applications for optimization, you can guarantee a perfect image in the feed.
Android I/O Instagram iPhone As an advertisement
Despite the fact that Instagram is used by millions, often instead of a beautiful photo in the feed you can see a blurred spot. The reason for the distortion is that developers protect servers from overloads. By default, images are compressed to be displayed on the screens of any device. Therefore, bloggers who want to make a super-beautiful feed should know how to do it so that Instagram does not spoil the quality of photos. We offer several ways to save photos from compression. nine0003
Instagram compresses photos before posting, thereby spoiling the quality of the photo. Such photo optimization occurs when using a mobile application and a desktop version of a social network.
Developers promised users to save images in the best quality on any operating system - iOS, Android. But by the highest quality, users and developers understand different things. Instagram considers a quality image to be 1080 pixels wide.
If you upload a photo that does not meet the required parameters, the Insta algorithm optimizes it, thereby spoiling the quality. nine0003
There are optimal image parameters:
- Instagram will not spoil the photo quality at a resolution of 320 to 1080 pixels.
- Safe aspect ratio options, 4:5 and 1.91:1 ratios.
— File size must be no more than 30 MB.
- The most suitable file formats are JPG, PNG.
To make the cover of the post look in the feed in accordance with the idea, and Instagram did not ruin the quality, try a few of the methods below. nine0003
To prevent Instagram from spoiling visual content, do not upload pictures without preparation. After opening the Gallery, select the photo you want to publish. Depending on the smartphone model, the option may have a different name, but in most gadgets you can find the "Crop" command. Bring the size, aspect ratio of the image in accordance with the requirements of Instagram. To get started, just do this. If Instagram spoiled the quality of the picture, you will have to try the following methods. nine0003
The social network provides three image formats for posts: vertical, horizontal, square. When uploading a photo through the Instagram app, test the built-in options. Start by cropping, changing the format. To prevent Instagram from spoiling your photos, remember the size requirements. We offer a summary table. Save so you don't lose. Use when preparing content.
The easiest and fastest way to edit a photo is to use special applications.
When searching and choosing a program, read the latest user reviews. For the correct operation of the application, it is necessary to update, bugs are fixed. Otherwise, they will not perform their functions. Carefully read the terms and reviews of paid programs. There are reviews of fraudulent schemes on the Internet: users buy an application, download it, but it does not work.
This method is not comparable to professional editing with software, suitable for general users. A couple of clicks and you're done.
We offer a selection of applications for preparing photos for publication on Instagram, without losing quality:
- InstaSize. Working version for Android and iOS smartphones. Process photos saved in the cloud storage or phone gallery, shoot directly on the camera. In addition to editing and optimizing images for posts, you can make stories. nine0003
- Prisma. Offers not only cropping and optimization, but also a filter that makes pictures in the style of popular artists.
Snapseed. Filters, brushes, point changes in pictures. Program from Google.
- VSCO. Filters, photo sharing platform. The ability to create an individual preset, use it for multiple images.
- Canva. The most popular online service for creating photo and video content for Instagram. Canvas will help not only publish a picture so that Instagram does not spoil the quality (compress the size, change proportions), but also add inscriptions, decorative elements, backgrounds using templates. The service offers ready-made solutions for the design of photos, videos, Stories, animated publications for various social networks. There are free and paid features. Most bloggers get by with the free portion. nine0003
The Instagram version for the iOS operating system has more options for photo editing, editing Stories, posting. Almost all image editing programs for iPhone are of high quality and work properly. Developers of many applications are trying to make a version for Android. It doesn't matter what software you use. Finding a quality editor that will help you create beautiful feeds is not difficult.
Mobile apps are no match for editors. The quality of processing increases significantly when using these popular programs: Adobe Photoshop, Lightroom. Photographers use exactly this software to create beautiful works. Color correction, one of the most important stages of photo processing, is carried out with the help of Photoshop and Lightroom.
- Adobe Photoshop. Software designed specifically for working with photos. Lots of features, brushes, commands. The disadvantage is the complexity of the software. To create beautiful works, you will have to understand the intricacies for a long time, learn how to work with tools. However, YouTube offers thousands of video tutorials of varying difficulty levels. You can find a lesson on any image manipulation. nine0003
- Lightroom. It is used as a separate tool and means of primary photo processing before further work in Photoshop. Color correction is performed, sharpness is adjusted, proportions are changed - this minimum is enough for publication on Instagram.
Ordinary users of social networks need cute, emotional, bright post covers. Subscribers will not look at every pixel of the image of a lifestyle blogger, an online store. The content of professional photographers is subjected to such an analysis. nine0003
What should I do to attract customers to photo shoots? First of all, remember the rules for publications. The next step in attracting customers can be your own website, where you post pictures in maximum resolution, large size.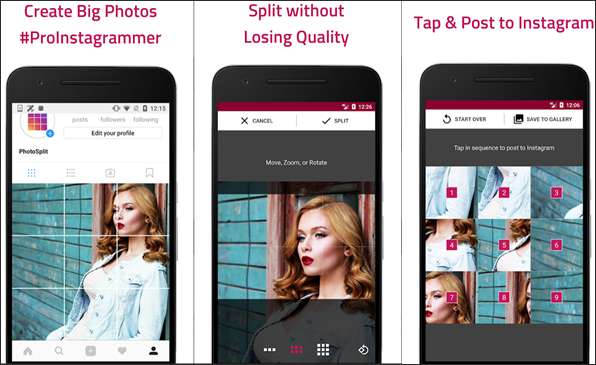 The site will not spoil the quality without special optimization settings.
A novice photographer or blogger who does not yet have enough funds to develop a site can store his work on portfolio sites (Behance), file hosting, cloud storage. And to share a link to a portfolio, create a landing multilink. This is a mini-site with links to all projects, portfolios, as well as contacts of the author. nine0003
The Hipolink multilink service is a great start. Create a page (it's free), place contact information, links to portfolio.
Hipolink also offers:
— Messenger buttons in corporate colors, with logos. Customers will be able to start a chat in any messenger by clicking on the button.
- Dozens of design options.
— Tools for collecting visitor statistics (Google Analitics, Yandex.Metrika, Vkontakte Pixel, Facebook Pixel). nine0003
- Placement of buttons for online services, including Behance, cloud storage.
At first glance, it may seem that a stylish feed and regular stories, a little Reels and a lot of advertising are needed for blog popularity and monetization. But it is not so.
How should the path of turning a user into a customer look like:
— A person visits your page. He sees the profile header, reads a profitable offer. Highlights the features that make you different from others. nine0003
- Scrolls the feed for a few seconds (from 3 to 7).
- Views the "Recent" section. It is extremely important to complete this section. Chaos and lack of order spoil the impression and move away from the purchase of a service / product. Place in the Current portfolio, working conditions, prices, reviews. Section about you as a specialist. Also collect catchy stories-series in one folder "Actual".
- Sees a multilink in the profile header and a call to follow it.
- When clicked, it gets to the mini-site, sees a welcome text there, answers to frequently asked questions, order conditions, examples of work (link to portfolio), a button to go to the chat (which means that the message will not be lost in Instagram Direct).