Follow these steps to create and send out a WhatsApp Form in just a couple of minutes.
And that’s it, You’re done!
What Types of Forms Can I Create on WhatsApp?Whether you need to create an online order form, a signup form, or any other, a WhatsApp form is a great way to make sure you get the answers you need. There are two basic types of forms you can make with Opinion Stage: standard and interactive. These are the differences between them:
Standard FormWhen you want to have all your fields on one page a standard form is your best bet. It’s quick and simple to create and gets your questions asked in one space.
Here’s an example of a standard event registration form you could share with potential attendees over WhatsApp:
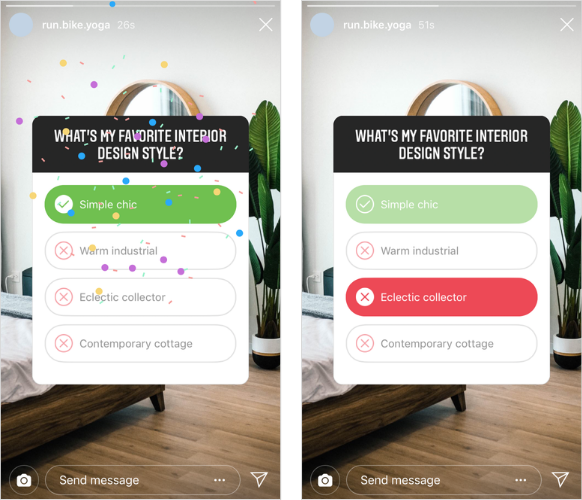
Interactive FormAn interactive form presents every question in a separate card and allows you to add images to every question. Filling in forms can be tiresome, which is why people often avoid them or give up in the middle of the process. Interactive forms are less intimidating and more fun. As a result, response and participation rates are much higher.
When creating an interactive form, you can customize the question flow for each user by applying skip logic to determine which question each user will see next based on their previous answer. After you publish your form and share it on WhatsApp you can also use the drop-off report to optimize your form by analyzing where respondents lost interest and improving it accordingly.
Here’s an example of an interactive referral form you could share over WhatsApp:
Tips for Creating Forms on WhatsAppSince you’re sending your form out on WhatsApp your respondents will probably answer it on the go and on their phone. This means their attention span may be short, as they are probably surrounded by distractions. So, keep it short and simple.
If your questions are clear and easy to understand, respondents won’t have to make an effort to figure out what you want from them. Also, it’s important to define what pieces of information you really need. For example, if you are only targeting people in one country, do you really need them to fill in a country code when adding their phone number?
Tip: Don’t forget to set the essential questions as mandatory and leave the nonessential ones as optional to make sure you get what you need without losing your respondents in the process.
You would be surprised how much good images can improve conversion rates. If a user sees an appealing image at the start of the form-filling process, they’re more likely to engage with it and complete it, especially if they encounter additional beautiful images along the way.
However, it’s important to make sure that the image and question work well together.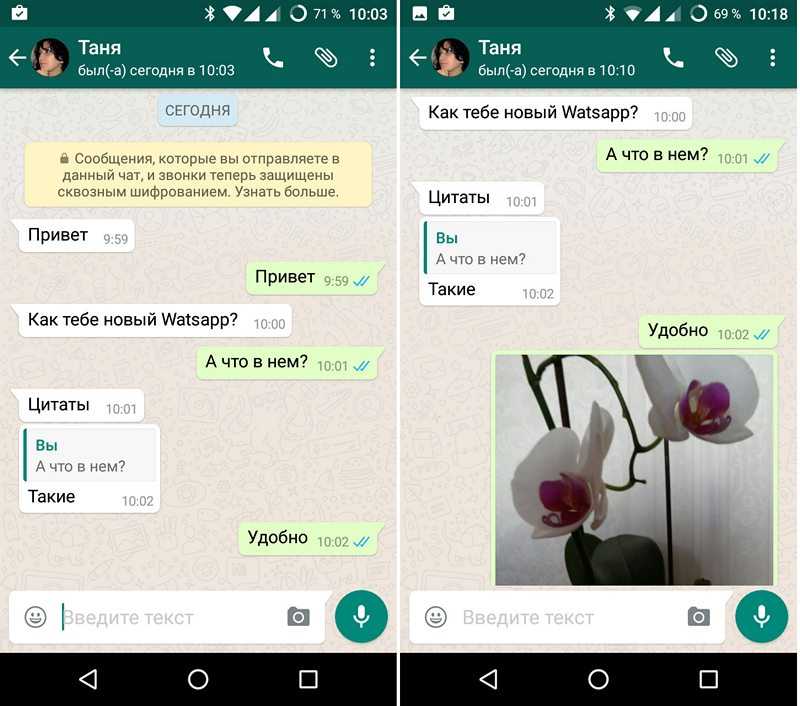 Try selecting images that are eye-catching but also add context to the question or topic.
Tip: With an interactive form you can add a different image to every question which will make filling it in so much more fun!
Once you start receiving responses to your form you’ll probably want to act on them, add respondents to your mailing list, update the attendence list to your event, etc. There are two important parts to that:
In order to get notified about submissions, all you need to do is configure notifications on each submission in the form’s settings, and you’ll get an email whenever a new form is submitted. To organize responses, you could easily export form responses to Google Sheets or Google Docs. Or, you could integrate your forms with your CMS/CRM, HubSpot, or MailChimp to collect all your results in one place.
Why reinvent the wheel when you can build off of an existing template with suggested questions and images you can use.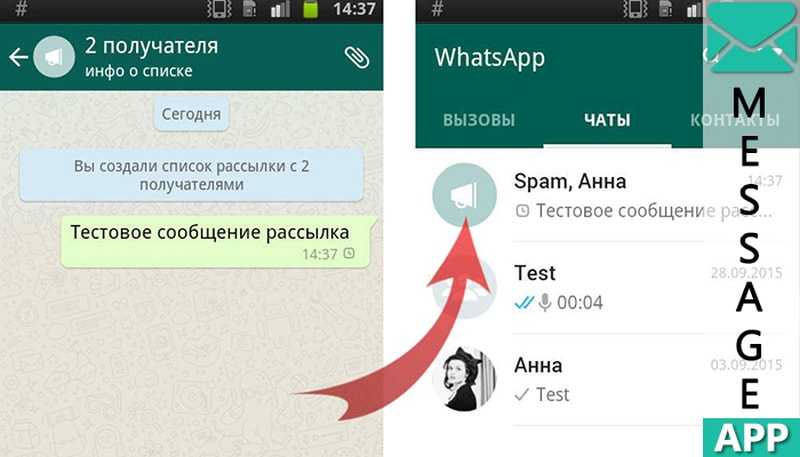 Our template library is full of pre-designed and configured form templates organized by useful categories. Use them for inspiration or as a starting point for creating your own WhatsApp forms.
You can configure every aspect of WhatsApp forms, including sizes, colors, and fonts. You can even add your own logo to it. Use this opportunity to get your brand out there!
Why Use WhatsApp Forms?
With over 2.5 billion active users and more than five billion downloads, WhatsApp is one of the most popular messaging apps in the world. As such, it’s an excellent way to get your respondents’ attention quickly. If you build your form right while keeping your audience in mind, you’ll probably be able to reach a lot of people and get quick answers.
What is the Best Alternative to Google Forms?
If you want to maximize completion rates of your forms the best alternative to the basic Google form is to build an interactive form with the Opinion Stage form maker. It’s super easy and quick to use and enables you to send out an engaging form that offers an enjoyable experience.
How to Create a WhatsApp Form?
Start by using our form maker and form templates to create your form. After your questions, answer options, and images are all in place, simply click on ‘Publish’ and share a link to your form on WhatsApp (follow the instructions above). Share your form in private conversations or in group chats. depending on your need. And then sit back and wait for the responses to start flowing in.
This article describes how to setup WhatsApp message responses so that a WhatsApp notification will be sent each time a new row is inserted into a Google Sheet containing Google Forms responses, i.e. on future Google Form Submits.
Step 1
From your Google Form response sheet, start the WhatsApp Sender add-on by clicking Extensions > WhatsApp Sender > Start.
This will open the WhatsApp Sender sidebar.
NOTE: In order for messages to be sent automatically on a Google Form submit, it is important that one of the fields on your Google Form is the phone number of the recipient and that this is set as Required (see the screenshot below).
Step 2
From the Sheet drop-down, select the sheet containing your Google Forms responses.
Step 3
From the WhatsApp Number drop-down, select the column containing the recipients' phone numbers.
All cells in this column must have a valid phone number (except the column name of course). For information on formatting phone numbers, please refer to this article.
Step 4
Write your WhatsApp message.
Step 5
Add personalized fields to your WhatsApp message by clicking in the desired location within the message template, selecting a field from the Add Personalized Field to Message drop-down and clicking Add.
Repeat this step for all required personalized fields.
Personalized fields are the column names found in the first row of data in your Google Sheet, i.e. the questions from your Google Form. You can further customize your WhatsApp message by formatting the message text and adding attachments.
Step 6
Click Auto Send.
This will open the Send Messages Automatically dialog box.
Step 7
From the Send a Message on a Google Form Submit drop-down, select Automatically send a message.
NOTE: You will only be able to select Automatically send a message from the On a Google Form Submit drop-down if you selected a sheet containing Google Form responses in Step 1.
Step 8
Click Save to apply changes.
Step 9
Once you have configured auto send, you have two options:
A. Send Messages: This will activate automatic WhatsApp messages. Future Google Form submits will now receive an automatic WhatsApp message in response.
B. Send Test: This will give you a good idea of how your WhatsApp message will appear to recipients, before activating automatic WhatsApp messages. It will send a test message based on the first row of data in your sheet (that is row 2 since row 1 only contains column names).
Select one of the options above.
NOTE: Your message template will only be saved when you click Send Messages or Send Test.
Deactivate Automatic Messages
To deactivate automatic WhatsApp messages, click Auto Send on the WhatsApp Sender sidebar.
In the Send Messages Automatically dialog box, select Do nothing from the Send a Message on a Google Form Submit drop-down, and then click Save to apply changes.
Google Forms is a completely free tool for creating polls, polls, and quizzes. Despite a fairly simple interface and a simplified constructor, the service allows you to create interactive surveys of almost any complexity.
There are many add-ons that significantly expand the functionality of the service. For example, you can automatically check responses or get additional statistics on all responses. But first things first. nine0003
Join our Telegram channel!
Google Forms provides the following benefits:
 You can get statistics immediately after completing the survey / voting / research.
 Disadvantages of Google Forms:
The service will help you create interactive feedback forms for:
See also:
Google Analytics 4: The Complete Beginner's Guide
Open the service and click the "Empty File" button:
To create, click on the "+" sign There are also templates in the service interface. If you want to create a form based on a pre-made template, take a look at the options that appear on the main page, or click the Template Gallery button. nine0003 Opening the template gallery
Here are all the templates that Google Forms has in 2021:
Several ready-made options are available. Based on them, you can create your own by simply replacing the proposed dataTo create a new form, you must press the "Empty File" button and go to the settings.
In this section, the main work happens: you create and add responses.
If you have a list of ready-made questions, you can immediately download it by clicking the "Import Questions" button: nine0003 Click this button to copy multiple questions.
We are creating a form from scratch, so we enter its name ourselves and give a brief description:
Enter the name of the first questionInsert an image if necessary:
Adding an image directly to the questionThere are six ways to add an image:
 Just drag the image icon into the window.
 Back to creation. To customize the question items, click on the "One from the list" button:
By default, only one answer must be selected from the list ofA drop-down menu will appear to help you set the form options:
Question menu allows setting parametersLet's analyze the settings in the drop-down list in more detail.
Text (string). Use this option when the user must provide a short answer, no longer than one line. For example, phone number, name, email:
Text (paragraph) suitable for detailed answers One from the list. Choose if there is only one correct answer. nine0003 "One from the list" is suitable when the user must give one answer
A few from the list. The user will be able to select multiple answers: Alt: "Several from the list" will allow you to select one or more options in the form
"Multiple from the list" will allow you to select one or more optionsDrop-down list. If your question has a lot of answers, this option will help to visually reduce it:
Drop-down list is relevant for questions with a large number of answersFile upload. If your question involves the user sending files, then be sure to activate this option:
"One of the list" is suitable when the user has to give one answer Files will be automatically copied to their Google DriveScale. Activate this option when you want to receive feedback from the user on the quality of the goods or services provided. The user will be able to rate from 1 to 10 points:
Enter the minimum and maximum score Grid (multiple choice and checkbox grids). This function allows you to select the required number of rows/columns:
Alt: By
User will see rows and columns with answersThe date. Useful if you want to specify a date without time:
The date is specified in the format day/month/yearTime (hours/minutes) is configured in the same way
Let's return to the global form settings. If the answer to the asked question is mandatory, check the box "Required question":
For example, you want only the customers of your company to take a survey. The first obligatory question can be made “Have you used the services of the company?”. If the user answers “No”, then he will not receive access to further questions.
On the same screen, you can quickly copy a question or delete it:
These buttons are used to copy and delete questionPay attention to the button with the vertical ellipsis "⋮":
"⋮" button allows access to optional settingsBy clicking on "⋮", you can:
Pay attention to the side menu:
Side menu allows you to manage question parametersWith this menu you can:
See also:
Google Search Console guide: service overview
To improve the look, click the "Customize Theme" button:
Access to appearance settingsThis will open a side menu on the right, where you can select a header image, theme color, background color, and font style:
Customizing the external representation of the themeThere are many free images available for the header, sorted by theme: nine0003 In addition to ready-made images by topic, you can add your own: from a computer or find it in Google Photos
In the "Responses" section, you can follow all the responses that come from users:
No responses yetIf you want to close the form, move the "Accept answers" toggle switch to an inactive position:
We have disabled responses. Users will see a message that the poll is closed
 To open additional response settings, click the "⋮" button in the upper right corner: nine0003 Opening additional response options
In advanced response settings, you can:
nine0002 See also:
How to personalize cold emails: 5 working templates, 1 anti-example and expert advice
Here are the global Google Forms settings:
Settings for tests, answers, presentations Test. Google Forms supports tests. This means that teachers and other professionals can use Forms to create tests that are not tied to a timer. Just activate the "Test" checkbox (see screenshot above). nine0003
Pay attention to additional test settings: publication of grades, settings for respondents and general survey parameters:
Grade publication setting available (automatic or manual)The tools are convenient and thoughtful, but testing for a while will not work. Because of this, Google Forms is not really suitable for creating online tests. But you can solve this problem by installing an extension - for example, Form Timer.
Answers. Managing the collection and protection of responses: nine0003 You can perform various actions with answers
Presentation. This is where the form submission and responses to its questions are controlled:
Set up the view, specify the text after passing, set other parametersIn the Default Values section, you will find the following options:
Presentation. This is where the form submission and responses to its questions are controlled:
Default settings (email collection) valid for current and all new surveys The default question settings (marking all questions as required) are valid for all new questions.
Read also:
Transition to Google Analytics 4 - installation, configuration, goals
You can find these settings in the upper right corner of the screen next to your Google account avatar: nine0003
Presentation. This is where the form submission and responses to its questions are controlled:
Other Google Forms OptionsLet's consider them.
Create a copy. You can copy a previously generated form. You can also copy access settings.
Delete. The file is moved to the trash for 30 days, then deleted permanently.
Create a fill pattern. You can show other users how to fill out the form. To do this, you will need to fill it out yourself once. nine0003
Seal. Run a standard Windows print job and send the created form to paper.
Access settings. Everything here is the same as in Google Docs. Generate a link to the form, then share it with other users.
Script editor. This module is purely for developers who want to add some functionality to Google Forms.
Additions. There are hundreds of extensions here that you can use right in Google Forms. Notifications, icons, sliders, graphics, interactive elements, word maps, analytics, calendars, timers - what is not here: nine0003 If you are missing some feature in Forms, then just install the appropriate add-on
Google Forms is a simple and reliable Swiss Army knife. Of course, there are more advanced, powerful tools for working with surveys and quizzes.
But Google Forms is good because there is only the most necessary, and the interface is as intuitive as possible, not overloaded. Any user can create a survey, even one who has not dealt with such a task before. nine0003
To make Forms even more convenient and functional, we offer the 5 most useful extensions:
 Disables the form after the maximum number of responses on a specific day or time, or when a cell reaches a value you specify.
 nine0002 Comprehensive web analytics

There is no doubt that WhatsApp is one of the most popular communication applications in the world. It is used for a variety of reasons. However, some people are not aware of the methods to send PDF documents using WhatsApp for Android. In this guide, you will learn how to send PDF documents using Whatsapp. nine0003
Part 1. How to Send PDF Files Using WhatsApp on Android Phone
Part 2. Common Mistakes When Sending PDF Files Through WhatsApp
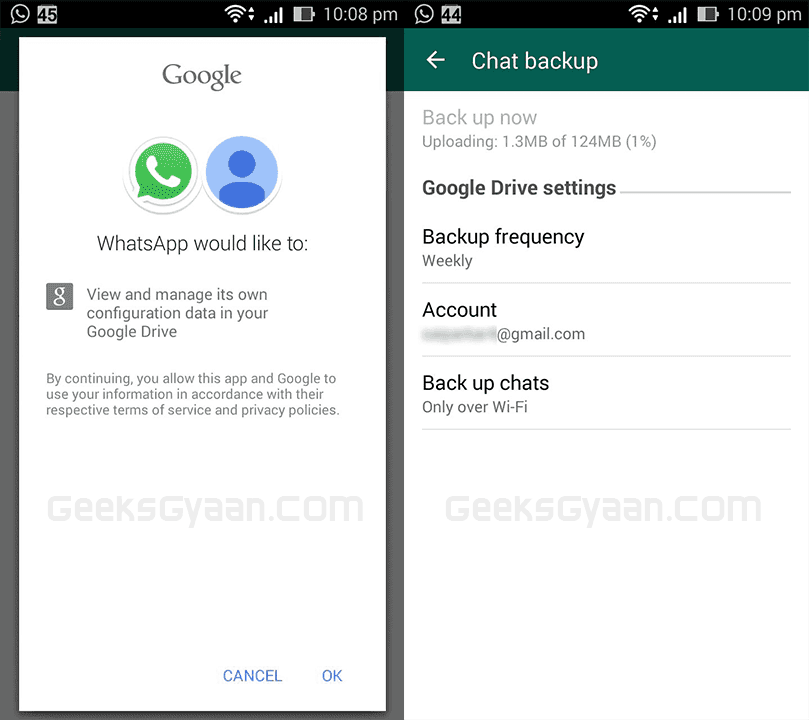
Part 3. How to Send PDF File Using WhatsApp with Google Drive
Part 4. Read and Edit PDF Anywhere on Android
latest version of whatsapp. Suppose you don't have the latest version, try installing it first. With the Google Play Store, you can download it in no time. So here are the steps to use WhatsApp to send PDF files to Android phone. nine0003
Step 1: First, open WhatsApp Messenger on your Android phone or tablet by selecting the WhatsApp icon. Now check if you are viewing the app in chat mode. If yes, go to the next step.
Step 2: Once you're on the Chats screen, find the conversation with the contact you want to send the file to. Moving on, open the contact page by clicking on it.
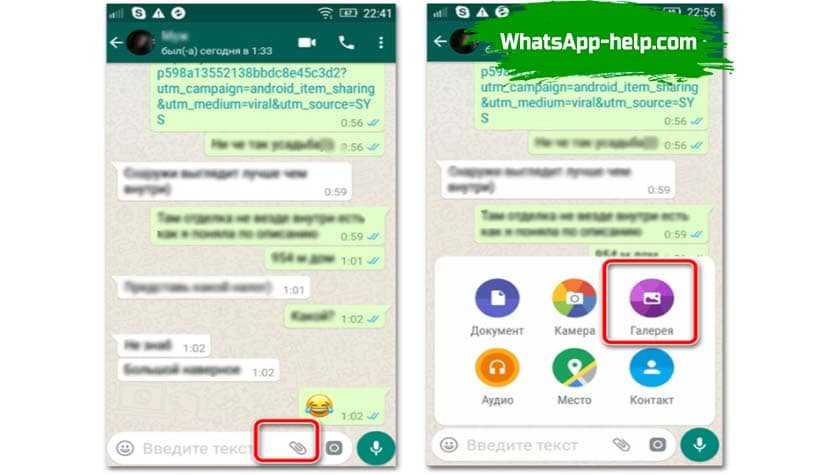
Step 3: You will now be taken to the contact page. Find the paperclip icon and click on it. In addition, you will see the sharing menu, you need to click on the document icon. nine0003
Step 4: The document screen will open when you click on the document icon. Now you can see all the pdf files here. These can be Word documents, PDFs, or any other files on your Android phone.
Step 5: If the PDF file you want to send is available on the screen, you need to click "Submit" to deliver the file to the contact you selected.
Make it easy for people to interact and communicate with PDF documents with intuitive and powerful PDF tools. nine0003
Free Download Free Download Free Download More >
There is a chance that you will encounter many problems when sending a PDF document using the WhatsApp messenger. Errors also largely depend on the mobile platform of the recipient. Well, every problem has a solution. Here are some of the most common mistakes when sending PDF files via WhatsApp. nine0003
"Xyz needs to update whatsapp to get documents" error may occur, sometimes whatsapp is updated but this error still appears.
Errors occur in some cases: "Documents cannot be sent to 'Group Name' because 'Contact Name' is in a version of WhatsApp that does not support documents." This error occurs if the device on which the WhatsApp application is installed is not efficient enough or the application is running on an older version. nine0003
One of the most common problems is "Can't send documents to 'Xyz' because 'Xyz' is on a version of WhatsApp that doesn't support them." In this case, the problem is again related to the device or the version of WhatsApp installed on it.
If you can't send your PDF using WhatsApp messenger, you can send PDF files using WhatsApp from Google Drive. Here are the simple steps for that. nine0003
Step 1: As before, open the WhatsApp app on your Android phone or tablet. Find the conversation with the contact you want to send the PDF to. Open a contact.
Step 2: Moving on, you need to click on the paperclip icon on the next screen. The icon will be located at the top of the screen. The WhatsApp sharing menu will open. When it opens, click on the document icon.
Step 3: At this point, you need to click on the three-line icon that will be located to the left of the "View other documents" option. nine0003
Step 4: You will now see the "Open Form" menu and you will be able to select a PDF file from Google Drive.
Step 5: In the last step, you need to click on Drive to attach the PDF file that is in your Google Drive account. You will be taken to your Google Drive account and there you can easily select a PDF by simply clicking on it.
Get started with the easiest way to manage your PDF files with PDFelement! nine0003
Free Download Free DownloadDownload Free
If you send PDF files via WhatsApp, chances are you'll want to view, read or edit them too. Well, here is the best PDF software on the market.
From creating a document to editing, converting or adding comments, you won't run into problems if you rely on this magical software. It is an efficient software with an all-in-one solution for working with PDF. Moving on, it has tools for filling, annotating, and signing PDF documents. Not only that, it has simple tools to customize fonts, personalize text styles, and add graphics. For beginners, it has a simple user interface. You will have no problem using the unique features of this software. nine0003
If you're thinking about commenting, it gives you a set of commenting tools so you can easily take notes and add color highlights. One of its most amazing features is high security. Your PDF document will be secure if you password protect it with PDFelement. It can completely change the way you work with digital documents. Manage your digital documents as accurately as possible. The best part about this software is that it is easily available on Android devices. Here are the steps to read and edit PDF text with PDFelement on Android device. nine0003
Step 1: First of all, you need to download and install PDFelement on your Android phone. Once it's downloaded, you need to view your PDF using the app.