While you can browse Instagram on your desktop or laptop through a browser, for a long time, the Instagram desktop website didn't offer a way to upload photos. Because Instagram is a mobile-focused service, it's bent towards uploading your photos through its Android and iPhone apps.
However, there is now an official method for posting to Instagram from your PC. And in case this doesn't work for you, we'll show you a workaround that lets you post to Instagram using Chrome. This works on Windows, Mac, or a Chromebook—as long as you have access to Google Chrome. Here's how to post on Instagram from a laptop or desktop.
As of late 2021, Instagram now allows you to upload photos to your account using its desktop website. While it took a while to roll out, it should be available for all users at the time of writing.
To upload from your computer, just log into Instagram. com and click the Plus button in the top-right corner. This will bring you to a screen where you can drag and drop photos from your PC, or click the Select from computer button to browse for them. From there, you can perform basic edits, apply filters, and add a caption.
This is the best way to add photos to your Instagram account using a computer. In case it's not available for you or you want to try a workaround, you'll find instructions on how to post to Instagram using Chrome below.
To start, open Instagram.com in Google Chrome and make sure you're logged into your account. Then right-click anywhere on the page and choose Inspect to open the Developer Tools panel. You can also use the F12 key on Windows or Cmd + Option + i on a Mac, if you prefer.
This will open Chrome's Developer Tools panel on the right side, containing a bunch of HTML and other page details.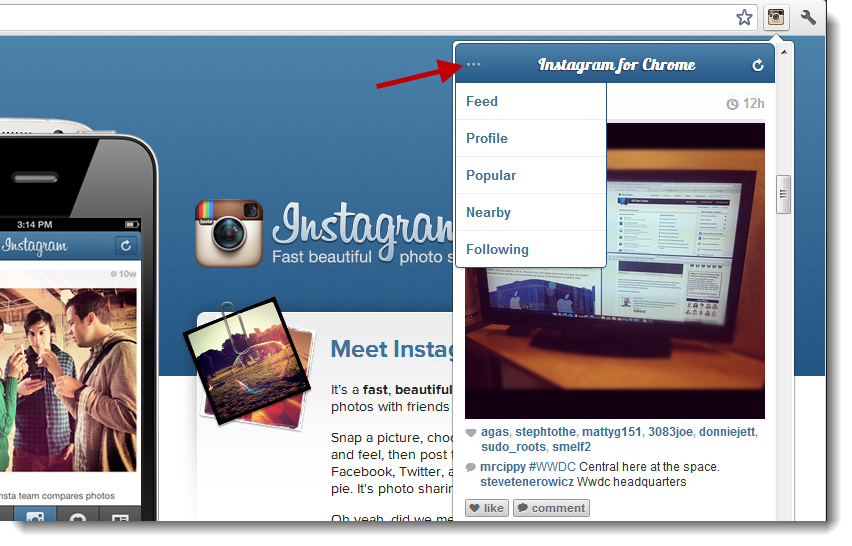 But you don't need to worry about any of that.
In the top-left corner of the new Developer Tools window, you'll see an icon that looks like a phone next to a tablet. Click on this to switch to mobile view—you can also use the keyboard shortcut Ctrl + Shift + M on a Windows PC or Cmd + Shift + M on a Mac.
This mode effectively tells the website that you're using a mobile device. You'll thus see the interface switch to something that's a lot like you're used to seeing on Android or iPhone. Keep the Developer Tools panel open to continue using the mobile interface, as closing it reverts to the normal desktop view.
At the bottom of the screen, with mobile view enabled, you should see the various icons for Instagram's different tabs. If you don't see this row of icons, refresh the page (F5) and it should appear.
Click the Plus icon in the middle of that toolbar to upload any photo from your computer using File Explorer or Finder.
By default, Instagram only lets you upload a few image types, including JPEG. If you want to upload a PNG or another type of image, you'll need to make a small change first.
On Windows, click the Custom Files box in the bottom-right corner of File Explorer and change it to All Files. If you're on a Mac, click the Options button at the bottom-left of Finder and change the Format box from Custom Files to All Files.
After you select your image, you have some options on the Edit tab. If your photo is larger than Instagram's standard dimensions, you can drag it around to frame the picture as you wish. Use the Rotate button at the bottom-right to spin it 90 degrees at a time. Click the full-size button in the bottom-left to toggle between the full width or a square size (if applicable).
Swap to the Filter tab at the bottom of the screen to apply one of Instagram's many filters. As you'll notice, you don't have access to all of Instagram's editing tools using this method. If you want to adjust the image further, we recommend using a photo editing app on your computer to make any adjustments before uploading your picture to Instagram.
From here, click the Next button and you can enter a caption, set the photo's location, and tag people if you want. Then you're all set to share your photo. People will never know that you posted it using your computer and not a phone!
Instagram offers an official Windows app on the Microsoft Store for Windows 10 and Windows 11. It's basically a port of the mobile app, and provides the same set of functionality as the desktop website. This includes posting to Instagram from your PC, so give it a try if you prefer to use a dedicated app for posting to Instgram.
If you're interested in more, we've looked at other ways to post on Instagram from your computer. Keep in mind that none of the other options are more convenient than this, so we'd recommend either the official method or the mobile Chrome workaround in most cases.
Download: Instagram for Windows (Free)
Thankfully, you don't have to rely on this workaround anymore to post on Instagram using your computer. Instagram's desktop website now makes it easy to post photos no matter what browser and operating system you're using. But if the official method stops working and you need a workaround, it's simple to post on Instagram using this Chrome trick too.
Either way, posting from your desktop instead of a phone is great if you prefer to edit photos on your computer. It saves you the step of transferring the photos to your phone, then uploading them using Instagram's mobile app.
Now, make sure that what you post on Instagram attracts interest.
Device Links
Since Instagram is a mobile-focused app, you won’t find the same features on the web version. Up until recently, posting content from Chrome on your computer wasn’t possible. You had to use Android emulators or other methods to do this. Fortunately, this has now changed, thanks to new Instagram updates.
If you’re interested in learning more about how to post on Instagram from Chrome, you’ve come to the right place. In this article, we’ll offer a detailed guide on doing it on both PC and Mac.
Posting photos on Instagram using the Chrome browser on your Mac device has never been easier. Follow the steps below to do it:
 ”
”Instagram has listened to its users, and now you can post videos to your feed directly from your Mac device. What’s more, you don’t have to limit yourself to 60 seconds anymore because you can now upload longer videos as well. Here’s how to do it:
Many users are thrilled because they can post photos and videos from the Instagram browser version on their Mac devices. Unfortunately, posting Stories isn’t an option. But that doesn’t mean it’s impossible.
The easiest way to upload Stories using Chrome on your Mac is to access the Developer Tools. Here’s how to do it:
As previously mentioned, Instagram has finally enabled its users to post content from their computers without using alternative, often more complicated methods.
No more using Android emulators or numerous programs and apps to post photos on Instagram using your PC. You can now finally upload them using Chrome in only a few steps:

Previously, posting Instagram videos using Chrome on your computer was a daunting task. You were limited to posting 60-second videos. Fortunately, this has changed, and you can now post longer videos in a few clicks:
By allowing its users to post photos and videos directly from their PC, Instagram has significantly improved their experience.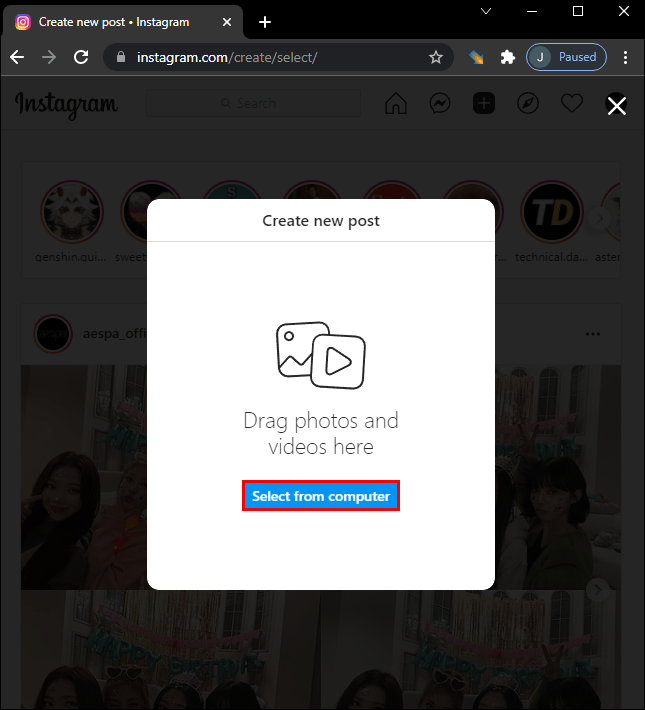 Unfortunately, posting Stories using Chrome on a computer hasn’t become available. But, nothing is impossible, including posting Stories from a PC.
There are several methods for doing this, but the easiest one is to change the browser user-agent. Follow the instructions below to do it:
As you know, Instagram doesn’t have a desktop app. Since it was designed as a mobile phone app, the browser version was significantly lacking features. Thanks to the recent updates, Mac and PC users can finally post content without using workarounds.
We hope this article has taught you how to post on Instagram from Chrome. Additionally, we hope you learned more about the new Instagram updates. We can’t wait to see what the Instagram future holds.
Do you prefer using Instagram on your phone or computer? Have you heard about these Instagram updates before? Tell us in the comments section below.
June 12, 2020 Likbez Technologies
Social network desktop site does not allow posting. But there are workarounds.
You can open the mobile version of the Instagram* website on your computer and create stories and posts there, just like in the official app. How to do this - we show on the example of Chrome, but in most other browsers the steps will be similar. nine0003
Go to the Instagram* website and log in to your account.
Open developer tools. To do this, press Shift + Ctrl + I or right-click on the page and select View Code (or a line with a similar name).
On the toolbar that opens, find the icon with a schematic representation of multiple monitors or mobile devices and click on it. If you can't find it, press Shift + Ctrl + M. One way or another, the browser should launch the site in mobile mode. nine0003
Customize the size of the Instagram* interface that is convenient for you using the buttons above the site window.
Refresh the page. After that, a publish button will appear and you can use the social network on a PC in the same way as on a smartphone.
Last year, Facebook* launched a dedicated Creator Studio section. It allows you to publish and even schedule posts on Instagram*.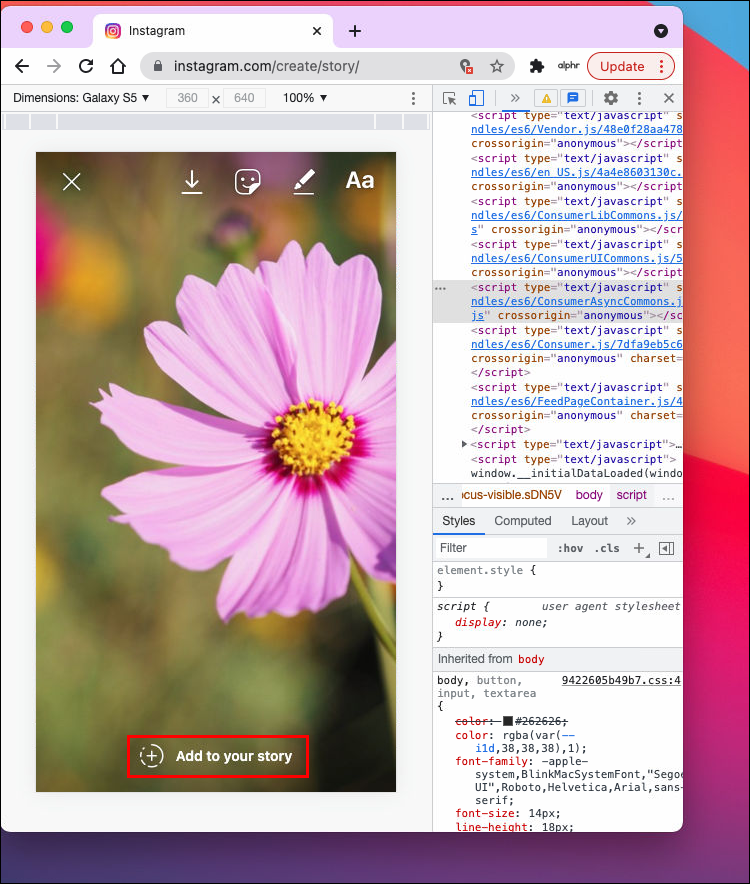 You can't create stories yet. nine0003
To work with Creator Studio, you need to switch your Instagram* account to a professional one (creator profile or business account). To do this, go to the settings of the Instagram* mobile app, select "Account" → "Switch to a professional account" and follow the prompts. The procedure will take you a couple of minutes. If you don’t like something, you can return to the usual account type at any time.
In addition, you must link your profile to a Facebook page*. To do this, click the Edit (iOS) or Edit Profile (Android) button on your account page in the Instagram* app. Select "Page" and connect your new Facebook* page using system prompts. nine0003
Now open Creator Studio on your computer browser, select the Instagram* icon at the top and log in with your account.
To make a post, on the left panel, click the Create a post button and select Instagram* Feed. Add a photo or video using the Add Content button.
Click the arrow next to Publish and select the appropriate option: Publish Now (publish now) or Plan (schedule). In the second case, you can specify the time at which the service will publish the post automatically. nine0003
Emulators are special programs that allow you to run any Android application directly on your computer. By launching the official Instagram* mobile client this way, you can easily publish Stories and posts. You don't need an Android device for this.
Install any free emulator from Lifehacker's selection for Windows, Linux and macOS. In the screenshot example, you can see a window with the NoxPlayer interface. nine0003
Launch the emulator and enter the Google Play app store through it by clicking on the corresponding icon. Connect your old or create a new Google account to be able to download Android apps.
Download Instagram* from Google Play directly in the emulator and log into your profile. After that, you can publish videos and pictures from your computer as if you were using the social network on your smartphone.
See also
*Meta Platforms Inc. activity. and its social networks Facebook and Instagram are prohibited in the territory of the Russian Federation.
1. Publish photos via browser
2. Publish photos via emulator
2.1 Bluestacks
2.2 Nox App Player
3. Browser extension
Instagram has become incredibly popular as a social network in recent years , so more and more people are interested in creating their own account and posting photo and video content regularly.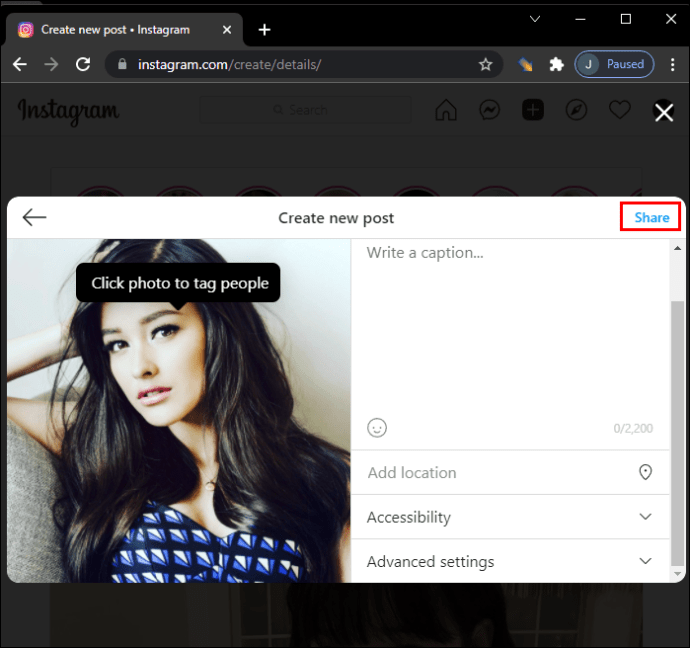 At the same time, full-fledged clients for personal computers did not appear. And even the release of Instagram for Windows 10 did not significantly change anything, since its functionality is greatly reduced and the program is not suitable for owners of earlier versions of the operating system. In this article, we will explore three ways you can upload photos to Instagram. nine0003
A few years ago, the browser version of the social network was limited in functionality: the user could not publish photos and videos, but he could view other people's photos, "like" posts and leave comments. In the spring of 2017, the developers updated the browser version of Instagram, which made it possible, when entering the site from a mobile device (tablet or smartphone), to publish photos without installing the official application. This method can also be used on personal computers, which we are going to talk about:
1. First of all, you need to open the official website of Instagram in your browser and log in with your account. All subsequent steps are described for browser Google Chrome , but the principle of operation is extremely clear and can be applied to other modern browsers (Opera, Mozilla Firefox, Yandex.Browser).
2. Press the key combination Ctrl + Shift + I to open the developer console. The console can also be opened with RMB - "View element code" .
Here and below, RMB is understood as click of the right mouse button , and LMB respectively - click of the left mouse button .
3. In the developer console, you need to click on the mobile device emulation button (icon in the form of a tablet and smartphone), and then set the source mobile device, as well as the resolution and scale. I draw your attention to the fact that the resolution and scale are selected individually - see how it will be more convenient for you to view the tape on your monitor. nine0003
4. After all the necessary parameters have been selected, refresh the page using the key F5 to see the mobile interface. Next, just close the developer console.
5. The interface completely repeats the mobile application. To publish a photo - just click on the button in the form of a plus sign to select the desired image through the explorer.
Another way to post photos to Instagram using your computer is to use the official Android app. However, to run mobile applications under the Windows operating system, you will need to install an additional program - an emulator. Today, the most popular Android emulators are Bluestacks and Nox App Player, on the example of which we will analyze the process of posting photos on Instagram.
1. Download and install the Bluestacks emulator on your computer;
2. After starting, in the upper right corner, find the search for applications. Enter the word Instagram in the search and download the application;
If you get a message that " this device is not supported by ", then make sure you have enough hard disk space. It must have at least 15 GB of free space.
3. After the download is completed, the application can be opened immediately from the store or launched from the tab "My applications" ;
4. Browse your feed, like and post photos on Instagram through your computer.
1. Download and install Nox App Player emulator on your computer;
2. After starting the emulator, go to Google Play Market (Play Store) and find the application there Instagram ;
If after opening the application page you are told that " your device is not supported by ", then you need to open the Nox App Player settings, go to the " Properties " tab and select another device. After saving the settings, restart the emulator.
3. Once installation is complete, launch Instagram and log in to your account. If you don't have an account, you can register it by pressing button Sign Up ;
4. Posting photos is no different than posting from your smartphone. By clicking on the plus icon, you will be transferred to Explorer, where you need to select the path to the file on your computer.
Another option for posting photos from your computer is to install an extension for your browser. We remind you that from time to time such extensions are released by attackers and can use them to steal your personal data. Therefore, if you are worried about the security of your account, then use the first method from this article. nine0003
1. Launch the official extension store for your browser. In Google Chrome, it can be opened via Menu → More Tools → Extensions . Next, click on the icon in the form of three horizontal stripes in the upper left corner and at the bottom click on "Open Chrome Web Store" . Enter the word " Instagram " in the search and see the results of the issue;
2. Search results will show all matching queries in each section of the store. We click on the Extensions category and see which of the proposed software suits you. Depending on the browser, the number and types of extensions will vary, focus on the rating and the number of reviews; nine0003
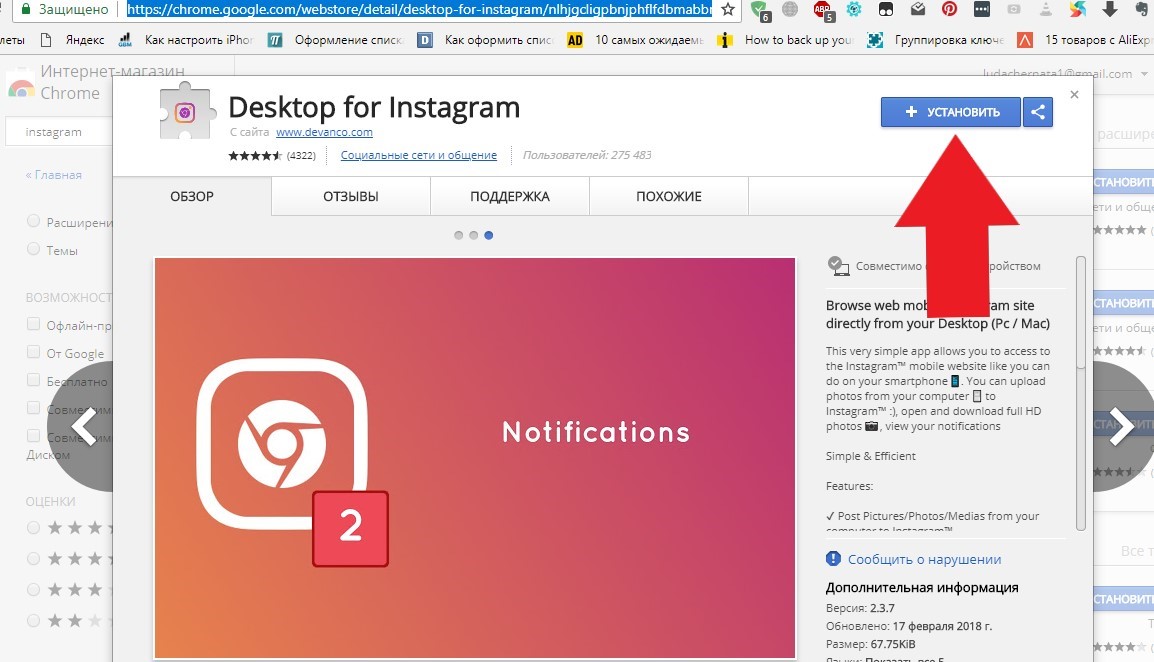
3. After downloading and installing the extension (in our case it is Desktop for Instagram for Google Chrome), the Instagram logo will appear in the toolbar.
4. Click on the icon that appears to open a new social network page. You can now upload photos to Instagram through a browser.
Note: Depending on the extension, functionality may be limited.