By Cat Ellis
last updated
(Image: © Shutterstock)
Learning how to post to Instagram from PC is a nifty little trick to master for those moments when you're desperate to share your latest adventures with your friends and family but find that your phone is completely out of juice.
If you have one of the best Windows laptops or the best computers, posting to Instagram from there can actually offer you more flexibility in terms of being able to easily upload edited images and videos. Plus, you can view everything on a much bigger screen, which can be really helpful depending on what content it is that you're wanting to share.
That being said, trying to post to Instagram from PC isn't the most straightforward of tasks by any stretch of the imagination. Still, it's definitely worth the hassle if you're someone who prefers to take picture-perfect snaps with one of the best DSLR cameras instead of a smartphone. There's no denying the cameras on the best phones have come a long way in recent years, but for the those of us who are photography fanatics, you can't beat holding a digital camera in your hands.
The good news is that for all you aspiring content creators out there or anyone who just wants a bit more freedom when it comes to posting to Instagram, we have all the tips and tricks you need to know below to help you figure out how to post to Instagram from PC. And all it takes is grabbing some free software!
1. Get Vivaldi
The super-customizable web browser Vivaldi offers the quickest and easiest way to post to Instagram from PC or Mac. It does this by running the mobile version of Instagram's website in a web panel.
Download and install Vivaldi , then either run through the wizard to import bookmarks and set your preferences, or click 'Skip all' and continue with the browser's default settings.
2. Create a web panel
Navigate to www.instagram.com , then click the plus icon (Add Web Panel) on the left-hand side of the browser interface. The URL will be filled in automatically, so all you have to do is click the plus again.
The mobile version of Instagram will now appear in a sidebar on the left-hand side of the browser, and will stay there as you browse other sites. Log into your account, then resize the sidebar until the mobile site fits in comfortably.
Image credit: TechRadar3. Upload to Instagram
Click the plus icon at the bottom of the website to choose a photo from your PC or Mac, apply filters, add a caption and tags, and upload it to your account.
1. Get BlueStacks App Player
The Instagram app for Android is superb, and you can run it on your desktop using free Android emulator BlueStacks App Player, enabling you to post to Instagram from PC or Mac.
Download and install BlueStacks , then wait a few minutes while the engine starts for the first time. Dismiss the tutorial using the cross at the top right, make sure the correct language is selected and tap the arrow button.
Image credit: TechRadar2. Log into your Google account
Click ‘Continue’, then log in using your Google account. Review the terms of service and, if you agree, click ‘OK’.
The next checkboxes are completely optional; if you’re only using BlueStacks to upload to Instagram, feel free to uncheck them all. Click the Next arrow, then enter your name (it'll only be used to personalize some apps).
Image credit: TechRadar3. Install the Instagram app
You'll now see a version of the Google Play Store. Search for Instagram (the search bar is in the top right), select the official app when it appears and click Install. The app will request access to information including your contacts and location. If that's OK with you, click 'Accept'.
After a moment, the Instagram icon will appear under the My Apps tab. Click it once to launch it.
Image credit: TechRadar4. Upload, apply filters and share
BlueStacks will change to the size and shape of a vertically-oriented smartphone. Sign into your Instagram account with your usual details (the login link is at the bottom). Your Instagram feed will appear as it would on a phone.
Click the plus icon at the bottom, then select 'Gallery'. Click the 'Gallery' drop-down menu at the top left and select 'Other', then click 'Pick from Windows'. Find the photo you want to upload, select it and click 'Open'.
You can now crop the picture, add filters and a caption, and share it with your followers via all the usual social networks.
Cat is the editor of TechRadar's sister site Advnture. She’s a UK Athletics qualified run leader, and in her spare time enjoys nothing more than lacing up her shoes and hitting the roads and trails (the muddier, the better)
Tired of posting on Instagram from your phone? Wondering how to post on Instagram from your PC or Mac instead?
You’ve come to the right place. Posting on Instagram from your desktop can save you time and offer more flexibility in what you can upload (such as edited videos and images).
And you can do it without having to upload them onto your phone first.
Below we’ve outlined three different ways to post on Instagram from your computer.
How to post on Instagram from your computer
Method 1: How to post on Instagram from your computer using Hootsuite
Method 2: How to post on Instagram from a PC or Mac
Method 3: How to post on Instagram from your computer using Creator Studio
How to post an Instagram Story from desktop
How to post an Instagram carousel post from desktop
How to edit an Instagram post from desktop
Bonus: Download a free checklist that reveals the exact steps a fitness influencer used to grow from 0 to 600,000+ followers on Instagram with no budget and no expensive gear.
Below, you’ll find ways to post on Instagram from your PC or Mac. We’ll also show you how to post via Hootsuite which works on either operating system.
If you’re more of a visual learner, watch this video from our pals at Hootsuite Labs to see how easy it can be:
You can schedule feed posts, Stories, carousel posts, and Instagram ads with Hootsuite.
The instructions below will walk you through the process of posting to your Instagram feed. We cover Instagram Stories and carousels a little further down in this article.
To post on Instagram from a PC or Mac using Hootsuite, follow these steps:
 Alternatively, you can also Schedule for later if you want it to post at a different time.
 For a quick summary of how to post on Instagram from Hootsuite, watch this video:
Voila! Posting photos and videos to Instagram from PC or Mac is that easy.
Method 2: How to post on Instagram from a PC or MacAs of October 2021, all Instagram users can create and publish feed posts from the browser version of the app.
To post on Instagram from your desktop computer (PC or Mac), follow these simple steps:
 A Create new post window will pop up.
And that’s it!
At the moment, only feed posts can be created and published directly from Instagram on desktop. Keep reading to find out how to post Instagram Stories from a PC or Mac computer.
If Instagram is your social network of choice and you don’t mind not having all your social networks in one dashboard, Creator Studio could be a good option for you.
Note that when using Creator Studio, you can post and schedule all types of posts other than Instagram Stories.
How to post on Instagram using Creator Studio:

You can post an Instagram Story from your computer using a third-party social media management tool like Hootsuite. Just follow the steps outlined in this short video:
Or, read our step-by-step article on how to post an Instagram Story from your computer.
If you don’t have Hootsuite, you can post an Instagram Story from your PC or Mac through the following steps:
You’re done! It’s practically the same steps as if you were using the Instagram app on a mobile device.
#1 Social Media Tool
Create. Schedule. Publish. Engage. Measure. Win.
Start free 30-day trial
With Hootsuite, you can also create and easily publish carousel posts (with up to 10 images or videos) directly to Instagram. Here’s how.
1. Go to Planner and tap New post to launch Compose.
2. Select the Instagram account you want to publish to.
3. Include your caption in the Text box.
4. Go to Media and tap Select files to upload. Select all the images you want to include in your carousel. All selected images should appear under Media.
5. Use the yellow Schedule button to select a date and time to publish your post.
6. Tap Schedule. The post will show up in your Planner at the time you have scheduled it for.
That’s it! Your post will go live on the date and time you selected.
How to edit an Instagram post from desktopHootsuite Compose allows you to edit any image directly on your dashboard before you post it. Unfortunately, you won’t be able to edit the image once it’s posted.
Follow these steps to edit:
 This brings up Hootsuite Composer’s edit tool. It allows you to customize the aspect ratio of your image to fit practically any social media platform’s image metrics. From the sidebar, you also have the ability to add filters, adjust lighting and focus, add text and stickers, and use the brush too.
Voila! You just edited your image from your desktop.
Post to Instagram from your PC or Mac using Hootsuite. Save time, grow your audience, and measure your performance alongside all your other social channels. Try it free today.
Get Started
Easily publish and schedule Instagram posts from your computer with Hootsuite. Save time and get results.
Try it for Free

Below we will analyze each of them.
This method is suitable for those who want to download infrequently and little.
To start uploading a photo:

To post a photo:

To start uploading a photo:

If you have Chrome browser in your arsenal, you can use the extensions for posting photos on Instagram*. There are many of them, but most of them work crookedly, or do not work at all. nine0003
Consider installing and working with extensions using Upload Photo to Instagram* as an example.
After downloading, go to Extensions and turn on the download.
You can go to Extensions in Settings via Additional tools, or click on the Extensions panel icon in the form of a mosaic piece Find the desired Extension and enable it by clicking on the Button linesClicking on the extension icon will open a new browser tab with the main page of Instagram*. If you have logged in to your Instagram profile * in the browser, then it will open.
The icon for adding a new photo to the Feed will appear near the Settings on your Profile page By clicking on it, the window for adding a new post to the Feed will open right here Of course, with this method of loading content, we are not talking about filters and some complicated settings. You can only add an image, make a caption and tag people in the photo if necessary. nine0003
Another extension is App Phone for Instagram* or [App Instagram*].(https://chrome.google.com/webstore/detail/app-for-instagram/fhkhmblpnhfedddndenodedcaknclgkd).
Install it in the same way as before.
Add it to the Extensions panel After clicking on the extension icon, a new tab will open with the image of a smartphone. Add a photo from your computer as if you are using a smartphoneThe delayed posting service is designed to make it easier to manage your Instagram accounts*. You plan today, and see the result tomorrow (and even a year later). nine0003
SMMplanner allows you to add and remove photos and videos for a minimum amount, publish them to the Feed, Stories and IGTV.
Convenient and intuitive interface You can apply all sorts of filters, settings to the content, edit the general appearance of the page and, of course, make many posts at once and set the time of their publication.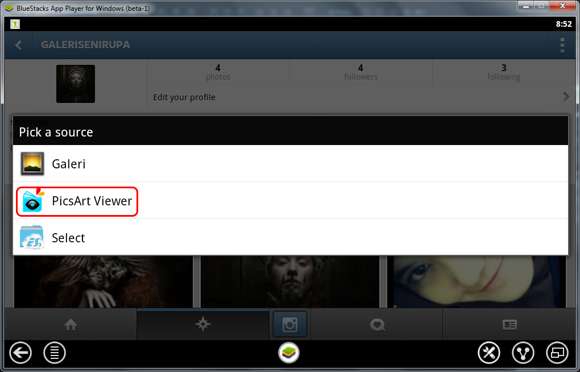
Read more about the service in the article "How to upload photos to Instagram* from a computer" on the SMMplanner blog.
But back to the topic of the article: how exactly to publish a photo on Instagram* through SMMplanner. nine0003
After registering with the service, in the Accounts tab, select "Connect account".
Please note that through the service you can post photos not only on Instagram * Enter the data from your profile on the social network and click "Connect" Go to the Posts tab and click "Schedule a post"You will see a window for planning a new post post. Everything is simple here and there are hints everywhere, no dancing with a tambourine.
Add photo via Photo/Video button, write text and postDespite the fact that the service is paid, you can use it for free.
The guys from SMMplanner provide two free plans, you just have to choose The official service from Facebook*. All work takes place in the browser, after authorization in Creator Studio, you can add and delete photos, set up delayed posting and see page statistics.
Following the instructions, enter the Login and Password for the desired Instagram account*, and confirm the link to Facebook* from your smartphone. Subsequently, you can switch between Instagram * and Facebook * through these two icons on top.
In the window that opens, add a picture using the Create Publication button, add text and publishFeatures of the service:
You can switch to the Author's account in the following way. Go to Instagram Settings* on your smartphone, select "Account" and then "Switch to Professional Account".
Select the post category that best suits your content, then enter "Author"Instaplus is an automated online promotion service for Instagram*. It can automatically like, subscribe and unsubscribe, watch Stories, and much more.
We are interested in the ability to upload photos from a computer to Instagram* using Instaplus. On the main page, through the "Try for free" button, register, and then link your Instagram account *.
You can add a photo via Instaplus as follows:
Then you can edit the photo, add a description and a geotag.
Using the Android application emulator would be more popular, if not for one "but", about which a little later.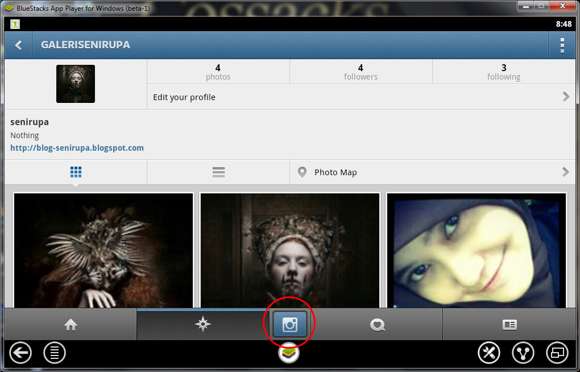 The essence of the emulator is as follows: by installing the program on your computer, you will work with applications on the monitor as if you were sitting on your phone. nine0003
Consider BlueStacks.
After installing the application, log in to your Google Play account In the search, enter the word "Instagram *" and install the application You can enter Instagram* by clicking on the Notifications icon ... ... section My gamesTo upload images to Instagram*, you must first add these photos to the emulator's library.
Enter Media Manager, yellow icon in My Games Click "Import from Windows" and select the photos you want You will see them in the imported files here Now go to the Instagram* emulator and upload photos the same way you would on your phone: a plus sign at the bottom in the center of the screen , and the Gallery will already have the necessary photos There is another way. When you launch Instagram* through the emulator, and press the usual plus sign at the bottom of the screen to create a new post, open the Gallery.
Now that "but" - the moment about the performance of your computer. If you have 4 GB. RAM and less, then each process in the emulator will take you 5 minutes or more; in other words, everything will slow down, and the program may refuse to work at all. nine0003
Here the situation is the same as with browser extensions - there are many online services, but few of them work. Consider the principle on the example of instap.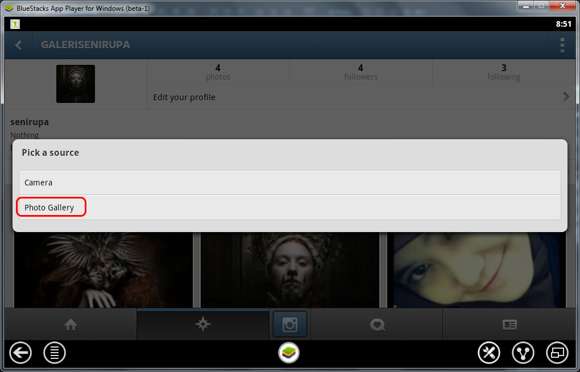 ru.
ru.
The service was created specifically for working with Instagram accounts*. Please register before using the service for the first time.
To add a photo from your computer, enter your Instagram Login and Password* in the required window and click "Add". Next "Download from PC" After selecting the desired image, you will be able to access the settings windowThrough the service, you can add a description, mark users, publish photos both in the Feed and in Stories. But such free services have bugs. This will upset that after applying filters to a photo, it is published without them.
Disadvantages of the service: no more than three posts per day without a premium plan, you can't create a photo gallery and apply settings from Stories to photos when posting there.
Until recently, by installing the official Instagram* application from Microsoft, you could upload photos and videos from your computer to Instagram*. The creators have updated it, and now there is no such possibility left. Despite the outrage in the product reviews, no one is going to return the ability to upload photos. But this method cannot be discounted yet. As they say, what if? nine0003
It's worth noting that you can also download other apps from the Microsoft Store that allow you to upload photos to Instagram* from your computer.
App for Instagram*: View, Upload Photo, which should allow you to upload images. By the way, this is the only function of this application, in addition to viewing the Feed and Profile.
Should I pay $10 for a simple photo upload?Winsta is an unofficial Instagram client* for Windows 10.
The application is paid, but you can use the free period of 7 daysIn the application, you can add an image, edit its size and make a description for the post.
Winsta has only an English-language interface, adding a new photo via the Feed button There are many ways to upload photos to Instagram* from a computer, for clarity, we will collect them in a single table and compare the possibilities of the methods with the functionality of the Instagram* application on a smartphone.
|
It should be noted that the data in the table indicate only the possibility of a particular action, and does not mean the convenience of using the service or application. nine0003
For example, using the emulator, you will be “like in a smartphone”, but firstly, it may simply not work for you, and secondly, it has only the standard functionality of the application, while SMMplanner, Creator Studio or Instaplus can offer opportunities that go beyond the standard.
And if you need to upload a photo once, then there is no need for great functionality: the ability to upload through a browser is enough.
nine0000 How to upload photos to Instagram from a computer?| ichip.ru
Unfortunately, you can't just open the Instagram website in your browser to publish a photo through it. This is because the application is closed source: the system must detect the camera and touch screen in order to allow the publication. This condition greatly complicates the download of photos from a computer. But there are several ways to get around it.
Here is the easiest way: it does not require the installation of additional programs and applications. We describe how to post a photo through the Chrome browser.
1. Go to the Instagram website and log in to your profile.
2. Press the key combination Ctrl+Shift+I . With this action, you will call the developer console. Another way to call the console is to right-click anywhere on the page and select View Element Code or View Code in the window that appears.
3. Look for the icon , which is indicated by the arrow in the picture below. Clicking on it will turn on the smartphone screen simulation mode. In the settings above the "screen" you can select the type of device that you want to simulate.
4. Reload the page. After that, a button for adding a photo will appear at the bottom of the screen. By clicking on it, you can open a window with computer media files. Select the desired photo and upload it as you would normally do on a smartphone. Mission accomplished!
The second method is more reliable, but also more laborious. For it, you need to install additional software: emulator Nox Player or BlueStacks .
1. Install Nox Player. The easiest way is to download it from the official resource.
2. After installing , enter the Play Market . The app will ask you to sign in to your Google account.

 )
)