 Add filters and post it as usual.
 When Instagram first hit smartphones, every image uploaded had to be shaped like a perfect square.
This is all well and good for selfies and pictures of your kids, but for those majestic panorama shots of the Grand Canyon, Instagram's always struggled.
Nowadays, you can upload any sort of photo to Instagram. However, they don't always look so good.
Here's the best way to post panorama shots to Instagram on your iPhone or Android device, along with an app for iPhones that will help them look better.
Check out the products mentioned in this article:The simplest way to post panoramas is:
1. Open Instagram on your iPhone or Android and tap the plus icon at the bottom of the screen to upload a photo.
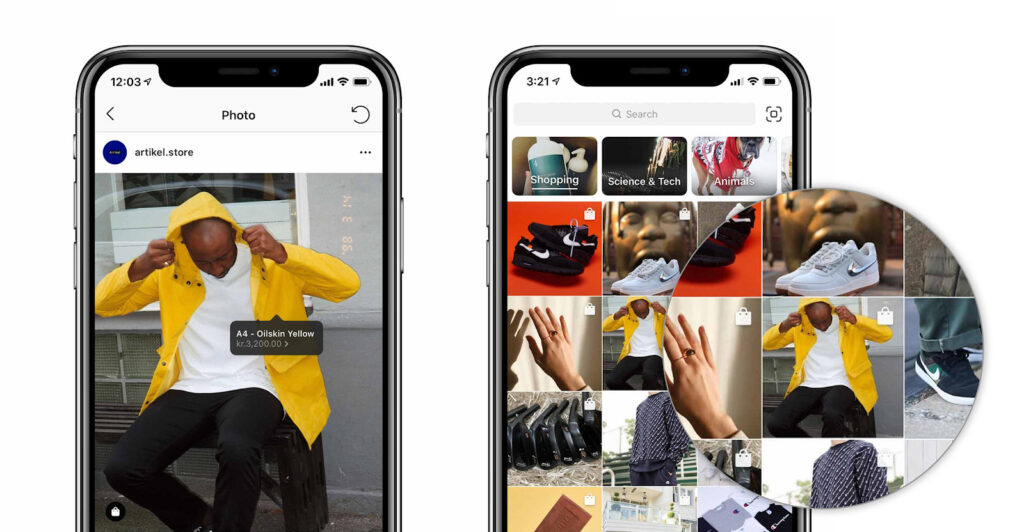
2. Once in your photo gallery, select the panorama shot you want to use.
3. Touch the image preview at the top with two fingers, then squeeze them together to zoom out. Zoom out until as much of the panorama as possible is visible.
Much of your longer pano shots may be lost when you use Instagram to crop them. Steven John/Business Insider4. Add filters and post it as usual.
The result here is a rectangular picture with large blank spaces on the top and bottom. This will do your photo some justice, but for full-sized panoramas, you likely still won't be able to fit the whole photo.
For the full effect, you'll need to use a program like Photoshop to cut the panorama into smaller, square images. If you have an iPhone, there's an app that will do this for you automatically: "Unsquared for Instagram."
Download the Unsquared app on the Apple App Store and give it the permissions it needs to access your photos. Then, follow these steps to cut up your photos.
1. Open the Unsquared app and tap the image of a stack of photos at bottom right.
2. Tap the pano image from your library that you want to use, then tap the blue check mark.
3. Your image will appear with the Unsquared watermark on it. Tap the blue icon that looks like a series of squares at the bottom of the screen, and you can pick how many photos you'd like the panorama shot to be split into — once you choose an option, the watermark will shrink.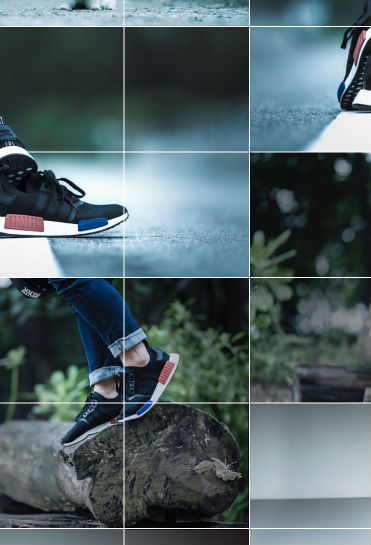
Note that the more pieces you cut it into, the more of the top and bottom of the shot that will be cut off. In general, if you want to include every part of the photo, try to pick "3 Pieces."
4. Once you're satisfied, tap "Done." The split-up photos will be saved to your phone, and you can post them to Instagram.
You'll be able to post the split photos as a series to Instagram. Steven John/Business InsiderSteven John
Freelance Writer
Steven John is a freelance writer living near New York City by way of 12 years in Los Angeles, four in Boston, and the first 18 near DC. When not writing or spending time with his wife and kids, he can occasionally be found climbing mountains. His writing is spread across the web, and his books can be found at www.stevenjohnbooks.com.
Read moreRead less
Insider Inc. receives a commission when you buy through our links.
Skip to main content
The VergeThe Verge logo.The Verge homepage
The VergeThe Verge logo./
By Vjeran Pavic
|
Photo by Brennan King, animation by Vjeran Pavic / The Verge
Part of /
The Verge Guide to Instagram
It’s already been a few years since Instagram allowed you to post multiple photos simultaneously in a single post. This small change enabled a lot of creative options. One of my favorites is creating seamless panoramas by simply slicing your photo in two — like this one.
If you want to take advantage of this neat little hack, here’s a quick, simple tutorial on how you can pull it off.
Before you start, you’ll need two things: Adobe Photoshop (or another pixel-based photo editor that lets you work with layers) and an elementary understanding of Instagram’s requirements for sizing photos.
First, about the sizing: no matter which photo you upload, Instagram will automatically resize and compress your images. For example, square photos will always end up being 1080 x 1080 and vertical ones will always be 1080 (w) x 1350 (h). So if you want to create a panorama made out of two vertical photos, you’ll need to duplicate the pixels lengthwise, while the height stays the same: 1080 x 1350 becomes 2160 x 1350. Or if you want to create a panorama made out of three images, you’ll use 3240 x 1350. The same applies if you’re starting off with square images, which will fit into a panoramic space with twice the width (2160 x 1080).
Okay, let’s boot up Photoshop and open up two documents.
In Photoshop, you can save document sizes as presets for future edits.

Guides will help you split images in equal parts.
Now you’re ready for exporting. You can either export each layer at once using Photoshop’s “Layers to Files” option (under “File” > “Export”) or you can export each layer individually. I tend to add a few more layers to the same document, so I batch export those. In case you want to double-check your final export settings, you can use “Save for Web. ”
”
Here are all the layers I’ll batch export.
If you’re using a PC, it might be easiest to save your files to a cloud service, where you can easily access them with your phone. Or if you’re in the macOS / iOS ecosystem, simply Airdrop your exports.
Getting the photos to properly show up on Instagram should be easy enough, but let’s go through that quickly just in case, because there are some things you can easily skip by accident. On your mobile device:
Don’t forget to enable vertical photos first. Also, you can tap and hold one photo to enable multiple selections.

Vox Media has affiliate partnerships. These do not influence editorial content, though Vox Media may earn commissions for products purchased via affiliate links. For more information, see our ethics policy.
Most Popular
The Collab feature on Instagram* is another way to collaborate with brands and bloggers, or simply make a collab post with a friend or family member.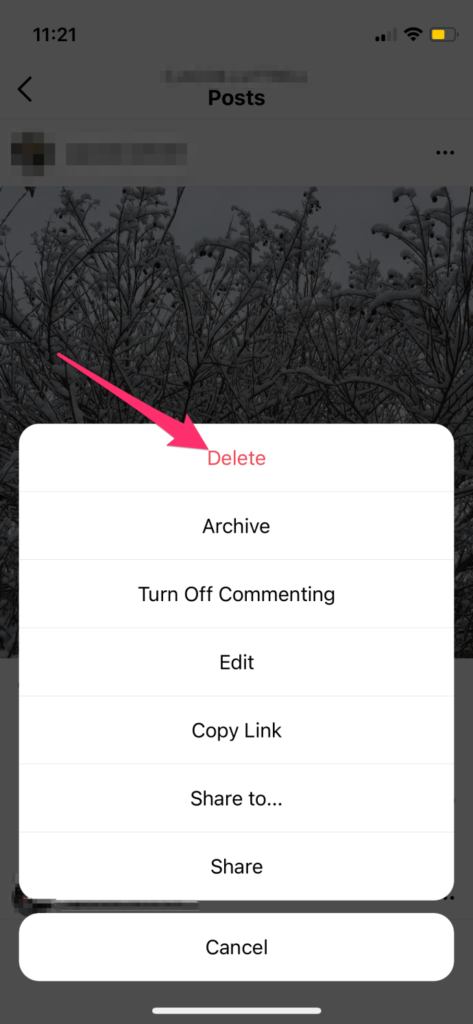
We tell you how to set up the function, about its advantages and the purposes of introducing it into the social network.
A feature known as “Collab” or “Invite a Collaborator” was tested in early 2021 in several countries, including the UK and India, and launched worldwide in October. Collaborative posts are now available for any open account. nine0003
Collab allows you to share posts and videos on Instagram* with another person so that no one has to duplicate content. Both authors of the post will be listed, and the post will collect total likes, views, and comments.
Collaboration posts can be used by media personalities to announce collaborations, influencers to interact with brands, and ordinary users to post a video about a vacation with their best friend.
For example, Kourtney Kardashian and her fiancé Travis Barker used this feature on Halloween to show couples' costumes from Tim Burton's Edward Scissorhands. nine0003 At the top right, you can see that the post has two authors, kourtneykardash and travisbarker. Click on the accounts and find that both users have the post, with the same engagement rates
The feature is very easy to use after a little practice.
To make a joint post, click on the plus in the upper right corner or bottom center of the screen. You will be taken to the creation menu. Next, follow the usual steps to create a post or rils. When you go to the menu where you can add a signature, click "Tag people" - a separate screen will open. nine0003
Next to the "Add tag" option, you will see the "Invite collaborator" function. Click and then find the account of the person you would like to invite to create a shared post.
You need to know what a collaborator's username looks like in order to search for it. Multiple users can be selected, up to a maximum of 20. Note that 20 is the total number of participants. It includes both co-authors and people you simply tag in a post. You can tag 10 people and 10 co-authors, or 20 co-authors and no one else. nine0003
In the process, you will see a pop-up message "If [co-author name] accepts the invitation, this person will be credited as the author of your publication and it will be made available to their subscribers."
This means that you cannot unilaterally designate someone as a co-author of a joint publication. You can only invite a person to cooperate, and he can accept or decline the invitation.
By the way, if you were invited to become a co-author, and in the future you want to remove yourself from this post, just go to the post menu and click "Stop sharing"Have you added all the co-authors you wanted? Click the "Done" button in the upper right corner of the screen to save the settings, then publish as usual.
To recap:

For Reels co-publishing, the process is the same - record and edit as usual. Check Preview that everything looks correct, then click Next to get to the sharing options. On this page, click on "Tag People" to access the "Invite Collaborator" tag, and follow the outline. nine0003
Read also: How to check Instagram* for cheating: instructions.
Collab is a great feature to reach new, relevant audiences, but you have to make sure the content works for all collaborator channels. For example, you sell high-quality coffee makers, and the co-author sells great coffee. Co-authoring a post is a good idea, as the audience is interested in both.
Several clear advantages for joint posts on Instagram*:
But consider the inconvenience : a joint post will be placed in the profile grids of both authors. This can be awkward when scheduling your posts in the same style. Consider the aesthetics and layout of both accounts before co-writing something.
Instagram co-authorship* is for general posting, not co-creation.
Duets on TikTok allow you to record your own video along with the original based on another user's video.
A diction lesson is an example of a TikTok video created specifically for duets. Any user can take it as a template and complete the task by filling in the pauses after the speaker's wordsDuets on TikTok and co-authorship on Instagram* introduce the creator of the video to a new audience, which is usually not very good on Instagram*. This is not my opinion, the thought was voiced by the head of the social network Adam Mosseri. nine0003
Instagram* is a platform where brands and influencers can stay connected to audiences they have built elsewhere. It's getting harder and harder to use Instagram* to acquire followers from scratch.
This is a problem for Mosseri, who wants Instagram* to be just as good at getting new creators noticed as TikTok.
Adam Mosseri, Head of Instagram*
“Instagram* is much better at helping content creators who have already made a name for themselves on the platform. TikTok is better at identifying new and young talents, and, first of all, helping them to open up. nine0003
And we want to be really good at it. Historically, we have paid less attention to this, but I am pushing my teams in every possible way to ensure that this “boy” (Collab) becomes better.
Mosseri acknowledges TikTok's ability to create social media stars, which he believes Instagram should also have*. Collaborative posts compensate for one of the main weaknesses of Instagram * and allow you to attract followers without an existing audience.
Theoretically, the function of joint posts will help to identify smaller accounts, but for this, there must be connections - promoted accounts with which they could begin to cooperate. nine0003
Content creators who don't have good connections or a large audience won't benefit much from collaborative posts, but this is a step towards Mosseri's goal of doing more with this "boy", Collab.
It can be concluded that the company plans to develop and improve joint posts.
The delayed posting service SMMplanner works in a similar way: it constantly adds new functionality and improves the existing one. Now this is a whole set of SMM tools with analytics, photo and video editors, a reposter from Instagram * and the site's RSS feed to all popular social networks and various other features. nine0003
Register here - to test all the features you will have 14 days of free access to the professional plan instead of the standard week. Then choose any of the PRO plans or the free version, depending on your needs.
How to post a photo to an Instagram post*
How to post multiple photos to Instagram* A post of several pictures that you can scroll through is called a carousel. In this format, it is convenient to post thematic photos and collections. nine0003
How to post a photo on Instagram* in full sizeWhen choosing a photo for a post, click on the frame icon. It's in the lower left corner of the image.
How to add a photo to an instagram story*
How else can you post a photo to instagram*
- Use the service of delayed posting
- Through the browser
Do not rush to roll your eyes, exclaiming: “Content for dummies has been brought up!”. Although the article is written for beginners, a rare seasoned instagram user* has used ALL of the methods described for posting photos. And yet, some of them are undeservedly forgotten. nine0139
Shake the dust off them.
Option one, which is also the easiest:
Option two: send a photo to Instagram* directly from your phone gallery or from another application. It will not work to write a step-by-step guide, because the phones have a different interface. But the principle is always the same: select a photo, find the Share button, select Instagram*, and then add the photo to your feed, chat, or Story. nine0003
To post multiple photos to instagram at once*:
Step 1. Open the app, tap the plus button at the bottom of the screen.
Step 2. Click the slide icon to select the desired photos from the gallery.
Remarochka: in one post on instagram* you can collect up to 10 photos or videos. nine0003
Step 3 Edit the images as needed. You can either apply a general filter to all photos at once, or edit each one individually by clicking on the desired photo.
Step 4. Write a text, put a geolocation, mark friends on the photo if necessary. Now you can publish.
Another note: images in the carousel can be swapped or removed from the list. To reorder an image, click and drag it to the desired location.
After clicking on it, the photo will return to its original size. You can also pinch a photo with two fingers and crop it.
Keep in mind that square pictures or 4:5 aspect ratio (vertical rectangle) look best on instagram*. And 16:9 pictures, like from a computer, look narrow and visually stand out from the tape.
Step 1. Enter the application. If you are on the home page, click on the avatar thumbnail with a plus sign in the upper left corner. If on your profile page, then on the avatar. nine0003
Step 2. Creative. You have already opened the story editor. Take a photo or select an image from your mobile device's gallery.
Step 3. Bring the story to life. Attach the desired stickers, text, mark the profiles of friends or a place ... well, that's all, you can publish. How else can you post a photo on instagram? Or if you go on vacation, but good statistics in instagram * should not go there. nine0003
You can use automatic posting in many applications, but it is safer to do this using the official social network service - Facebook Creator Studio. To set up delayed posting: