Luke Mead
Social Media
In this tutorial, I show you how to create a Photo Album for your Facebook Page.
This tutorial isn’t for people creating albums for their personal Facebook account.
There are many reasons that you might want to create a photo album on Facebook.
The most obvious one is you want to show off lots of photos, without posting them individually.
Doing this is an excellent way of promoting your business, by subtitling showing off your products, services & events.
This is a really super simple tutorial, I recommend doing this on your desktop computer, because it’s just a bit easier.
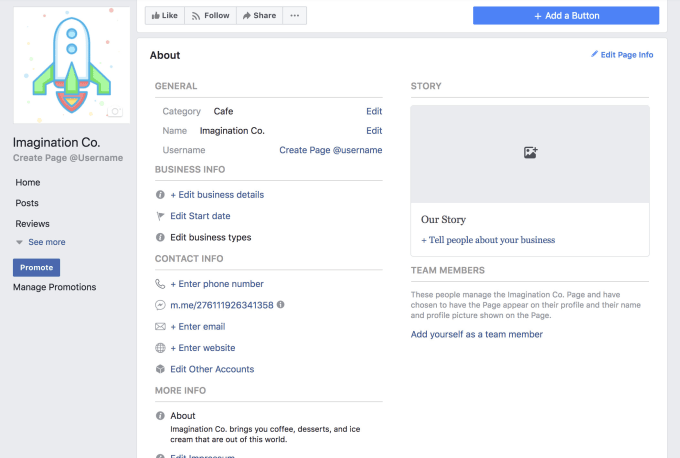
Before we go any further, it’s important to check that you have permission to post on your Facebook Page.
Learn about Facebook Page permission’s here.
Head to your Facebook Page.
Head to the photo area on your Facebook Page, this can sometimes be hidden behind the more button.
Now you should be able to create your photo album.
Firstly give it a name, then all that you have to do is select & upload all the photos that you want inside the album.
This is a really handy Facebook tip for organising your photos on your Page.
If you need more help with creating a photo album, I recorded this video.
Luke Mead
Hello! I’m Luke, and thanks for being here, I really appreciate the support.
A little bit about me:
I am a digital marketer by trade, but love the outdoors & travel.
I’ve actually got a few little projects I work on.
IPM Media & Luke Mead Marketing are my main “marketingcentric” educational platforms.
But I also run Luke Mead 4x4, where I explore all things outdoors.
Keep in touch:
I recommend you email me at [email protected] if you want to get in touch with me!
Follow me on Instagram!
Connect with me on LinkedIn!
Insert Images into a PDF using Preview on Mac
Partner with us - enquire now.
We’re a no bullshit marketing blog.
Meet Stella SEO, a free digital tool that lets you audit, report & track your SEO.
Analysing IPM Media’s SEO using Stella.
Optimise your eCommerce SEO with 5 Practical Tips
10% off shop wide with code IPM10 at Dirt Roads
Learn more

Facebook is, first and foremost, a place for sharing. Sharing your thoughts, your feelings, your life events, and your photos. It's there to help you document your life, for you and everyone around you. It's a digital scrapbook.
It's easy enough to add photos to Facebook through a post, but if you want to keep them more organized — especially if you have a lot of photos - the best way to do that is to make an album.
Albums are exactly what they sound like — they're the folders in your computer's file explorer, there to help you keep track of which pictures are from. You can make an album for all the photos from a family vacation, or from a semester of school, or for someone's birthday party — the possibilities are endless. You can add photos to that album all at once, or add a few and go back and add more later as you take them.
You can add an Facebook album no matter where you are. Here's how to do it.
1. Go to your profile page on a Mac or PC.
2. On the toolbar under your cover photos, click the tab that says "Photos"
3. Underneath the name of the tab, click "Create Album."
Click "Create Album" to start adding pictures. Melanie Weir/Business Insider4. You'll be prompted to add any photos that already exist on your computer to the album. Select the ones you want, then click OK.
5. Fill in the other album information — title, description, date, location; you can also add co-contributors here. When you are finished, click "Post" in the bottom right corner to finish creating the album.
Add photos, fill in the information as desired, then click "Post." Melanie Weir/Business Insider1. Go to your profile page on your iPhone or Android.
2. Scroll down to where your recent posts feed starts. Above it, to the left, tap the button that says "Photos."
3. Tap the tab at the top that says "Albums."
Select "Create Album." Melanie Weir/Business Insider4. At the top left, tap the option for "Create Album. "
"
5. Enter the album details, then tap "Save" in the top right corner.
Note: You can't add as many details when creating an album on mobile as you can on desktop. If you want to add details like location or tagged people later, you can edit the album on the desktop site.
Enter details, then tap "Save." Melanie Weir/Business Insider6. To add photos to your new album from your phone, tap "Add Photos/Videos."
Tap "Add Photos/Videos." Melanie Weir/Business Insider
Melanie Weir
Freelance author
Melanie Weir is a freelance author for Insider, mainly focusing on the Tech Reference section, but occasionally contributing to Lifestyle and Entertainment topics as well. She is also a freelance writer for ScreenRant, and is the Lead Weekend News Editor at TheThings.com. In her spare time she writes plays for both stage and screen. She can be reached at [email protected], or through LinkedIn.
Read moreRead less
Insider Inc. receives a commission when you buy through our links.
Some albums (such as Profile Photos) cannot be deleted, but you can delete photos from these albums. Deleting an album also removes the photos from the album. You will not be able to recover a deleted album.
To delete album :
To transfer a photo or video to another album, go to Facebook from a computer (laptop). Currently, on mobile devices, you cannot transfer photos or videos from one album to another. nine0007
To transfer photos or videos from one album to another:
If there is a (first time) photo (or video) on your profile feed that you want to move to another album:
 facebook.com on your computer.
 Note : You cannot move photos that are in background photo album or profile .
You can only add items to albums that you have created, and collaborative albums in which you are a collaborator of . Live videos cannot be added to an album.
To add a photo or video to an album:
 nine0016
 Album privacy settings control who can see your post. To change a post's privacy settings, first change the album's privacy settings. You can add a photo to an album after it has been published.
Note : A maximum of 1000 photos can be added to one album. nine0007
You can get a link to share your photos and albums with people who don't use Facebook.
To get a link to the album:
To get a link to a specific photo:
Copy the link to send it to your friends who don't use Facebook. Remember that every person who receives the link will have access to the contents of the album.
Note : You can only share links to pictures you add yourself and from albums you create. You cannot post links to automatically generated albums (e.g. profile photos, phone photos).
To save the photo on your computer:
To create a Shared Album:

When collaborators are assigned to a shared album, they can add photos and videos, tag photos, edit the album, and add new collaborators. Collaborators can only edit and delete uploaded photos. The owner of the album can delete photos of other collaborators. If a collaborator is removed, they will have the option to remove photos added to the collaborative album from the level of their activity diary. nine0007
To leave a shared album you've been added to:
Viewing a shared album may become unavailable. It depends on its privacy settings. Photos or videos you've posted in a shared album will remain there when you leave the album. After you leave a shared album, you will no longer be able to remove photos and videos from it. nine0007
Only the person who created the shared album can configure its privacy settings. To set the privacy settings for the shared album you are creating:
Remember that if you tag someone in a photo, it will be available to the tagged person and their friends. nine0007
You can only remove collaborators from a shared album that you have created. To remove a member from a shared album:
Removed collaborators will not be able to add photos and videos to the shared album. Depending on the privacy settings of a shared album, remote collaborators may not be able to access the contents of the shared album. nine0007
To change the privacy settings for published photo albums:

Only the person who created the album can change the privacy settings.
You can change the privacy settings for individual images in most albums, including Profile Photos and Cover Photos, but not all albums support this feature. nine0007
To set the privacy for the selected photo:
Please note that some photos, such as the current profile photo and the home page background image, all have a public status.
By Milena Anderson Reading 4 min. Views 2 Posted by
Short answer
How to share an album on Facebook 2020?
There is no one-size-fits-all answer to this question, as the process for posting an album on Facebook 2020 depends on the content of the album and account settings. However, some tips on how to share an album on Facebook 2020 include using the share button located at the bottom of each album page, tagging friends in posts about the album, and using social media like Twitter and Instagram to promote it. nine0007
Can I share an entire photo album on Facebook?
Yes, you can share an entire photo album on Facebook. To do this, follow these steps:
Open your photo album on Facebook.
Click the Share button (it looks like a square with an up arrow).
Select the "Share as photo album" option.
Name your photo album and click Share.
Why can't I share the album on Facebook?
Facebook only allows you to share individual songs from an album. nine0007
How do I get a link to a Facebook album?
To get a link to a Facebook album, you can go to the album page and click the "Share" button. You can then copy the link that appears in the "Copy to" field.
How to share an album on Facebook 2021?
There is no specific way to share an album on Facebook 2021, but you can use the same methods as for sharing other types of content on Facebook. You can post a link to the album on your Facebook page or share individual photos and videos from the album. nine0007
How do I share an album?
There are several ways to share an album. You can email it, post it on social media, or send a link to a specific song in the album.
How do I create an album to post on Facebook?
There are several ways to create an album on Facebook. You can use the Facebook app on your phone, or go to Facebook.com and use the scrapbook tool there. nine0007
How do I share an album on Facebook from my iPhone?
To share an album on Facebook from iPhone, first open the album in Photos. Then tap the three bars in the top left corner of the screen. This will open the exchange menu. Click "Share on Facebook".
How do I share an album with my iPhone?
There are several ways to share an album from iPhone. You can share it via AirDrop, send it as an email attachment, or post it to your social network account. nine0007
How do you share photos on Facebook?
To share a photo on Facebook, you first need to open the photo in the photo editor of your choice. From there, you can share it as is, or crop and customize to your liking. If you're happy with it, click the "Share" button located at the bottom of the editor. From there, you can select the Facebook group or page where you want to share them.
Why can't I share my photos on Facebook? nine0007
Facebook requires photos to be public for friends to see. You can share photos with certain friends, but they won't be visible to everyone.
How to share multiple photos on Facebook?
There are several ways to share multiple photos on Facebook. You can use the Share button on individual photos or use the Photo Gallery feature.
Why can't I share some of my photos on Facebook? nine0007
There are several reasons why photos may not be shared correctly on Facebook. One possibility is that you may not have permissions to share the photo. You may also need to adjust the photo's privacy settings before it can be shared.
Why can't I see my albums on Facebook?
There are several reasons why albums may not appear on Facebook. First, if you've deleted your albums, they may no longer show up on Facebook. Second, if your albums are private, they may not be visible to Facebook. Finally, if you have an older version of Facebook (before September 2016), your albums may not work correctly on Facebook. nine0007
How do I let Facebook access my photos?
There are several ways to allow Facebook access to your photos.