Learning how to schedule Instagram posts in advance is the easiest way to save time on the platform so that you can focus on what matters.
The more complex your Instagram marketing efforts are, the more helpful a scheduling tool becomes. This is true whether you own a small business or manage a global team. Consistent, high-quality content is easier to plan, craft and share when you automate some of the grunt work.
In this article, we’ll go through how to schedule posts on Instagram, including the best Instagram scheduling tools for Business, Creator and personal accounts.
1. Add your Instagram Business account to your social media management platform
2. Compose your Instagram post
3. Find the best time to post
4. Schedule your post
Bonus: Download our free, customizable social media calendar template to easily plan and schedule all your content in advance.
Can you schedule posts on Instagram Business? You sure can!
Visual learners: Watch this video for demos of how to schedule Instagram posts and Stories with Creator Studio and Hootsuite. Everyone else: keep reading.
Brands with business profiles can use third-party apps like Hootsuite to schedule posts across multiple social media platforms, including Instagram, Facebook, TikTok, Twitter, LinkedIn, YouTube and Pinterest.
You can schedule feed posts, Stories, carousel posts, and Instagram ads with Hootsuite.
Before you start, make sure to switch to an Instagram Business or Creator account — it’s free, and it only takes a minute. If you’d rather stick to a personal account, we have a section for you coming up.
If you’re using Hootsuite, it’s easy to link your Instagram account. From the Hootsuite dashboard:
For more details on this process, check out our very thorough help article.
In your Hootsuite dashboard, click the Create icon, then select Post.
In the Post To field, choose your preferred Instagram account from the list.
Now go ahead and upload your visuals (or select them from your content library). You’ll also want to write an engagement-driving caption, add your hashtags, tag relevant accounts, and add your location.
Your draft will show up as a preview on the right.
Start your free 30-day trial
If you haven’t already prepared your image for Instagram, it’s easy. Click Edit Image to crop your visual to the required aspect ratios (that is: 1.91:1 or 4:5), filter it, and otherwise perfect it.
Bonus: Download our free, customizable social media calendar template to easily plan and schedule all your content in advance.
Get the template now!
You can also edit your image using Canva’s editor inside the Hootsuite dashboard. No more switching tabs, digging through your “Downloads” folder, and reuploading files — you can seamlessly create beautiful visuals from start to finish without leaving Hootsuite Composer.
To use Canva in Hootsuite:
Start your free 30-day trial
Posting at the right time can help you reach your audience when they’re online. Plus, early engagement tells the Instagram algorithm that people like your content (a.k.a. gives it a nudge to surface it in more users’ feeds).
Hootsuite’s Best Time to Publish feature shows you your best time to post on Instagram based on your posts from the past 30 days. It groups posts by weekday and hour to identify when your posts had the highest impact, based on average impressions or engagement rate.
To find your best times to post, save your post draft and follow the instructions below:
You will see a heatmap highlighting your best times to post (based on your account’s historical performance). You can switch between two tabs: “Build awareness” and “Boost engagement” to find the time that will work best for your specific goals.
Start your free 30-day trial
All right, now comes the easy part. Click Schedule for Later in the bottom right, and select the date and time you’d like your post to go live.
If you skipped the step above and didn’t go to analytics to look up your best times to publish, you will see a couple of recommended posting times once you select a date. You can pick one or manually set a time.
That’s it! You can review your scheduled posts in the Hootsuite Planner, and edit them there before they go live, as well.
Start your free 30-day trial
Finally, let’s take a look at how to schedule an IG post for those of us using personal profiles.
If your Instagram profile is neither a creator nor a business account, don’t worry. You can still schedule your posts; there are just some extra steps involved. In short: Hootsuite sends you a mobile push notification at the scheduled time, which reminds you to log in and tap publish.
For self-evident reasons, we’ll pretend that your preferred management platform is Hootsuite. From the Hootsuite dashboard:
You’re also going to want to set up the ability to use mobile push notifications. Follow these steps on your phone:
 Compose your post
You know the drill: write a good caption, use the right hashtags, tag relevant accounts, and add your location.
If you want to level up your posts, check out our list of Instagram marketing tips. Or else read up on the latest Instagram trends in 2022.
The key difference between business and personal accounts? Posts scheduled for a personal account don’t publish automatically. Instead, you’ll get a mobile notification.
You’ll still want to check your Instagram analytics and make sure you select the best time to post.
Go ahead and pick your time and date, then click Schedule.
When the time comes, you’ll receive a push notification on your phone to remind you to post to Instagram. Note that this is essentially the same process for scheduling your Instagram Stories (no matter what kind of account you have).
The process for posting looks something like this. The Hootsuite app will take care of most of the work, but you need to open Instagram, paste your caption in, select your photo, et cetera. Not tough brain work, but give yourself five minutes to triple-check that everything’s right.
And voila! You’ve done it!
Can you plan your Instagram feed on Facebook? You sure can — if you have a Business or Creator profile on Instagram. Facebook’s native Creator Studio allows you to craft and schedule Instagram posts from your computer.
Note that while Creator Studio is a handy Facebook scheduler for Instagram, it’s currently not possible to post or schedule an Instagram Story from Creator Studio. To do that, you’ll want to check out our post on how to schedule Instagram Stories.
In general, Creator Studio is a good tool if you only want to schedule Instagram and Facebook posts (and don’t mind not being able to schedule Stories). But most social media pros can save a lot of time and energy using a social media management tool and handling all social channels from a single dashboard.
A tool like Hootsuite will help you schedule content to Instagram and Facebook pages, as well as TikTok, Twitter, LinkedIn, YouTube and Pinterest, all in one place. Here is how Creator Studio compares to Hootsuite:
To schedule Instagram posts from your computer using Creator Studio, follow these steps:
That’s it! Now you can lean back and check your DMs.
If you’d like to streamline your process even further, you can also consider cross-posting.
Cross-posting is the process of sharing similar content across multiple social media channels. It’s a handy choice for businesses with smaller budgets and less time to personalize content.
You can use cross-posting (via Hootsuite or Facebook Creator Studio) to set Facebook to post to Instagram. It’s not always the best choice for truly engaging content, though.
We’ve got more details in our in-depth guide to cross-posting. If you’re serious about scaling your Instagram marketing efforts, you’ve got better options.
If you’re ready to take the plunge and get real efficient with your posting habits, these tips will help keep you ahead of the game.
In general, posting when your followers are online is key. That’s because the Instagram algorithm prioritizes recency. This means that, generally, a newer post will show up higher on your followers’ newsfeed than an older one.
That’s one reason why simple cross-posting may not work. Your audience on Facebook may be active from 6-10PM on weeknights, but browsing Instagram from 1-4PM.
The right Instagram analytics tool will tell you when your audience is most likely to be online and/or engage with your post.
For the Hootsuite social media team, that time is 8AM-12PM PST, or 4-5PM PST on weekdays. For you, it might be different.
Luckily, Hootsuite’s Best Time to Publish feature can show you your best time to post on Instagram based on your posts from the past 30 days. It groups posts by weekday and hour to identify when your posts had the highest impact, based on average impressions or engagement rate. Then it suggests the best times for you to post moving forward.
It will also suggest time slots that you haven’t used in the last 30 days so that you can shake up your posting habits and test new tactics.
If we learned anything in 2020, it’s that the world is changing faster and faster. That’s why automating Instagram posts is a little more nuanced than “set it and forget it. ”
”
When it comes to Instagram scheduling, going much farther than a week in advance can start to increase the risk of something going sideways. You don’t want to cause a social media crisis for your brand by posting something insensitive. If something unexpected happens, you may need to pause your posting calendar entirely. You might even need to use your social channels to communicate through a crisis.
Our advice: keep your finger on the pulse, and stay nimble.
If you do schedule your posts far in advance, it’s not the end of the world. Sometimes you need a full two weeks of vacation!
Just make sure you’re using an Instagram scheduler that allows you to press pause on all upcoming content if a crisis or emergency suddenly occurs.
With Hootsuite, pausing your scheduled social media content is as simple as clicking the pause symbol on your organization’s profile and then entering a reason for the suspension. (This is actually one of our favorite Hootsuite hacks. )
)
Source: Hootsuite
Yes, the miracle of Instagram scheduling means you can now increase your quantity of posts without sacrificing quality. But should you?
The short answer is “maybe.” The long answer is “maybe, if you can maintain consistent quality at that pace over the long term.”
Consistency matters more than frequency when it comes to engagement. Remember that the algorithm prioritizes good relationships: if your followers are engaging with your Instagram content, the algorithm will show more of it to them.
No matter how busy you are, make sure you take a fresh look at that copy before it goes live.
And for big teams with a lot of moving parts, an internal multi-stage approval system is ideal for preventing a gaffe.
But though words are important to any social media post, visuals are key on Instagram. Get yourself an Instagram scheduler that allows you to edit your photos in the same dashboard you publish from. It’ll save you much more time and ensure that your images are fully optimized before posting.
Shout out to Hootsuite’s image editor, which can crop your image to the correct size for any social network. It also has an extensive filter library (useful for those of us who would rather leave photo editing up to the professionals). Watch the video below for a preview of the tool.
Now that you know how to schedule posts on IG, you’ve got time to take a look at the big picture.
Are you creating content that works for your audience? What’s earning likes? What’s falling flat? Choose your preferred Instagram analytics tool and start exploring.
Use Hootsuite to schedule Instagram posts at the best time, respond to comments, track competitors, and measure performance—all from the same dashboard you use to manage your other social networks. Start your free trial today.
Get Started
Easily create, analyze, and schedule Instagram posts, Stories, and Reels with Hootsuite. Save time and get results.
Free 30-Day Trial
Facebook Business Suite offers a variety of tools to help you manage your presence across Facebook and Instagram, all in one place.
With Business Suite, you can save time by scheduling your posts on both Facebook and Instagram. You can also manage all of these posts together, so you can keep up your relationships with both communities.
To start using Business Suite, you'll need to connect your Facebook Page and your Instagram business account. Learn how to do that below.
To connect your Facebook Page and Instagram account on Android:
To connect your Facebook Page and Instagram account on iPhone or iPad:
To connect your Facebook Page and Instagram account on Android:
To connect your Facebook Page and Instagram account on iPhone or iPad:
Before you begin
Add a Facebook Page to your Instagram. To add or change the Facebook Page that's connected to your Instagram account:

Before you begin
Add a Facebook Page to your Instagram. To add or change the Facebook Page that's connected to your Instagram account:
Maria is the owner of Lucky Shrub, a garden design and maintenance company. She has a Facebook business Page and an Instagram business account for Lucky Shrub, but doesn't have enough time to post consistently on both platforms.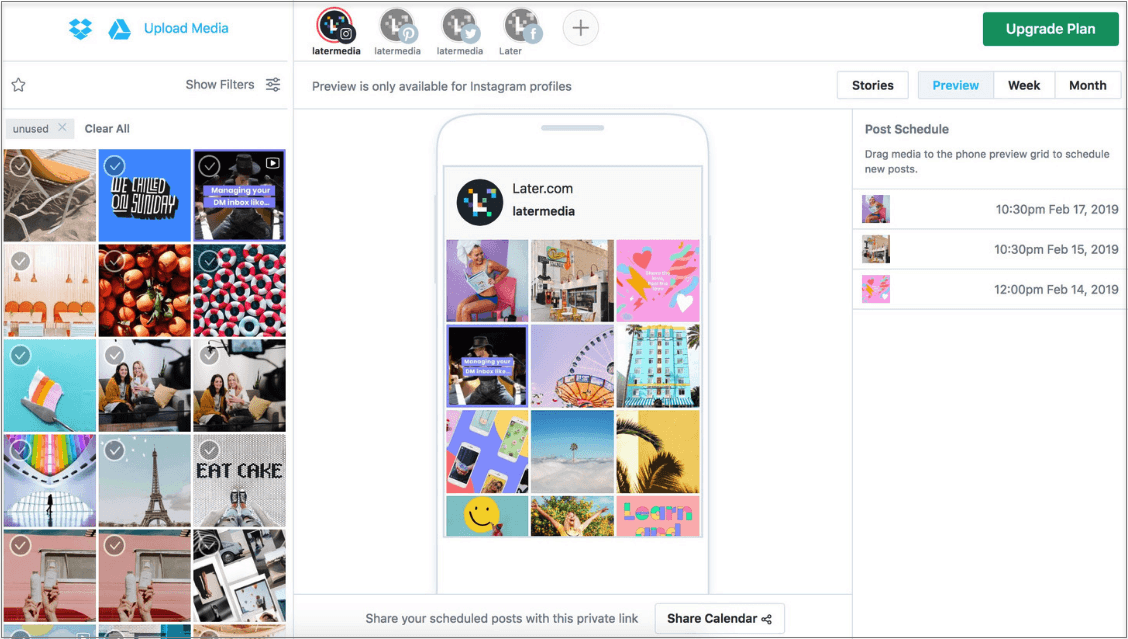
Maria wants to engage her audience on Instagram and Facebook, and reach more people who don't already follow Lucky Shrub. Maria can use Business Suite to manage Lucky Shrub's online presence efficiently, save time and reach more people.
When you share content frequently, customers will think of your business when they're ready to make a purchase. Business Suite enables you to create and schedule posts so that you can stay connected with your community while you save time and focus on other business goals. Here's how you can do it:
Manage content and learn how your posts perform across Facebook and Instagram all in one place.
When you first open Business Suite, you'll see your most recent posts. To see all your published posts, click Posts. You can filter your posts based on where you shared them: on your Facebook Page, Instagram account or both. To edit or delete a recently published post, click on it from the Home tab and make whatever changes you'd like.
Understand which photos and videos perform best on Facebook and Instagram. Use what you learn to customise your future content to succeed on each platform.
Learn how your posts resonated with your Facebook and Instagram communities. Track metrics including reach, engagement and reactions or likes. You can also click on a specific post to view more detailed insights about it.
When you advertise on Facebook, you can reach people beyond the community that you already have and build new customer relationships. You can do this by boosting your posts to turn them into ads in Facebook Business Suite.
Maria is planning a product launch for a new line of garden tools. She wants to create a series of posts to showcase her new products. She decides to boost these posts to increase awareness and reach more people. Here's how Maria can boost a post and turn it into an ad.
Open the Posts tab to select a post you'd like to boost. Think about your business goal and which posts can help you achieve it. You can also alter the caption of an existing post to prompt people to take a specific action. Click Boost Post on the post that you want to turn into an ad.
Maria selects a recent post with photos of one of her landscaping projects. She changes the caption to, "Get your garden lookin' as nice as this. Message us for a free consultation."
Your ad objective determines where people who click on your ad will go, so choose one that aligns with your business goal.
Maria's goal is to find more customers for her landscaping service, so she selects the objective Connect and chat with potential customers. When people click on her ad, they'll be directed to a message thread with Lucky Shrub.
Determine who you want to see your ads. Use what you know about the people you want to reach – such as their age, location and other details – to choose the demographics, interests and behaviours that best represent your audience.
Maria decides to create an audience of people who are interested in garden design, landscaping and plants, and who are located in her city.
Next, choose where you want to run your ad: Facebook, Instagram or Messenger. Choosing automatic placements will help you to make the most of your budget.
Maria chooses automatic placements because this is her first time boosting a post. She'll use her findings from this ad to determine where she'll run the next ad.
Select your budget and how long you want your ad to run for. Facebook will optimise your ad to spend an average amount of your total budget selected over the period of time you specify.
Maria sets a total budget of $50 for her boosted post to run for two weeks.
Select your budget and how long you want your ad to run for. Facebook will optimise your ad to spend an average amount of your total budget selected over the period of time you specify.
Maria sets a total budget of $50 for her boosted post to run for two weeks.
Watch the video below to see how you can boost a post from Business Suite.
When you share and schedule your posts on Business Suite, consider the following:
Once you know what you want to post, and when and where you want to post it, establish a process to create content regularly. You can either set aside time to do this once a week, shoot photos and videos throughout your day, or a combination of both. For example, Maria schedules posts on Mondays so she can focus on other business priorities for the rest of the week.
Size your photos or videos for a square aspect ratio so they'll look great no matter what platform you share them on. For example, Maria makes sure that she previews her posts based on whether she's sharing them to Instagram or Facebook.
Use Insights to explore how your posts and stories resonate with your audiences on both Facebook and Instagram. Understand which types of posts are performing well on each platform and create content with your audience in mind. For example, Maria monitors her post insights with the Business Suite app when she's on the go to see how they are performing on both Facebook and Instagram, and adjusts what she posts to optimise for each platform.
With Business Suite, Maria can share and schedule posts across Facebook and Instagram from one place. In the next lesson, learn how you can use Inbox in Business Suite to efficiently respond to your messages and comments on Facebook and Instagram.
PREVIOUS
NEXT
Was this page helpful?

More courses
More recently, Facebook has pleased with the function. Now we can do delayed posting and schedule publications in advance without using additional programs and services.
There are 2 disadvantages to using autoposting services:
1. In some services, you need to enter the login and password from your Instagram account .
It is very easy to get on fake sites that simply collect logins and passwords of promiscuous social network users. I am too distrustful and I don’t want my account to be spammed in the comments “I earn up to 46 thousand a day with my child” after some time.
2. Other services access the account via API .
This method is safe for your account data, you just give access to actions on behalf of your Instagram profile without entering a login and password.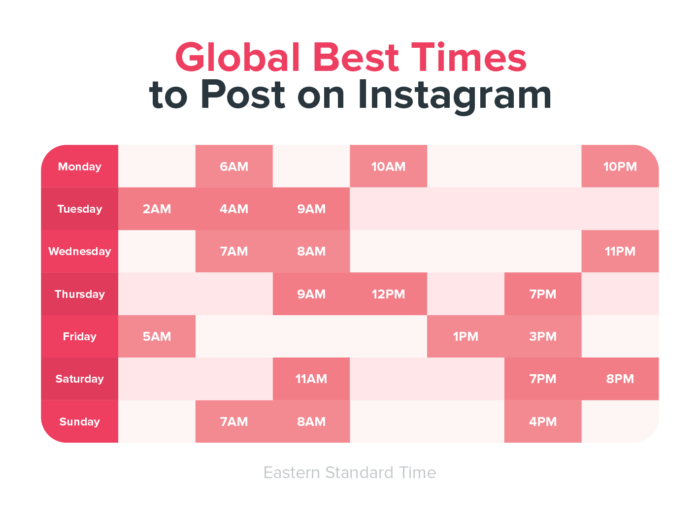 But here another nuance appears: for suspicious actions, your profile may be banned.
For example: you have scheduled a publication through such a service at 18:00. And at 18:03 you go to Insta from your phone - like, post a story or just scroll through the feed. Instagram sees it like this: 2 active users on 1 account from 2 different devices from 2 different countries (such services are often placed outside the CIS) - it looks suspicious. Ban.
Therefore, in consultations, on live broadcasts and in private conversations, I did not recommend using different gliders. It's good that Facebook made this feature for Instagrammers.
To schedule a post, go to Creator Studio. There are two ways to get here:
Go to the Instagram tab , to do this, click on the logo on the Instagram logo. If this is your first time here, you will need to enter your username and password from your account. You trust the data to Facebook itself, and not to third-party applications, so you can not be afraid for your data.
In the upper left corner, click on the button " Create publication ". The service allows you to publish a post in the feed, or a video in IGTV.
Here you can also view account statistics: audience data, reach, engagement, impressions. In general, all the same numbers that are shown in the application. Below you can add other Instagram accounts.
Select " Instagram Feed " and the " Your Post " window will open. Insert text into it, upload a photo of the post, specify a geotag and, if necessary, enter hashtags. In one post, you can use up to 2200 characters, 30 hashtags and 30 mentions of other profiles.
You can publish the post right away, or you can set the desired date and time. See the little triangle on the right next to the " Post " button?
Click on it, select " Scheduled Publication " and enter the date and time.
Delayed posting via Facebook allows you to schedule posts several days in advance. It is very convenient when you are going on a trip or just tired of writing posts every day. Use delayed posting on Instagram, the feature is free and available to everyone.
If you have any questions, please write in the comments. I will answer.
Save not to lose:
Zarina Musina
practicing marketing copywriter
I have been writing since 2012. My specialization is selling texts for landing pages, websites and mailing lists. I train and improve the skills of copywriters. Subscribe and let's chat: VKontakte / Telegram channel / Chat in Telegram
The social network itself still has no special mechanics. But there are at least three suitable solutions. Detailed instructions on them were compiled for Pressfeed by the author of the blog SMMplanner Alexey Edakin.
The Instagram application and the website do not have a built-in function for delayed publications, as is done in VKontakte or Odnoklassniki. But on the other hand, Facebook, which owns Instagram, offers two tools at once - Creator Studio and Business Suite, where this function is available.
Creator Studio is Facebook's official content publishing tool. It is simple: you need to go to your Instagram account, click on the "Publish" button, set the release date. Everything, the post will go to the "future"!
Changing the type of account on InstagramFor delayed posting, your Instagram account must be switched to a business profile. To do this, go to Settings → Account → Change account type.
Link the page to Facebook right away: Edit profile → Page → Create or connect a page.
Associating an account with FacebookNow let's start delayed posting.
Step 1. Go to the Facebook Creator Studio homepage. Select the tab to enter Instagram. You will need to enter your username and password on a new page.
If you have linked pages on Facebook and Instagram, log in via Facebook, so you can post to both social networks.
Step 2 . Click "Create Post" and select "Instagram Feed".
You can also make a delayed video in IGTVStep 3. Create a post. Add a photo or upload several at once to make a carousel. There is no built-in editor, but you can mark an account and crop images to 1:1, 1.91:1 and 4:5 formats.
You can add a geotag to a postThe maximum amount of text is 2200 characters. You can make 30 mentions and post 30 hashtags. All indents and paragraphs will be preserved - you do not need to use services to create invisible spaces.
In advanced settings, you can disable comments for a post and write alternative text for uploaded images.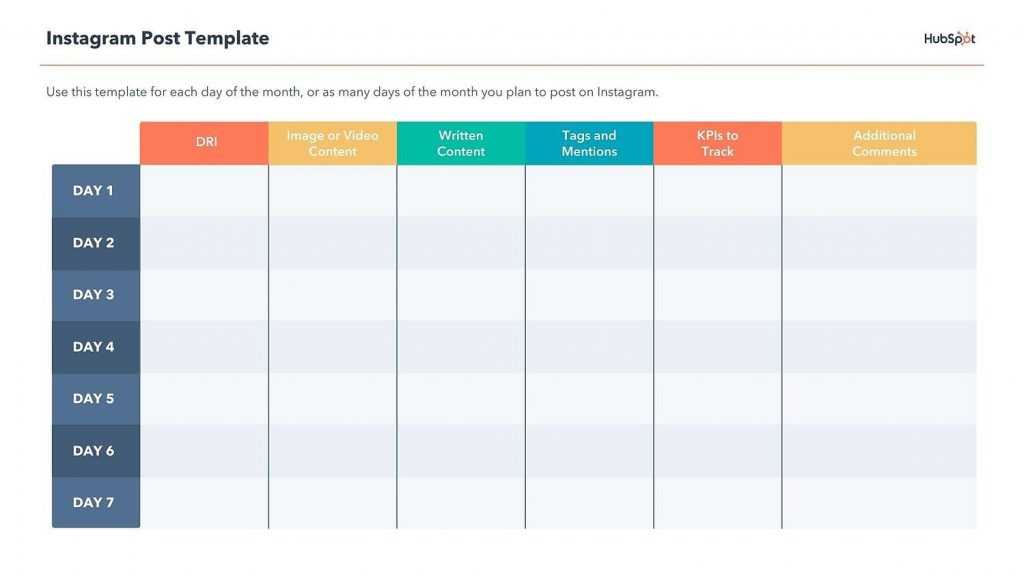
Step 4. Making a delayed post. Click on the arrow next to the "Publish" button and select "Scheduled Post". We set the time and day.
A delayed post cannot be released immediately to the feed - the minimum time is +10 minutes from the current one. Planning for later dates is unlimited - you can set any day and time.
We plan to release a post on InstagramAs a result, the delayed post will appear in the profile exactly at the specified time, with all the tags and a breakdown by paragraphs in the text.
A delayed post is no different from a posted one from the applicationYou can view all posts in the "Content Library" section - the first in the list will be scheduled publications. In the same section, you can see the number of likes and comments for each post that appeared on your account.
Where to see the release date of post Creator Studio has a publication calendar - this is a visual content plan. A scheduled post can be edited or its deadline can be shifted - this helps to flexibly change the order of posts.
In the "Statistics" section, you can see the audience and study the dynamics of likes, coverage. The data is available for a week and a month and is no different from the statistics from the application.
How to view Instagram statistics on a computerCreator Studio has apps for iPhone and Android, but delayed posting is only available for Facebook. If you want to make scheduled posts on Instagram from your phone, you will need to install Business Suite.
Business Suite is a marketing platform for managing advertising and commercial accounts on Facebook and Instagram. The service has an online version and applications on the phone. The functionality is wider than that of Creator Studio, so you can also do delayed posting on Instagram.
Advertising no longer leads to the target audience?
Tell the media about your product for free
How it works
You need to transfer your Instagram account to a business profile and link it to Facebook - the Business Suite can only be accessed through this social network.
See instructions above.
After that, install Business Suite on the phone.
Step 1. Download Business Suite to your Android phone or iPhone.
Download Business Suite to phoneStep 2. Log in to Facebook by email and password. Click the "Publish" button in the center. We switch in the post editor to the Instagram profile.
If you do not switch, the post will be sent to both social networks at onceStep 3. Create a post. We write the text, add an image, mark people and put a geotag. We click "Next".
Writing a post. The restrictions are the same - 2,200 characters maximumStep 4. Set the exit time. Click "Publication scheduling options" → "Schedule for the future". Specify the date and time. Click "Schedule" and go back. Click "Publish".
We plan the release time of the post on Instagram The post went on hold. You can find it in the "Publications" → "Scheduled" section. You can edit the post, change the posting time, or delete it.
Guide “How any company can start publishing in the media”
How to choose media, make friends with journalists and what to check in the text before sending.
Watch for free
How to delete a scheduled post for InstagramBusiness Suite, like Creator Studio, has access to profile statistics and a number of advanced features: you can reply to direct messages and run targeted ads. The only downside is that you can’t schedule stories in both services. But there is a solution.
To do this, we will use one of the delayed auto-posting services with the ability to edit stories - SMMplanner.
Step 1. Go to the SMMplanner website. We enter the account, create a new one or do it through any social network.
Step 2. Enter the menu. Go to the menu tab and select "Accounts".
Step 3. Connect your Instagram account. Select "Advanced API SMMplanner". Enter login and password.
What does it mean: posting through the Instagram API will not allow you to create delayed stories - its functionality is the same as Creator Studio.
ConnectingStep 4. Planning stories. We return to the "Posts" section and click "Schedule a story."
Planning a StoryStep 5. Creating a Story. First, select an account, then make a background - you can upload a photo or video. All stickers from the application are available, but if you need text, you will first have to add it to the image. You can use the Canva or Crello editors that are built right into SMMplanner.
Edit and set the timer Step 6. Plan the time. Click "Schedule", set the date and time. After that, the story will appear in the "Posts" list - it can be edited or rescheduled for another time.