NewsInformationHow to add someone to restricted list on Facebook: Step-by-step guide
Advertisement
India Today Web Desk
New Delhi,UPDATED: Nov 9, 2020 17:42 IST
How to add someone to restricted list on Facebook
By India Today Web Desk: Facebook is a well-known social media application where people can upload their photos, videos, and share their status with other Facebook users. It even allows its users to create a page in order to connect with people. Now if you have a person in your Facebook friend list that you don’t want to see your Facebook activities you can add him/her to the restricted list on Facebook.
advertisement
You can someone in your Restricted list. It is for people you’ve added as a friend but may not want to share with your Facebook posts and other media.
When you add someone to your Restricted list, you’ll still be friends with them on Facebook, but they'll only be able to see your public information and posts you tag them in.
Here is how to add someone to your Restricted list: If you don't see it, tap on See More.
READ: How to enable Face ID lock for Facebook Messenger: Step-by-step guide
Edited By:
Megha Chaturvedi
Published On:
Nov 9, 2020
Advertisement
5:53
2:14
2:56
4:01
Advertisement
 Friends and family bid him a teary goodbye
Advertisement
Facebook is exceptional at keeping us connected to people we’d otherwise lose touch with. It’s equally adept at helping us stay involved in the lives of our family, friends and professional contacts. There’s an art to picking and choosing who sees what, though – just because we can share everything with everybody doesn’t mean we should.
There’s a side of you that you present to the people you work with. Protecting both your privacy and your reputation means filtering what you let your managers, co-workers, partners and clients see. The Facebook restricted list lets you control who sees what, and additional privacy settings also let you manage what you see of everyone else’s.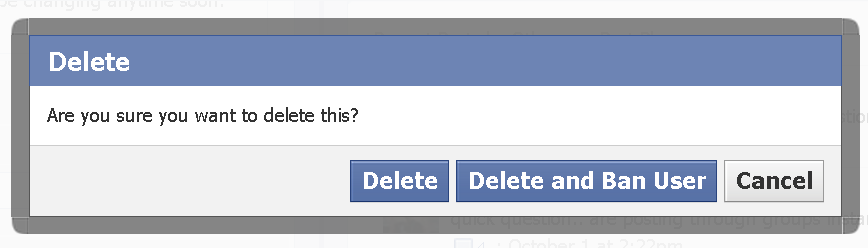
Before we get into it, remember this: nothing that you post online is ever truly private, even if you’re diligent about your privacy settings. Whether it’s a fluke that exposes your protected posts, a hacker who gets into your account or a screenshot someone passes along, your content can get out to the public. If what you post is career- or relationship-ending, it may not be worth it.
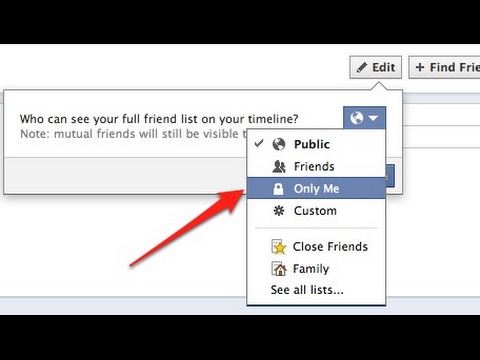
When you add someone to the Facebook restricted list, you remain friends with them while limiting the posts they’re able to see. They will only see your posts if you’ve set the audience to “Public” (indicated by the globe icon), if they’re tagged in it or if a mutual friend tags both of you in the post. They will not know that they’re on your restricted list. You will still be able to chat with them via Messenger and you’ll see their posts in your News Feed as normal.
Let’s say you don’t want your supervisor to see everything you post on Facebook, so you add him to your restricted list. The next time you post, you select the “Friends” audience. Your supervisor will not be able to see the post – it won’t show up in his News Feed and he won’t be able to see it if he goes directly to your profile. However, if you choose a “Public” audience or you tag your supervisor in the post, he will be able to see it even though he’s on your restricted list.
There are all sorts of connections you may want to add to the Facebook restricted list:
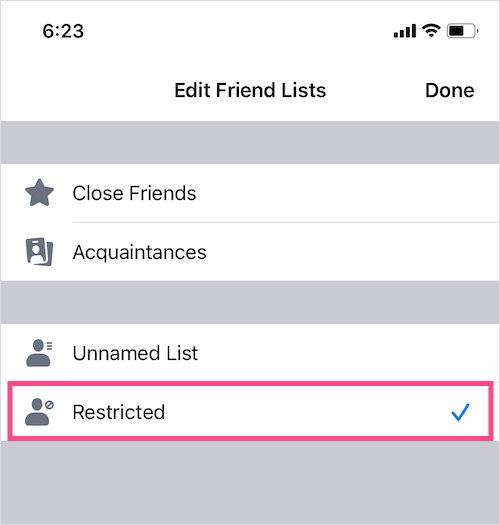
Here’s how to add people to the Facebook restricted list on an iPhone:
The process is similar on a browser:
To remove a friend from the restricted list, go through the same steps and just de-select “Restricted. ”
”
Wondering if you made it onto someone’s restricted list? There are a few ways to figure it out (if you care enough to) aside from asking them point-blank.
If you’ve given your Facebook a privacy overhaul and you want to make sure your past posts aren’t seen by everyone and anyone, you can limit their visibility. This will automatically set all of your past posts to “Friends,” indicated by the icon with two people. People tagged in the posts will still be able to see them. Here’s how to do it on an iPhone:
Here’s how to do it on a browser:
If you only want to change the privacy of a single past post, here’s how to do it on an iPhone:
The process is similar on a browser. You just go to the post, hover over the privacy setting and then select the setting you want. You can also choose the “Friends except…” option to block certain people or lists from seeing what you post (you can do this when creating a post, too).
The easiest way to change who will see your future Facebook posts by default is through the browser. On your iPhone, you have to actually post something in order for the change to take effect. This just sets the default; you can still change the visibility for a specific post by clicking the dropdown when creating the post.
In addition to the Facebook restricted list, Facebook also has a Close Friends list and an Acquaintances list. Adding people to these lists can help you control what you see in your News Feed. You can also set your posts to be hidden from people on these lists.
The Close Friends list is for people whose posts you want to see more of, while the Acquaintances list is for people whose posts you want to see less of. By going to an acquaintance’s profile, you can see everything they’ve posted, including the posts that didn’t show up in your feed.
Facebook auto-creates a few lists for you, like people you went to school with. If the ready-made Facebook lists aren’t quite cutting it, though, you can create your own custom friends list. With a custom list, you can better micro-manage who sees what.
Creating multiple friend lists helps when selecting who can and cannot see what you post, but it also gives you the option to filter what you see. By going to “Explore” and then “Friend Lists,” you can select the list you want and then view all of their recent posts in a News Feed.
If you want to stay connected on Facebook without unfriending someone, you can unfollow people on Facebook so their posts stop popping up in your feed. On an iPhone, go to the person’s profile and click the Friends icon under their profile photo. Click “Unfollow” in the pop-up.
On a browser, go to their profile and hover over “Following.” Click “Unfollow [Name]” on the bottom.
You can customize what you see in your News Feed in a few ways. On your browser, click the three dots to the right of “News Feed” on the left. On an iPhone, click the three lines on the bottom right, click “Settings and Privacy,” click “Settings” and then scroll down to “News Feed Settings” and click “News Feed Preferences.” You’ll get several options to choose from. These three are the most useful:
There are a number of other privacy settings that can help you manage your Facebook account. You can find these under privacy settings and “Timeline and Tagging” settings. Control things like:
When you feel strongly about not being visible or available to someone, consider blocking them – you won’t appear in their search results, they won’t be able to see anything on your profile and they won’t be able to contact you in Messenger.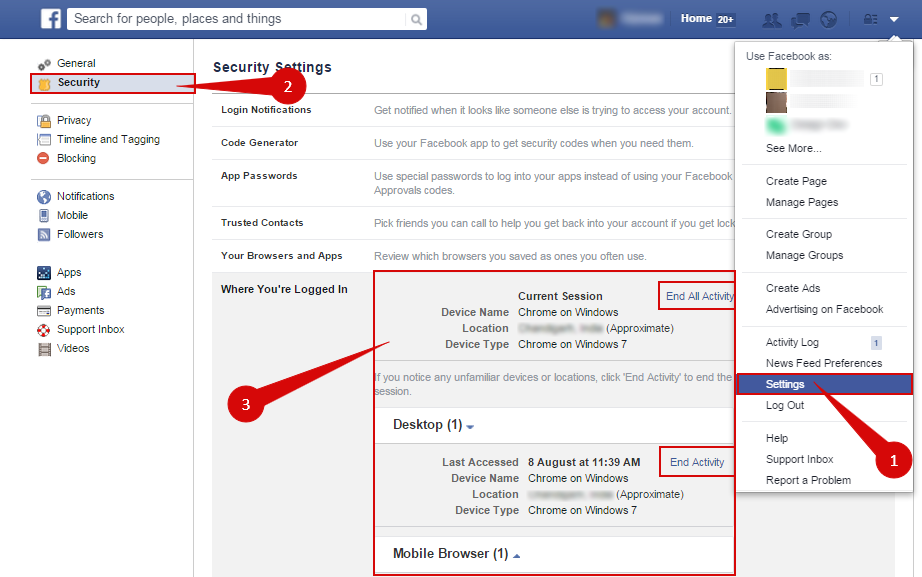
If you have hundreds or thousands of friends, it’ll take hours to comb through them to unfriend, unfollow or add them to the correct list, and you may still miss some. Once you’ve gone through everyone you work with to ensure they’re not seeing certain content, take a more organic approach with the rest of your list. Make a point to check Facebook every day and look at birthday announcements, then make privacy changes to just those people. After a year, you’ll have updated everyone on your list.
It’s not possible to unfriend multiple contacts at once, so you have to consider each and every person you unfriend – and even though disconnecting will cut down your contacts list, it could leave people with hurt feelings. People don’t get notified when you unfriend them, but they will notice that they’re no longer connected with you if they go to your profile.
A random acquaintance who you’ve never met or talked to in real life is probably safe to unfriend without any repercussions, but people you’ve known for a long time, even if communication has been non-existent in recent years, may get insulted. To keep the peace and avoid burning a bridge, unfollowing a person and adding them to your Acquaintances or Restricted list may be a kinder, less dramatic choice.
The larger your Facebook network, the more your privacy is up for grabs, and the safest option is to never post something that you wouldn’t be okay with everyone seeing. Since you want to use Facebook to express yourself, though, put thought into which individuals and lists can see certain types of content every time you post. You’ll communicate with your most important connections without having your privacy invaded.
Have you found any clever ways to make Facebook work for you and expertly manage your connections? Tell me about it in the comments!
Featured image via Vadym Nechyporenko / shutterstock.com
one What is Restricted Access on Facebook
2 How to restrict access on Facebook
3 Why can't I add as a friend on Facebook
four How to add friends on Facebook and not be blocked
Every Facebook account owner sooner or later faces the problem of "unwanted friends". You post various personal information in your profile, add interesting photos, comments and posts intended for close and old, time-tested friends, and completely strangers or colleagues knock on your “friends” who, in principle, should not see this information. What to do: it is inconvenient to refuse, to admit - you will have to carefully filter all the information posted and remove the excess?
Before moving on to the topic, I suggest looking at feature articles: a review article about Facebook itself and interesting data about how Russian brands behave on Facebook.
Taking into account the new features of Facebook, there are three ways for each user:
 Both decisions are fraught with difficulties in further communication and the loss of good relations;
 What is Friendship with Limits on Facebook and how can I use this feature?
Preservation of confidentiality and personal information is one of the priority policies of Facebook. Therefore, among other settings, the Privacy setting allows you to restrict access to your publications not only from outsiders, but also from friends.
Facebook offers an interesting solution to a friend request from strangers, colleagues or relatives. So, if it’s inconvenient to ignore or openly refuse, feel free to add acquaintances to “friends”, but at the same time use the “Limited” list. That is, a person becomes a friend on Facebook, but at the same time he will fall into a special list of "Limited Friends".
"Restricted access" is a list of users from among your friends who will see only your page's public information and public posts. Also, a user from "Restricted Access" will be able to see your new post only if you mark it.
Also, a user from "Restricted Access" will be able to see your new post only if you mark it.
Users on this list are considered friends, but they do not have full access to your account information. Only the “official” part of the content is available to them, and personal photos, records and other too private content are simply not available, as well as for ordinary outsiders. It is very convenient and practical, there is no offense and at the same time there is no leakage of private information to unfamiliar people.
How is this possibility realized in practice? First, you add the person as a friend as usual (the "Confirm" button), and then add him to the "Limited" list. The sequence is as follows:
 In fact, it all looks very English - polite and very respectful to the user.
 In addition, there is one small subtlety in providing information to friends from the "Restricted" list - as already mentioned, they do not see your personal information, they cannot view photos that are not intended for the general public, but if this person is tagged on the posted in photo album as a "friend", then this photo will become available for him. If at least one of your close friends points to a person from a limited list in the picture, Facebook will send you a request for permission to publish and openly show the photo. Be sure to keep this in mind when adding new pictures and tagging friends and acquaintances on them.
Consider another option adding a friend to the "Restricted Access" list
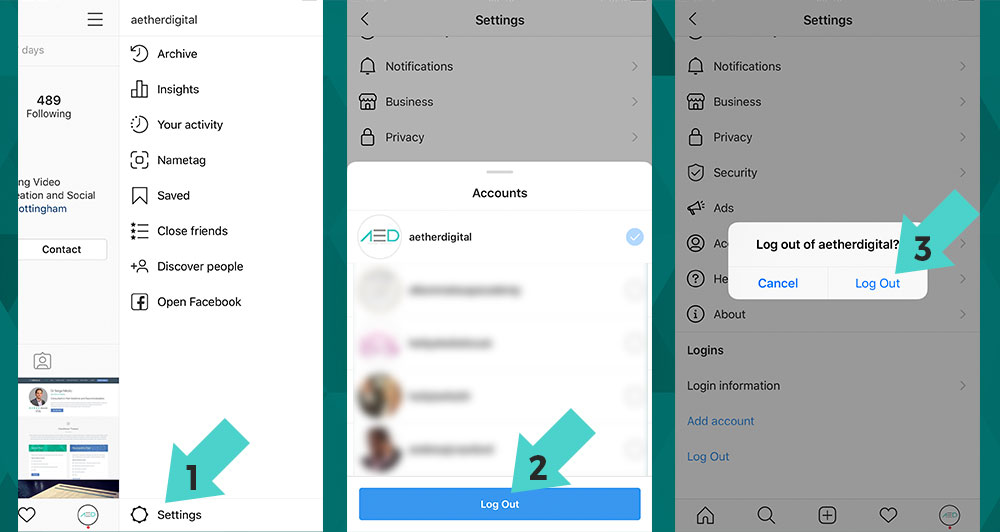
In order to add a friend to the "Restricted Access" you need to open your profile and go to "Settings". Next in the menu you will see the item "Block". By clicking on this item, you will find yourself on the "Block Management" page. The first item on this page will be "Restricted Access". On the right there will be a column "Edit list", by clicking on this panel you can enter the name of the friend you want to add to "Restricted access".
Keeping your materials and important information secret is the desire of every user. This is especially true when annoying personalities ask for friends and start commenting non-stop on all posts and photos. In such situations, Facebook allows its followers to restrict access to information and publications on a personal page from other users.
Enter the "Privacy Options" tab. This tab can be found by clicking on the settings icon, which is located in the upper right corner of the page. Next, select "Settings" in the menu, then "Privacy".
In this tab, select the parameters of those users who can see your photos, leave comments and write you in private messages.
Also, you can create a narrow circle of users who can see your posts. For the rest, your page will be closed.
Facebook recommends that you only add people you know personally as friends and that you avoid unsafe connections. However, if you have already decided to add a person as a friend, but have some problems with this, then this may be due to such reasons as:
Sometimes Facebook can block attempts to add a person as a friend, and not allow you to send requests, deeming previous requests that did not receive a response as spam. If you were blocked by mistake, then you should wait a while, and the site administration will remove the block.
How to avoid blocking?
Valentin Romanenko
Blog (c) 2009-2022
Projects
Facebook is an excellent online platform where people meet, communicate, start business and even personal relationships. However, for a considerable number of people, the degree of openness and transparency that Facebook offers to its users is not an easy test. After all, these people value privacy very much.
Therefore, we will analyze how to protect your account from unwanted interest, and how to make sure that information about one user does not become public domain.
Content:
There are no so-called "private profiles" on Facebook, when information about the user is available only to him. However, this does not mean at all that the social network toolkit does not contain the components necessary to protect information. Each user is able, using individual settings, to determine the degree of accessibility of the information contained in his profile.
Facebook's privacy settings are responsible for this segment. This is a very extensive section in the settings menu. In addition, users should be aware that the social network offers them to choose the privacy settings for the published content.
When placing a post or any information, the user can see icons in the form of a padlock, a silhouette or a globe next to the field to be filled. They are the regulation of the degree of confidentiality of information and content posted on the social network. What is not for prying eyes should be marked with a padlock, since this level of confidentiality means that the publication is completely closed to everyone except the account owner.
In the desktop version of Facebook, you can block access to your personal profile in the following way:
If there is a desire that any information in the Facebook profile should not be available to outsiders at all, and if privacy settings apply to it, then you can safely use the "Only me" option.
Allow only some friends: if there is something that can only be accessed by some friends, then you can give them access using the "Specific Friends" access.
Exclude only some: there is a "Friends except" option, which optionally allows you to filter access to users who are in the friends list.
Important! Every Facebook user should know how to check the availability of personal information that he entrusts to the social network.
To do this:
In particular, if you don't want everyone to know where you work, remove the default globe icon in the Work and Education section. Select, for example, "Friends only". The same is desirable to do with the email address and phone number.
By using a social network using a mobile device, you can hide information that is not supposed to be available, so to speak, to the general public.
What you need to do:
The lower part of the section is given for options that are responsible for the degree of confidentiality of publications, subscriptions and stories. In the same place, if necessary, you can configure accessibility levels.
As you know, a page is a kind of Facebook account that is available to all users. Therefore, the page cannot be closed.
But certain actions can be taken to regulate the degree of confidentiality.

If an unwanted publication appears on the page, you need to click on the name of its author, then on the ellipsis and click "Deny access to the page."
To introduce these restrictions, you need to:
If you need to enter a restriction for users of a certain age, then in the "General" section there is a subsection "Age restrictions".
Facebook groups can also set different levels of accessibility for users who are not members of these communities. By this parameter, groups are divided into:
Facebook group privacy settings are specific: you can only change the group privacy level once every 28 days. If the group has less than 5 thousand members, there are no problems with group status changes. But if the number of participants is more than 5 thousand, and the group positions itself as closed, it will not be able to switch to open status.
How to change the status of a group: