What are Instagram Reels?
How to make a Reel on Instagram in 5 steps
5 tips for making viral Reels as a business
Instagram Reels cheat sheet
By now, you already know that Instagram Reels are a gold mine for helping you grow your following. The short, entertaining videos have a special way of grabbing users’ attention, which can mean lots of engagement for your brand.
Since Reels debuted two years ago, they’ve become the platform’s fastest-growing feature. Creators like Justin Bieber, Lizzo, and Stanley Tucci helped transform the addictive feature from a TikTok wannabe to a full-blown competitor. And we’re not surprised.
But how do you use this tool to reach more people, get new followers, or spread the word about your products and services? In this guide, we’ll cover everything you need to know, from how to make a reel on Instagram to figuring out the best time to post it.
Bonus: Download the free 10-Day Reels Challenge, a daily workbook of creative prompts that will help you get started with Instagram Reels, track your growth, and see results across your entire Instagram profile.
Instagram Reels are full-screen vertical videos that can be up to 90 seconds long. They come with many unique editing tools and an extensive library of audio tracks (featuring everything from trending songs to snippets of other users’ viral content). On top of sounds, Reels can include multiple video clips, filters, captions, interactive backgrounds, stickers, and more.
Reels are different from Instagram Stories. Unlike Stories, they don’t disappear after 24 hours. Once you post a Reel, it’s available on Instagram until you delete it.
The best part? Reels are currently favored by the Instagram algorithm, which is more likely to recommend them to people who don’t follow you than feed posts. That’s huge for social marketers.
Users can also discover Reels in a dedicated section of the Instagram app. A scrollable feed full of trending Reels (a.k.a. Instagram’s version of the TikTok For You page) can be accessed through the Reels icon at the bottom of the Instagram app’s home page.
An individual user’s Reels can be viewed in a dedicated tab that can be accessed above the account’s Feed.
Reels are also heavily featured in the Explore tab. If you’d like to set your Reels up for success with this powerful discovery tool, check out our guide to getting your content on the Instagram Explore page.
If you’re familiar with Instagram and/or TikTok, you’ll find making Reels quite easy.
Are you a visual learner? Check out this video and learn how to make an Instagram Reel in under 7 minutes:
Otherwise, follow these simple step-by-step instructions.
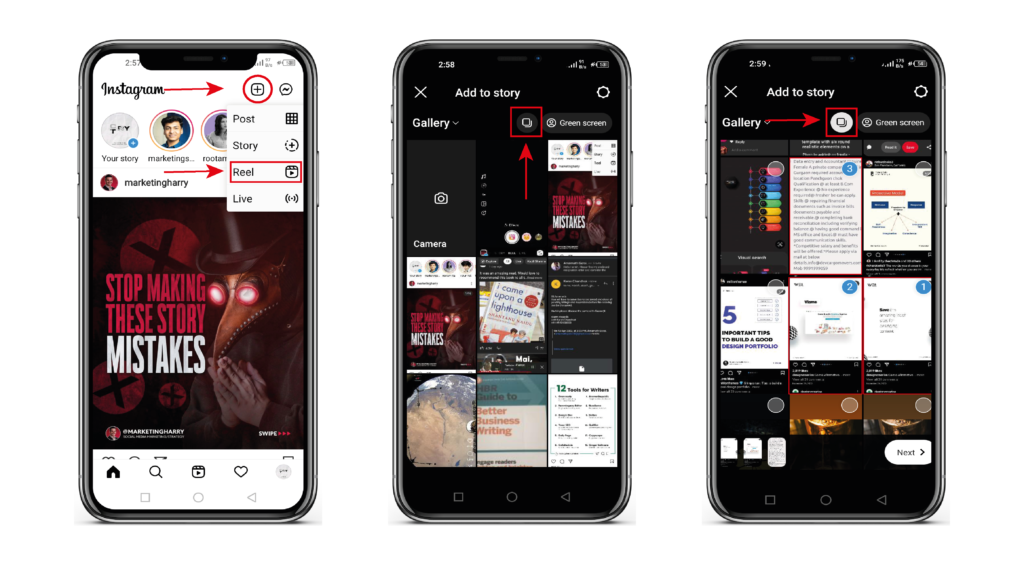
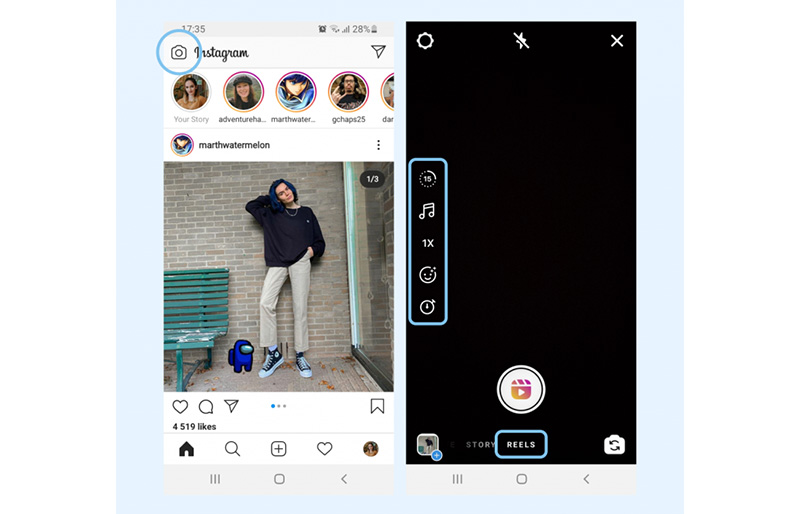
To access Reels, simply open the Instagram app and head to your profile page. Click the plus sign button on the top right of the screen and select Reel.
You can also access the Reels editor by swiping left to the Instagram camera and selecting Reel from the bottom options.
Instagram Reels gives you two options to create a Reel:
Reels can be recorded in a series of clips (one at a time), or all at once.
If you set a timer early on, there’s a countdown before the hands-free recording starts.![]()
During the recording, you can tap the record button to end a clip, and then tap it again to start a new clip.
Then, the Align button will appear, allowing you to line up objects from the previous clip before recording your next. This allows you to create seamless transitions for moments like changing outfits, adding new music, or adding new friends to your Reel.
If you want to watch, trim, or delete the previous clip you recorded, you can tap Edit Clips. Check out our Instagram Reels tutorial for more in-depth editing tips.
Once you’re done with recording, you can add stickers, drawings, and text to edit your Reel using the icons on the top of the editor.
The Reels editor features built-in creative tools so you can do all your editing from one interface.
Here’s what each feature does:
 You can even choose to add your favorite part only.
After you’ve aligned your clips, you can tap the music note icon to add trending sounds or music, or record a voiceover.
You can also tap the download icon to download Instagram Reels to your device to view or edit later.
Check out our Instagram Reels tutorial for more in-depth editing tips.
When you’re ready, tap Next in the bottom right corner of your screen. You will be able to:
Once you adjust your settings, tap the Share button at the bottom of the screen.
Congrats! You’ve posted your first Reel. Now, let’s move on to some tactics that will help you make this format work for your brand.
Optional: Schedule your Reel
You’ve got your Reel ready to go, but maybe 11:30 pm on a Tuesday isn’t the best time to get maximum exposure. You might want to consider scheduling your Reel to post at a more ideal time.
Until recently, this feature was only available via Meta’s Creator Studio, or with a third-party tool like, you guessed it, Hootsuite!
In-app Reel scheduling is coming to both business and creator accounts, with Meta confirming that they “are testing the ability to schedule content with a percentage of our global community.”
While only available to lucky Android users at the moment (check your App, you might have it already!) the scheduling feature is expected to be available to everyone very soon.
At this time, regular posts and Reels can be scheduled in-app, but not Stories and no scheduling feature is available for desktop users.
Instagram Reels can be a great way to get your business in front of the right audience. The feature can also help you grow your following and boost engagement rates. But this doesn’t happen automatically. You’ve got to know the hacks to go viral on Instagram Reels.
The magic of Reels is in Instagram’s not-so-secret sauce — the algorithm. This is the all-knowing matchmaker the platform uses to determine which Reels it shows to which users. Understanding the way the Reels algorithm works can help you get more views from the Explore page and the Reels tab.
Adding trending sounds, using the right hashtags, and making your Reels visually appealing are all great ways to tell the algorithm, “Hey! Pay attention to me!”
If you scroll through Instagram Reels or TikTok on the regular, you’ll notice that many creators use the same sounds on top of their videos. Thousands of people have used The Home Depot Beat and the typing sound audio. That’s not a coincidence.
Instagram Reels sounds are snippets of songs or audio clips from other creators’ videos. When they gain popularity, they can help you get more views if you add them to your Reels. This is because users often search by sounds and because, quite frankly, the aforementioned algorithm seems to like it.
The best way to find trending audio on Instagram is to use the platform and take note of which sounds you’re seeing pop up more than others.
When you scroll through Reels, make note of any sounds that have an arrow next to the name of the sound.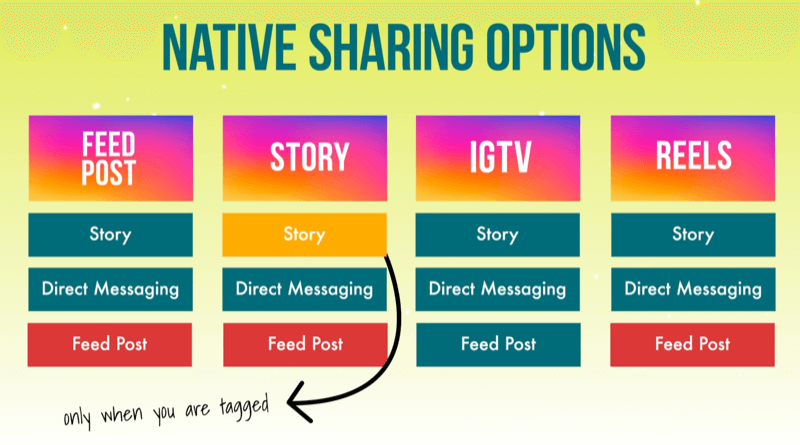 The arrow indicates that they’re trending. It can be tough to find sounds after you’ve already excited a Reel, so make sure to save them and use them later.
One last tip! Be sure to choose songs wisely and use them sparingly. We all know what happens when trending sounds get overused. (Oh no, oh no, oh no no no no no).
As much as you might want to sell, the reality is that users don’t open up social media apps hoping to see ads. They turn to Instagram to explore ideas, connect with others, and get a quick burst of entertainment during breaks in their day. That’s why you need to make sure your Reels help them do just that.
Be sure to create content (yup, this includes Reels) that’s actually entertaining to your target audience. Whether that means leaning into a trending dance or creating quick how-to Reels, aim to delight, inform, and entertain users rather than sell to them.
See: Away’s comedic approach to travel content, Barkbox’s clever use of trending sounds, and Delta’s brilliant attempt to gamify Reels.
That doesn’t mean you shouldn’t turn your Reels into ads, though. Boost those high-performing—but non-salesly!—Reels to get even more visibility.
You can use the same strategies to be successful with Reels that you used to boost content on Instagram Stories or in the original Feed. Consistently posting is one of the best things you can do to help improve your performance across the platform, including in Reels.
Bonus: Download the free 10-Day Reels Challenge, a daily workbook of creative prompts that will help you get started with Instagram Reels, track your growth, and see results across your entire Instagram profile.
Get the creative prompts now!
That’s because it helps increase your odds of going viral. Plus, the algorithm is kind of like your biggest fan—it loves when you post new stuff! In general, the Instagram gods prioritize showing recent videos over stale ones, so keep things fresh.
Posting often also helps you aggregate a ton of helpful insights that will guide you when you’re trying to figure out what works and why. The more you post, the more you’ll learn about your target audience—what they like, when they scroll, and more.
Last year, Instagram added a new feature called Collabs. This option lets you share credit with another creator and allows them to share the Reel from their page as if it was their own.
The Collab feature is a game-changer if you work with influencers, brand partners, and others. It lets you extend your reach to their entire following, which can mean tons more likes, shares, reach, and overall engagement.
Here’s how to use Collabs:
Once the user accepts your collab invitation, the Reel will show up in the Reels tab in their account.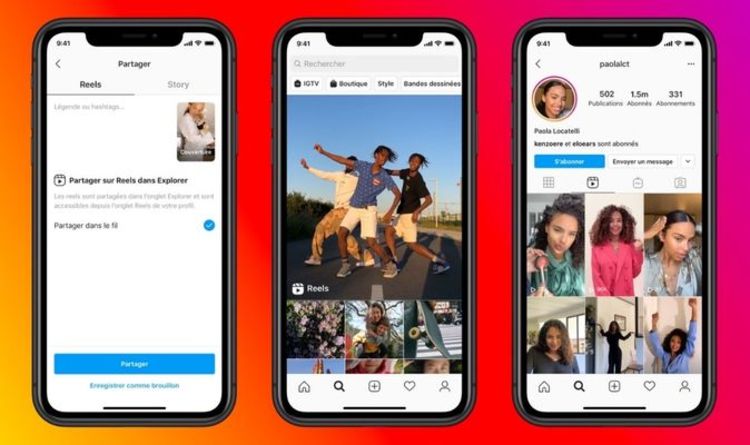
Need quick answers to all your burning Reels questions? Skim our cheat sheet (and bookmark it for later).
Scheduling social media posts is a must when you want to stay on your game without having to work overtime. Luckily, there’s an easy way to schedule Instagram Reels with Hootsuite.
Using Hootsuite, you can schedule your Reels to be auto-published at any time in the future.
To create and schedule a Reel using Hootsuite, follow these steps:
Start your free 30-day trial. You can cancel anytime.
And that’s it! Your Reel will show up in the Planner, alongside all of your other scheduled social media posts. From there, you can edit, delete or duplicate your Reel, or move it to drafts.
Start your free 30-day trial. You can cancel anytime.
Once your Reel is published, it will appear in both your feed and the Reels tab on your account.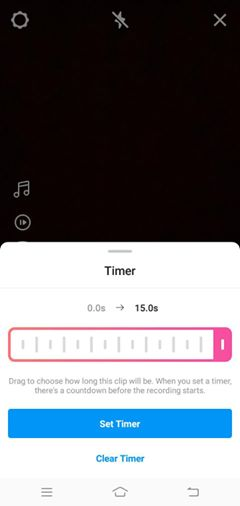
Note: You can currently only create and schedule Reels on desktop (but you will be able to see your scheduled Reels in the Planner in the Hootsuite mobile app).
In-App SchedulingNote: At the time of writing this feature is in a limited testing phase but is expected to be released to all Instagram users soon.
Whether you’re a creator or a consumer, downloading Instagram Reels is a useful tool to have up your sleeve.
When creating, it helps you save drafts directly to your device or share them with others before they go live. You’ll also want to download Reels you’ve created if you plan to share them on another platform.
When scrolling, downloading allows you to save other creators’ videos permanently, even if the creator takes them down. It also allows you to access them when you’re offline.
There are several ways to download Instagram Reels.
If you own the Reel, you can download it using the Download option from the Reels editing page. Once it’s published, you can download it from the Reel itself. Click on the three dots in the bottom right corner of the Reel and select Save to Camera Roll.
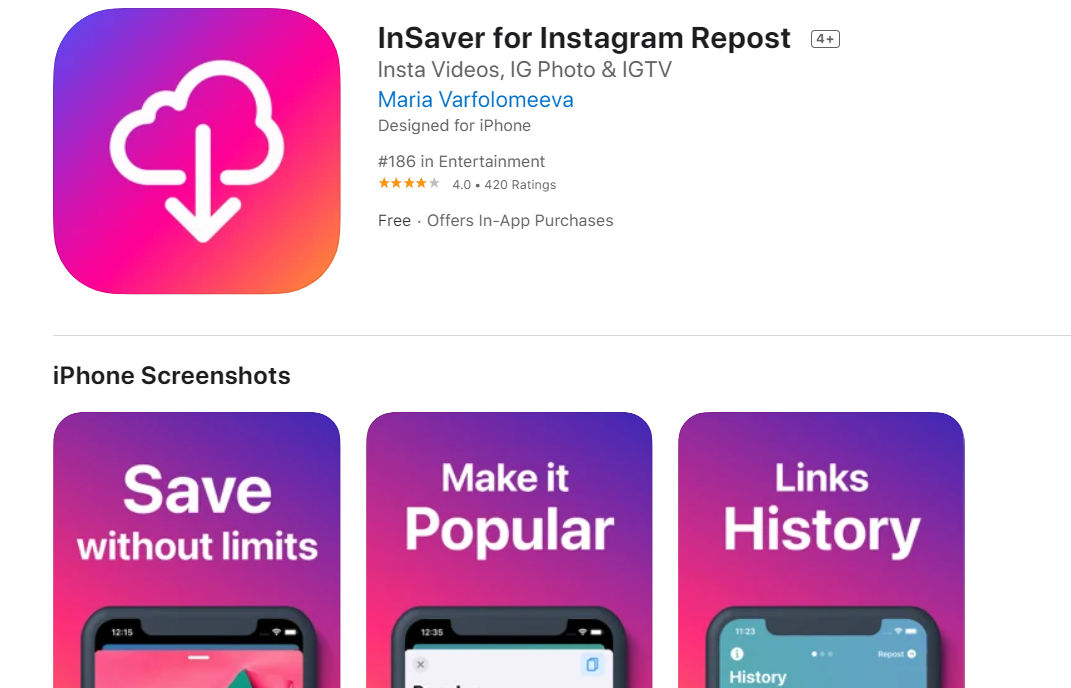
If you want to download someone else’s Reel, you’ll have to record your screen or use a third-party app, such as InstDown or InSaver.
Learn more in our guide to downloading Instagram Reels.
Knowing what time to post on Instagram Reels is an easy way to target your users when they’re the most active. Catching them when they scroll means more engagement and further reach for your brand.
The thing is, everyone’s ideal post time is different. For Hootsuite, the best time to post on Instagram is between 9 a.m. and noon, Monday through Thursday. But your audience may skew later, earlier, or scroll more on the weekends.
Don’t worry. There’s a quick way to figure out when to post. In Hootsuite, you can see the best time to publish Instagram content from the Analytics feature. Click “Best Time to Publish” to see when your users are the most likely to engage with the post. The heat map is a handy way to visualize the best times.
Start your free 30-day trial. You can cancel anytime.
Another way to find the best time to post Reels is to check what worked best for you in the past. To review the performance, of your existing head to Analytics in the Hootsuite dashboard. There, you’ll find detailed stats, including:
Getting the sizing right is another great way to set your Reel up for success.
Using the wrong dimensions can make your post look—we won’t sugarcoat it—downright ugly. And that means an instant swipe-up from users. On top of that, the almighty algorithm doesn’t like it when your Reels look stretched or distorted. We don’t blame her.
So what’s the ideal Instagram Reel size? Make your Reel frames and cover 1080 pixels by 1920 pixels. If you choose to have your Reel show up on your regular Grid (probably a good idea, by the way), make sure your thumbnail fits the ideal size of 1080 pixels by 1080 pixels.
What about the Instagram Reels ratio? Users will have the best experience viewing Reels in full-screen mode, which features a ratio of 9:16. However, Instagram also shows Reels in the main feed, and crops them to a ratio of 4:5.
Just make sure to avoid putting any important information around the edges of the frame, because it could get cut off.
Read our full guide to Instagram Reels sizes.
Instagram Reels can be as long as 90 seconds.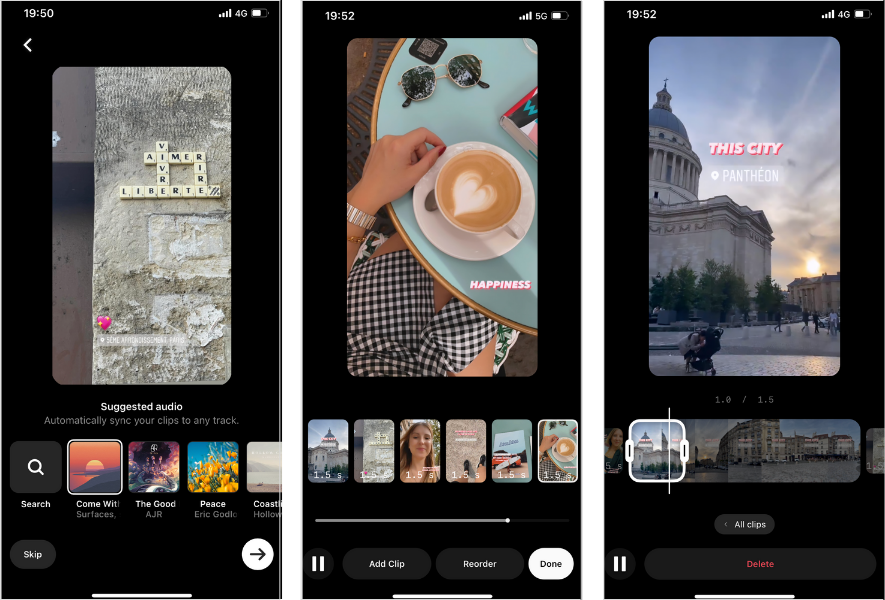
When Instagram first debuted the Reels feature in 2019, users could only post Reels up to 15 seconds long. In 2022, users have a choice of four Instagram reel lengths up to 90 seconds each. That means you’ve got a full minute and a half to dazzle your audience.
But should you actually use all 90 seconds? Not always. It totally depends on the Reel itself. In general, aim for user-friendliness when you’re deciding how long to make an Instagram Reel.
Longer Instagram Reels come in handy for more time-consuming stories, how-to guides, tours, and more.
You certainly don’t want to draw things out, though. Remember that the point of Reels is to create small snippets of delightful content, so keep it short and sweet.
Bonus tip: Unless you’re looking for a quick way to enrage your audience, you should never post multi-part videos when you could do it in one. That’s what 90-second Reels are for!
One of the best things you can do as a savvy Reel creator is checking out what other people are doing on the platform. To get unique Instagram Reels ideas, you can search for content to help inspire you.
A quick way to search for Reels is to use the general search bar at the top of the app. Type in a search feature and explore content, users, and hashtags related to that term.
While Instagram’s standard search function is helpful, it doesn’t only show Reels. A good great way to search only Reels is to click on hashtags from other Reels. This will limit your results to Reels and filter out images.
For example, if you’re an avid consumer of puppy content, you can click on the #dogsofinstagram hashtag from a Reel’s caption to see more Reels of dogs being cute.
Easily schedule and manage Reels alongside all your other content from Hootsuite’s super simple dashboard. Schedule Reels to go live while you’re OOO, post at the best possible time (even if you’re fast asleep), and monitor your reach, likes, shares, and more.
Try it free
Save time and stress less with easy Reels scheduling and performance monitoring from Hootsuite.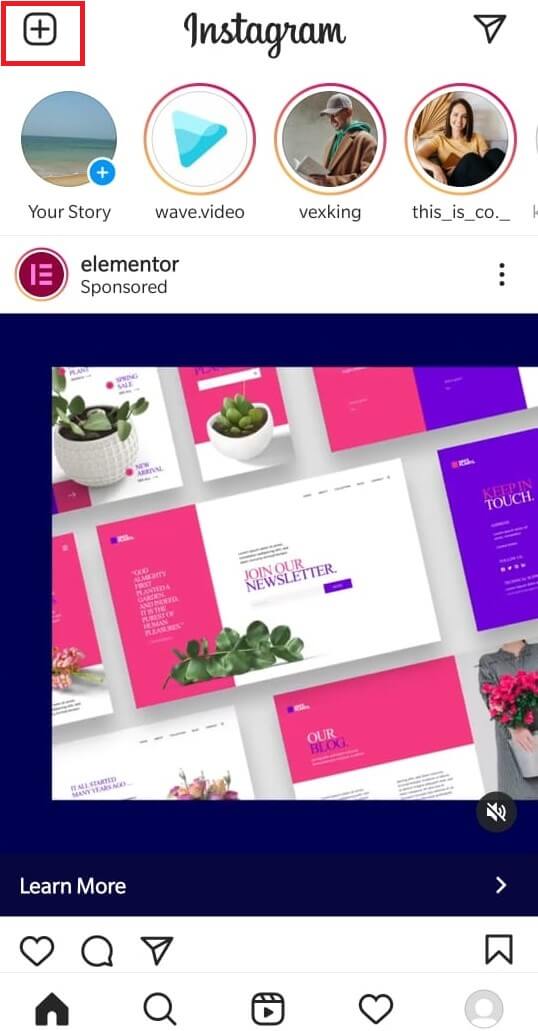 Trust us, it’s reely easy.
Free 30-Day Trial
By now, you may have noticed a lot more videos in your Instagram feed. Instagram has doubled down on video—and Reels are the platform’s fastest-growing format. If you want to know how to make a Reel on Instagram but you don’t know where to start, we’ve got you covered.
With over two billion monthly users, Instagram’s popularity cannot be denied. The rise of Reels—bite-sized video posts—is the platform’s response to TikTok’s mega-popular micro videos. In fact, 66% of consumers say short-form video is the most engaging type of social content. And Reels are one of the main Instagram content formats marketers want to use to collaborate with creators.
With Reels reportedly receiving around 22% more engagement than other video posts, it’s time to strike the iron while it’s hot.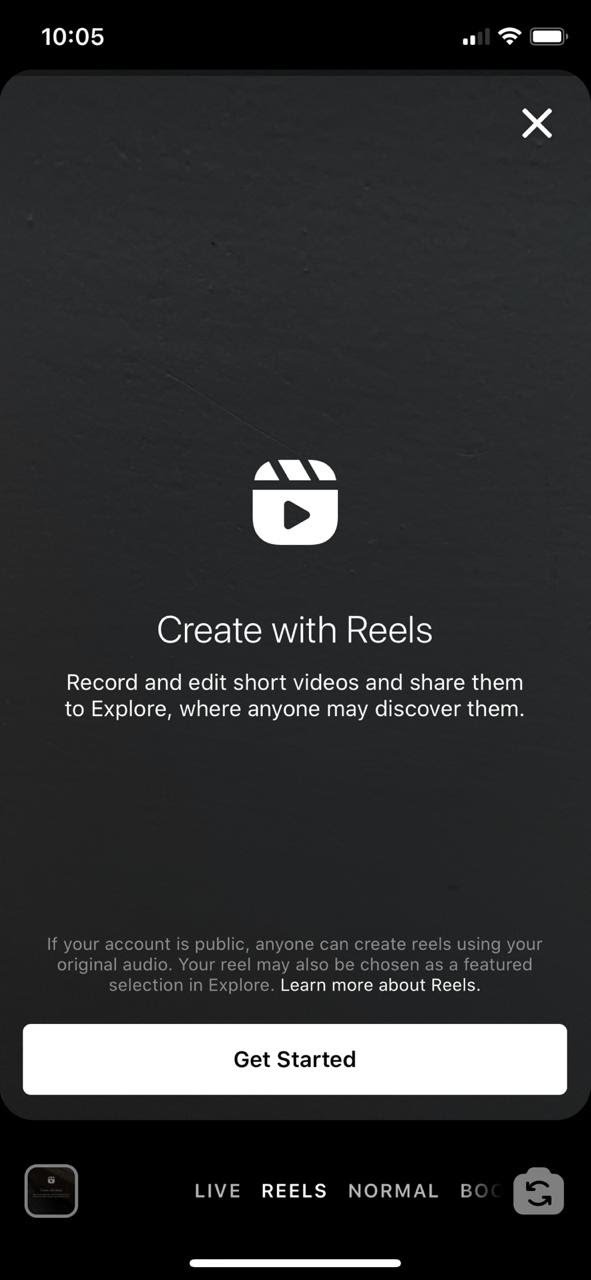 Whether you’ve never made a Reel or you just want some fresh tips, we’re going to show you how to make an Instagram Reel, step by step.
Instagram Reels are short, multi-clip vertical videos that range from a few seconds to 1.5 minutes. Like TikTok, Instagram offers editing tools that allow you to easily create your Reel, and add entertaining features like music and captions.
Why use Reels? In short, they’re the best way to increase your audience, reach and can make it easier to strike viral gold. As Sprout’s Social Media Strategist Olivia Jepson tells us, “Our top videos on Instagram over the last year have been Reels. Specifically, Reels that inspire and offer immediate value for viewers.”
While they haven’t outright said the Instagram algorithm prioritizes Reels, the platform has made it clear that video is their priority—a recent test by Instagram turns all Instagram videos into Reels.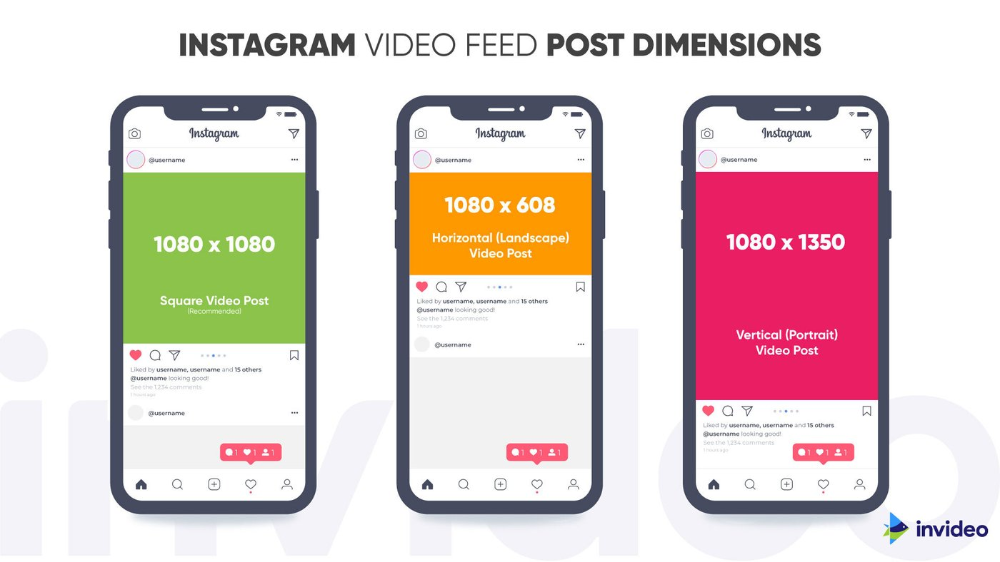 And accounts that haven’t adopted this type of content are feeling the crunch. What’s more, the platform has made Reels the most discoverable content format, able to be shared and featured in four places: Stories, a Reels-only tab, the Explore page and the regular feed.
This presents a major opportunity—using Reels gives audiences more ways to find your content, and gives you more ways to grow. Ride the popularity wave while this format is still fresh.
Producing a new type of content can feel daunting, but it doesn’t have to be. With Reels, the reward is worth the learning curve.
Let’s walk through making an Instagram Reel, and tips on how to make it stand out.
The secret sauce behind successful Reels is the same as any other content: Let your brand’s voice and values guide you.
To create your strategy, consider the following:
 What do you want to accomplish with them? Increasing engagement? Reach? Knowing this ahead of time will help guide the types of Reels you make.
Once you start posting, check your analytics to see which Reels perform the best. This will help you refine your content strategy. Using a reporting tool like Sprout Social, you can even see how your Reels perform against all of your content—on Instagram and beyond—to prove their impact.
This is where the fun begins—grab your phone and open Instagram. Tap the “+” in the upper right corner. Then, you’re ready to get started.
There are two ways you can gather footage for your Reel: filming or using existing footage.
Lights, phone, action! Start filming by holding down the round white recording button. Use the double arrow icon to flip the camera toward yourself, or to film what’s in front of you.
While you film, a pink border will appear around the white button. This shows you how much you’ve filmed so far.
Use the tools on the side of the screen to spice up your content. Here’s what they do, from top to bottom:

Repurpose videos and even photos you already have. Transform previously posted TikTok or Instagram content. Or break up existing YouTube videos into short, snackable Reels.
To select existing visuals from your phone’s library, tap the square image and plus sign icon in the bottom left corner.
If a lot of your videos are horizontal, upload them to your Reel and tap the “scale” icon. Alternatively, upload your footage as if you’re creating an Instagram Story. Once in the Story editing window, use your thumb and forefinger to stretch your footage into vertical, full screen content. Then, hit the three dots in the upper right corner and tap “save.”
Level up: Create your first Reel by piggybacking off of someone else’s. Remix allows you to post your own reaction or commentary to an existing Reel—just open the Reel you want to use and tap the three dots in the bottom right.
Time to put your video editor hat on. Once you have your footage, hit “Next” to start editing.
Tap “Edit clips” in the bottom left corner. You’ll then see all of your clips lined up at the bottom.
Music adds immediate entertainment value—in fact, it’s one of Instagram’s main tips for getting discovered.
While editing, tap on the music notes icon. This will take you to an audio editing screen. Adjust your video volume and the volume of added audio, like songs, by dragging your finger down the columns that appear.
On this screen, you can add three kinds of audio:
You can use all of these together, or pick and choose.
When you add music, the name of the song will appear on your Reel. If you don’t, when people watch your Reel, your Reel’s sound will be marked as “original audio”—if your account is public, other people will be able to create Reels using that audio.
Level up: Find trending sounds and songs on Reels. When you open a Reel, a little arrow will appear next to the name of the audio if it’s trending. Tap on it to save it for later.
Video closed captions are key for social media accessibility. They also keep people watching—even when their phone is muted.
To add closed captions, tap the square smiley face icon at the top of your screen. From here, you can add GIFs, stickers, polls and more to your Reel. For now, select “CC CAPTIONS”.
Once Instagram has transcribed your audio, customize the style of your captions at the bottom of the screen, and change the text color at the top of the screen.
Level up: Auto-captions aren’t perfect. Edit them by tapping the text as it appears. Then, tap the words you want to correct, and hit done.
If you’ve ever created an Instagram Story, this process will look very familiar.
Tap the “Aa” icon in the top right corner of the screen. Then, type in your text and customize the look and color. To add more, tap the “Aa” icon again.
Adjust where your text appears by tapping and dragging it to where you want it to be on the screen. And set when it will appear and disappear in the video by tapping the corresponding text at the bottom of the screen. Then drag the left and right bars to choose when the text’s duration starts and ends.
Delete text by tapping and dragging it to a trash icon that appears at the bottom of the screen.
Whether you want to add aesthetic filters or a crown of cartoon hearts, tap the sparkles icon at the top of the screen to search for and add new filters and effects, or ones you’ve saved.
When you’re done editing, tap “Next”—this is where you’ll prep your Reel before you publish. Here are the three most important preparation steps to complete every time:
Once your Reel is prepped, you have three sharing options: Publish immediately, save a draft or schedule it.
Publishing quickly is crucial for jumping on trends. Once you’ve prepared your Reel, simply hit “Share” to send your Reel out to the world. Then, share it to your Story for extra amplification.
If you don’t want anyone to be able to remix your Reels, head to your Settings and Privacy section to restrict this.
If you’re not ready to publish your Reel, you can save it as a draft. Once you’re in the window where you can prep your post, tap “Save Draft” at the bottom of the screen. Then, find your Reels drafts later by going to your profile and tapping the Reels icon under your bio.
Scheduling Reels ahead of time with a tool keeps your content flow consistent, and takes one more thing off your plate.
Using Sprout Social, you can easily schedule your Reels. When your Reel is ready, download it from Instagram by tapping the download arrow.
Then, upload it into Sprout where you can prep it in many of the same ways as on Instagram.
Keep in mind: you can’t use Sprout for Reels with sounds from Instagram’s music library—but we’re still here to help. Use the Sprout Mobile Workflow to get a reminder on your mobile device on the day and time you want to publish your Reel.
The only constant in life is change, and that adage could not ring more true for social media. Reels may require a little practice. But it only takes making one Reel to unlock your video editing abilities and start connecting with your audience in a new way. You might even find that you love the process.
Use this guide to make creating Reels reel-y easy. Before you know it, it will feel as simple as one, two, post. Now that you know everything about how to make a Reel on Instagram, check out our article about creating an Instagram marketing strategy to elevate your channel.
Modern marketers have no idea how it is possible to manage their marketing strategies without Instagram videos. Today, this tool is spreading at a tremendous speed. Such an increasing popularity of video as a format for delivering information is largely justified by the fact that video marketing has become very accessible. You do not need to have video editing skills, you do not need to hire a team of designers, but you can use various video editors and create a great professional video.
With SUPA Video Maker, you can create your own unique video in minutes. All you need for this is a little time and desire. Intuitive interface and detailed video instructions will help you quickly figure out how to use our video maker. Plus, a collection of ready-made templates will help you choose a direction, navigate what suits you and your business. In SUPA, you simply choose the template you like, modify it to suit your style, add text, animated elements or stickers, emoji, choose brand colors and fonts. With this step-by-step algorithm, the perfect video for presenting your business on Instagram will be ready in 10-15 minutes. Easy fun creation process and professional result is the best solution for your brand. In addition, with SUPA you can create videos for Instagram online right in your browser without overloading your computer with heavy programs. Don't worry about the correct video size or format - we've already taken care of that.
And all this without big budgets and with minimal time and resources. In 2020, over 85% of businesses plan to use video marketing as a marketing tool. Instagram videos are a great way for a brand or person to make themselves known, present a product, tell their story, and attract followers. Video can be both free and paid promotion method. We wrote about how to make an advertising video for Instagram here.
73% of US teens say that the best platform for brands to tell them about new products or promotions is Instagram. Only 12% of teens will respond to Facebook, and 37% to email
Source: eMarketer
Video can help you build brand awareness, share your ideas, promote products, gather feedback, learn about customer preferences, or educate your audience.
Video on Instagram can be posted in several formats - video in the feed, video Stories, IGTV (read more about IGTV updates here) and Instagram Live, which gives any business to show creativity and space for imagination and experimentation. You can run ads in any of these formats. Advertising in stories has already proven to be particularly effective. We wrote about how to create advertising stories correctly here.
More than five million businesses use Instagram to interact with their customers. It's time to join them. The most popular video is the one that engages your followers and gives them the opportunity to feel connected to your brand or your life. At SUPA, we have made sure that the video is engaging. To do this, we have created a unique database of templates, many different elements, emoji, stickers. For more dynamism, you can create an animated video or animated text. Rearrange slides, add brand colors, add text and pop-ups. You can add music to an Instagram video in our SUPA video maker. Music will help your story and plot unfold fully.
But it is important to remember that the video in the Instagram feed does not automatically play the sound, the user himself needs to click on the video for the sound to appear. Therefore, make your video as clear as possible and without sound. To do this, it is good to use titles, logically build shots and plot. The visual component plus good quality become more important than ever before. Tell a story in your video, lure the user with a scale or an unfolding plot so that he can clearly see the benefits of your product or service.
Video has already become a necessary element of any well-thought-out content strategy, so use it to the maximum. According to research, Instagram users interact with posts 20 times more often than Facebook users.
Try to keep the balance of text and video, there should not be too much text, no more than 20%. Promote your logo and brand colors: in this way you will form clear associations with subscribers, and they will recognize you by your characteristic video style or storytelling style, color style.
Another reason to create and post videos is viral content. Videos go viral much faster than photos. In addition, videos are more readily shared than photos. According to eMarketer research, user engagement with video content is growing at a faster rate. People choose stories, plots and details that cannot be fit into one picture.
Creating a video for Instagram in our video maker is very easy. Especially if you know the main features of a successful video.
 Use repetitive elements or images, corporate fonts.
Posting a video on Instagram is pretty easy. Save the video created in SUPA to your mobile phone and go to the Instagram application, click on the "+" button for adding a new publication, add the finished video saved previously to the gallery, and click "next". Since the video has already been edited, all you have to do is post the video.
Remember that you need to choose an interesting video cover.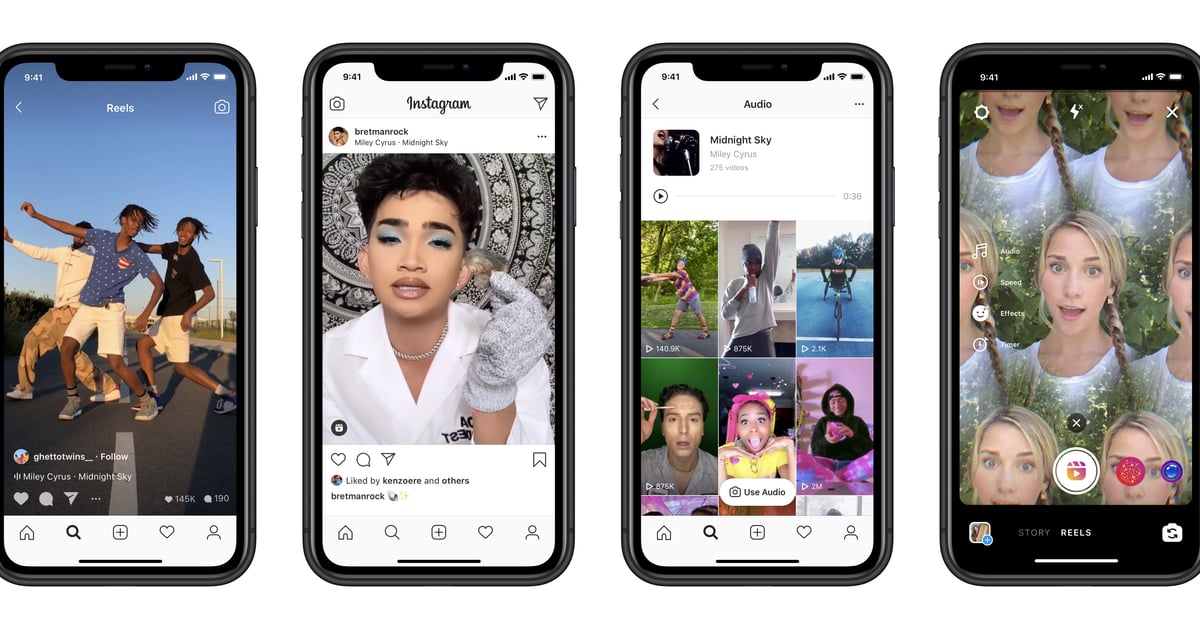 Think about it in advance so that your video has exactly the frame you need. The cover is the first impression that can both attract and repel the user. Even with the coolest video, a subscriber can simply pass by due to an unsuccessful cover.
How to add a video to Instagram in such a way that it will definitely catch the eye of the user? Study the hours of activity of your audience, choose the right video for posting. Experiment with video length and find the optimal length for your audience. Analyze statistics. Read about average Instagram performance indicators here.
Instagram video format is an important part of the video creation process. If you follow the given parameters, then your video will be more acceptable for viewing.
How-to videos are the most popular on Instagram. So be sure to include them in your content plan. Explaining something in a video is much easier than describing it in words. Users love simple clear instructions on how to use your product / service, how to wear this or that thing. In such a training video, you can also show your expertise in your topic, invite subscribers to follow your guide.
Announce a new product or updates to existing products in a video. Show the product from all sides in the video so that the user has a complete impression of it. Make your subscribers look forward to this product. Run a paid promotion promo to show your product to as many people as possible. 64% of users are more likely to buy a product after watching a video about it. In 2019, more than 823 thousand advertising publications were published in the Russian-language segment of Instagram.
Tell the story of the brand in the video, how the idea to create a business or become a blogger came about. Create a separate video clip in which you can demonstrate the brand values and convey them to the user in an accessible form.
Show how your business works from the inside. Tell about the standard day of your company, introduce subscribers in the video to those who create / sell products for them. People love to watch the underside of interesting processes. This gives the effect of involvement and presence, makes the person even more related to the brand.
Perhaps you would like to discuss a topic related directly or indirectly to your field. Select a format for this video. Do this for a variety of content and your own entertainment.
Create a funny and funny video for your subscribers, play up your failures or mistakes in the production of goods, for example.
Show testimonials from existing customers in a video. You can take both text reviews and design them in the video constructor using cool emoticons or elements, or combine individual video reviews into one video. Sincere live reviews will make sales for you.
According to research, the most popular videos on this social network are instructional videos. We have analyzed the algorithm for creating an educational video in detail here.
Yes, we described how to create a video for Stories correctly here.
Minimum aspect ratio of 1.91:1 and maximum aspect ratio of 4:5.
Details about how to work in the advertising account, we wrote here.
SUPA offers a wide range of text settings. You can change the size, position, make animation, add corporate fonts - video instruction on text settings.
The minimum video length for a tape starts from 3 seconds, and the maximum video length can be 60 seconds.
We have made detailed instructional videos on how to work with SUPA.
three years after the creation - in 2013. Today, video content is wildly popular in all social networks.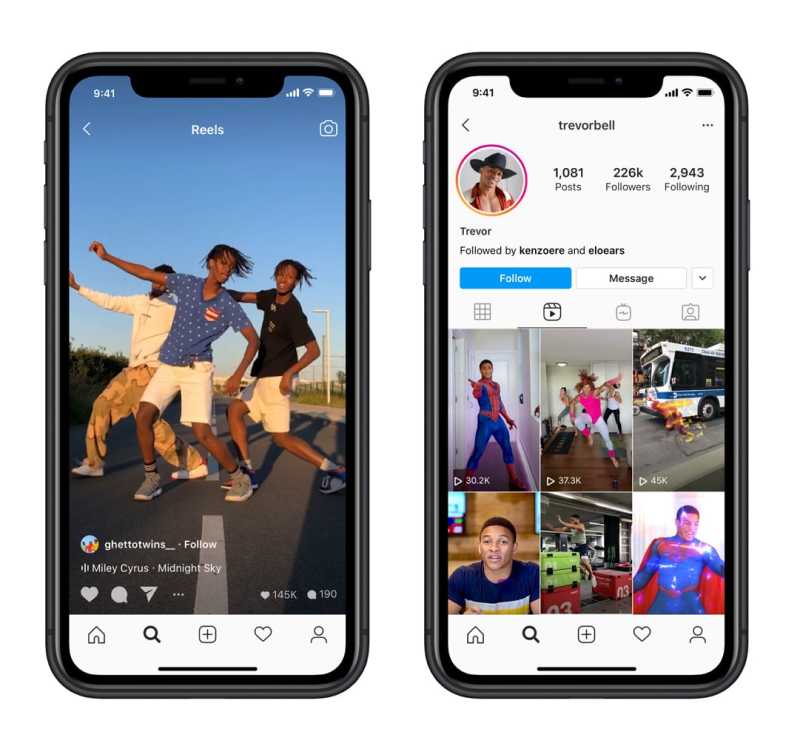 In addition, marketers and brands have clearly “switched” to the use of video advertising. And all because every day more than 200 million social network users view at least one business/brand profile. According to statistics from emarketer.com, 11% of followers buy products through Instagram.
SUPA Video Maker is a versatile tool for promoting your business. Creating video ads for Instagram or video stories in SUPA is easy, fast and fun.
To do this, you need to follow a simple algorithm: register in the video maker, choose a video template from our huge collection and modify the template according to your tastes and needs. In SUPA we have provided for all your requests and wishes. In order for your ads to be effective and attract the attention of subscribers, the capabilities of the video maker include the creation of animated video and text. In SUPA, you can adjust the timing of the text to appear or the speed of the new visuals.
To increase brand awareness, you can add and use your brand fonts, colors. SUPA makes it easy to customize your ads and make them eye-catching. Our video maker has thousands of pictures, visual effects, emoticons, emojis and custom elements.
SUPA is the ideal solution for creating engaging yet budget friendly advertising. Sell directly through video or create interesting story-driven commercials. Creating a video mockup for an Instagram ad has never been easier.
Video advertising allows you to show a product or service, talk about your brand features, your values or discounts.
Instagram offers several different types of advertising: promotional photos, carousels, ads in videos, ads in stories. Video advertising has great potential: according to statistics, the potential advertising reach of Instagram is almost 850 million users. Agree, there is room for your creativity to unfold.
American marketers note that almost 70% of influencer advertising budgets are spent on Instagram.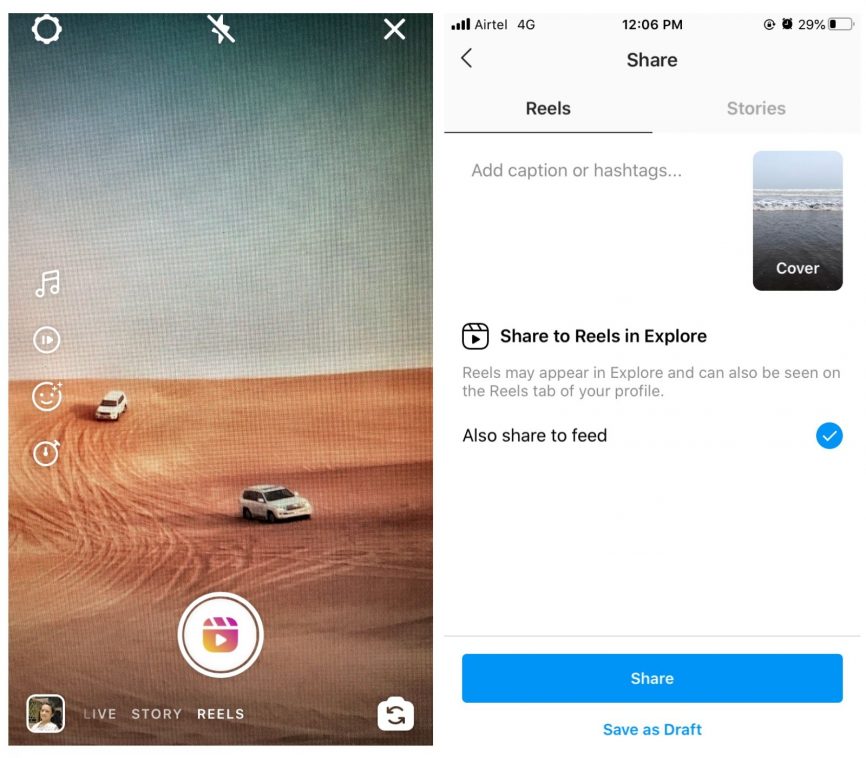 The statistics clearly indicate the trend of ever-increasing popularity and effectiveness of Instagram ads.
Video advertising is always an opportunity to show more, show creativity or tell a full story. Storytelling sells the most successfully. The main details of the application algorithm can be found here.
Another option for video ads is IGTV. You can also advertise your product or service there. Read about the new tools of this part of the application here.
81% of users search for product information on Instagram. Approximately 130 million followers click on product posts every month
Source: eMarketer
Instagram followers tend to scroll through the feed rather quickly and lose interest in content just as quickly. Your subscriber in the first three seconds should understand that in front of him is not just a picture, but a video. These first seconds are critical in order to interest the subscriber, catch his attention and involve him in watching the entire video. And, perhaps, even encourage you to watch the video with the sound turned on. But you should be aware that your video should be understandable without sound. To do this, use interactive elements, emoji or animations, visual transitions, frames offered by SUPA.
In the first 10 seconds of the video clip, the main idea of the video must be clear to the user, otherwise he will lose interest. The quickest way to attract a person's attention is movement, flashes of light, or changes in contrasts. Then the viewer has a clear understanding that before his eyes - video advertising. Your video should be bright and dynamic. Try to create it in such a way that it differs from the usual advertising that the user is already used to.
Video ads in the feed are a very organic way to advertise your business/brand. Ads fit naturally into the content and user-consumed information. It seems to fit into his usual routine of scrolling through the Instagram feed.
Add links to your site or product right into your video. Do not bother the user by going to the profile header and searching for the product he needs. The process of interacting with your ad should be simple, engaging, and customer-focused. Don't forget to optimize for mobile devices your landing/website to which you lead the viewer.
Feel free to experiment, for example, try running some kind of challenge in your video. They go great with the audience and show crazy engagement. Read more about how to run a successful challenge here.
Instagram ads should not be text-heavy. Try to keep the text on the video no more than 20%.
Video ads will become more interesting if they are animated using SUPA templates and tools.
Instagram has one of the highest engagement rates: properly crafted ads on this network will give you brand awareness and guaranteed sales. Therefore, use at least a couple of our life hacks that will tell you how to make advertising on Instagram interesting and effective:
 In our editor you can personalize the video for all your needs.
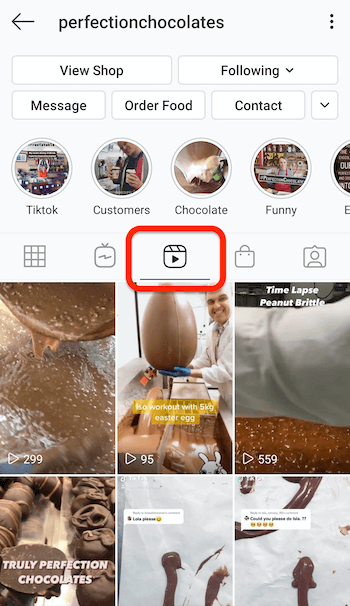
Find out more about the latest Instagram updates here.
Instagram allows you to add MP4 and MOV videos. There are also a number of resolution and duration requirements.
Resolution: 600 x 750.
Aspect ratio: 4:5.
Maximum size and length: 4 GB / 120 seconds.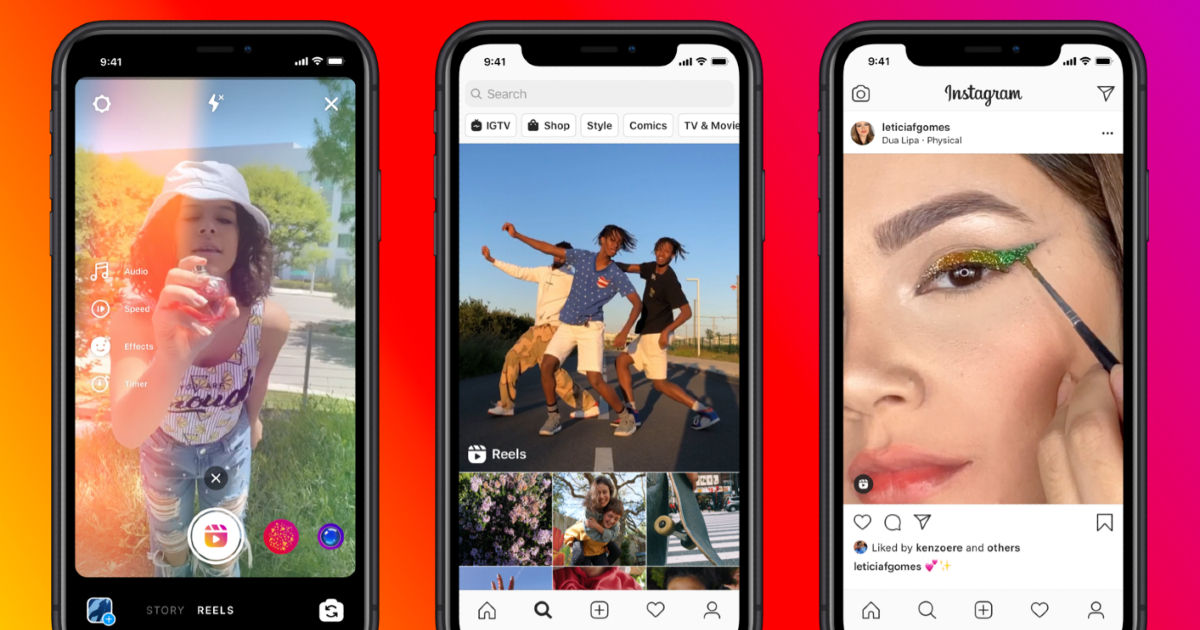
Resolution: 600 x 315.
Aspect ratio: 1:91:1.
Maximum size and length: 4 GB / 120 seconds.
Resolution: 600 x 600.
Aspect ratio: 1:1.
Maximum size and length: 4 GB / 120 seconds.
The most optimal for video advertising in this social network is still a square video. Vertical can unprofitably "shift" comments and likes. As for the duration of 120 seconds, keep in mind that in order for the user to see the entire video, he must select the “continue watching video” option.
Read more about Instagram video formats here. If, in addition to video ads, you also want to create videos for stories, then here is a cheat sheet with the requirements for them.
Creating a video that meets all the requirements of Instagram is an important task. But it is equally important to properly set up an advertising account so that advertising brings customers and sales.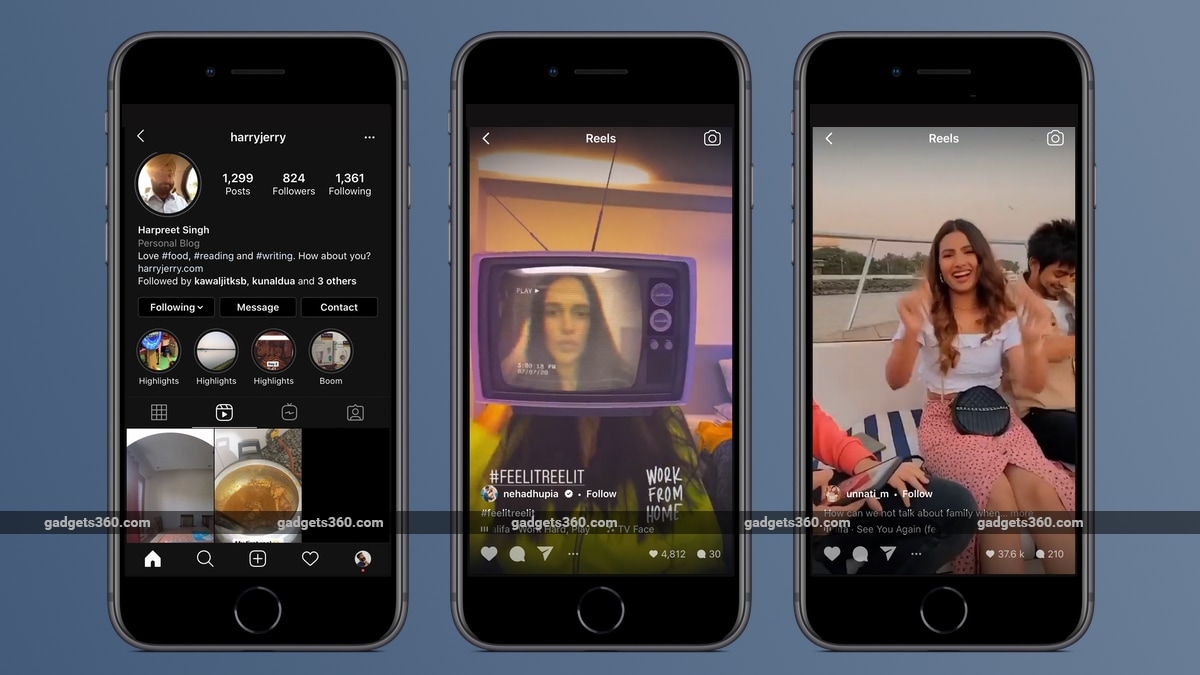
Initially, all promotion on the Instagram network was tied to the Facebook Ads Manager advertising account. Now the social network has decided to allow creating ads on Instagram even without an FB account. This option will become available soon to business accounts, however, it will only be available to those who have not previously promoted their posts on Instagram.
For those companies that have been using the advertising opportunities of one of the most popular sites for a long time, the algorithm for setting up Instagram ads remains the same:

Yes, there are some peculiarities when creating a regular, non-advertising video - read more here.
Maximum size and length: 4 GB / 120 seconds.
Yes, SUPA has extensive options for customizing video templates. Detailed instructions here.
Of course, see the algorithm for its creation here.