Want to play a video while no sound? It may occur on mp4 or mkv files, google chrome, Kodi , Instagram, etc. Then this article is all about your helping hand to fix those Instagram video sound problems.
Wanna a quicker solution? Download the Instagram video repair tool from the buttons on the right.
Try It Free Try It Free
How to fix Instagram videos no sound issue?
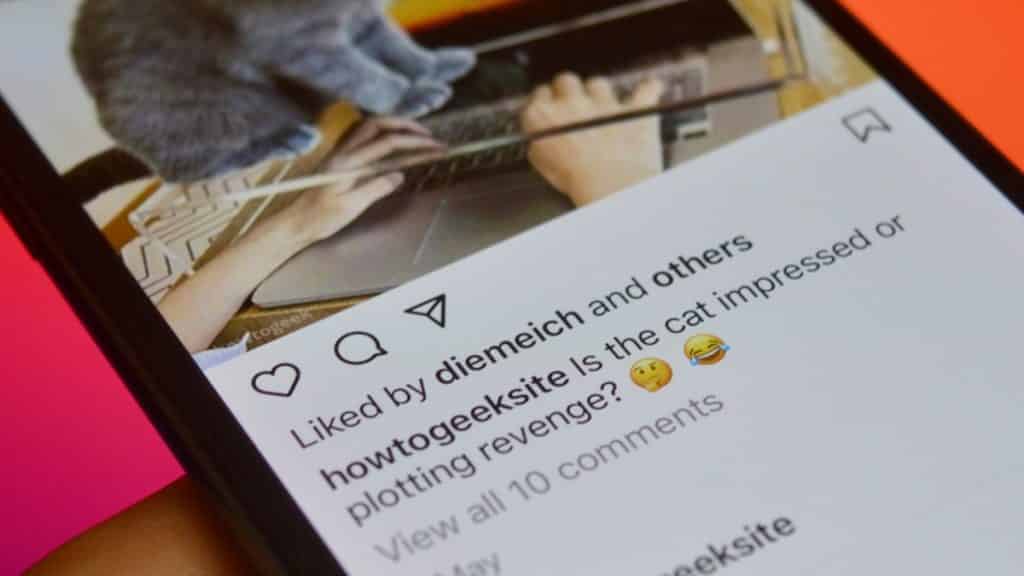
Why isn't Instagram working? There is no sound on both my boyfriend's and my Galaxy S9+ when playing Instagram videos on the explore page. There is no sound icon in the corner to tap or anything. It has been like this for approximately a week. What's wrong with Instagram? Has anybody else experienced this? It's very, very frustrating. How to fix this?
While playing a video, how many of you faced a problem, i. e., no sound on Instagram. The Instagram video sound problems carry one or other reasons, some related to the application, and sometimes the cause is related to the device you are using.
Here you will get all about the relevant causes along with the potential fixes for the no sound Instagram. Let’s dig into the handy solution and fix the "no sound on Instagram" error!
01 What Causes Instagram Video No Sound?
02 Solve the Instagram Video Sound Problem with Video Repair Tool
03 Other Ways to Fix No Sound on Instagram?
04 Instagram: Here’s How to Post a Video without Sound
Before heading towards the apt solution to fix no sound on Instagram, let’s get familiar with the hidden causes of Instagram video has no sound after upload. Talking about the platform, Instagram carries a default feature in which the sound is not played automatically. Rather, every motion content (video) carries a speaker icon on the extreme lower right corner.
Now, if the user clicks on the icon, the sound will play along with the video, and in case the icon is not clicked, the icon will carry a small cross symbol indicating that you are playing a video on mute mode. Secondly, by tapping on the video, it also plays the sound, or else you can adjust the sound with the volume button of your device.
But if none is the reason mentioned above for the no sound Instagram, then the following is the list of potential reasons causing the Instagram video sound problems.
Some of the videos do not carry the sound at all. In this case, one can see a text with the cross's symbol on the speaker icon in the extreme lower right. The text appearing would be, i.e., 'This video has no sound.'
Sometimes the issue is relevant to the sound driver of the device on which you are using the application. Updating the drivers to more compatible ones can solve the no sound in Instagram problem.
Other tabs opened on your browser, or some of those extensions can also cause the problem. Close them one by one or delete those extensions individually to check which one is causing Instagram video sound problems.
Cache and cookies of the browser or websites may be a reason while using the application via Pc or laptop.
When the audio codec is not compatible with Instagram, one can face that no sound in Instagram issue.
Have you ever met with the situation that videos look blurry after being uploaded to Instagram? If you do, then read on to find the solutions to fix Instagram video quality.
Learned about all the causes playing a vital role in Instagram sound not working? Now let’s navigate to the solutions.
If you feel lost when facing the Instagram video sound problem, i.e., no sound on Instagram when playing videos, you need powerful software to deal with it.
Wondershare Repairit OnlineRepairit - Online Video Repair provides online services to carry out video repair functions without downloading any software on your computer or Mac. It repairs your corrupted video no matter what video issue you have encountered, it also helps to repair damaged or broken videos in various formats, including MOV, MP4, M2TS, MKV, MTS, 3GP, AVI, etc.
It just need 3 steps to repair the blurry videos online.
Step 1: Add corrupt videos
Step 2: Repair uploaded videos.
Step 3: Preview and save the fixed videos.
Wondershare Repairit for DesktopIf the online video repair service cannot satisfy your video repair needs, the desktop version of Wondershare Repairit Video Repair will provide you with a perfect video repair service. The desktop version of Wondershare Repairit works fine on your Windows and Mac system, and it provides a perfect excperience that you don't worry about the file amount and size.
The following are its main features you may want to know:
Try It Free Try It Free
5,481,435 people have downloaded it.
Support to repair damaged videos with all levels of corruption, such as video no sound, out-of-sync video or audio, sluggish video display, flickering video, missing video codec, etc.
Support to repair videos of diverse formats, including MOV, MP4, M2TS, MKV, MTS, 3GP, AVI, FLV, MXF, KLV, INSV, M4V, WMV, MPEG, ASF, etc.
Repair critically damaged or corrupted videos available on SD cards, phones, cameras, USB flash drives, etc.
Repairit has a quick and advanced scanning mode. You can use either depending upon the level of corruption the video file has undergone.
Compatible with Windows PC, Mac OS, and supports PC to mobile transferring/sharing.
Step 1: Download the software on your device and drag and drop the corrupted video to the software interface.
Step 2: Once the corrupted video is added, click Repair.
Step 3: Once the repair action is completed, a window tells you to save the repaired video. Click Ok to save the repaired video.
Optional: If running the advanced video repair mechanism, you need to add the sample video to the software to continue the repair.
Once the sample video is added, click Repair. Once the repair mechanism is done, a window will appear to show that the video repair is completed. Click Ok to save the repaired video.
Once you know what exactly the cause is behind that Instagram video's no sound, the next step is to get an appropriate solution for it.
Let's start with a video we curated for you, which covers the most common reasons that cause Instagram no sound issues and how to fix them accordingly.
Try It Free
Try It Free
You can explore more from Wondershare Video Community.
Playing a video on Instagram and not listening to any sound? Make sure your ringer is on. When your device is in mute or vibrating mode, the sound can't play on the platform. So turning on the ringer is vital.
Here is the stepwise procedure to turn on the ringer:
Step 1: Open the Instagram application on your device and detect no sound.
Step 2: Head to the settings, and next to the settings menu, click on Videos.
Step 3: In the option of Videos, next select Sound and tap on the ringer.
If the ringer is not the cause of sound not working on Instagram, then the next step you can reboot your phone. Sometimes your phone is facing software glitches that burden the application’s cache. To avoid all this, reboot your phone to get rid of Instagram video sound problems.
The following are the steps to reboot your iOS and Android.
Rebooting Android:
Step 1: Press and hold the power button on the side of your phone.
Step 2: The power options will appear on the screen.
Step 3: Now select either reboot or restart options to continue.
Reboot iOS:
Step 1: Press and hold the volume button and the side button simultaneously.
Step 2: The power slider will appear on the screen.
Step 3: Navigate the slider to restart the device.
Another easy way to deal with no sound Instagram is to force close the application. The following are the steps to show how to force close the app.
Step 1: Navigate the settings, and in the menu bar, select Apps.
Step 2: Select the More setting icon.
Step 3: Check on the Show system apps.
Step 4: In the list of apps, click on Instagram.
Step 5: Tap the option of force to stop.
Approximately after 30 seconds, rerun the application if the problem is resolved.
Using the older versions of the application can also be a potential reason to cause Instagram videos with no sound. To avoid the problem, you need to update the software application. This up-gradation will skip all those in-app problems. Here is how you can update your Instagram to the newest version.
Step 1: Navigate to the play store or the app store.
Step 2: Open the play store.
Step 3: Select the option of Updates or My Apps.
Step 4: Select Instagram from the list.
Step 5: Click the option of Update to download the new version.
With all that burden of memory on the device or in the application, sometimes in-app problems like no sound on Instagram can be confronted. The best way to avoid them is to clear all the cache memory on Instagram. Follow these steps and clear all that undue cache.
Step 1: Head on to the settings option on your device.
Step 2: In the settings menu, select the option of Apps and Notifications.
Step 3: In the list of Apps and Notifications, search for the installed Instagram app.
Step 4: Click on Instagram, and in options, select Storage and nextly click on Cache clear.
Step 5: Once you click Clear Cache, all the Instagram data will be deleted, hence ruling out the problem, i.e., no sound Instagram.
Turning off your device's power-saving mode can also help to deal with the Instagram video sound not working problem. The device on the power saving mode is unable to perform all the functions appropriately. Using Instagram on power-saving mode can cause an issue of no sound Instagram. So all you have to do is to turn off the power-saving mode.
Step 1: Select the options of Apps from the main menu.
Step 2: In this list of options, select Settings.
Step 3: Check for the Power saving Option in the settings menu bar.
Step 4: Disable the power saving by swiping the button to the left.
Checking your device's date and time is a quick option to fix the no sound on Instagram. Follow the below-mentioned steps to check the date and time.
Step 1: Go to the setting menu of your device.
Step 2: In the settings menu, select the option of date and time.
Step 3: Tap the checkbox of Automatic date and time to ensure that your device's date and time are correct.
Once you have tried every possible aspect, it is quite possible that this no sound Instagram issue is linked to the application. If the problem is not solved by rebooting/restarting the device and checking the internet connection, then the last step you are left with is to uninstall and reinstall the application. Here is how you can do this:
Step 1: Start the process by clicking the option of Settings from the main menu.
Step 2: In the settings menu, click on Applications and then Manage Applications.
Step 3: In the list appearing on the screen, select Instagram.
Step 4: A dialogue box will open. Tap Uninstall.
Step 5: Once done with uninstalling, now head towards the play store or app store, reinstall Instagram and log on to the application with your user name and password.
If you are uploading a video to your Instagram feed and you want to post it without sound, then here comes a stepwise procedure, follow it, and you are all done.
Step 1: Start by opening Instagram and click on the Share button, i.e., the one with a + icon.
Step 2: Select the video from the phone library that you want to post
Step 3: Once selected, tap on the option of Next to continue.
Step 4: In the Next window, you will see the speaker icon on the screen's top. Tap this icon for turning off the sound of the video being uploaded.
And all done in mere seconds!
Hence, the instagram video has no sound problem is solved in this content. In this article, all the possible reasons for no sound on Instagram, along with appropriate and approachable solutions, are mentioned. Every solution is explained with a stepwise procedure that further eases you to follow steps. All you have to do is check the reason behind your no sound on Instagram and then select a suitable solution from the above-mentioned ones.
You may also be interested in learning how to recover Instagram photos and Facebook photos on the computer.
Try It Free
Try It Free
Instagram is an excellent platform for posting video content. However, users occasionally run into an issue where their sound isn’t working on Instagram, even if you tried the volume keys, tapping the crossed-out speaker, and opening the video.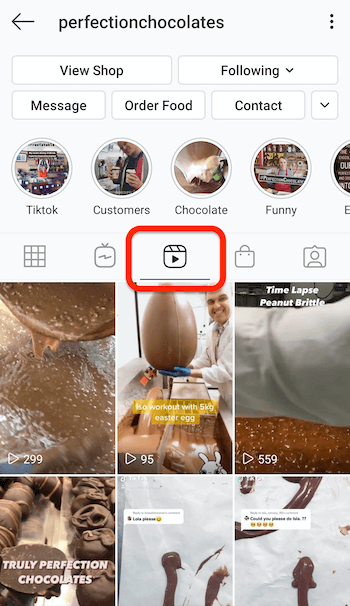 This situation can be frustrating as it prevents you from enjoying the content on your Instagram feed.
Fortunately, this is a pretty easy issue to fix in most cases. If you’re having problems with the Instagram sound is not working, let’s take a look at the steps you can take to fix it.
Keep in mind that specific videos or stories don’t include any sound. In this case, you’ll see the “Video Has No Sound” marker at the bottom left.
Not getting any sound on Instagram might be related to your Bluetooth headphones or earbuds, even if you are not wearing them. For example, if Apple AirPods have “Automatic Ear Detection” turned off, the sound will go to the earbuds whether they are in your ear or not and as long as they are paired with your iPhone.
A similar problem occurs with many wireless speakers. The speaker’s volume is turned down, you forget to unpair it from your smartphone, or the sound is going to another device.
Here’s how to fix this:
Simply rebooting your device can often reload any processes that weren’t running correctly. This action may fix your audio issues.
To determine if this is the case, restart your smartphone to eliminate the bugs and junk files that might prevent sound from playing.
For iPhone X and later: hold one of the volume rockers and the Side button simultaneously until you see the Power slider. Move the slider to power off the phone, then press and hold the Side button and release it when the Apple logo appears.
For older iPhones (iPhone 8 and earlier): hold the Side/Top button to bring up the Power slider. After turning off the smartphone, press the Side/Top button again to power it back on.
For Android: Press and hold the power button for a few seconds until the power options appear, then tap on reboot or restart.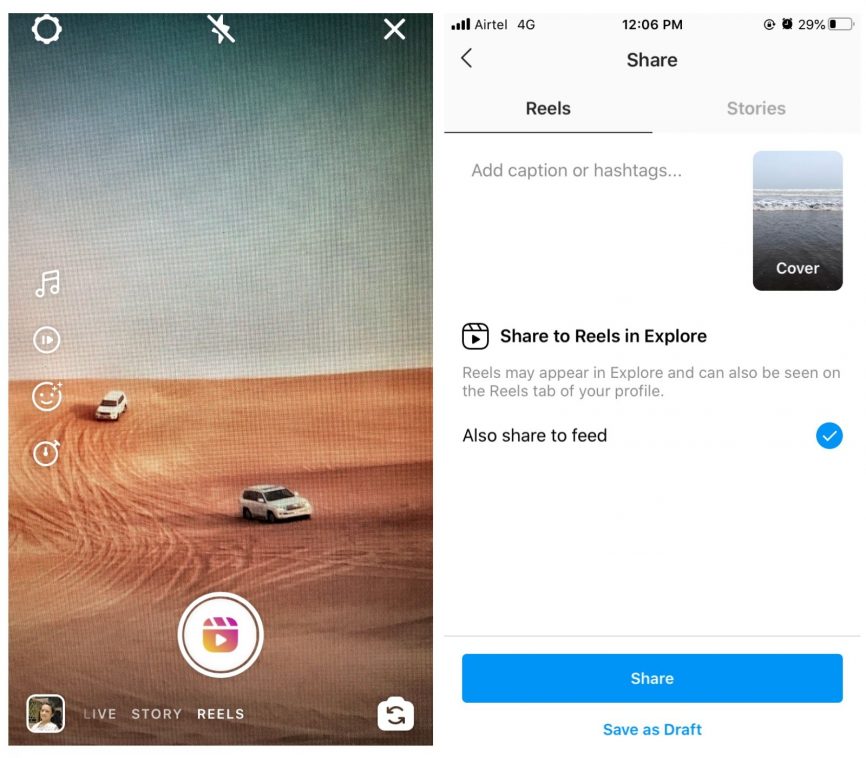 If you’re using a newer Android phone, you may need to hold the volume button and power button to restart.
Instagram frequently releases updates and bug fixes that address various in-app problems. In the past, many users reported issues with playing music on stories or playing sound altogether. This situation is why you need to check if there’s an update.
If your phone’s Operating System (OS) software isn’t up to date, you may run into problems when using various apps, including Instagram. Here is a quick guide for software updates on iOS/Android.
For iOS:

For Android:
If you use Samsung Galaxy, you should look for Software update instead of System. On Pixel smartphones, you need to tap Advances instead of About phone. Either way, you should find your way to the Download and install option easily.
Several users have responded to our article during the same time frame, stating they were having a sound issue that lasted for several days. Although it didn’t affect everyone, a massive outage is easy to spot using Down Detector.
This step will tell you if other people have the same issue as you and cut your troubleshooting time short. If there is a massive problem, you can report it to Instagram or wait it out. If not, continue troubleshooting or report it to Instagram.
Has your smartphone recently been submerged in liquid? Did you drop it? If the answer is yes, there might be a hardware issue that prevents your phone from playing sound.
To test things out, try playing sound with other apps, such as YouTube, SoundCloud, or Spotify, and make sure the volume is up to the max. Hopefully, you’ll be able to hear the sound from the built-in speakers.
If not, try cleaning your speakers with a toothbrush or soft-bristled brush. Assuming this doesn’t work, you may need to take your phone into a repair shop to have the speakers replaced.
With iOS 13, many users reported issues with their Instagram audio.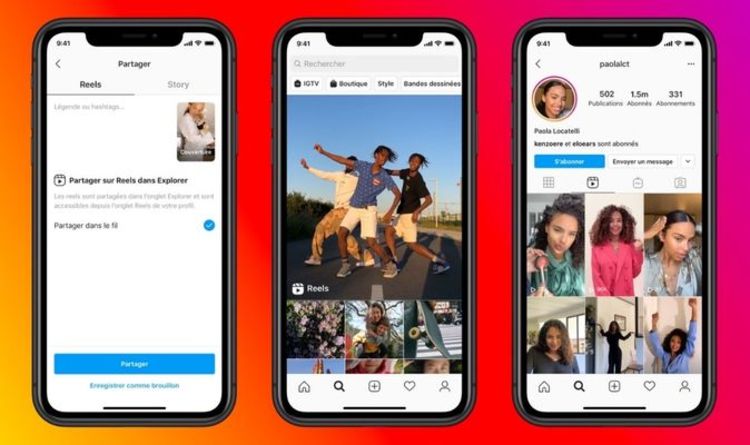 Whether it just isn’t playing while you’re scrolling or you aren’t able to record audio, this issue is easily remedied.
Follow these instructions to fix this update glitch:
Many users who’ve reported this issue can attest to this fix. If you’ve tried everything we’ve listed above to no avail, this should resolve issues for iPhones running iOS 13.
Clearing the Instagram app may fix the problem. Essentially, this wipes out stored data, so it’s similar to an app restoral. You can always choose to delete and reinstall the application on your phone, but clearing the Cache is a simple solution to try:

The steps above won’t delete any of your information in the app, although you may need to log back in once you’ve cleared the Cache.
Unfortunately, iPhone users will have to delete the app to clear the Cache. You can either long-press the app icon until it jiggles, then click on the X to confirm, or you can go through the settings.
Once the above process is done, you can go back to the App Store and reinstall the application. Just be sure you have your iCloud password to download and your Instagram login credentials.
Lastly, there’s one other thing you can check—your Sounds. Both iOS and Android have separate settings for how your phone distributes sound. Of course, you’ve probably tried turning the volume up, but it isn’t unheard of (especially after a system update) that your sounds could route to the wrong speaker. For example, if your phone is routing to the earpiece, you aren’t likely to hear it.

Unfortunately, there are many reasons why the sound might stop working on Instagram. Thankfully, you now know the best solutions to try if you find the sound not working for you on Instagram.
Instagram has announced the launch of new features in Russia. Users will have access to a TikTok-like Reels video service and a music sticker in Stories. With it, you can add music to your stories and answer questions with songs. Russian Facebook users will be able to pin it in the profile header so that it plays when the page is opened nine0019
Starting June 23, Russian Instagram users will begin accessing Reels, a platform for short videos, the company said.
Finished reading here
With Reels, you can shoot and edit videos up to 30 seconds long, apply AR effects to them, and use the green screen effect to change the background. In Reels, you can add music from the app's library or choose from trends or recommendations. Users will also be able to create their own original audio, and if their account is public, other users will be able to use this audio in their videos. nine0005
Videos created with the new feature can be shared as Stories or Posts, limiting the audience if desired.
The battle for buzzers: how Instagram wants to take over the TikTok audience
In addition, Facebook and Instagram are also launching a new music sticker in Stories. To add music to your Stories, you will need to follow these steps:
 The sticker can be moved, rotated and resized.
 With the release of the music sticker, Instagram and Facebook users will be able to answer questions in Stories with songs. In addition, Facebook users will be able to add their favorite track to the Hobbies / Interests section and pin it to the profile header - it will be played every time someone decides to visit this user's profile. nine0005
“Reinventing TikTok is unlikely to succeed”: what’s wrong with YouTube and Facebook’s short video services
Instagram began to roll out the Reels feature around the world in an attempt to attract the TikTok audience. In Russia, the short video format is gaining popularity - VKontakte is already developing its own clone of TikTok - the service is called Clips. In addition, in the fall of 2020, the head of the Ministry of Education, Sergey Kravtsov, announced joint plans with Mail. ru Group to develop an educational network for Russian schoolchildren, similar to TikTok. nine0005
30 most expensive Runet companies. Forbes rating
30 photos
Marina Dulneva
Author
Anastasia Skrynnikova
Editorial Forbes
#Instagram #reels #Facebook #the Internet #tiktok #video
Forbes Newsletter
The most important thing about finance, investment, business and technology
Today, Instagram has become for one part of the users a means to publish their personal videos and photos, and for another - a way to extract commercial benefits. Whatever option you use Instagram, one thing is important - the quality of the published photos and videos should be at the level. For example, before a video is published on Instagram, it is desirable to subject it to an editing procedure, for example, by overlaying music on the video. nine0005
Any video posted on Instagram can become several times more interesting if you add a suitable music track to it. It is easy to perform this procedure from any mobile device for which the Instagram application is supported, or a computer.
This is a versatile and very powerful video editing tool. It supports over 100 different video formats. There is the ability to quickly trim and crop, connect all parts of the video, improve video quality, change speed, add text, overlay music and many more useful features. nine0005

You can overdub multiple music tracks at once, trimming them as needed. It is also possible to overdub a recording of your voice. To do this, click: Video settings > Audio track > Microphone recording.
When it comes to overlaying music on video from your smartphone, you should immediately take care of the presence of an application that will allow you to complete the task. nine0005
Today there is a fairly extensive list of applications aimed at video editing or simple processing specifically for Instagram. More specifically, iMovie for iOS, PowerDirector for Android, and VivaVideo for both mobile platforms are recommended. It is on the example of the last application that we will cope with the task.
 Click on the button "Done" .
  nine0008
 A computer is the ideal video editing solution if you need to add quality music to video with a powerful program.
Today there is a great variety of video editing software, among which are Adobe Premiere, CyberLink PowerDirector, Movavi Video Editor and many other great solutions. But since we are considering such a simple procedure as adding music to a video, which can be done literally in any video editor, then below we will consider this process using the example of a simple and completely free program - Windows Live Movie Maker. nine0005