Your computer and mobile phone live two different lives. There are apps so broad-gauge you can’t limit their functionality to mobile or tablet only. And there’s hardly a better example than Instagram. Focused on photo and video sharing, Instagram grew into a tool for recording every moment of your routine. While lots of communication happens around Instagram posts and stories, it was inevitable for the app to become a messenger as well. And so it became!
You can access Instagram on Mac via your browser — it covers the features like browsing through the feed, commenting, and liking. Since recently, you can also read and send Instagram messages on computer. What the web version doesn’t support is the Instagram upload feature. This means you can not share your content to Instagram from a browser. But worry not, there are some workarounds — both inside the native app and with the assistance of third-party tools.
Instagram Direct was added to the platform in 2013, around three years after the launch. You can access Instagram direct messages (DMs) via the icon in the top right corner of your Feed from mobile or on the web. Here’s what you can do with the Instagram messenger:
You can read more about the capabilities of DMs on the Instagram Help Centre.
Once you receive a message on Instagram, you’ll see a number count appear with your DM icon. Tap it and you get access to the message. For a long time, this was the only way to check direct messages on Instagram — by launching the app. Since 2017, Instagram has also added the notifications feature, allowing users to view messages right from a phone’s locked screen.
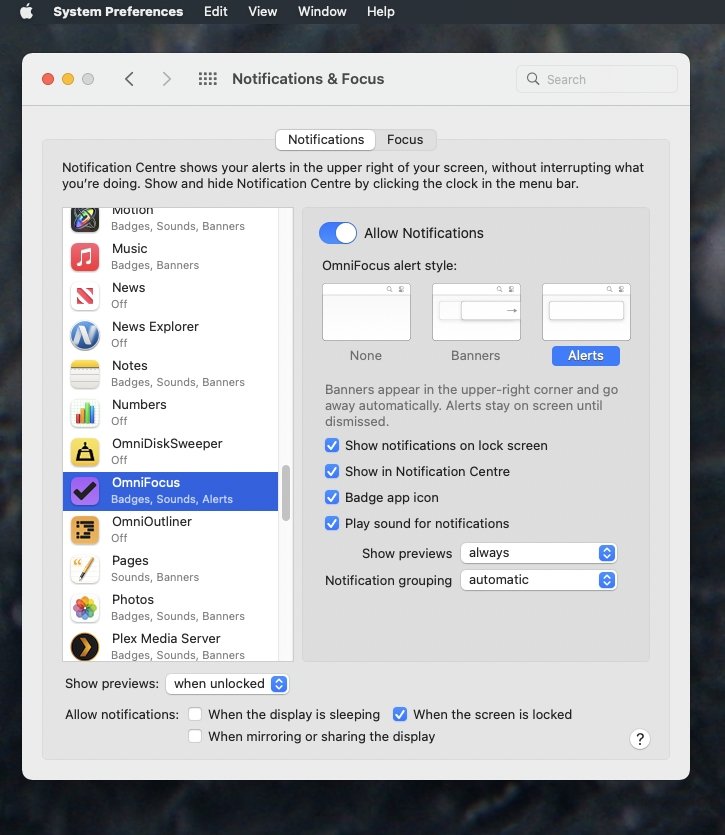
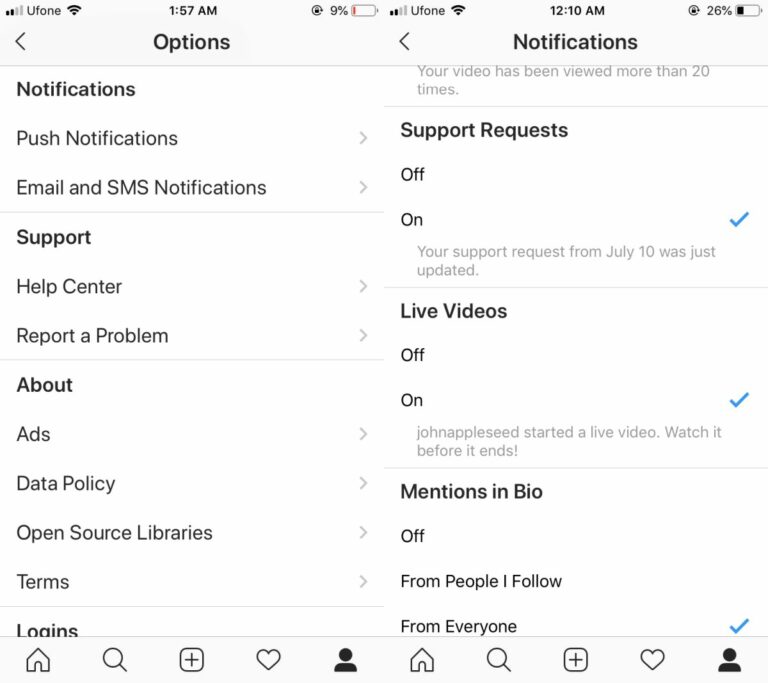
How to check direct messages on Instagram on computer? To allow Instagram send you notifications, you have to do the following:
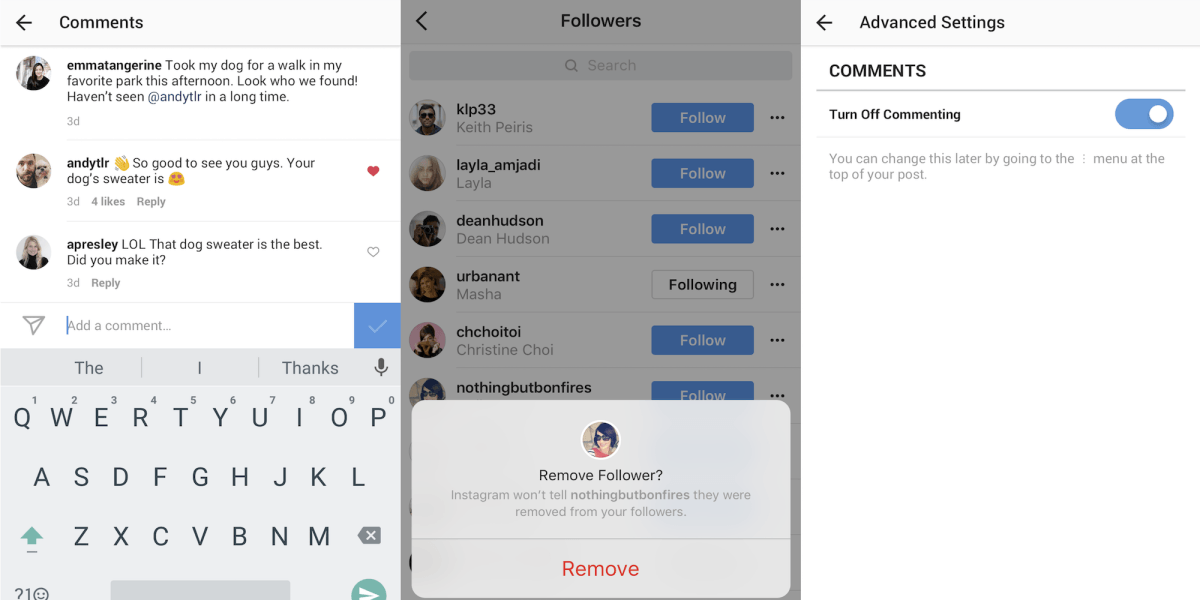
In the same menu, you can customize notifications settings for posts, likes, comments as well as pause all in a click.
An all-in-one messenger for Mac, IM+ gives you the flexibility of choice in terms of how many messenger accounts you can handle from one spot. It also covers the DM feature of Instagram, along with other messengers of your choice. Basically, it’s an aggregator of messengers that supports popular platforms, from Slack to Facebook Messenger to Telegram, and sits in your Dock for easy access to all communications.
The key pain IM+ is solving relates to the number of accounts you can manage. The app simplifies your life if you need to toggle between business and personal accounts on Instagram. Plus, sometimes we all get into a messaging loop — switching between Telegram, Facebook Messenger, and Instagram. IM+ puts it all into a sidebar, so you don’t have to dig around.
Here’s how IM+ adds flexibility into your Instagram routine:
Whether for different channels or multiple Instagram accounts, IM+ is a perfect tool for business communication. If you want to learn more about how to reap benefits from Instagram for Business, check out this guide.
Beautiful Instagram journey on Mac with GridsIM+ works if you need to check DMs on Instagram, but it’s pretty much limited to messaging. Grids is a whole different story. A full-featured Instagram app for Mac, it fills the gaps by bringing the native features of a mobile Instagram app to macOS. Fair to say, it even makes many things easier.
As you launch Grids, it takes you to a beautifully organized feed.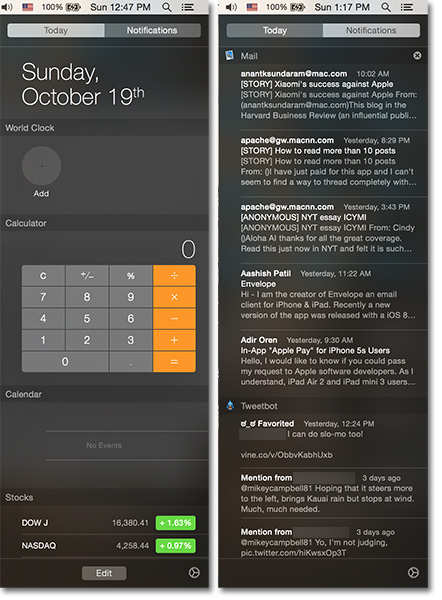 You can choose from among four different layouts and view posts the way you want. The search, likes, comments, and tags — every small thing that makes Instagram complete is covered.
Grids also has the DM feature that replicates Instagram’s native DM logic. You’ll find a familiar DM icon in the top right corner of the app’s window:
How to post photo and video to Instagram from MacOnce you’ve mastered Instagram DM on Mac, dive deeper into Grids — it has so much more to offer:
 Simply click on your profile picture and share your photo or video in Stories.
 Without using any third-party software on Mac, your Instagram life is pretty much limited to viewing photos, liking, and commenting. But it’s not carved in stone, though. You can make Instagram think you’re accessing the platform from your mobile phone and thus get access to some of the features like Instagram DMs and photo upload.
What you can do is change browser user agent to iPhone or iPad to enable photo upload on a Mac:
Well, it still has some limitations. If you change user agent to mobile, you’ll be able to post photos and stories as well as do some basic editing — like rotate or add text and stamps to stories. However, you won’t be able to upload video. Plus, there won’t be any of the filters and color effects available.
Note: Instagram thinks you’re using your phone, so it might occasionally give you mobile-related prompts. For instance, it can ask you to rotate your device. To fix the problem, you’ll just need to make the window look narrower by dragging its edge inwards.
Cheating is cheating. You can use the option of tweaking Instagram settings for emergency cases, but it doesn’t cater for frequent use. This is why we recommend having a native app like Grids installed on your Mac. This is the best way to bulk upload photos and videos and post Stories. If you need to use Instagram DM online, you can get it in the web version via your browser. For messaging on Mac, we use Grids or IM+ messenger (if you need more than one messenger in one spot) — both apps are part of Setapp. As a nice perk, you get around 180 other macOS tools in the same package for a flat fee.
Search this guide
Many apps on your Mac use notifications to let you know about upcoming events or reminders, incoming calls, and more. Notifications appear briefly in the top-right corner of the desktop or stay there until you close them.
In some apps, the first time you open it you’re asked to choose whether or not you want to receive notifications from it.
Notifications from some apps, such as Calendar or Reminders, can be time sensitive; for other apps, such as Home, they can be critical. The first time you receive a time-sensitive or critical notification, you’re asked to allow or not allow these notifications when a Focus is active.
Your choices are saved in Notifications preferences, which you can change at any time. See Change Notifications preferences.
Tip: If you need to minimize distractions by silencing all notifications—or allowing only certain notifications to appear—use a Focus, such as Do Not Disturb or Work. See Set up a Focus.
See alsoUse Notification Center on MacTurn off notifications for an app or website on MacCustomize website notifications in Safari on MacTurn a Focus on or off on Mac
Character limit: 250
Please don’t include any personal information in your comment.
Maximum character limit is 250.
Thanks for your feedback.
When I get busy working on my Mac, the thing that annoys me the most is the ping-pong of unnecessary website notifications. They seem to spoil the attention. Luckily, I'm not alone in not liking these unwanted warnings, am I? As is usually the case in most cases, macOS offers the flexibility you need to handle Safari notifications and even prevent unwanted notifications. So, if you think it's time to control website alerts in order to have some peace of mind while browsing the web or reading articles, here's a rundown for setting up website notifications in Safari on Mac.
By customization, I mean control over most aspects: appearance, the order in which they appear in the Action Center, and even no entry in redundant alerts. In addition to helping you avoid noise and help you concentrate on your task, it can also play a worthy role in improving the battery life of your MacBook. As you may have guessed, it's like killing two birds with one stone. Now that the conversation is over, let's get started with the steps!
Depending on your preference, you can customize how Safari notifications appear on your Mac. For example, you can choose between banners and alert styles. As long as the banners are displayed in the upper right corner of the screen and automatically disappear, alerts will remain on the screen until you dismiss them.
You also have the option to hide notifications on the lock screen, always display them, or only allow them to appear when the computer is unlocked. In addition, you can also sort alerts based on recent, recent by app, and manually by app.
Programs for Windows, mobile applications, games - EVERYTHING is FREE, in our closed telegram channel - Subscribe :)
Click on Apple Menu -> System Preferences -> Notifications. Now select Safari from the sidebar and then customize the notification style and other settings.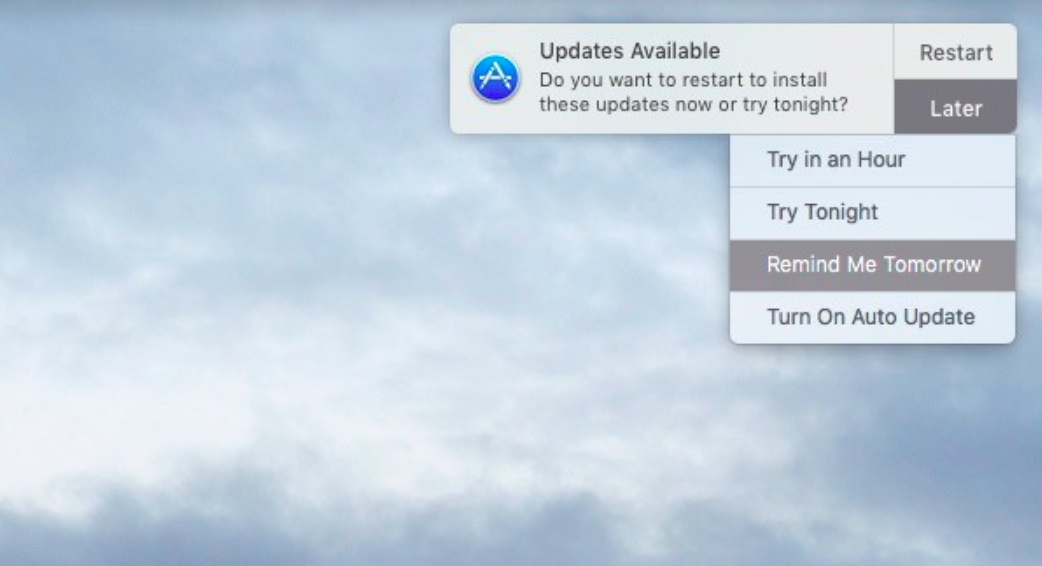
Just in case you don't want to see Safari notifications completely, turn off the toggle for Allow notifications from Safari ,
Notes: You can follow the same steps to perfectly customize notifications for certain apps on your Mac. If you want more control, customize each app's alerts to suit your needs.
Do you find website pop-ups asking you to allow them to send you notifications annoying? If so, you can disable them so that these pop-ups do not reappear.
open Safari on your Mac -> Safari menu -> Preferences -> Websites -> Notifications . Now uncheck the box for "Allow websites to ask permission to send push notifications".
Is there a site that sends you notifications too often? Then why not stop it right now.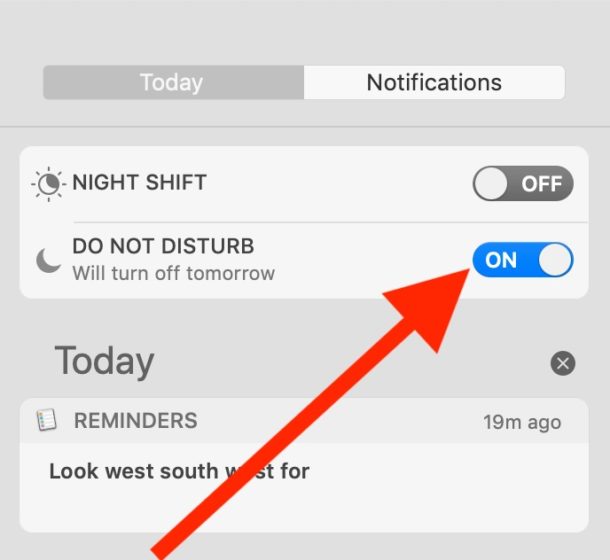 Safari lets you prevent individual sites from sending alerts, which can be useful if you want to selectively set limits to hide unwanted notifications.
launch the Safari app on your Mac -> Safari Menu -> Preferences -> Sites -> Notifications , Find the specific site you no longer want to receive alerts from. Then click on the drop down menu next to the site and select Opt Out.
Siri keeps a close eye on your browsing history and offers useful tips to improve your user experience. if you no longer want to see these suggestions or find them useless, you can prevent the virtual assistant from doing so. To do this, press Apple Menu -> System Preferences -> Siri -> Siri Suggestions and Privacy.
Now select Safari in the sidebar. Then uncheck the boxes for Show Siri Suggestions in app and Learn from this app . At the end, be sure to click on Done to finish.
There you are! This way you can manage Safari notifications on macOS so that you can surf the web with complete peace of mind. As someone who loves to use Safari on iDevices, including iPhones, iPads, and Macs, I find these custom settings quite helpful. In addition to being quite productive with features like autocomplete, the web browser is also more secure, requires fewer resources, and runs smoothly. By the way, let me know what features you like the most in Apple's web browser and what improvements you want to see in it.
Programs for Windows, mobile applications, games - EVERYTHING is FREE, in our closed telegram channel - Subscribe :)
Now Instagram can no longer be called just a platform for uploading photos and you can see it. Instagram is a whole ecosystem with great functionality and various business tools. In this regard, one big question is brewing: is it possible to use Instagram on a computer? Upload all your photos through your Mac, share different content, all from the comfort of your desk. Today we will try to figure out whether Instagram on a computer can replace your familiar application on the iPhone. Looking ahead, I want to say that everything is very good.
Using Instagram on Mac is more convenient than you might think.
I must say right away that I use Instagram from my computer as often as I use the app on my iPhone. Can't say I have any problems with it. Everything works smoothly, podlagivanie minimum. If earlier, when I went to Instagram on Mac , I experienced pain and suffering, now everything is more than fine.
Did you know? Top 5 questions about Instagram
Years of using Instagram has shown that the most convenient way to use Instagram on a computer is through Safari. Yes, this is not the only way, but the most working one. What’s more, you don’t need to download anything.
To open Instagram on a Mac computer , follow the simple instructions:
Interestingly, Instagram offers to download the app from the App Store, but there is no official app for Mac.
This is what the Instagram feed looks like if you go here through a browser.
Done. Now you can use Instagram directly from your computer. I think that you will understand the interface without problems. It almost completely copies the application familiar to all of us on the iPhone.
Out of features available on Instagram on Mac , I will note the following:

There are two shortcomings that I managed to find here. The first is that in the web version of Instagram you cannot post Stories. This will hardly seem like a minus to you, especially considering that stories are usually filmed at a fast pace.
Second, photos may not look as beautiful as you are used to seeing them on a smartphone. This is due to the low resolution of the photo. If it seems to you that SLR cameras have long outlived their usefulness, then here is proof that this is not so.
Literally at the end of 2021, a new feature appeared on Instagram that allows you to post photos directly from your computer. Users for some reason did not appreciate the innovation. I've been using it happily for a few months now.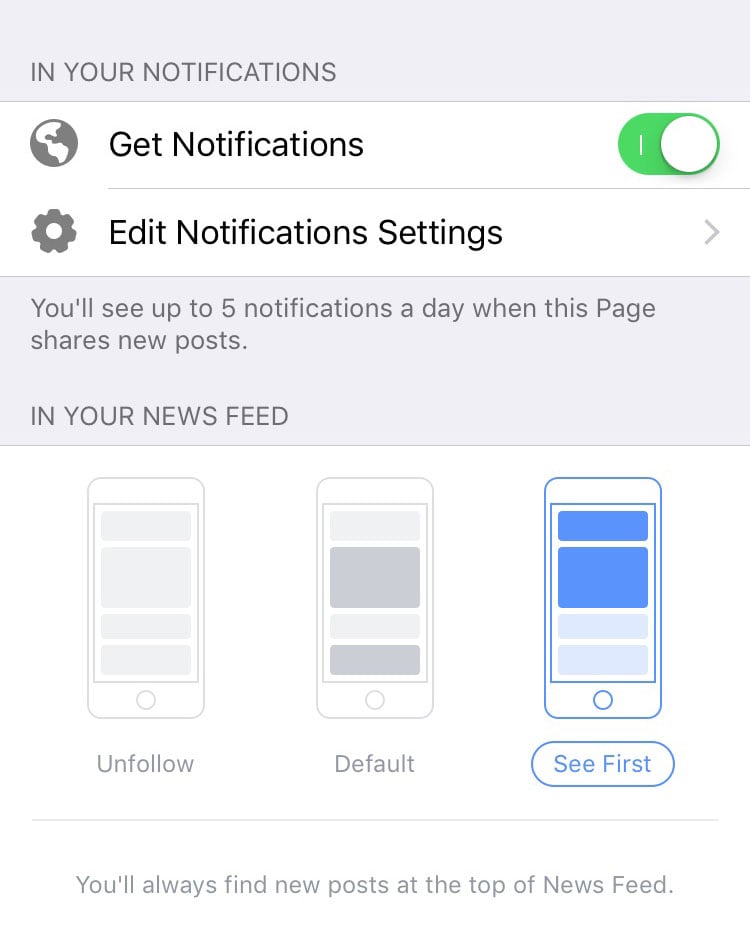
To post a photo to Instagram from a Mac, you need:
This is what the video editing tools look like on the desktop version of Instagram.
In terms of functionality, there is also a complete order here. I posted a few photos on my profile and there were no problems. Use boldly.
You may ask me: why upload photos from a computer? I have a simple answer to this: after any photo session, the photographer usually uploads pictures to the cloud. From an iPhone, digging into the cloud is such a thing, which is why the desktop version is usually used for these purposes. Although many of my colleagues do not think so. Author AppleInsider.ru Alexander Bogdanov, for example, is an excellent user of Yandex.Disk and knows no grief.
Subscribe to us in Yandex.Zen, where you will find a lot of useful and interesting information from the world of Apple.
Another way to use Instagram on Mac is the Grids app. I tested it back on macOS Big Sur. It was paid in the App Store, so I downloaded it in a not the most honest way. I remember then it seemed to me very laguchy and I had to leave it until better times.
My experience with Grids has been extremely negative.
Download Grids
I recently decided to go to Grids on Monterey. Congratulations, now the application has become shareware. Anyone can download it. But I immediately warn you: the interface here is not at all the one you are used to in a smartphone.
Plus, a huge number of features are available only in the paid version:
If you are going to use the software, you should immediately buy the paid version. Otherwise, you simply won't be able to use it properly.