How to find create mode on instagram
7 Ways to Use Instagram's Create Mode to Interact with Your Followers
Instagram has launched a feature called ‘Create’ Mode, which you can access by swiping left from your ‘Story’ menu.
A spokesperson from Instagram describes this feature as a new mode to combine interactive stickers, drawings, and text without having to share photos or videos.
That means you can still use most of the same interactive features that you’ve grown to love, but under an entirely new interface Mode. The only difference is that you can’t attach a picture or video, which you need when using the interactive stickers from the ‘story’ interface.
Now, let’s talk about what’s under the new ‘Create’ Mode and how you can use it to engage your followers.
1. Be Open With The Ask Me Anything Sticker
The way it works is up to you, whether you ask a question, or you let your followers ask you something. There are also various template questions provided by Instagram.
This sticker is a great tool to use when you’re looking for external input from your audience. Ideally, you should ask a targeted question that has the most potential of piquing your audience’s interest.
When someone submits a response to the sticker, it comes in privately. You can see it under the view count icon in your story.
You can then share the responses, and whoever submits them will get notified if you do so. Not only does this spark a meaningful engagement, but it also shows your audience that you actually take the time to read their responses.
Starbucks took the creative route and used the ‘Ask Me Anything’ sticker by quizzing their followers what drink is coming back. They used emojis to give hints and used colorful images as backgrounds in their stories.
Then, they posted answers from followers who had the right guesses. To end the suspense, they finally revealed that their S’ mores Frappuccino is indeed making a comeback for the summer.
The ‘Ask Me Anything’ sticker is versatile and can be used in so many different ways for different occasions.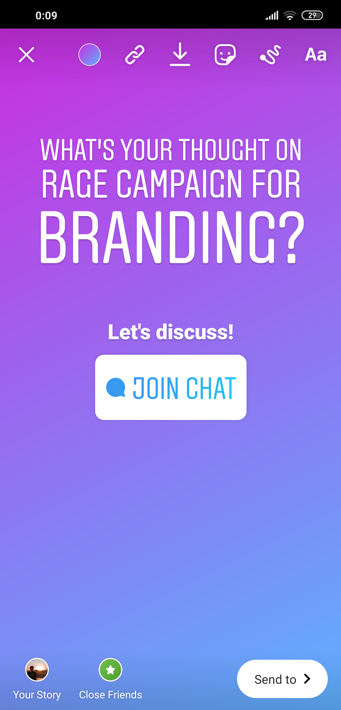 You can learn more about your followers, ask them what they think of your brand, or like Starbucks, build up the suspense for a new product release.
2. Test the water for new content or product with Poll sticker
This poll sticker is a handy tool to test which campaign, product, or topic that the majority of your audience prefers to see next. It’s certainly not detailed enough to be considered a valid market test, but at least the response that your followers give should give you a hint of which of the two options they would be interested to see.
Again, the response will be visible to you privately. You can see who votes which options under the view count icon in your story. This should be very useful to you, especially if you run a blog subscription or targeted campaign. By knowing who votes for what, you can eventually use both options and just target them to different groups of people.
IKEA used the polls to ask their followers what they liked whilst showing off their new catalog. Sticking to their simplistic roots, their polls were nothing out of the ordinary but it was accompanied by stunning visuals and great furniture design.
Instagram’s poll sticker is an excellent customer research tool. Instagram itself has a large user base, so it’s a great place to test new products or services. Polls help brands get a better idea of what their audience is interested in, giving them a valuable insight into what their customers prefer.
3. Share your favorite accounts/things to follow
The main purpose of using this sticker is to give your two cents on which accounts are worth following. If you’re building followers based on a certain niche, this could be a good way to mutually promote other accounts. Showing who you follow or who you’re endorsing could be a good way to start showing your niche based on who you recommend with this sticker.
Although this feature doesn’t provide on-screen interactive fields like many other stickers, given you have followers who agree or have similarities in who they follow or who they’re currently hooked into, it could still be a powerful conversation starter.
This Mode comes with a lot of options. You can share the music you’ve been listening to lately, random thoughts, or even interact with your followers by asking questions. Another feature that comes with this Mode is the ‘On this day’ feature which allows you to share a story or post you published on the same day the previous year.
4. Hype up product launch with the countdown sticker
Got a product or content to launch? This countdown sticker allows your followers to turn on notifications once the timer runs out.
This could be a very valuable method of announcing product or content launch effectively. The only challenge is making a pitch good enough to make your followers turn on the countdown notification.
Build up hype for an event or a product launch with this countdown sticker. It’s a great way to build anticipation and keep followers on their toes and remind them that you exist and that something awesome is coming along the way.
The countdown sticker isn’t just for events or product launches. Many brands have used it for TV shows, holidays, sales, and pretty much anything. For example, you can even create a countdown for having pizza.
Whether it’s a huge event or a simple meal, a countdown is ideal for any situation. However, keep in mind to include an interesting title and other elements such as gifs or captions to reel
5. Try the “draw something challenge”
Not only does the new ‘Create’ feature has different implementations of the existing stickers, but it also adds several new templates.
One of these templates is the ‘draw something’ challenge. You get a blank canvas to draw on, and you can ask others to draw their own version by tagging them in your story.
This could strengthen your bond with others in your niche, especially if you’re working in the visual/art/graphic design industry. This one provides off-screen interaction between you and the accounts that you challenge to draw something.
Get creative and challenge your followers to a drawing challenge. This is great for encouraging engagement which will be good for your page in the long run.
For brands who are into creative stuff such as arts and crafts or those selling stationery, this feature can be used to engage with your customers. For example, you can host a giveaway based on the best drawing by a follower.
Another thing you can do is create a community with a drawing challenge. Remember to include a creative title for the challenge and a hashtag so it doesn’t get buried in other posts.
6. Start conversations
Once you’ve engaged with your followers regularly, it’s going to be much easier to actually talk with them. This brand new sticker from Instagram allows your followers to start a chat with you using the story as a trigger topic.
This could be a great way to start a group discussion on certain topics from your story.
For example, if you’re opening a new shop or studio in a certain area, you can use the discussion sticker to invite followers to engage with your brand. Followers can ask you all kinds of things, such as when your place is opening, operating hours, and many more.
This is also excellent for building communities. Although it may seem like something small, the discussion you created with the sticker can even be called a ‘mini’ community— and that’s better than nothing.
7. Layer stickers onto your Stories
No rule forbids you from using more than one interactive stickers to improve the engagement rate from your story.
If you think your poll needs a longer explanation, use the ‘ask me anything’ or ‘discuss’ sticker:
Refinery29 is one of many brands who are always up to date with Instagram’s latest features. Here, they combine the ‘Quiz’ sticker with text and locations to show followers where they’re staying in Tokyo.
Combine different stickers and get creative. There are no exact rules on how to use Instagram’s ‘Create’ Mode so you’re free to experiment with different combinations.
Closing thoughts
With the new ‘Create’ Mode, you’re not limited to just what we showed in the examples above. You’re free to combine and use the stickers any way you like. The possibilities are endless.
Whether it’s the poll sticker or if you’re asking your followers what they think of your latest product launch— it’s time to give Instagram’s ‘Create’ Mode a try.
Instagram provides a lot of free tools that you can use to interact with your followers, but before you get to that stage, you obviously need to generate a solid following first. Check out these proven tactics to get more Instagram followers to get started.
10 Instagram Create Mode Features To Up Your Engagement!
Looking for ways to boost engagement without taking another perfect picture? Create Mode on Instagram might be the answer. In this post, we’re covering the basics of Instagram Create Mode, and the 10 features available in it that will kick your Instagram Stories up a notch!
Did you know that you can schedule Stories to your Instagram at the best times to maximize engagement? We’ll send a push notification with your Story to your phone when it’s time to post! Try it out with a free trial of Tailwind for Instagram now!
What is Create Mode on Instagram?
Instagram Create Mode helps you combine interactive stickers, drawings, and effects without needing a photo or video to share!
This 2019 Instagram product rocked social media with 10 different styles and templates that allow you to use stickers, drawings, and texts without uploading a background image first.
How to Use Create Mode on Instagram Stories
Instagram’s Create Mode opens up possibilities for creators to boost engagement and create new content!
To access Create Mode, open Instagram Stories, and swipe right from Normal Camera to Create.
Create Mode automatically opens on Text mode, but you can swipe left at the bottom of the screen to scroll through the 10 Story options. Find out more about each below!
1.Instagram Create Mode: Text
Whether you want to tell a story or showcase a quote, you can do it with the text tool, the first option in Create Mode in Instagram Stories. Use it to customize text without needing a photo background!
2. Instagram Create Mode: Shoutouts
Use a shoutout to wish a friend a happy birthday or celebrate your anniversary of working with a brand!
Open a Create Mode Instagram story, swipe once to access Shoutouts, then tap the dice button to view options!
In the search bar, enter the username of the person you want to give a shoutout to.
All the stories you’ve tagged this account in will populate for you to choose from to commemorate your friend.
3. Instagram Create Mode: GIFs
Another swipe in Create Mode brings you to a GIPHY search. Type in a keyword or phrase, and scroll through the Instagram GIF options! This GIF format fills the entire screen in three tiles.
4. Instagram Create Mode: Templates
Instagram Story Create Mode templates offer pre-made posts designed to help boost engagement on Stories.
After swiping to the template option, click the dice to choose from the templates, including things like a quick draw challenge or a list of the songs you’re listening to.
Each template is designed to let your followers learn about you, and encourage responses!
5. Instagram Create Mode: On This Day
Similar to Facebook Memories, the On This Day option lets you view posts you shared years past and reshare them!
Tap “See All” at the top of the screen to select your memory.
It will then appear on your Stories as an embedded post!
You can use your On this Day post to highlight important moments in your brand or business’ past to show them just how far you’ve come, or just share feed posts that received tons of engagement.
6. Instagram Create Mode: Polls
One great idea for how to use Instagram Create Mode to boost engagement is by asking your followers’ opinions. Use poll stickers to post your own inquiry, or use a pre-set template.
You can ask This or That Questions, or use one of the templates to engage with your followers in a fun way!
7. Instagram Create Mode: Questions
With the Instagram Questions sticker mode, ask followers a question of your choosing or one from the pre-set templates.
Use this tool to spark a conversation and show your followers you care about what matters to them.
How to Share Your Question Responses
If you share a question on Instagram Story Create Mode or Sticker Mode, you can also share followers’ responses on your story.
Simply post your Question and wait for the responses to come in! When your first response appears, a new Create Mode option will appear called responses. Here, you can view your responses and share them without a background image!
8. Instagram Create Mode: Donations
Use the donation feature to post a fundraiser for a nonprofit of your choosing or pick from popular suggestions. Your followers will be able to donate to a nonprofit that you promote, spreading the good deeds around!
9. Instagram Create Mode: Countdown
Use this feature to post a countdown sticker to the start of the weekend, end of the workday, and more.
Customize the countdown header or tap the dice to generate a random option.
Users who tap the sticker can set a reminder for when the timer goes off!
10. Instagram Create Mode: Quizzes
Choose a random prompt or create your own light-hearted quiz sticker! Just change the heading of your Quiz to reflect the question, and add options for your followers to guess from!
Pin Me For Later 📌:
Start a Free Trial of Tailwind for Instagram!
- Schedule photos and videos directly to your Instagram feed with Auto Post.
- Optimize every post for more engagement with SmartSchedule and Hashtag Finder.
- Automatically hide your post’s hashtags in the first comment to keep your caption clean & clutter-free.
- Make your posts more discoverable with user tagging & location tagging.
- Analyze what's working across every post and profile with smart analytics.
No credit card required
Find out the date of Instagram registration, how to see when the account was created
With each update, something new appears in the Instagram application. Despite the huge functionality, one option is still not enough. Namely: the date of registration of the Instagram page and how to find it out. The developers of the platform do not plan to introduce such an opportunity in the near future. This is because they put the privacy of accounts above all else: the user should not be afraid of being “revealed”. nine0003
What does the age of Instagram tell us and what does it affect
What does the date the account was created tell us about? Everything is obvious. It determines the age of the account: it is either old or new. Depending on the situation, it may be "on hand" or, conversely, be not profitable.
The social network system is trying to actively promote new profiles: it raises them in the feed, shows them in recommendations - therefore, it is better to take the “new” one for advertising.
On the other hand, recently Instagram introduced additional limits for fresh pages: 720 unsubscribes/subscriptions per day or 30 per hour. In addition, a meager number of likes and comments, restrictions on messages in Direct. In case of repeated violations, everything is strictly - a ban from the administration. So such accounts are absolutely not suitable for promotion. nine0003
Where to see the date of account registration
You can find out the date of registration of an Instagram account in several ways:
- by finding the very first post;
- via profile;
- using the GetIp online service.

For convenience of choice, let's consider each in more detail.
In publication dates
So, to find out the age of an Instagram account, you need to turn on the detective mode and “comb” the feed of the desired user. To do this, go to his page and scroll down until you hit the very first post. Then open it and look at the date indicated under the comments (for example, July 22, 2018). According to it, one can draw conclusions about when this profile was registered. nine0003
There are a couple of nuances:
- the user could start posting not immediately after creating the account;
- The user may have cleaned up their old feed.
So the method, although simple, is also ineffective.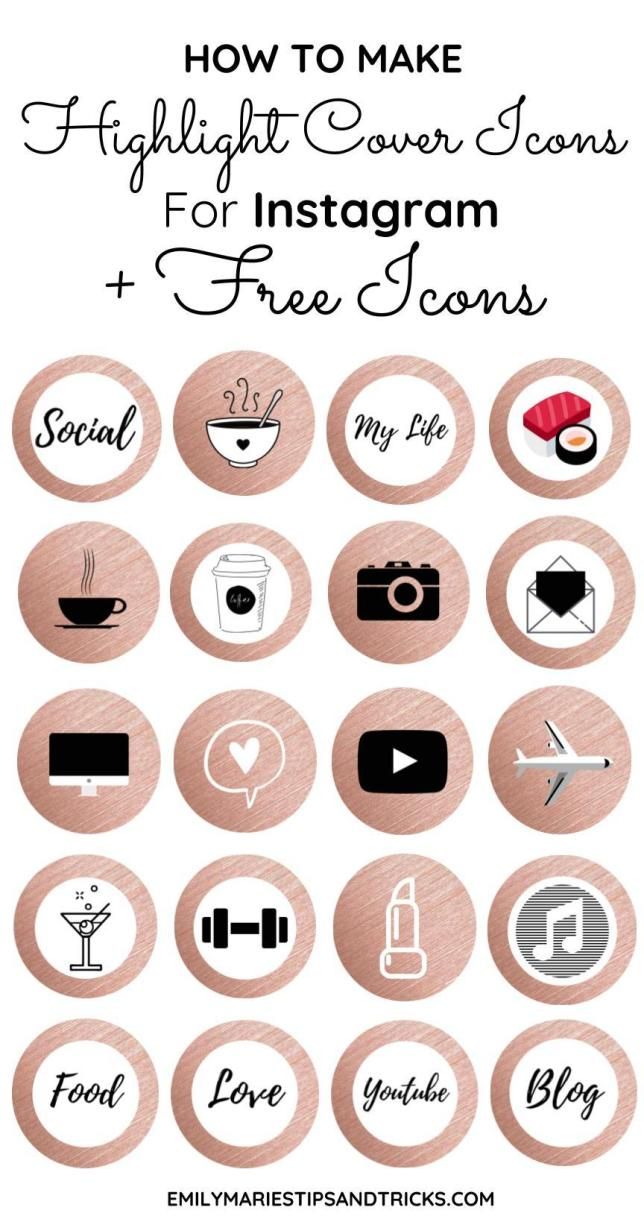
Note the main disadvantages of this method:
- long and tedious if there are a lot of posts in the feed;
- inaccurate;
- does not work when the profile is closed or the page is empty.
In profile
The second method is more accurate, but it is only suitable for your own accounts. If this suits you and you just wondered how long you have been using this social network, follow the following algorithm of actions:
- Unlock the screen of your gadget and launch the Instagram application.
- Log in using the standard login and password.
- Tap on the "person" icon, which is located on the bottom panel.
- Click the menu button and open the settings. nine0020
- Click on the "Security" section and the "Data Access" subsection.
Done. Here you can find:
- the day, month and year of creating an Instagram profile;
- how many times passwords have been changed;
- previous nicknames and names;
- network inputs and outputs;
- search history, etc.
Helpful advice. If you are going to purchase an account, ask the host to take a screenshot of the Data Access page. nine0003
Use Getip
The third way is to use a third party Getip online service. He is the only one who can suggest user profile information at no additional cost.
To work with it you will need:
- Go to Insta and copy the nickname of the page we need to the clipboard.
- Go to the Getip web resource.
- Insert a nickname into an empty line and tap "Check".
After some waiting, you will see information about the date this account was registered.
Important. Lately, Getip often gives error 500.
Try to solve this problem by contacting the technical support of the service.
How to find out the age of someone else's Instagram
In addition to searching for the first publications and using the online service, there is another way that allows you to find out the date of registration of someone else's Instagram profile. It will show accurate information about the time the account was created, the last nickname changes and the country where the user is accessing the network from. nine0003
For information, do the following:
- Open Instagram and find the page of the person you need.
- Click on the function button (three dots) in the upper right corner of the screen.
- Select Account Information.
After that, a window with all the data will appear in front of you.
This method also has its drawbacks:
- you cannot view information in a private profile; nine0019 doesn't work if the person has less than 10k followers.
When the account registration date might come in handy
The account creation date can be important in the following cases:
- When purchasing a page from another user. As mentioned above, up to a certain age (6 months), new profiles have restrictions on likes and comments, so they cannot be promoted quickly.
- When ordering a product in online markets or joint purchases. It is undesirable to give your money to "three-day" sites, since, most likely, these are scammers. nine0020
This may be useful to satisfy your own curiosity. After all, it is interesting how many years you have already spent on social networks.
How to hide your Instagram data from others
If you want to protect yourself and hide your data from other users, then completely close your profile. To do this:
- Go to the page with the "little man" and open the settings.
- Click on the "Privacy" line and select the "Account Privacy" option.
 nine0020
 - Move the "Closed account" toggle switch to the active position.
Thanks to this feature, you can no longer be "punched" through online services and caught on early publications. Among other things, the button to view "User Information" will now be unavailable.
To find out information about your Instagram account, you need to use third-party services or scroll through posts manually. It's worth it: the information found will allow you not to waste your time on scammers and not get into an unpleasant situation. nine0003
How to use Instagram* Stories: a comprehensive guide
July 11, 2017 Technologies
The Instagram* Stories interface is intuitive for everyone, but some features are not so obvious. A detailed guide will help you publish your first story on Instagram*, as well as reveal some useful tricks for experienced users of the service.
The Basics
Creating a Story
Swipe from left to right on the Instagram home page* (where you follow your feed) to start posting stories. To take a photo or shoot a video, you need to click on the circle at the bottom of the screen, and by swiping down you can open the media selection window from your library. There is another way to create a story: select your account tab (where your photos are shown) and click on the + next to your profile photo. nine0003
Shooting modes
Instagram* Stories supports five shooting modes.
- Live. By selecting this mode, you can broadcast from your smartphone's camera. After the broadcast is over, the video can be shared on Instagram*.
- Normal mode. A quick tap takes a photo, a long press takes a video.
- Boomerang.
 Boomerangs are short looping animations. This mode is suitable for shooting dynamic videos. nine0020
 - Write back. With this mode, you can shoot video in reverse.
- Hands free. In this mode, a quick tap will start a 15-second recording without you having to hold down the record button.
Filters
Instagram* Stories has a small selection of filters, but it's usually enough. Filters can be changed by swiping left or right.
Supported photo and video format
Instagram* Stories photos and videos are vertical. Horizontal media files are cut off when imported. To select the desired area of the photo to be published in the story, you can use the frame crop in the standard photo editor. The maximum video length is 15 seconds. Keep in mind that a longer video clip will be shortened when imported. You can upload to history only those pictures and videos that were taken in the last 24 hours. nine0003
Masks
Another borrowing of Instagram* Stories from Snapchat. To go to the masks, you need to tap on the icon to the right of the camera change icon.
Stickers
To attach a sticker to a story, you need to click on the corresponding icon after shooting or simply swipe up on the screen.
Location, temperature, and time stickers
On the first line of the sticker selection screen, you can choose to add location data, the current temperature at your location, and the time of publication to your history. nine0003
Adding a selfie to the story
On the next line of the sticker selection screen, there is a camera icon. Choosing such a sticker will allow you to take a selfie and embed it in the story. Moreover, the borders of the photo can be either blurred or emphasized with a white frame. With this feature, you can create fun collages or express your opinion about what is depicted in the story with the help of a joyful or condemning grimace.
Change sticker size
Use two fingers to make the sticker larger or smaller.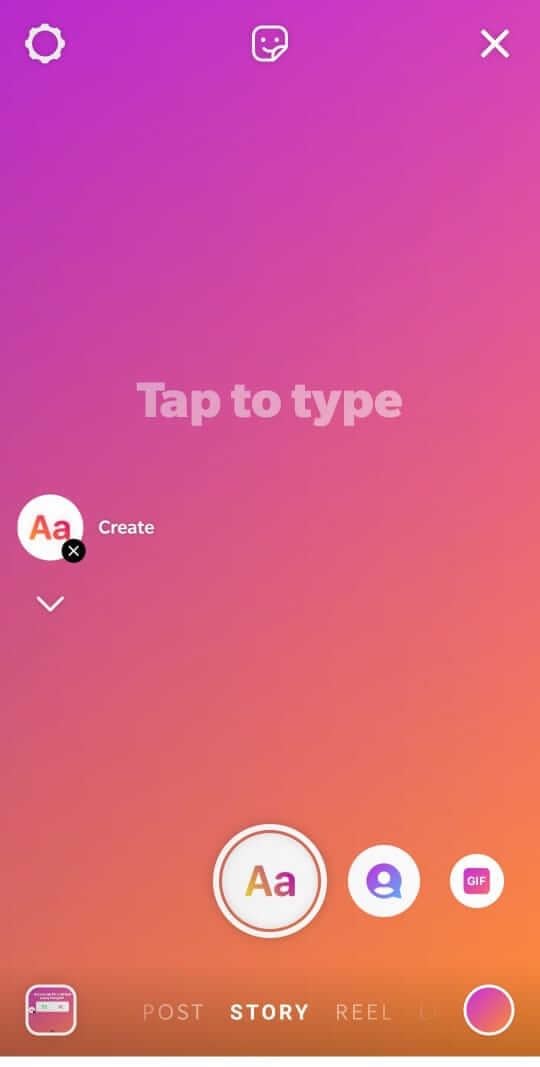 Once you've selected a sticker, pinch your fingers together to make it smaller, or move your fingers apart to make it bigger. nine0003
Attaching a sticker to a video element
Select any of the stickers, press and hold your finger for a couple of seconds. A time slider will appear in front of you. Select the second with the element to which you want to attach the sticker, set the desired location and size of the "sticker" and click "Attach". Now the sticker will be attached to the selected video subject.
Adding hashtags
To assign a hashtag to a story, you can use the tag in the text, but it's easier to select the appropriate sticker. Tapping on it will change the display style of the hashtag. When your friends see the tag, they can jump to posts with the same tag with one click. nine0003
Quick sticker selection
To avoid having to scroll the screen every time to find your favorite sticker, swipe right when you select it. You will see a list of recently used stickers. There is a separate group of stickers that fit especially well on portraits. To access them, swipe left.
Deleting stickers
To delete a sticker you accidentally added, press and hold your finger. A trash can icon will appear at the bottom of the screen, and you need to move the extra “sticker” there. nine0003
Drawing
To switch to drawing, click on the corresponding icon between the sticker and text icons in the story editing window.
Types of brushes
Four brushes are available to the user.
- Regular brush. The same basic brush from any graphic editor.
- Marker. Differs in the shape of the brush and the degree of transparency.
- Brush with neon stroke. Similar to a regular brush, but with a choice of stroke color. The main color remains white. nine0020
- Rainbow brush. One brush - seven colors.
A choice of erasers is also available.
Brush size
Brush size is adjusted using a special slider that opens by clicking on the icon with three dots in the lower left part of the screen.
Color selection
You can also choose brush colors when drawing: they are located at the bottom. You can move between the three standard palettes by swiping left or right. To choose your color, hold your finger on one of the circles. nine0003
Fill
To fill the frame with a single color, select the brush, press and hold anywhere on the screen. After uploading, you can open part of the photo or video using the eraser tool.
Text
Select the Aa icon to the right of the draw icon to start typing.
Styles and alignment
To adjust the color and size of text, follow the same steps as when painting with a brush. The scale of writing can also be changed using two fingers. nine0003
A button with indent adjustment appears in the upper left corner when typing. You can position the label on the left, right, or middle. The second functional button when typing is the letter A in a square. By clicking on it, you can switch between three label display styles.
3D text effect
To give text a 3D effect, create two identical labels but in different colors. Place them almost on top of each other, with a slight shift: you get 3D text. nine0003
User mark
To mark a user in your story, type the @ symbol when creating a note. Start typing a nickname and Instagram* will suggest options from among your friends. You can attach hashtags in approximately the same way: use the # symbol for this.
Other
Save Stories
Click on the three dots in the top right corner when you are on your Instagram profile*. To automatically save your stories, go to the story settings and move the "Save published photos" slider to the active position. nine0003
Add music to Instagram* Stories
There is no function to add music to video in Instagram* Stories. But there is still a way to add audio to a story. Many may have noticed that the music playing on your smartphone is not interrupted when viewing other people's stories. The same thing works when creating a video: just turn on the song on a streaming service or, for example, on the VKontakte social network and start shooting a story.
Video rotation
You can avoid cropping the edges of videos when publishing to stories using special applications that rotate videos by 90 degrees.
Upload
Price: Free
Publication of old photos and videos in the story
If you are late with the publication and 24 hours have already passed since the shooting, a little trick will help you upload a photo or video. Just send the desired pictures or videos to yourself on WhatsApp and save. There is an easier way - using special applications. nine0003
appbox fallback https://apps.apple.com/ru/app/id1049894654
appbox fallback https://play.google.com/store/apps/details?id=com.

