If you want to edit video for Instagram, you have a number of options for doing so. However, the first thing to establish is what kind of video you’re planning to post. Instagram has taken a while to figure out its video offering, and you currently have a few options for where and how you can post videos.
Currently on Instagram, you have three main methods of posting videos – Stories, main feed posts and Reels. Until recently there was also the long-form IGTV app, however Instagram’s parent company Meta announced that it would be shutting down IGTV as of March 2022, due to lack of interest and a desire to simplify the platform’s video offering. You can also go Live, but since we’re talking editing here we’ll leave that alone for now.
UPDATE July 2022: video posts are (almost no more) – an Instagram Reels update means that all videos less than 15 minutes in length will now automatically be shared as Reels.
In this guide, we’ll take you through each type of video you can post on Instagram, explain the requirements and how best to edit and optimise your videos for each one. For more powerful video editing options, check out our guide to the best video editing software, as well as the best free video editing software if you’re on an extremely tight budget. Also, bearing in mind that Instagram works best on mobile, our guide to the best video editing apps might also be helpful.
The easiest way to get started posting your video on Instagram is to hit the + symbol at the top right of the screen. This will take you to the menu where you can select what type of content you want to post. The top three options will be Post, Reel and Story. Select which one you want to post, and you'll be taken directly to the editing and uploading interface.
So, let's look at each one in turn.
An Instagram feed post is the simplest way to share a video. The in-app editing functionality here is quite limited, meaning that if you simply want to share a video on your feed, you may want to edit it beforehand in a separate app or program. Here are the key things to remember.
Set the dimensions: You can post a video in Instagram’s traditional square format, or in the dimensions it was originally shot. When selecting your clip from your gallery, click the two-arrows icon on the bottom left to toggle between these options.
Remember the time limit: You’ve got a maximum of 60 seconds when posting video clips to your Instagram feed.
(Image credit: Jon Stapley/Future)Trim and add filters: In-app, you can use the uploader to trim your video clip, or to add one of Instagram’s famous filters (though they are a bit passé these days). If you want to add music, text or effects, you’re best off either doing it beforehand or using either Reels or Stories, as the post editor doesn't offer this functionality.
Instagram Stories are short, ephemeral photos and videos that show up at the top of a user’s feed, and disappear after 24 hours. Originally introduced to compete with Snapchat, Stories have since become a key part of the Instagram experience. Here are some tips for editing Instagram Stories.
Think in 15 seconds: An individual Instagram Story is 15 seconds long. If you upload a longer video, it’ll automatically be split into multiple stories, but this can make for a disjointed experience for the viewer. You can individually select parts and remove them to isolate a 15-second section, but the breaks may not be where you want them. It’s best to plan in advance and trim your clips to 15 seconds or less before upload – your phone’s native video app will likely be able to handle this.
Stay vertical: Instagram Stories are almost exclusively viewed full-screen on a phone display, so portrait format dimensions (1080 by 1920 px) are what you need to be thinking in. If you do have video that’s a different orientation, you can always zoom in manually in the interface like you would with a photo, but remember that this will have an impact on the quality.
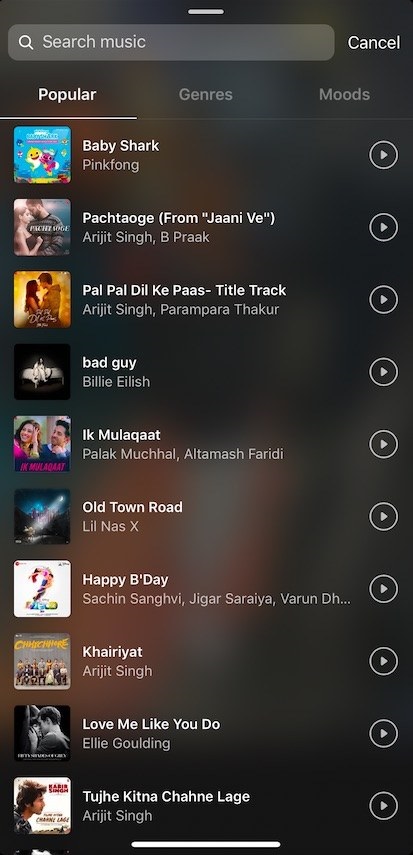
Remember what you can do in the app…: The Instagram app makes it easy to add simple things to your Stories. You can overlay text, add music (the app links up with Spotify), rotate video, zoom in, move the video around the canvas, add a background, overlay photos from your gallery, and more. If you have simple tasks like these in mind, the easiest thing to do is probably handling it in-app.
… and what you can’t: The Stories interface isn’t much for colour correction. There are Instagram’s well-known filters named after cities, which you can access by swiping left or right in the Stories interface, but honestly these are pretty lame. For simple colour correction or stylish presets, you’re best off looking into an app like Adobe Premiere Rush.
For more on Stories, see our Instagram Story tips guide.
What Stories were to Snapchat, Instagram Reels are to TikTok. These are short clips that can be posted to the main feed, or continually scrolled through just like TikToks.
Create in-app if possible: You can add pre-recorded clips to a Reel by tapping the camera roll icon at the bottom left, but unlike TikToks, Reels don’t let you add many effects to these clips. You can add text, stickers and music in a similar interface to Stories, but the more advanced stuff is fenced off unless you’re shooting in-app. Simply tap the centre button to start recording, or use the clock icon to start a recording timer.
Set the length: Reels can be set to 15, 30 or 60 seconds – they don’t have to be exactly these prescribed lengths, but they cannot exceed them.
Use transitions: In the Effects panel (accessed by tapping the stars icon), you can find some useful Transitions to get you from one clip to another. These include effects like Warp (whip between clips when you turn your head left or right), Spin (trigger a spinning transition by tilting your head), Zoom (tap a section of the frame to transition by zooming in on that area) and more. They can be really handy for stitching clips together smoothly.
Save effects: The effects interface on Reels is a big sprawling mess. If you find an editing effect you like, save it using the bookmark icon so that you can easily access it again.
(Image credit: Jon Stapley/Future)Align your clips: Once you’ve added your first clip, you’ll notice a new icon on the left-hand menu bar. This is the Align tool – selecting it will bring up a ghost overlay of the end of your previous clip, which you can then align the next shot to. This is useful for smoothly transitioning between clips.
Want to know more about Reels? Check out our full beginner's guide to Instagram Reels for more tips.
Read more:
Thank you for reading 5 articles this month* Join now for unlimited access
Enjoy your first month for just £1 / $1 / €1
Already have an account ? Sign in here
*Read 5 free articles per month without a subscription
Join now for unlimited access
Try first month for just £1 / $1 / €1
Already have an account ? Sign in here
Jon is a freelance writer and journalist who covers photography, art, technology, and the intersection of all three. When he's not scouting out news on the latest gadgets, he likes to play around with film cameras that were manufactured before he was born. To that end, he never goes anywhere without his Olympus XA2, loaded with a fresh roll of Kodak (Gold 200 is the best, since you asked). Jon is a regular contributor to Creative Bloq, and has also written for in Digital Camera World, Black + White Photography Magazine, Photomonitor, Outdoor Photography, Shortlist and probably a few others he's forgetting.
Aug 30, 2022• Proven solutions
Instagram is known as one of the most prominent community where you can capture and share your moments simply and beautifully on the Internet. Beside photo editing and sharing, it has expanded their services to include uploading, editing and posting video as well. So far, Instagram allows you to post up to 60 seconds of video.
You can edit your videos using the relatively simple built-in program that Instagram provides, or you can make your video more attractive in your Instagram community by using some extra filters and effects provided by Filmora Filmstock, and edit your video with Filmora video editor on your PC or Mac to make it more fantastic in your business. In this article, we will show you how to edit video clips in Instagram and how to edit your Instagram video clips in Filmora.
You May also like
12 Facebook Marketing Tips for Business >>
8 Best Facebook Scheduler >>
Facebook Insights: How to Use it for Beginners >>
Instagram has launched a new longer-form video app for content creators named IGTV on June 2018, which allows you to upload a longer video, while in Instagram Stories, the video length is limited to 15 seconds, and the video in main feeds can be 60 seconds.
Though IGTV allows you to upload portrait/vertical videos only with a minimum 4:5/a maximum 9:16 aspect ratio, at present, Instagram still displays square video (1:1 aspect ratio), portrait video (5:4 aspect ratio) and landscape video (16:9 aspect ratio).
We recommend you to use Filmora video editor to edit your Instagram videos because:
New to video editing world? Check this ultimate guide to Editing Video to learn video editing step by step.
More Instagram Editing Tips:
How to Crop and Export Videos to Instagram >>
How to Upload a Video to Instagram From a Desktop >>
How to Edit Instagram Photos >>
Video editing in Instagram video system is relatively straightforward. All you need to do is recording the video in your smartphone or tablet to start.
Record: After launching Instagram, tap the Plus icon at the bottom of the screen. And then tap Video button to continue. Tap and hold the circle button at the screen to start recording. You can release it when you want to stop recording. You can tap and hold the button again to record multiple video clips. You can also tap the switch button to switch between cameras.
Delete: Is there a clip that you don’t want? You can get rid of the most recent clip that you recorded quickly. All you need to do is tap the Delete button and tap it again to confirm.
Add a Filter: After you have recorded the video, tap the Next button in the upper right. Currently, there are 24 filters available in Instagram. Swipe the filters at the bottom of the screen to check all filter options. Tap a filter once to check how it will look with your video clip, tap the filter again to adjust with the slider.
Image Stabilization: There's a small camera icon at the top of the screen after you taking the video. By default, it's turned on on and applied to your video. If you want to turn it off, just tap it again.
Add Cover Frame: Once you have completed adding a filter to your video, you can select a cover. The cover frame is one particular frame from the video and it will be in the front of the video. It is important to choose an interesting cover to attract your friends to watch.
Recommend to choose a handheld stabilizer for your phone to make your video footage to next level
Check at Amazon
You can just do some basic video editing within the Instagram app. However, if you want more control over how your video is edited, you can try Wondershare Filmora. It's a simple yet powerful editing tool that provides you with far more options to edit your video clips. You can do the edits quickly with far more options and get exactly what you want. There are more than 300 new effects available in Filmora, you can add titles, motion elements, overlays and music sound to your video clip, which will make your video more attractive. What's more, if you need some more professional look in your video, you can apply our Filmstock Effect Packs. And you can get some Effects Packs for free in Filmora Filmstock now.
Download it now and follow the steps below to edit your Instagram videos quickly and easily.
Lanuch Filmora, and then click the "Import" button or directly drag your video to the media library of this powerful Instagram video editor. You can preview your video in the right Preview window. And if you find your footage is a little shaky, you can stabilize it by right clicking the footage and then selecting Stabilization. If the footage is OK, then drag and drop it from the library to the Timeline.
While Instagram just provides some basic editing options, you can shape your footage quickly and easily using Wondershare Filmora. You can move the slider on the timeline and use the red Scissor icon to cut or split your video. Then double click the video on the timeline, select Transform, you will be able to rotate and flip your video. What's more, you can click the Color option and do some advanced color tuning to make your video more beautiful.
You can choose from many different graphics, transitions, sound effects, texts and tiles, overlays, elements and filters, which means you can get the exact look and sound you want. To do this, just go to each effect tabs above the timeline and drag-n-drop the effects you'd like to apply. There are over 120 built-in filters in Filmora video editor, and you can get more in the Filmora Filmstock.
Once your video clip is ready, just save it to your local folder or device in mp4 or other supported formats, and then upload it to Instagram and let it play for the world! You can also change the video settings like resolution, bit rate. Besides that, you can also share your video to Youtube, Vimeo, or burn a DVD collection if you need.
Want to make your video standing out in your Instagram community? Try the Filters and Effects provided by Filmora Filmstock. It provides various unique amazing texts, filters, overlays and motion elements, which will help to make the stunning videos for you. Currently, there are 333 specially designed Effect Packs available, including Beauty series, Fashion series, Fitness series, Food series, Travel series, Education series and Holiday series. What's more, Filmstock has After Effects available for the users to download. And the good news is, you can get some Effects Packs, such as Spring Pack, Crayons Pack, Japanese Graduation Pack, Animated Emoji Pack,and Paris Sketchbook Pack, etc. for free and the design team will update and add the Filmstock effect packs monthly, which allows you to enjoy different new effects per month. You can visit Filmora Filmstock to get the detailed completed information.
Watch the video below about Filmora effect packs in Beauty series :
Learn more about the excellent Filmora Filmstock
You can also add photo effects to your Instagram images. Click here to check the photo editor which provides more than 200 photo effects.
Liza Brown
Liza Brown is a writer and a lover of all things video.
Follow @Liza Brown
Companies have not been
added to compare more
Back to content
Whoever you are, out of over 1 billion Instagram users, one thing is certain, no matter how wrong your Instagram video is, you can be sure that by following the information in this guide, you will be able and able to edit your Instagram video after it has been turned into an Instagram story.
Instagram is a social network and photo-sharing application that allows registered users to be called Instagrammers to upload and edit photos and videos using the Instagram app was bought by Facebook in 2012. However, it was originally owned by Kevin Systrom and Mike Krieger. Instagram users have used it to share photos (even live ones), edit images and videos with any of the filters, and explore the profile of other users in other parts of the world. Instagram is free to download and users can choose the free mode (default) or choose a custom style.
Cliptomatic, the smart video editor, is an app that turns everything you say into live subtitles. Public figures such as AOC, Karamo Brown and Jameela Jameel use it to make videos on their Instagram stories accessible. [SITE LINK] https://t.co/3PvevCs6lq #AccessibilityFriday
- Women Enabled Int'l (@WomenEnabled) June 28, 2019
If there's something that Instagram has in abundance, it's features. These features attract customers/fans and most users and Instagram also make sure that each feature or feature is updated or a new one is created regularly.
Due to the purpose of this guide, we'll focus on the Instagram Story feature, but we'll take a look at some of the features found in one of the most iconic and famous apps of all time. These are some of the features that can be found on Instagram.
One of the great features of Instagram is the video tagging feature. Tagging was once someone else's Instagram until recently. If you were to use Instagram for almost a decade, you would come into contact with photo tags, but not video tags. Today, Instagrammers use the video tagging feature to tag people who are in the photo and others who are not. To enable video tagging, follow a few steps.
will appear on your profile.
The direct messaging feature is another feature that is commonly found in other social media sites/apps, but is slowly gaining popularity to become one of the most beautiful and best features of Instagram. The direct messaging feature allows users to send private messages to friends, family, or contacts. Here's how to send a DM.
Another notable feature of Instagram is the hashtag. Hashtags are known on networks such as Twitter, Facebook and many other social networks. Interestingly, the hashtag is not only a function, but also a symbol. There are many benefits to using a hashtag. These include allowing users to create unique posts that are easy to find. Another benefit of using a hashtag is that hashtags are used to start a conversation. If you want to make the most of your hashtag, follow the rules below.
Another thing that makes Instagram stand out from other apps in terms of features is the abundance of filters. The benefits of using these filters on your Instagram video include but are not limited to the following. Filters are a great way to get more Instagram followers. Filters come in a variety of effects and colors, making them the perfect choice for adding fun and zest to the images they are applied to. There are many filters, including color image effects, face filters, and AR filters.
This is perhaps the most important feature in this guide. Instagram Story allows users to post anything from photos to videos and more. These stories can be as short as 24 hours, while videos are typically 15 seconds long.
It's quite simple; however, Instagram does not allow the user to change the content of their videos; this will allow users to save and delete any messages. Here's how to save or delete any story of your choice.
To select a highlight, do the following.
Other third party apps can be used to edit Instagram videos on your Instastories. These apps include Canva, Expand, Hype Type, Inshot. These apps are compatible with Android and Apple operating systems and can perform various functions. These features include blurring the background, adjusting the video speed, and making collages. We hope to have helped you with this comprehensive guide.
Date: April 2, 2020 / Categories: Engagement, / Author: E.O.
April
2
2020
E. O.
O.
Contact Page, • Personal Information
Instagram Reviews © 2022 - All Rights Reserved. This site is in no way affiliated with Instagram.
Go to top
Instagram is an amazing social media platform as it focuses on sharing experiences through photos, videos and impressive animated stories. It has given self-made internet celebrities a chance to shine, and this platform has also changed the way ads are placed.
Table of contents
Edit captions
Tag new people
Add a place
Can I edit thumbnails?
Editing published content is not easy
Frequently asked questions
How do I edit all videos after publishing?
Can I edit IGTV videos after posting?
It's no surprise that Instagram offers some of the most comprehensive video and photo editing tools available. However, all of these tools are only available before you post something.
Once you actually upload the video to your album or your story, all editing functions will disappear. You can make some changes to published content, but they are very limited. Let's take a closer look at what you can do.
One of the easiest changes you can make to an already published video is to change the title. If you want to add hashtags to reach more people, write something smarter, this is one of the things you can change after posting.
This video will not receive noise after you edit or remove the caption. Instagram also doesn't send change notifications to anyone.
Just like you can tag people in pre and post photos, you can do the same for videos. When you're excited, it's easy to forget to tag your friends in your message. If you accidentally missed someone, do the following:
If you tag someone, even in a video that has already been posted, that person will receive a notification. Other people following this post will not receive notifications.
You can also change location. You can add a location (if you posted a video without one) or you can change an existing location associated with your posted videos.
If you want to edit a location, you must first delete the old one.
Unfortunately, this is another thing that Instagram doesn't allow you to do after posting a video. To get a great thumbnail, you should select it before posting your video. Just in case you don't know how to do it, here are the steps you need to follow.
As you can see, the editing options disappear when you upload and post something on Instagram. Short of changing the title, changing the location, and tagging people you forgot about before posting, there's not much you can do.