So, you want to know how to sort out the privacy settings on your photos. As with everything regarding privacy on Facebook, the answer isn't immediately obvious. Because that would be far too easy.
In this article, we're going to look at why photo privacy matters, then explain how you can protect your images from the eyes of strangers.
Keep reading to learn everything you need to know about Facebook photo privacy settings...
Keeping your photographs private—or at least restricted to a small group of friends—is more important than you might think. And it's not just because a creep from your old high school is still liking everything you post.
So, what are some of the pitfalls of having your photographs publicly accessible?
Of course, the warnings above apply to all forms of social media. But in this article, we're only going to focus on Facebook. How can you control who sees your photos on Facebook? Keep reading to find out.
Let's start at the very beginning. Even if the privacy of your old photos is a mess, it's time to turn over a new leaf. So let's make sure the privacy is correct for all your new photos going forward.
When you upload a new picture to Facebook, you can use the same privacy controls as you do for regular text posts. In the upper left-hand corner of the new post box, you'll see a dropdown menu. This menu controls who can see the post.
You have six options to choose from: Public, Friends, Friends except (to exclude some people), Specific friends, Only me, and Custom.
Make your selection, click on Photo/Video to select your snap, then select Post.
OK, so making sure your new photos are private is quite straightforward, but what about your old photos? Depending on your addiction level, we could be talking about thousands of images.
Luckily, it is possible to change the privacy level of your old snaps. You have three methods open to you:
Individual Photos: If you only want to modify the privacy setting of one photo, you need to locate the old Facebook post on your wall, in your Activity Log, or in your albums.
Open the photo, and in the upper right-hand corner, you'll see the same dropdown menu as you see when setting inline privacy. Just choose your desired audience.
Albums: If you want to change the privacy of an album, navigate to your photos page from your profile and click on Albums. Choose the album you want to alter, click Edit, and choose your audience.
You can edit photos on a case-by-case basis in the Profile Pictures album, the Cover Photos album, the Mobile Uploads album, and the Timeline Photos album. However, other albums apply the same setting to all the photos within them.
Restrict Access to Everything: If you've taken a laissez-faire approach to Facebook privacy in the past, you might have too many pictures and too many albums to use either of the above methods. In that case, it's better to change the privacy settings of everything you've ever posted to the network.
This covers your photos, but also your videos, wall posts, comments, Likes, and other content.
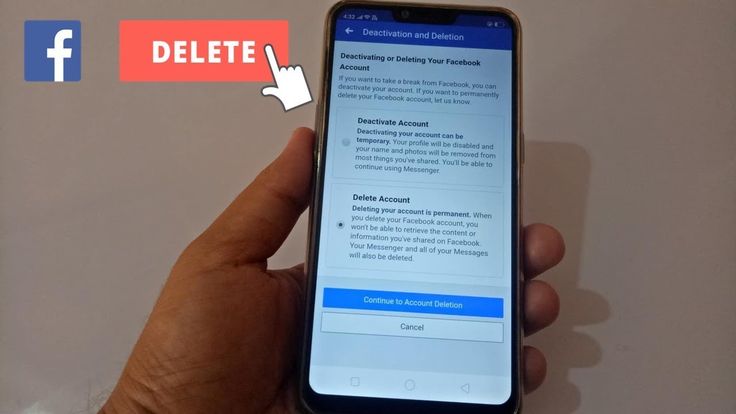
Go to Settings and Privacy > Privacy > Limit the audience for posts you've shared with friends of friends or Public and click on Limit past posts > Limit Old Posts to make the changes. Anything you have shared with friends of friends or the general public will change to Friends only. The changes cannot be undone.
For a quick way of seeing which photos are shared with the public, you can use the Activity Log. It'll save you the time of trawling through endless albums.
Click on the Activity Log link from your profile page, click on Filter, and select and select Photos and Videos in the pop-up box. Next, choose Public in the drop-down box that appears.
Great, so that covers everything you've uploaded yourself, but what about photos of you that other people have uploaded? How can you make those private?
Well, you can't. They're not your photos, and you don't have control over them. But you can untag yourself.
To remove a tag, navigate to the photo in question, click on the small arrow in the upper right-hand corner, and select Report/Remove Tags. Click Untag Photos to complete the process.
Unfortunately, the photo will still be visible to other users on Facebook. As long as the image does not break the network's Statement of Rights and Responsibilities, there's nothing you can do.
If you feel the image is abusive, you click on the Report link to let Facebook know. If the company agrees, it will remove the photo.
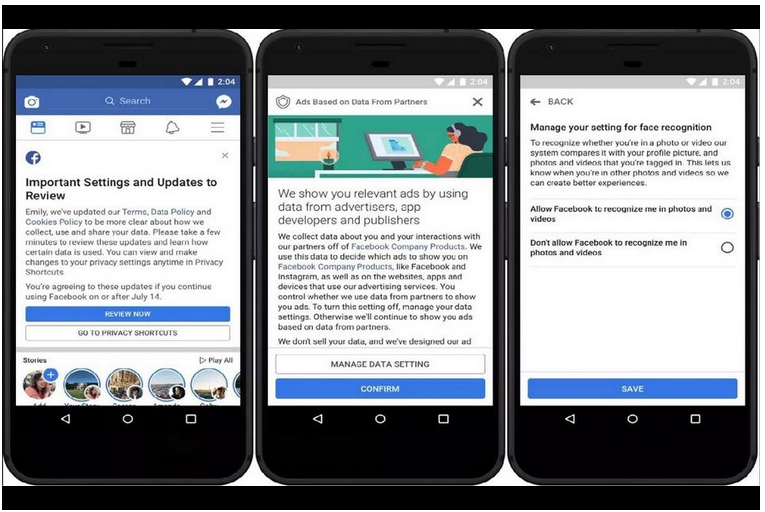
You can't prevent other people from tagging you in photos, but you can stop your name from being shown to them when they upload a photo. It means when someone uploads a photo, Facebook will not suggest your name to them as a recommended tag, even if it recognizes that the image looks like you.
In the latest version of Facebook, you need to disable the face recognition feature to prevent the suggestions from appearing. Go to Settings and Privacy > Settings > Face Recognition and make sure the setting displays No.
We hope this article has made you realize photo privacy is important and helped you to understand the steps you can take to ensure images of you aren't being exposed in the public realm. Because despite what tech companies would like you to believe, online privacy is important.
There are many reasons you should make your photos private on Facebook. Aside from privacy concerns, the site is also teeming with unscrupulous scammers who want to take advantage of other people on the platform.
To deal with this issue, Facebook has customizable settings that allow you to restrict access to your photos or hide your photos from others. You can set some to be viewable only by your friends or make them completely private and only viewable to you.
Here's all you need to know about how to make photos private on Facebook.
To make photos private on Facebook, you can change the privacy settings of entire albums or individual photos. Of course, the easy way on how to hide photos on Facebook is the former, so we'll start with that one.
You can change the privacy of an entire album on Facebook to save time, rather than needing to make photos private one by one.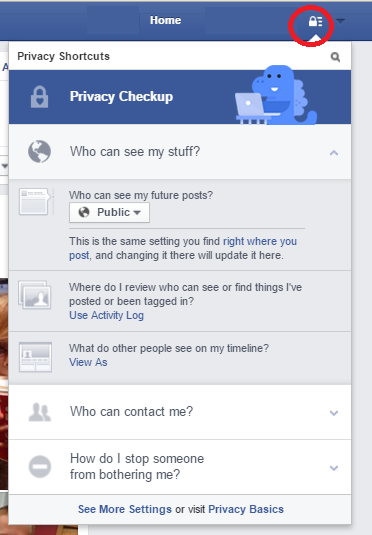
However, you should remember that you can only edit the audience of your photos—not pictures that your friends uploaded.
4 Images
To make a photo album private on Facebook, follow these steps:
 This will hide all photos in your Facebook album.
 If you don't want to make the photos completely private and still want to share them, just with a more limited audience, you can choose the audience options for Friends, Friends except, or Specific friends.
If you want to show the album only to a group of friends on a certain list, select Show Lists and choose the list you want to share the album with.
You can also change the privacy of individual photos on Facebook to make them private.
It’s important to remember that you can only change the privacy settings of certain photos inside some groups or albums. These include:
Photos uploaded in batches along with others and as part of an album will follow the settings of the album.
3 Images
To make a single photo on Facebook private, follow these steps:
You can also choose other audience options if you don't want to completely hide the photo and just want to make it less public. However, the best way to avoid the risks of using Facebook is to hide your photos completely or only share them with select people using the available Specific friends option.
If you want to double-check the privacy of your photos, you can view your public profile on Facebook.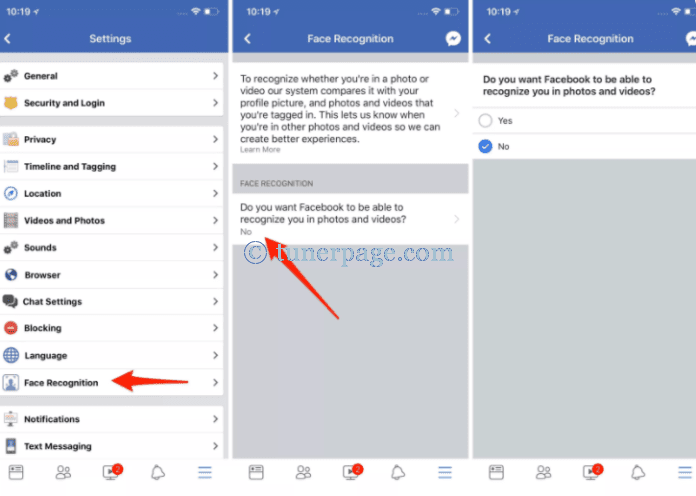 This is the profile that people who aren't your friends can see.
To do this, you'll use the "View As" feature on Facebook. You can access it on both the Facebook website and the app.
To enter this mode, go to your profile. Select the three dots below Edit Profile to open a dropdown menu, then select View As.
This will show you all the previous posts that people outside your Facebook friends list and the platform can see. You can not change the privacy settings of your Facebook photos while you’re on the View As mode, but you can take note of the photos and the dates, so you can find them later.
Once you know which photos you want to set to private, leave View As public mode by clicking on your thumbnail in the top right corner of your screen or clicking back. Alternatively, tap Exit View As.
On mobile, tap the hamburger menu at the top (Android) or bottom (iOS) and select See your profile. Next, tap the three dots adjacent to Follow Settings and select View As to enter View As mode.
The next time you post a photo, the privacy settings will automatically follow the last settings you set for a photo. So, if you set a previous photo to "Only Me," it will be the default audience setting of the next photo you upload.
2 Images
To change the audience settings of the photo you are about to upload, click on the audience settings button. You will find it below your name.
From here, you can change the post audience, then click Done to go back to your post. When you want to share the photo, select Post.
Always check this button before you upload or post anything on Facebook. You should do this just to make sure you are not accidentally sharing photos or information with people outside the platform and outside your friends' list.
Also, regularly check your profile in View As mode to see if you may have accidentally shared anything with the public.
Having a Facebook privacy and security checklist that you go through regularly will help make sure you catch any of these photos right away. Remember that the longer these photos are shared publicly on social media, the higher the chances of a scammer getting a hold of them. Although this helps, you can make your Facebook private if you need more security.
Reviewing your social media accounts and changing the audience settings of your photos to private is a good cyber hygiene practice. It will not only protect your data but will also protect the privacy of your loved ones who may be in the pictures you upload.
Always remember that there are unscrupulous hackers and scammers who are looking for ways to take advantage of other people.
No, the world doesn't care what you had for dinner last night. We do not need to see a photo of your hotel booking. And your cat looks just like everyone else.
People post too many photos on Facebook. Statistics suggest that we upload over 400 million photos a day. This is ridiculous.
However, if you are reading this article, you probably don't care what I think. You just want to know how to sort out the privacy settings on your photos. Like everything about Facebook privacy, the answer isn't immediately obvious.
In this article, we'll look at why photo privacy matters and then explain how you can protect your images from prying eyes.
Keeping your photos private, or at least only for a small group of friends, is more important than you think. And it's not just that the stalker from your old school still dreams of marrying you.
Note: If you are stalking, please refer to our guide to ask a girl on Facebook, , you will have better luck.
So what are some of the pitfalls of public domain photos?
Of course, the above warnings apply to all forms of social networking. But in this article, we will only focus on Facebook. How can you control who sees your images? Keep reading to find out.
Let's start from the beginning. Even if the privacy of your old photos is messed up, it's time to turn a new leaf. Let's make sure privacy is right for all your new photos going forward.
When you upload a new image to Facebook, you can use the same privacy controls as you would for regular text messages. In the lower left corner of the new mailbox, you will see a drop-down menu. This menu controls who can see the message.
You can choose from six options: Public , Friends , Friends except ( excluding some people), Specific friends , Only me and Custom .
Make your selection, press Photo / Video to select a photo, then select Publish .
So making sure your new photos are covered is pretty easy, but what about your old photos? Depending on your addiction level, we could be talking about thousands of images.
Fortunately, you can change the privacy level of your old photos. You have three methods:
Individual photos. If you only want to change the privacy setting for one photo, you need to find it on your wall, in your activity log. or in your albums. Open a photo and you'll see the same drop-down menu in the top right corner as you would when setting up built-in privacy. Just select the desired audience.
Albums. If you want to change the album's privacy, go to the photos page from your profile and click " Albums" . Select the album you want to change, click Edit and select your audience. You can edit photos on a case by case basis in Profile Pictures album, Cover Photo album, Mobile Downloads album and Timeline Photos album ; other albums apply the same setting to all photos in them.
Restrict access to everything. If you've been a non-intrusive Facebook user in the past, you may have too many photos and too many albums to use any of the above methods. Instead, it's better to change the privacy settings of everything you've ever posted online. This applies to your photos as well as your videos, posts, comments, likes and other content.
Go to Settings > Privacy > Restrict audience for posts you've shared with friends of friends or Public, and click Restrict past messages > Restrict old messages to make changes. Anything you share with friends of friends or the general public will only change to friends. Changes cannot be undone.
You can use the Activity Log to quickly view photos that are shared with the public. This will save you the time of traversing endless albums.
Click the Activity Log link on your profile page and select Photos from the left pane.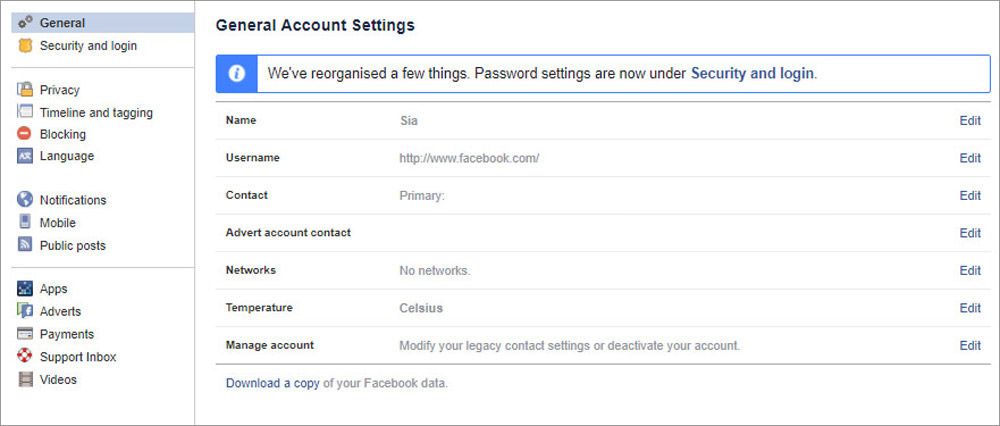
Then, at the top of the screen, select Public from the dropdown next to Shared With .
You can also change the On Timeline dropdown to see what content is visible on your own wall.
Great, that covers everything you uploaded yourself, but what about photos uploaded by other people? How can you make these private?
Well, you can't. These are not your photos and you cannot control them. But you can tag yourself.
To remove a tag, navigate to the relevant photo, click on the small arrow in the top right corner and select Report/Remove Tags . Click Untag Photos, to end the process.
Unfortunately, the photo will still be visible to other users on Facebook. As long as the image does not violate Network Statement of Rights and Responsibilities , there is nothing you can do. If you think an image is offensive, please click the Report, link to report it to Facebook. If the company agrees, it will remove the photo.
You can't prevent others from tagging you in photos, but you can prevent them from showing their name when uploading a photo. This means that when someone uploads a photo, Facebook won't offer them your name as a suggested tag, even if it recognizes that the image looks like you.
To limit tag recommendations, go to Settings > Timeline & Tags > Who sees tag suggestions when uploading photos similar to yours and change the setting to Nobody .
While you're in the Timeline and Flag settings, it's also worth changing View Messages Friends Tag You Before They Appear on Your Timeline to On .". This means that no images will suddenly appear on your profile timeline without your permission.
I hope this article made you aware that photo privacy is important and helped you understand the steps you can take to ensure that your images don't accidentally enter the public domain.
Let's quickly recap:
Have you taken steps to make your photos private? Can Facebook do more to make it easier to manage your photo privacy settings?
If you are concerned about Facebook privacy, you should be aware of Facebook shadow profiles. You can also find out if the Facebook app can spy on you and check if you can trust the Facebook portal for your privacy. And for a deeper understanding of Facebook's privacy violations. use these tools.
Facebook's privacy settings can seem like a bit of a paradox. Facebook is not exactly known for protecting the privacy of its users. The company appears to be moving from privacy scandal to privacy scandal, with revelations constantly popping up about the last time it misused user data.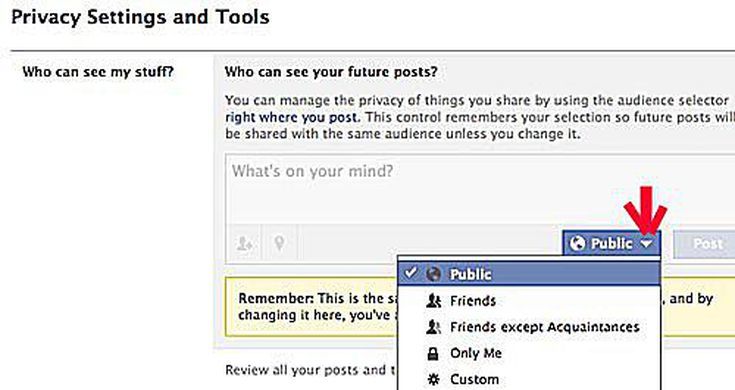
But that's not the only reason to rise to the top of your Facebook. privacy settings. If you don't want the world and their dog to freely view your photos, you'll need to tweak a few options. If you have a public or business profile and then a separate personal profile, you must also ensure that you make your personal profile as personal as possible.
Unfortunately, Facebook doesn't make this easy, with settings scattered all over the place. That's where this guide comes in - follow our tips and you'll be able to move control away from Facebook's tentacles.
For more social media tips for creatives, see our guide on how to change your Instagram bio font and the best social media platforms for artists and designers.
Click on the top right corner of each image to enlarge it.
Article content
You can restrict viewing of your photo albums, but they must do so one by one (Photo credit: Alex Blake / Facebook)
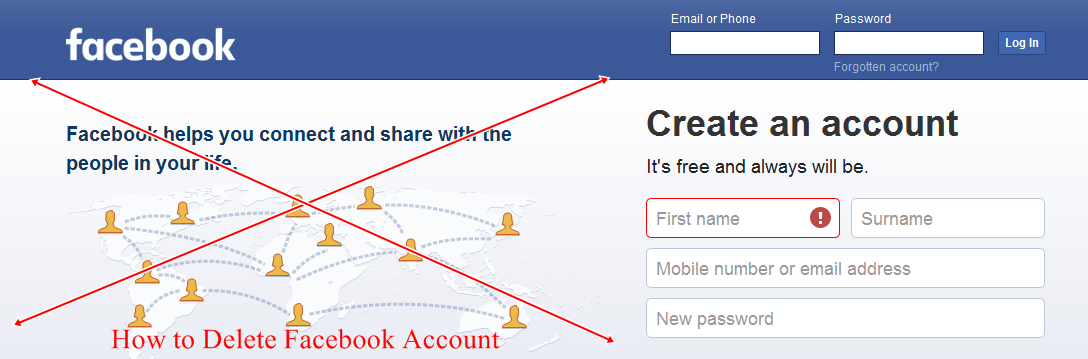
Many of your Facebook content is available to everyone, even people on your friends list. If that's not what you're looking for, click the down arrow to the right of Facebook's top menu bar, then click Settings. Go to the privacy section. Here you can configure who can see your future and past posts, whether you appear on search engines, who can add you as a friend, etc.
If you want to limit who can see your photos, it's a bit more involved. Go to your profile, click Photos > Albums, then select the album you want to customize. Click Edit, then under Privacy, choose who can see it. To do this for individual photos, go to Your Photos, click the image, then click Edit and choose who it's shared with.
[Your About section can reveal a lot about you, but you can stop strangers being curious with a few tweaks (Image credit: Alex Blake / Facebook)
Your Facebook About section can also reveal a lot about you, such as the city where you live, your contact information and relationship status. If you don't want this information to be shown to anyone who comes across your profile, you should restrict it.
To do this, go to your profile and click "About" under the cover photo. Select a section in the left panel (for example, "Places where you lived"), then hover your mouse over the information you want to change. Click the Edit button, then use the audience selector to choose who sees it. When you're done, click Save Changes.
Please note that some information, such as your name, profile picture, and username, is always public and cannot be hidden.
If you only want your future posts to be seen by a certain number of people, you can do so in your privacy settings (Image credit: Alex Blake/Facebook)
To make your choice default for future posts, click Privacy in your Facebook settings, then Edit next to "Who can see your future posts?" and select an option.
You can also change the sharing settings for messages after they have been published. Simply search for a post, then click the audience button next to the date and time information. You will get all the same options. as when creating a new message. Note that if you share something on a friend's timeline, it's governed by your sharing settings, not yours.
Creating friend lists is a quick way to share content with only a select group (Image credit: Alex Blake)
Sometimes you just want to share something with a certain group of friends. While you can select individual friends one at a time, it's much easier to create a list and share it directly with those people. It also protects your privacy by not handing out people who are not the target audience.
Usefully, Facebook creates several lists for you. On the home page, click "Friends Lists" under "Overview" on the left side (it may be hidden under "More..."). You will see three lists: Close Friends, Acquaintances and Restricted. Each one starts with a blank space, allowing you to add people as needed.
The acquaintance list is for people with whom you only share from time to time, perhaps like your colleagues. When creating a message, you can share with "Friends other than acquaintances" to exclude them. The restricted list is for people you don't really want to share everything with - like your boss - and those people will only see your public content and everything they're tagged with.
If you want a little more control, just click Create List and start adding friends to your new custom list.
If someone tags you in a post, Timeline Review lets you block them from appearing on your timeline (Image credit: Alex Blake / Facebook)
If your friend tags you in a post or on an image you don't want to be associated with, there are ways to remove your name from it. On a photo, hover over it and click Options, then click Remove Tag. In a message, click the… button in the top right corner, then click Remove Tag. This will not remove the picture, only your name.
To do this for things before they are published on your page, turn on Timeline Review.