That photo you just shared on Instagram looked perfect before you posted it. But now that you look at it, it doesn’t look so good anymore. Maybe, if you just used a different filter, it would be that much better.
You’re not the first person that has wanted to edit a photo after posting it on Instagram. Poster’s remorse is a widespread issue, and you’ll learn how to make changes to your photos in this article. There are a few edits you can make to the pictures you’ve posted, so we’re going to take a look at them one at a time.
It’s always best to start with the bad news. That way, it only gets better going forward. So, the bad news, in this case, is that you can’t change the filter on pictures that you’ve posted on Instagram. It’s probably not what you wanted to hear, but it’s the unfortunate truth.
For Instagram’s moderators, there are many factors to consider in this kind of scenario. Any editing of photos after they have been posted would impact all the people that interacted with the photo. Even something seemingly insignificant, such as a filter change, could markedly change the context of a photo. Just think about it: if you were to like or comment on a photo, it surely wouldn’t sit well with you if the content of that photo were to change in the future.
There are some changes you can make, however. You can change the caption of the photo and edit the location. You can also change the people that you tag in it.
You can change the caption on photos after you’ve posted them. If this is what you want to edit, then you’re in luck. Follow these steps:
Open the post you want to edit and tap on the three dots in the top-right corner.
You will automatically see a text box. Type in the caption you want the photo to have.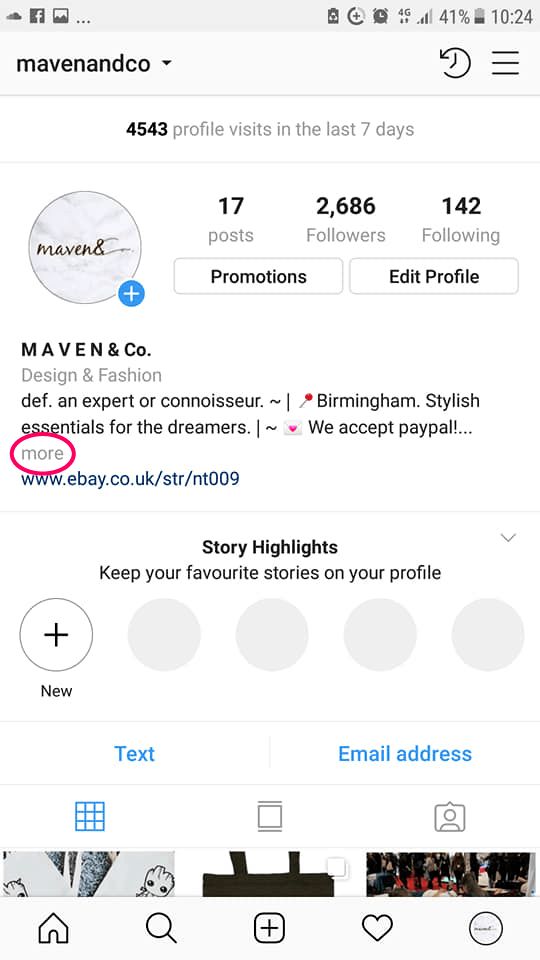
Once you’re satisfied with your caption, tap the checkmark in the top-right corner.
This will change the caption for your photo. That may not seem like much, but if you’re creative, it can make a significant impact.
Changing the location is also quite straightforward. You’re mostly going to take the same approach. Access the editing menu and tap on either Add Location or on the location that you have tagged. You will find this on the top-left of the picture, and it will change dynamically as it is updated.
It’s good to remember that Instagram will not give you the option of tagging a photo very far from where you are. However, you can certainly retag your photos when you’re traveling if you think it will make an impact.
Changing Who’s TaggedAt this point, you should be familiar with the process. Go to the Edit menu and select Tag People in the bottom-left of the picture. You will be prompted to tap anywhere on the photo and then search through your contacts to tag people. Once you select the people you want to tag in the photo, you can drag the tags around and edit them later.
OK, so admittedly, there is very little you can do to alter a photo once it has been posted. If you’re really that unsatisfied, the only option is to just delete the photo entirely and start anew. Before you do that though, here are some considerations.
If your photo is not getting the kind of engagement that you want, a different filter is probably not going to make a monumental difference. You may have to just accept that it’s not a winner. On the other hand, if your photo has a lot of engagement and you want to improve it in a fragmentary way, maybe rethink that. If you’ve achieved a good level of exposure, maybe you should leave it well enough alone and accept that maybe a change could make it worse.
When you consider it this way, you may just decide that not changing the photo is the best thing you can do.
It is difficult to create a perfect Instagram post. There are many considerations about what to say and how to appeal to your audience. Sadly, there’s not a lot you can do after the fact, so you should get in your due diligence before you decide to post. If you’re very unsatisfied with your photo, at the end of the day, you can just get rid of it and try again. Aside from that, you can change the caption and the tags, but not much else.
Unfortunately, no. There is no option to add or remove an image or video once you’ve submitted the post. Instead, you will need to delete the entire post and re-post it. u003cbru003eu003cbru003eIf you aren’t happy with the post but you no longer have the images you can change the visibility of that post by clicking on the three horizontal dots and choosing the ‘Archive’ option. This will move your post from the main News Feed to the archive folder found in Instagram’s settings. You can set this folder to private, save the photos to your phone (so you can re-post), or delete it.
Yes, by editing the text as described above, you can add hashtags or remove them. Simply click on the text box and type or delete as you normally would.
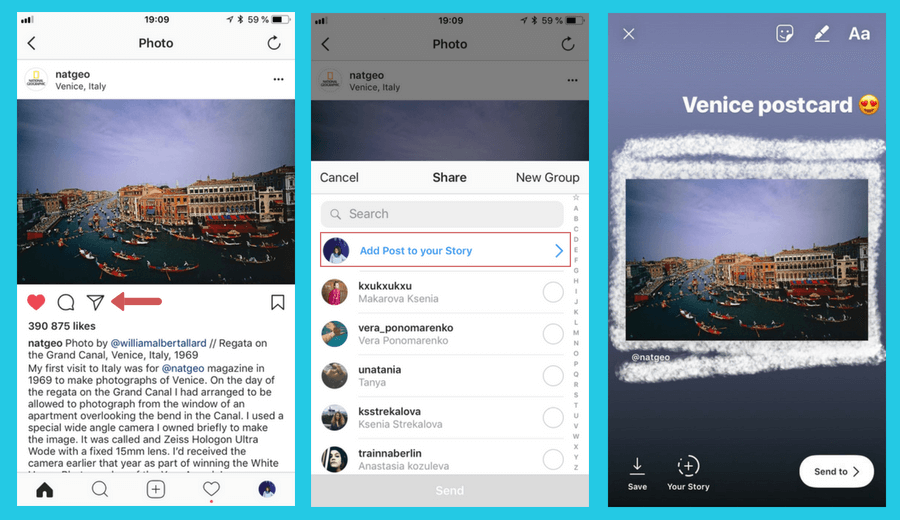
While you can’t edit a Story on Instagram, you can save it to your camera roll and upload it again the way you want. Click on the story and tap ‘More’ in the lower right-hand corner. From there, tap ‘Save.’ Upload it back from your camera roll as if it were a new post and make any necessary edits before publishing.u003cbru003eu003cbru003eInstagram Story Highlights do give you a little more flexibility in editing. If you want to save your Story for people to view for longer than 24-hours, you can change your Story to a Highlight and edit the content that way.
Do you find yourself frequently deleting photos? If you could give some advice to people who have just started using Instagram, what would it be? Let us know in the comments below.
- How to edit Instagram story photos after posting?
- Is there any way to change the filter of an Instagram photo after posting?
Well, many Instagram users are searching ways to edit Instagram photos before posting or after posted. But obviously, it is hard to find a full tutorial to guide Instagram users to get out of this trouble.
In order to help all of you get out of this trouble, I have collected some common questions about Instagram photo editing issues.
Let's go through these tips and learn how to add information to an Instagram photo after posting.
 How to Edit Instagram Photos After Posting
Can you add filter to Instagram photo, or change the filter after you have posted it online? In fact, the answer is No. You cannot add or change the filter of the photo on Instagram once published. Since the filter that you have chosen alters the picture basically.
To change the filter of the photo, you can delete the picture you have posted, suppose that there is no comment and like on it. And post a new photo with the filter you are choosing. But if the original picture has got likes and comments, we suggest you to post another picture later with filters.
Instagram allows you to add, edit or delete captions or texts of a posted Instagram photo. Below we will take iOS devices as an example to show you how to add more information to existing Instagram posts.
Step 1. The first step is to tap on "…" icon upon the photo or video that you have posted online.
Step 2. From the drop-down menu, choose the "Edit" option to open the text editing window.
Step 3. Now you can edit the Instagram photo information, add new information or delete unwanted texts.
Step 4. When everything is finished, tap on the "Done" button to confirm the modification.
After that, when you tap on the "Message" icon below the post, you can see the "Edited" mark.
With some professional Instagram photo editor, you might able to create a photo story directly. For example, you can use Filmora Video Editor or some simple photo video maker apps to download your Instagram photos directly, and use the tool to add filters, rotating, add texts, transitions, overlays, etc. to these photos and export to an ideal format as you like.
Tips
Instagram Stories has limits of the video length, if you find Instagram video trimming not working that you can't shorten your long video directly, please get this solution:
• [Definitive Guide] How to Trim Instagram Videos
If you want to learn more details about how to use Instagram photos to create a video movie, you can keep reading the below contents now.
When it comes to edit photos and videos for Instagram, we highly recommend you to use Filmora Video Editor for Windows (or Filmora Video Editor for Mac). It is the best Instagram photo and video editor software for Windows and Mac users. With this video editor tool, you can edit images in PNG, JPG, GIF, BMP, TIFF, TIF format. And you can edit almost whatever videos, captured on your phones, cameras, or downloaded from sites like YouTube, Facebook and Instagram. It also lets you to import music track with multiple audio editing tools.
Filmora Video Editor is easy to use. It helps you to create wonderful Instagram pictures and videos with powerful editing tools. Let's check the video tutorial to learn how to do it step by step.
Still don't know how to perform the Filmora Photo Editor? Just follow the below step-by-step guide to create and edit Instagram picture and video.
Step 1. Install and Launch the Photo Video Editor
Click the above "Free Download" button to get the program downloaded on your computer. And then you can easily install the program with the help of the on screen instruction. When finish, choose to start the program instantly. And you can see the main interface of the program as below image.
Now you can import your video, photo or music file to the video editor. To edit picture for Instagram, you can click on the "New Project" button in the main interface. And you will go to the editing window.
Step 2. Edit Your Instagram Videos
Import video, photo or music to the program:
In the editing window, you can simply drag and drop the picture to the main interface to import it to the program. Alternatively, you are able to click on the "Import Media Files Here" button to select the picture from your local to import to the program. The same steps can be used when you want to import video and music file.
Add filter to picture for Instagram:
To add filter to the Instagram photo, you need to first drag the picture to the timeline. And click on the "FILTER" icon on the toolbar in the middle of the main interface. There are many free filter options for you to choose from. Just click on the filter you want and drag it to the timeline to apply it to the picture.
Add text information to picture for Instagram:
With Filmora Video Editor, you can add captions, texts information to the picture for Instagram. To do so, click on the click the "T (TEXT/CREADIT)" icon after you dragging the picture to the timeline. And choose your desired text template from the library. Double click on the texts you have added, you can change the text information for your Instagram photo.
Add PIP, transitions and other effects to Instagram photo:
You can also apply other effects to your Instagram photo, including PIP, transitions, face off and elements. Simply click on the feature icon you need and select the effect to apply it to your picture.
Step 3. Export Instagram Videos
After you complete the editing, click on the "Export" button to export the picture and upload it to the Instagram.
When you are in the case of editing Instagram photo and video, just take a trial on Filmora Video Editor & Filmora Video Editor for Mac. Using it to create cool effects to help to make your Instagram picture more likes and positive comments.
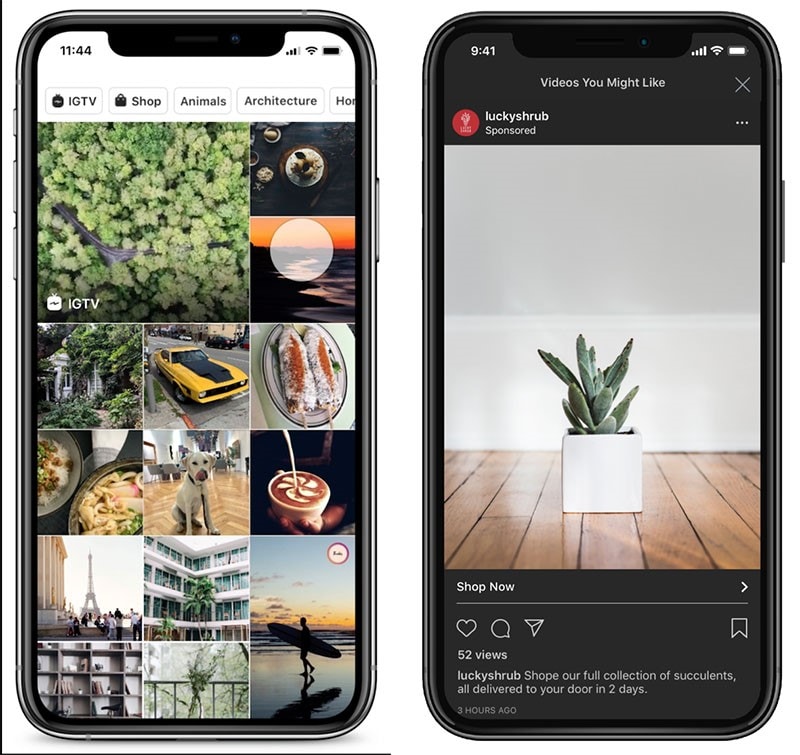
Each post is placed in the user's main feed, where it can be viewed by unique visitors and page subscribers. In the process of adding, the images are colorfully decorated as you wish, using a wide range of built-in tools. Is it possible to change the entry after it is posted in the public domain? In this article, we will tell you how to edit photos on Instagram after publication.
The main purpose and direction of the social network Instagram is to communicate with other users by posting personal photos and videos for everyone to see. You can turn even a bad photo into a high-quality image, thanks to a large selection of built-in graphic elements, text content and colorful filters.
The material is posted instantly and after posting it can be found in the main feed on the user's page. Here it can be viewed by any of your subscribers or guests (provided that the profile is not private). To post a photo, you will need to do the following:
Done. The post will appear in your news feed and be visible to all subscribers.
What if I need to make adjustments to an image after it's been shared? Standard social network tools allow you to edit pictures at any time after adding. To do this, follow these steps:
It should be said that when editing, you can only change the text accompaniment of the image, the signature under it, and also mark a specific person. Everything else can't be configured. If you want to select other filters and change the graphical display, you will have to delete the material and re-lay it out.
In the social network Instagram, each user can leave likes and comment on photos, provided that this function is not blocked by the page owner. If you do not like someone else's text, then you can delete it at any time. To do this, you need:

It's worth knowing that once comments are deleted, they cannot be restored, so think carefully before taking action.
To reply to a comment, just click on the appropriate button and enter a message. After that, the interlocutor will receive a system notification. In this way, you can erase not only your answers, but also the texts of other users.
Another unique feature in the Instagram social network is hashtags, with which you can find stories on the desired topic. They are ordinary words, but with a pound sign "#" in front of them. They can be left under any post and in short stories. If you need to edit the tags under a shared photo, follow these steps:
All photos and videos in the user's main feed are placed one after another, according to the date and time they were added. Sometimes you may need to swap photos or replace them. There are many reasons for this, for example, the meaning of the overall picture depends on the order.
Unfortunately, the interface of the social network does not allow you to swap already posted materials, but there is a way out and it will take you a lot of time and effort. To do this, you need to delete the publications and re-upload them in the required order. There are no other ways without deleting content on Instagram.
The article told how to edit photos on Instagram after publication. Everyone registered has this opportunity, but you can only change the text caption under the picture, everything else cannot be configured. Therefore, carefully approach the addition of new pictures, so that later you do not have to correct them and re-upload them.
The photo you just shared on Instagram looked perfect before you posted it. But now that you look at it, it's not so good anymore. Maybe if you just used a different filter it would be much better.
You're not the first person to want to edit a photo after posting it on Instagram. Poster remorse is a common problem, and this article will show you how to make changes to your photos. You can make multiple changes to the images you've posted, so we'll be reviewing them one by one.
It's always good to start with bad news. Thus, it will only get better. So, the bad news in this case is that you cannot change the filter for images you have posted on Instagram. This may not be what you wanted to hear, but it is the sad truth.
Programs for Windows, mobile applications, games - EVERYTHING is FREE, in our closed telegram channel - Subscribe :)
Instagram moderators should consider many factors in such a scenario. Any editing of photos after they have been posted will affect all people who have interacted with the photo. Even something seemingly insignificant, like changing a filter, could noticeably change the context of a photo. Think about it: if you were to like or comment on a photo, you would certainly not like it if the content of that photo changes in the future.
However, you can make some changes. You can change the photo caption and edit its location. You can also change the people you tagged in it.
You can change captions for photos after they have been published. If that's what you want to edit, then you're in luck. Follow these steps:
Open the message you want to edit and click on the three dots on the top right corner.
When you're satisfied with the signature, tap the checkmark in the top right corner.
This will change the caption to your photo. It may not sound like much, but if you get creative, it can make a big impact.
Changing location is also quite easy. You will basically follow the same approach. Enter the edit menu and click on either Add Place or the place you have marked. You'll find it in the top left corner of the image, and it will change dynamically as you update.
Keep in mind that Instagram won't let you tag a photo very far from where you are. However, you can change the tags on your travel photos if you think it will have an impact.
At this point, you should be familiar with the process. Go to the "Edit" menu and select "Tag People" in the lower left corner of the image. You'll be prompted to tap anywhere in the photo and then search your contacts to tag people. Once you select the people you want to tag in the photo, you can drag and drop the tags and edit them later.
Well, admittedly there is very little you can do to change a photo after it has been posted. If you're really that unhappy, your only option is to simply delete the photo entirely and start over. Before you do, here are some considerations.
If your photo doesn't get the interest you want, another filter probably won't make much difference. You may have to just accept that this is not a winner. On the other hand, if your photo is very interesting and you want to improve it in fragments, maybe rethink it. If you've reached a good level of impact, you might want to leave it alone and accept that perhaps changing it could make it worse.
Considering it this way, you might just decide that not changing the photo is the best thing you can do.
Creating the perfect Instagram post is hard. There are many considerations about what to say and how to appeal to your audience. Unfortunately, there isn't much that can be done after the fact, so you should do your due diligence before you decide to post. If you are very unhappy with your photo, in the end, you can just get rid of it and try again. In addition, you can change the title and tags, but nothing more.
Unfortunately not. There is no way to add or remove an image or video after sending a message. Instead, you will need to delete the entire post and re-publish it.
If you're not happy with a post but don't have any more images, you can change the visibility of that post by clicking on the three horizontal dots and selecting the Archive option. This will move your post from the main feed to the archive folder in Instagram settings. You can make this folder private, save the photos to your phone (so you can re-post), or delete it.
Yes, by editing the text as described above, you can add or remove hashtags. Just click the text box and type or delete as you normally would.
Although you can't edit an Instagram story, you can save it to your camera roll and upload it again whenever you want.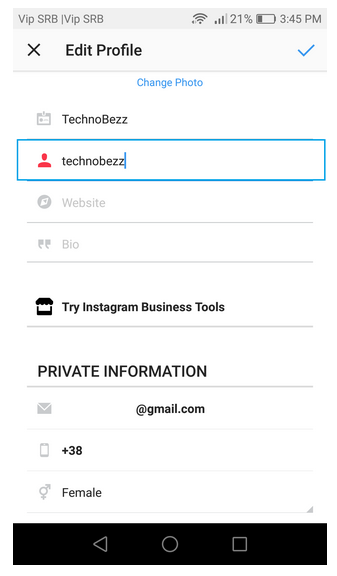
.jpg?width=626&name=3%20(1).jpg)