Instagram is constantly improving the platform with new effects and photo editing options. Blurring a picture is a common and popular way of improving the quality of an image on Instagram, and it has various benefits.
For instance, you can blur a picture you took at work to conceal the identity of your office or hide personal details.
Additionally, you can blur the background of a photo you took at the beach to place the focus on your face or beachwear.
So, how do you blur a picture on Instagram?
This guide will cover how to blur a picture on Instagram.
Table of Contents
Instagram is famous for its many filters and effects that let you add quality to your pictures before posting them.
You can adjust the size of your image and set the desired brightness, contrast, saturation, shadows, and more stimulating effects.
These are edits that most people are aware of, but there is one that you may not be familiar with; the “Tilt Shift.”
From its name, you may think the effect tilts your photo. However, that is not the case; The “Tilt Shift” enables you to blur parts of your picture to place the focus on particular aspects.
It has two options, “Radial” and “Linear.” The “Radial” option blurs the corners of your image to focus on a circular central part of the image.
For instance, if you apply a “Radial” effect on a picture of your cat, you’d blur the rest of the body and background and focus on its face.
On the other hand, the “Linear” effect blurs everything else, leaving the focus on a linear part of the photo.
For instance, if you want to highlight and focus on a paragraph in a book excerpt, you can blur the rest of the sections and leave the paragraph of interest in focus.
Let’s discuss how to blur a picture on Instagram in detail below.
Blurring a Picture on InstagramFollow the below steps to blur a picture on Instagram:

The “Radial” option blurs the edges of your picture in a circumference design.
After selecting this effect, do the following to adjust the areas you want to blur:
For the Linear option, the blurring effect occurs in a linear design.
Do the following to adjust the areas you want to blur:

Blurring a picture before posting it on social media can serve several purposes.
These purposes include concealing details you don’t want to show the public and placing the focus on particular parts of the picture.
To blur a picture on Instagram, find the “Tilt Shift” effect under the “Edit” option, then apply the “Radial” or “Linear” blur.
FAQsThe Instagram effect that blurs parts of a picture is known as “Tilt Shift.” To access it, tap the “Edit “option beside “Filter,” scroll through the edit options, and you’ll find “Tilt Shift” next to the “Sharpen” option. When you click on the effect, select either the “Radial” or “Linear” option to apply the blurring effect to your picture, click “Done,” then post the picture.
Yes, you can blur parts of a photo on Instagram using the “Tilt Shift” effect.
To adjust the blurred area of an image on Instagram after applying the radial or linear effect, pinch the image in or out with your thumb and index finger until you achieve the desired blur.
by Rajkumar Maurya
Instagram has many features which users can use to play around with their clicked image to show more creative stuff to the world. A few months back the Instagram had introduced the Focus feature that gives a sufficient amount of Blur to your selfie pictures in order to give a touch of DLSR photography. However, this feature can only be used in the live camera. Means images those clicked using the Instagram app in a live mode but what about the other pictures? It is not possible everytime to click images within the Instagram app, so there is a solution called Tilt-Shift which is enough sufficient to blur out the part of the picture on Instagram. Hence, let’s see how to blur the background or create a bokeh effect in pictures on Instagram for both Android and iPhone.
The glance of the steps you need to follow:
Comprehension of the above steps with screenshots:
Step 1: Open the Instagram app on your Android or iPhone smartphone from the menu. In case you are new to Instagram then you have to create an account and log in with the same credentials to work with it.
Step 2: Once you there, tap on the plus (+) sign given in the square box to at the bottom of the center to create a post for Instagram.
Step 3: Select the image you want to post on Instagram and tap on the NEXT button.
Step 4: Tap on the Edit button to perform some editing on the picture.
Step 5: Scroll the options to the left side and tap the Tilt-Shift option of the Instagram.
Step 6: Under the Tilt-Shift editing tool you will find two types of options one is Radical and the other one is Linear.
Radial: This option will allow you to blur out the parts of the image but in a circular pattern, means the center part of the circle will remain clean while the rest of will burred out from the photograph. To use this tool, just use the two fingers in or out to adjust the area of the picture to blur. For reference, how to do it, see the below screenshot.
Linear: It is the second blur effect option in Tilt shift of the Instagram which allows a user to implement the blur effect on the images but in a linear contour. Just like the Radical blur we mentioned above, here you also have to use your finger in the same way you used to zoom in or out some photographs. Select the amount of area you want to cast under the blurry effect.
Once the effect added just Tap on the DONE option and post the picture on Instagram.
In this way, you can add some amount of blurriness in any picture you about to post on Instagram on the fly.
Other useful resource
 ly): Let’s find out its Pros and Cons?
Categories How To Tags blur, blur background, camera, Camera App
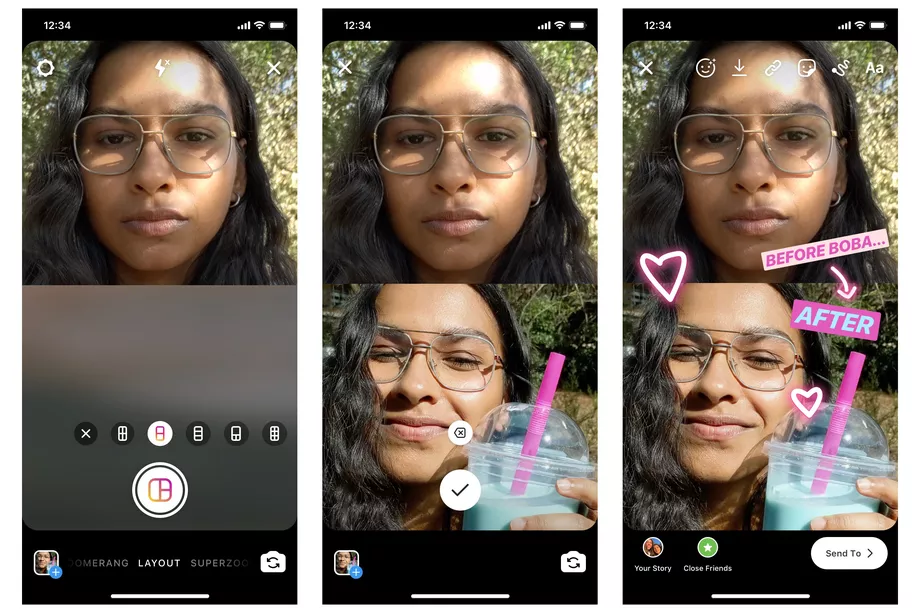
Regular users know that since 2021, Instagram has added a new "Focus" feature. And this means that with the touch of a single button, you can take a selfie or a picture with friends, where the background will be blurry. True, this option is not yet available for all smartphones. But there are other ways as well.
 We save the finished photo in stories or send it to friends in direct.
 The so-called bokeh effect (or blur in Instagram stories) can be done in this way:
If for some reason the Focus option is missing on your device, don't despair! There are a number of apps that can help you blur the background of your Instagram photos and Stories.
One of these is Snapseed (suitable for owners of androids and not the latest iPhone models).

You can create a professional photo effect with the subject in focus using Instagram filters. So it will be easier for you to understand how to make a blurry story on Instagram. We will describe step by step how to make a blurry photo on Instagram without much effort and for any phone model:
You can also download different masks on Instagram, you are guaranteed blur in the photo. Saved and used.
Of course, the quality of such filters is very different from a professional photo with focus. But with bright lighting and the right angle, you will attract the attention of subscribers with unusual pictures or stories.
Do you want to increase your popularity in your social networks? Discover everything related to blur effect in instagram stories .
The main reason why Instagram It is still one of the favorite social networks among users due to the large number of filters offered. One of the most popular is blur, which blurs the rest of the image, leaving us as the true protagonists of the photo. If you want to know how to use blur in instagram stories , Join us.
Index
With this Instagram filter, you can blur the background of a photo taken with the application's camera. The truth is that there are several ways to achieve this blur in instagram stories . On the one hand, the face identification tool known as "Focus" it focuses people while blurring the rest of the photo.
Another filter that does the same is "Bokeh" . The only difference from the previous filter is that it focuses on the people in front of the photo. If there were people in the background, they would also be blurred.
Both methods are ideal for effect blur in instagram stories . In fact, they can even be used in videos for your stories, and there are no restrictions regarding the operating system of the device, so you can do it on both iOS and Android.
Subscribe to our Youtube channel
Create an Instagram account
It's not just new users who have trouble managing a full-fledged social network like Instagram.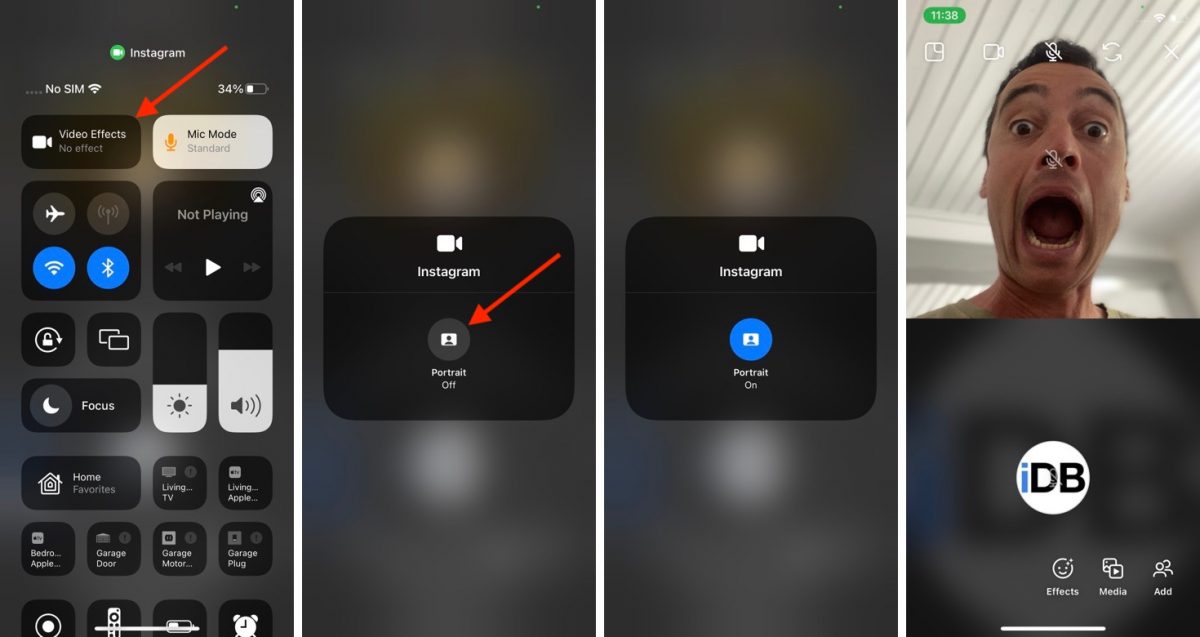 After all, it has changed and improved over time, so we can get a little confused when looking for effect blur in instagram stories . That's why we wanted to help you by giving you step by step instructions.
This is a fairly simple process, especially if you already know how to use other filters and effects in this social network. In any case, you can always delete the old one and download the new one, as it's pretty quick and easy. However, it might still be easier if we learn find the effects we want without looking too hard.
What is the focus effect
This seems to be the most difficult step in the process of uploading photos to Instagram , because we have to go from effect to effect until we find the one we are looking for. The truth is that this is not the only and far from the best way to find the blur filter in Instagram Stories.
The effects we find in the carousel are recommended by the app based on the most used filters. We will also find our favorite effects. However, we can use blur effect in instagram stories faster by following these steps.
Blur on Photos
There are many filter options you can use to get a good Blur on Instagram Stories .