Many parents worry about kids spending too much time on social media like YouTube, Tik Tok, Instagram, and others. There are a lot of hacks that teenagers and even pre-teenagers have invented over time: see this article for the details.
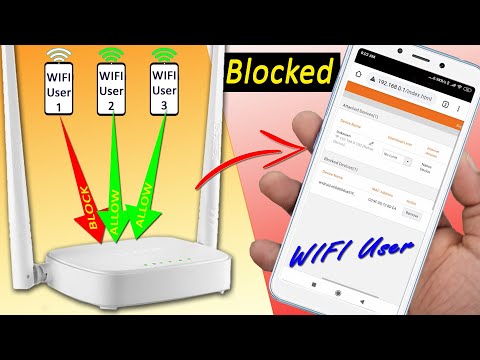
Yes, it is possible if you have purchased a wifi router with so-called “parental controls” built-in. These models usually cost a bit more (around $100 comparing to $20-$50 routers that do not have this feature).
Some of the popular Wi-fi routers with built-in parental controls:
Yes, you can do it if you have a router with a “URL Filter” or “Block Websites” filtering feature. To block a website (or web address) from being accessible you need to do the following on this router:
Here is the list of URLs you need to add if you want to block YouTube, Tik Tok, and Instagram:
youtube.com yt.com instagram.com tiktok.com tiktokv.com musical.ly
You can block any additional website by adding more domains to this list.
After saving you may need to wait until your router restarts. Then try to run a mobile app for TikTok, Instagram, or Youtube to check if the block was successful. Usually, blocking makes the app “hang” and the website open forever.
Yes, you can block selected websites on the selected computer by modifying a special file called
hosts
in Windows. This file represents the list of short rules for anything that is opened on the Internet on this specific Windows computer.
To block TikTok, YouTube, and Instagram on Windows 10 computer please do the following:
In this article, you’ve learned how to block Instagram, TikTok, and Youtube on your Wifi and on your desktop computer. Please remember that these blocks can be removed if someone (for example, your kids) is going into the router admin panel or into the settings of the computer.
About the Author
ByteScout Team of WritersByteScout has a team of professional writers proficient in different technical topics. We select the best writers to cover interesting and trending topics for our readers. We love developers and we hope our articles help you learn about programming and programmers.
You can easily block sites like social networking, porn, or messaging apps on your WiFi router using the IP Address and Website URL filters.
I know smartphone addiction is quite a problem these days. Especially in an era when everyone person in the holds a smart device. And these social networking sites is ruining our life further. We can’t even realize the time we have wasted scrolling those stupid feeds. Hence it’s really important to block sites that are really waste.
Yesterday I thought on it for a while and finally came to a conclusion to disable these social and chatting apps over the network. Especially Facebook, Instagram, WhatsApp, and some stupid Indian streaming sites like Zee5, Voot, etc. You can read about how to block the TikTok on the WiFi router.
I first thought of blocking them over the system firewall, however, this will only work on machines with a network firewall. So the next item I had was WiFi Router. And that where I can block access to social sites completely.
But, there is a caveat in this process. It will only block access when you have connected to routers WiFi but still access when your switch to mobile data. I wouldn’t say it’s a caveat but, something which a network admin can’t control.
There are multiple options to block in any router, however, the one which I have has only a few options. I personally tried two:
URL filter & IP based filter, and luckily the IP based filter is working like a charm. But, I don’t think it will sustain for a long as big players like FB, or say Google for that matter will have dynamic IP configuration.
Let’s talk about both the methods so that you can try whichever works in your case —
This is not the first time I was trying to block something over the network. My family has an addiction to watching daily soap series on streaming sites like Zee5, Voot, SonyLiv, etc. I got pissed off and blocked it over the network somewhere a year ago (maybe in 2017). At that time it worked, and able to block these websites on the fly.
Now, all the website has moved towards the secure connection (https://) which may or may not work on using URL or Keyword filter.
I’m using a basic router – Beetel 777VR1, which my ISP (Airtel Broadband) has provided free of cost on registering a new connection. Follow the below steps to configure URL or Keyword filter on the WiFi router.
If this works, you can keep on adding the other website that you need to block and skip the next method. But, if you still able to access facebook even after blocking it, then the next method will definitely help you!
I struggled a lot with URL filter, even tried a different combination of keywords and URLs – but, it hardly worked in my router! However, you can try and if that’s works then it’s great.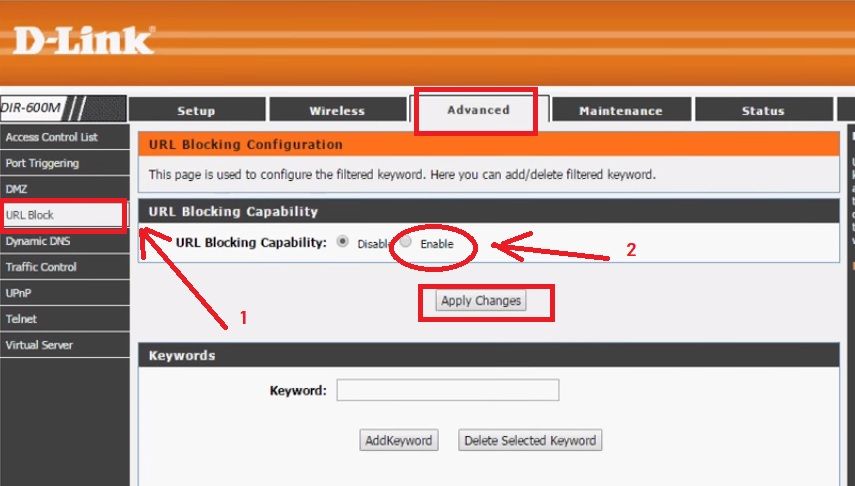
I read through multiple articles, blogs, watch videos and finally got to know a solution – blocking the IP address of the social site using the firewall.
Before we head over blocking an IP, we first need to know the IP address of the site. Looking up for IP is really simple with PING in Windows Command or Mac OS Terminal.
The steps are almost similar for both Windows Command Prompt and MacOS Terminal.
We will be using these addresses in our following section – IP/Port Filter. It’s important to have a correct IP address of the website, else the IP filter configuration won’t work.
The steps to access the section is similar to earlier in the Firewall tab section.
You need to add each IP address as a separate record in order to block. All the records will be stored in the router’s database. If you need to disable a blocking or delete a record completely, then hit on the command button for the desired action.
You can see my personal blocking record for all the IP Addresses. Below is a quick list of IP address for some famous social and chatting site that you can consider:
 240.23.174
These IPs are dynamic in nature and may change from time to time. Hence, you can always check for new IPs using the above method.
Check out the below video demo of entire steps and process which details how to block a website or app on the network. In the video, I have used restoreBin as a target website to block over the network firewall.
How to easily block a Website or App on WiFi Router Network?
Watch this video on YouTube
I hope you liked the video, please subscribe to channel for more videos.
I hope these simple tricks will help in blocking the restricted social website easily in your WiFi router modem. There is another way too using OpenDNS that I’ve explained to block Roblox Game. Let us know if you’ve any other questions or finding it difficult to block sites.
Please note that blocking website resource can lead to certain website rendering problems like displaying text only, or page not loading properly, etc.
If you've any thoughts on Block Websites from Network Access in WiFi Router Settings, then feel free to drop in below comment box. Also, please subscribe to our DigitBin YouTube channel for videos tutorials. Cheers!
Often, it becomes necessary to prohibit access to popular social networks such as Vkontakte, Odnoklassniki, Facebook, etc. For example, for company employees, or even at home. There are many ways to do this. You can, for example, block it using special programs, in the antivirus or firewall settings, or in the same hosts file.
But, there is another interesting way, this is blocking social networks (and any sites) through a router. In this article, I will tell you how to disable access to social networks if devices are connected via a Tp-Link router. In this way, you can block not only social networks, but almost any site. A big plus of this method is that access will be closed on all devices, such as: tablets, smartphones, laptops, and other equipment that can connect to the Internet through a router.
In Tp-Link routers, there are two options to block access to sites (or to allow access only to certain resources). Through "Access Control" (Access Control), or through "Parental Control" (Parental Control). We will do it through "access control", since "parental control" is intended for a slightly different matter.
The instruction is suitable for all Tp-Link routers. The control panel is almost the same for everyone, including such popular models as: TL-WR740ND, TL-WR741N, TL-WR841N, TD-W8968, TL-WR843ND, TL-WR842ND, etc.
To block the social networks we need, or just sites, you first need to go to the router control panel.
Everything is as usual: we connect to the router, open the browser and in the address bar we type the address 192.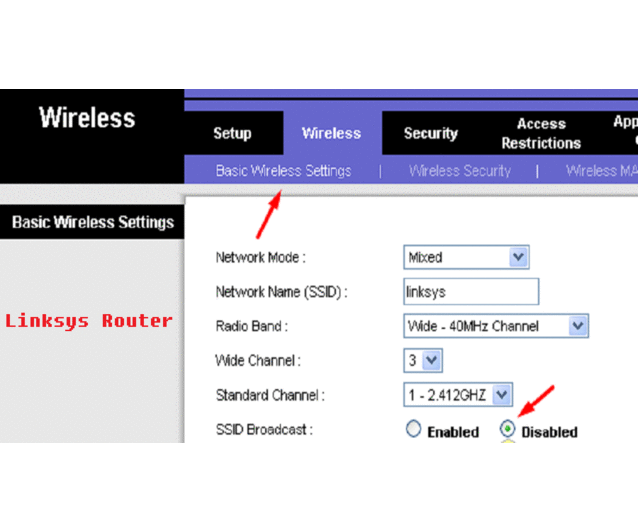 168.1.1 , or 192.168.0.1 .
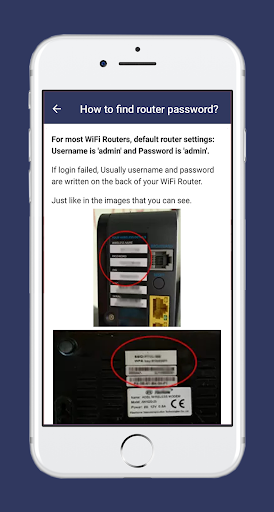
A window will open asking for a login and password. By default, in Tp-Link, these are admin and admin. But, if you have already changed the password for accessing the router settings, then you need to enter the data you set. If the default login and password are not suitable, then you will have to do a factory reset and configure the router again.
Enter your login and password and enter the settings.
Creating a list of sites to block
In the control panel, go to the tab Access Control (Access Control) - Target (Target). We will first create a list of social networks (or regular sites) that we want to block access to, and then we can apply this rule to any device.
Click on the button Add New.. (Add...).
If you have a control panel in Russian
Opposite the Mode item, select Domain Name (this means that we will block resources not by IP address, but by domain).
In paragraph Target Description , you must specify any description for the rule, in English. We write there something like "blocking vk".
In the fields Domain Name we indicate the addresses of the sites to which we want to deny access (we specify the addresses without http://).
Great, the list of sites is ready. You can create several of these rules. Also, they can be edited or deleted.
Adding a device for which you want to block access
Go to the tab Access Control (Access Control) - Host (Host) and click on the button Add New.. (Add...).
If a device connects to this router, it means that it has been assigned an IP address. And if an IP address is assigned, then you can block by IP. But, it's best to block by MAC address, since the IP is most likely dynamic, and changes with each connection (although you can also fix a static one).
So, in the field Mode (Mode), select MAC Address (MAC address).
In field Host Description (Host name), you need to specify some friendly name. For example, "blocking_PC1". The main thing is that you understand which device this rule applies to.
And most importantly, in the field MAC Address (MAC address), you need to specify the MAC address of the device to which you want to apply the rule created above, in other words, block social networks and other sites.
Most likely, you will have a question how to find out this MAC address.
If the device is already connected to this router, you can view it on the tab DHCP - DHCP Clients List (DHCP client list).
Just copy the MAC address of the desired device and paste it into the field.
Also, the MAC address can be viewed in the device settings (if it is a mobile device).
In Android: Settings - About phone - Status (it may differ on different devices, but something like this).
Windows Phone: Settings - Device Information - Information and look for the MAC address there.
It's a little more complicated on a computer, I'll write about it in a separate article.
So, we indicate the address of the computer (or mobile device) we need in the MAC Address field and click on the button Save (Save).
We have created a list to block, the device has also been added. You can, of course, add multiple devices, edit them, or delete them.
We just have to put it all together.
Go to item Access Control (Access Control) - Rule (Rule).
Check the box next to Enable Internet Access Control (Enable Internet access control control).
Below, we leave the item Deny the packets specified .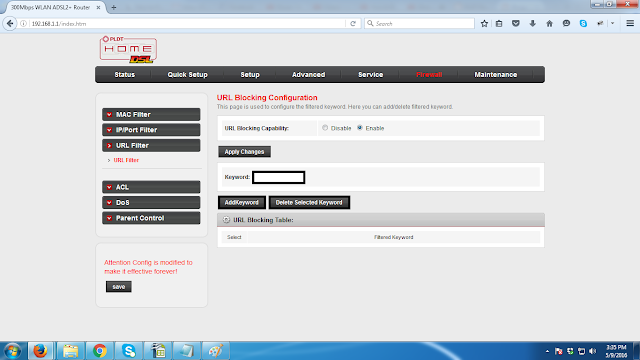 .. (Deny packets not specified ...).
Press the button Save (Save).
Next, click on Add New.. (Add...).
Russian
Field Rule Name , you must specify any name for this rule in it. Preferably a clear title.
In the Host field, select the computer we need, which we have already added.
In Target select the list of sites to block, which we also added.
Further, we leave everything as it is. There you can also set up a time block if necessary.
Press Save .
That's it, the rule has been created. You can create many such rules. Edit them, disable and delete them.
All settings will be active even without restarting the router. Sites that you have blocked on a particular device will no longer open until you disable or remove the rule in the settings.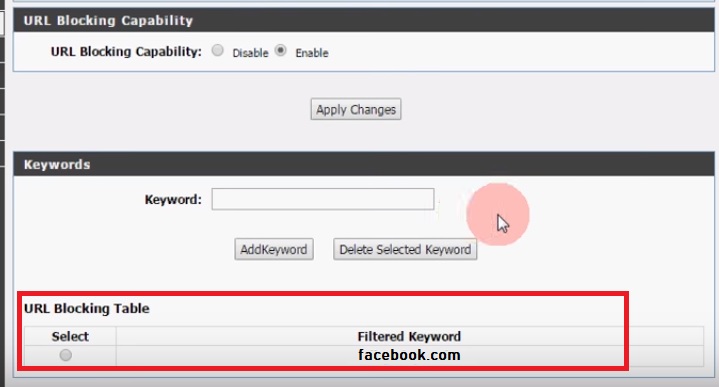
One more thing, if you block say vk.com, then the mobile version of m.vk.com won't work either.
In this tutorial I will show you how to block a website. We will learn how to close access to the site on a computer and phone.
One of the easiest and fastest ways. Suitable for all versions of Windows.
1. Directly from the open Start menu, type run and run the application.
2. Paste the path C:\Windows\System32\drivers\etc into the box and click OK.
The computer's system folder appears. You need to edit the hosts file in it. For reliability, first copy it to any other folder.
3. Double-click the hosts file. When prompted to select an application, select "Notepad".
4. Move to the end of the file and create a new entry like this:
127.0.0.1 youtube. com
com
Where youtube.com is the URL of the site to block. If it doesn't work, insert another line like this, but before the address type www. For example, 127.0.0.1 www.youtube.com.
5. Click File and select Save.
6. Restart your computer to apply the settings.
Note. Thus, you can block the required number of addresses. For example, popular social networks: vk.com, ok.ru, instagram.com, facebook.com, tiktok.com, twitter.com.
The advantage of this method is that the resource will be blocked on all devices that connect to this router. Thus, you can close access not only on a computer, but also on a phone, tablet, TV.
To do this, you need to go to the control panel. To do this, open the address of the router in the browser and enter the username and password from it. Example:
Usually, all this data is indicated on the back of the router, on a sticker.
If you have any difficulties accessing the control panel, please read the lesson “How to set up a router”.
In the panel, go to the "Parental Control" section and activate the corresponding item.
Below, look for the section "Restriction by site name", "Filter" or something similar in meaning. Set the switch to "Black List" and enter the sites that you want to block. Don't forget to save your changes and reboot your device.
Some advanced models additionally have a function of limiting the time spent on the Internet for specific devices.
This method will require you to have two Microsoft accounts, if you don't already have one, for a parent and a child.
Plus of this method: set it up once and forget it. The account can be connected to any other computer and all settings will be loaded from the Internet automatically.
1. From the Start menu, open Settings.
2. Go to the "Accounts" section.
3. Click Family & Other Users on the left.
To add a family member, click on "Add a user to this computer".
4. Log out or restart your computer. Log in with a parent account.
5. Go to account.microsoft.com and click Create Families. Send an invitation to the child's account to join the family group.
6. Go to your child's account and accept the invitation.
The family group has been successfully created.
7. Return to your account. Open "Family Management" and in the advanced options select the "Content Restriction" tab.
8. Activate the "Block inappropriate websites" radio button. In the "Always block" item, enter the site address or its IP and click on the + sign to apply. Thus, you can add several pages to block.
After the settings have been made, when a child tries to open a resource, a request for access to an adult family member will appear.
A proxy server is an intermediary between you and the Internet. With it, you can restrict access to sites, create rules for traffic consumption, divide users into groups, and perform other settings.
Consider a simple and free program for home use HandyCache. You can download it from the official site handycache.ru.
1. In the "Settings" tab (top), in the "General" section, go to "Access" (left).
Remember the IP and Port to connect.
2. In the Lists section, open Black.
By default, rules will already be created in the lists to block spam resources.
3. Right-click on an empty cell and select "Add Rule" from the context menu.
4. Enter the name of the resource in the new cell and activate the checkbox.
5. From the Start menu, go to Settings.
6. Open the "Network and Internet" section.
7. Click on the "Proxy server" tab, activate the "Use a proxy server" checkbox and enter the IP and port from the HandyCache settings.
Open your browser and try to access the banned site. The message "Web page not available" will appear.
For this method, you need to know the IP of the site. You can determine it through the service 2ip.ru/lookup or pr-cy.ru/browser-details. And also using the command line. To do this, enter the nslookup sitename command. The "Addresses" line will display all found resource IPs.
The disadvantage of this method is that the IP can change at any time and the blocked resource will become available again.
The firewall is designed to protect against network intrusions and block unwanted connections.
1. From the start menu, type Windows Defender Firewall and launch the application.
2. Go to Advanced Options.
3. Open the Rules for outgoing connection section.
4. Click the Action menu and select New Rule.
5. Set the radio button to Custom and click Next.
6. Apply the rule to all programs and click Next.
7. In the "Protocol and Ports" item, leave everything as default.
8. Next, set the switch to "Specified IP addresses" and click "Add".
Add IP addresses one by one and click OK.
9. In Actions, select Block Connection.
Leave the rest of the settings as default and save the rule.
Then try to navigate to the blocked resource. If everything is configured correctly, it will be unavailable.
Instead of the standard Windows firewall, you can use a third-party one with more advanced functionality. Consider the easy-to-configure and free simplewall firewall. It can be downloaded from the official website using the link.
In the program, go to the "Blocklist" tab. Click the + button to create a new rule.
Then click the Enable Filtering button to activate.
Further, when you try to go to the resource, the message "Access is denied" will appear.
Note. To protect the corporate segment, there is professional paid software KerioControl, UserGate. Installed on the server and controls the entire network of the enterprise. With it, you can create virtual networks, restrict access to the Internet by content and keywords, limit the speed and download of files to a certain size, and perform many other similar actions. In addition to software solutions, there are also hardware solutions that already have their own firewall and proxy server built in.
Browser extensions have been developed that can block addresses. The disadvantage of this method is that any user can disable the extension. In addition, the resource can be opened in any other browser.
In this example, I'll show you how to install and configure extensions in the Google Chrome browser.
1. To install, follow the link and click "Install".
2. After installation, click on the extension icon in the right corner of the browser and go to "Categories".
Only adult content can be blocked in free mode.
3. Click the gear icon to enter advanced settings.
4. Add the addresses to be blocked to the list.
If you try to access a prohibited resource, access to it will be denied.
The plugin is designed to block adult content. Additionally, it is possible to block individual pages.
Extension available via link.
After installation, when you try to go to an adult site, a message will open.
To block an individual page, click the extension icon and click Block this site.
The DNS service is designed to match domain names and IP addresses. When you connect a specific DNS, all traffic starts to pass through it and thus you can restrict access to content.
1. Right in the open Start menu, type run and run the application.
2. Enter the ncpa.cpl command in the box and click OK.
3. Double-click the network adapter.
4. Go to Properties.
5. Double click on the "IP version 4" parameter.
6. Set the radio button to Use the following DNS addresses.
Next, you need to specify the DNS of the management services.
For example, from the Yandex.DNS service:
Enter the addresses in the settings field and click OK.
Now when you try to access prohibited content, the message "Site contains adult content" will open.
Note. In addition to Yandex DNS, there are other similar services, for example, Norton ConnectSafe. But for deeper and more personal settings, you will need a paid subscription to special tools such as SKYDNS or OPENDNS.
Many paid versions of antiviruses have a built-in firewall or parental control. Through them, you can block unwanted sites by name or type of content. Such tools are present in Kaspersky Internet Security, Eset Smart Security, Avast Premium Security, and others.
Of the free ones, I can recommend Comodo Internet Security. All rules are created and configured in the Firewall section.
There are not as many ways to block a site on a phone as there are on a computer. We will consider only working applications for this task.
1. Install the application:
2. The first time you launch the application, you will be asked to grant access to accessibility features. Go to the "BlockSite" service and allow access.
3. Restart the application and tap on the + icon to create a new rule.
4. Enter the list of unwanted addresses.
Further, when you try to enter a prohibited resource, it will not load - something like this message will appear:
2. Create a new account or log in with your existing Google account.
The browser will automatically start blocking prohibited content.
3. To block access to a specific site, go to the menu and open the settings.
4. Go to the "Filtration Management" section.
5. Select the Black List category and create a list of unwanted addresses.
Note. For additional protection, you can download any application from Google Play to block installed programs. And with it, close the Google store and the built-in browser so that children cannot bypass the restriction on their own.
To configure, you need any file manager with access to the Root directory. I'll show you the example of free Root #.