So, it happened. You posted to your Instagram, only to see a mistake in your caption, location, tags or in the photo itself! 😱
Now you’re wondering how to edit an Instagram post after posting – and you’ve come to the right place.
Whether you’re correct a spelling error or add a missed photo to a carousel post, we’re covering all the major mistake-prone spots, including captions, locations, tags, and photos.
In this article, you’ll learn how to edit each of these four categories with step-by-step instructions.
Don’t worry; you can fix your Instagram mistakes faster than you can say, “No one saw that!”
Let’s get to it! ✏️
How Do You Edit The Caption, Location, Tags On An Instagram Post?First things first. If you’ve messed up your location or tags or need to know how to edit your Instagram caption, here’s the way to fix them:
Tap the three dots at the top right.But wait! There are a few things to keep in mind when you’re editing your caption, especially if you’re trying to fix formatting or line breaks!
If you’ve posted your caption and it’s one wall of text, you can add spaces to your caption by hitting the return key after each paragraph.
Just make sure you remove any hidden spaces after the punctuation at the end of your sentences, or Instagram will ignore your line break! 😭
You may even have to remove an emoji (at the end of your sentence) in order to get it to work.
Sound annoying? It is. 😤 There’s good news though!
You can avoid formatting issues entirely by using the caption tool in Tailwind for Instagram! 🎉 Our formatting tool allows you to add a clever caption and select your favorite emojis with ease from the Emoji Picker keyboard.
It also automatically removes the pesky space that appears after emoji on your smartphone keyboard. 🥳
Not only that, but our caption tool also preserves your line breaks!
Well, unless you hit the Space key after the end of your line! ⛔️
Want to try it for yourself? Snag a free trial of Tailwind for Instagram today – no credit card required! 💳
Can You Edit A Picture On Instagram After Posting It?You may be searching the web, desperately trying to find out how to edit Instagram photos after posting.
Here’s the bad news – you can’t. Unfortunately, you have one shot to add the right filter, crop or adjust your photo before it goes live. 😔 Instagram doesn’t currently support any features to edit your Instagram photos after you post.
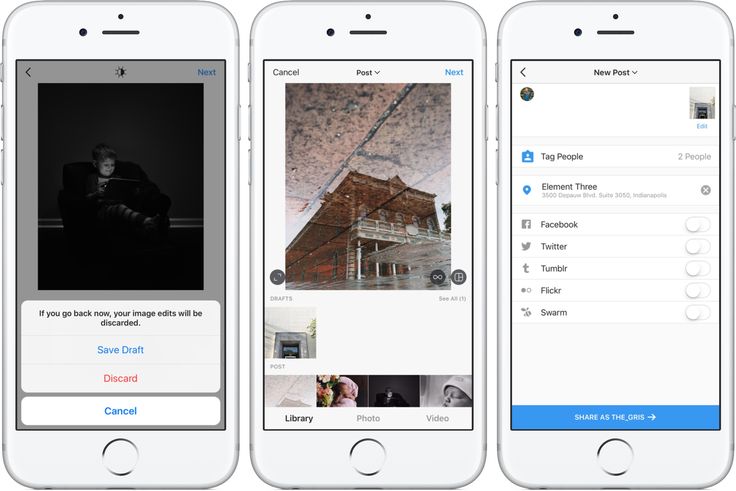
If you’ve messed up your favorite photo before sending it to your feed, your best bet is to delete and re-upload.
Make sure to copy and paste your caption before you do this, so you don’t lose all your hard work – and hashtags!
I’m sorry we don’t have better news here. To cut down on room for error, make sure to edit your Instagram photos thoroughly before posting.
Can You Add A Photo To An Existing Post?So, can you add photos to an Instagram post after you’ve posted it? No, you can’t. Unfortunately, this capability isn’t available on Instagram OR in Facebook Creator Studio yet (although it’s certainly been requested!)
Missed out on adding a key photo or video to your latest carousel post?
You’ll want to delete or archive the post as quickly as possible and re-upload the correct series.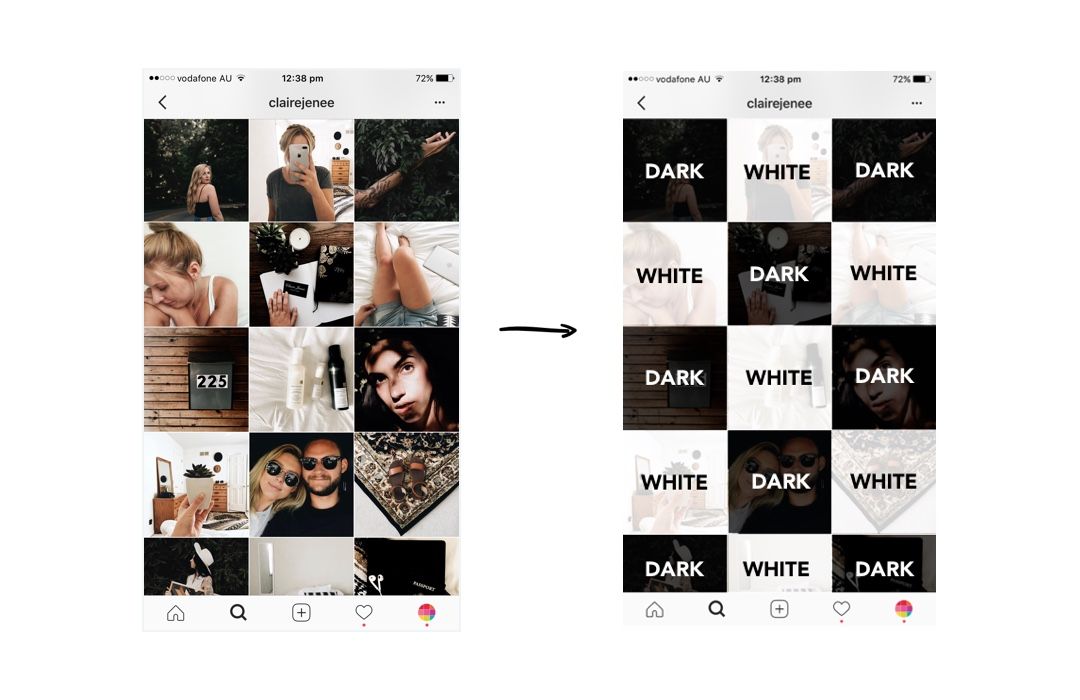
Pay close attention to each frame and swipe through a few times to double-check before you post!
This will help you keep track and catch mistakes before they go live.
Plan, Schedule, Publish Your Posts In One Place!In fact, one of the best ways to combat pesky mistakes on Instagram posts before they cost you time and energy is planning and scheduling your content in advance!
That’s where our all-in-one tool comes in! 🔥
Tailwind’s Instagram publishing tool allows you to tag your images, set your location and format your caption perfectly the first time around. 🧑💻
Plus, you can crop your photos and check how they’ll look in your feed with our 9-Grid preview tool! 🤩
If you want to create the perfect post – from locations, hashtags and everything in between, sign up for a free trial of Tailwind for Instagram now.
You’ll have access to all our pro features for 30 posts – and the best part is, no credit card is required! What are you waiting for? Test it out for yourself!
By: Jenn Herman and Eric Butow and Corey Walker and
Updated: 09-01-2021
From The Book: Instagram For Business For Dummies
Explore Book Buy On Amazon
You don’t need to have one Instagram post for each photo. Instead, you can add as many as ten photos in your Camera Roll (or Gallery if you use an Android smartphone) to a single post.
 The select multiple icon in the viewer is blue and the other viewer icons have disappeared.
If you select a photo but then decide that you don’t want to include it, just tap the thumbnail photo. The order of your photos will change if you selected more than two photos. To deselect all photos, tap the blue select multiple icon in the lower-right corner of the viewer.
The most recently selected photo appears in the viewer.
To reorder the photos, you have to deselect them and then reselect them in the correct order. (Yes, this is something Instagram needs to work on.) For example, suppose you select five photos and want to move photos 3 and 4 to positions 4 and 5, respectively. First deselect photos 3 and 4. At this point, the former photo 5 becomes photo 3. Then select the former photo 3, which becomes photo 4, and then select the former photo 4, which becomes photo 5.
The filter name appears above the filter thumbnail image.
A row of filter types appears below the photo. Swipe from right to left in the row to view all the filters. To apply a filter to all photos in the group, tap the thumbnail image under the filter name.
At the right side of the screen, you see part of the next photo in your photo group. To see the other photos, swipe left. To add another photo to your post, swipe to the end of the row, tap the + icon, and then select the photo from the Camera Roll screen.
In the New Post screen, you can write a caption, tag people, add a location, share your photo on other social networks, and turn commenting on and off.
You can't write a caption for each photo when you have multiple photos in your post. So when you write your description, the caption should describe all your photos, not just one.
When you've finished editing your photos, it's time to share them. Tap Share in the upper-right corner of the New Post screen.Jenn Herman, a social media consultant and world-renowned Instagram expert, pens a top-rated social media blog, Jenn's Trends.
Corey Walker offers social media strategy, content, ad management, and analytics focused on Instagram and Facebook.
Eric Butow provides website design, online marketing, and technical documentation services to businesses.
John Sonmez is a software developer and the author of two best-selling books, The Complete Software Developer's Career Guide and Soft Skills: The Software Developer's Life Manual. He is also the founder of the Simple Programmer blog and YouTube channel. Eric Butow is the owner of Butow Communications Group (BCG), which offers website design, online marketing, and technical documentation services for businesses. He is the author of 32 computer and user experience books.
Jenn Herman, a social media consultant and world-renowned Instagram expert, pens a top-rated social media blog, Jenn's Trends.
Corey Walker offers social media strategy, content, ad management, and analytics focused on Instagram and Facebook.
Eric Butow provides website design, online marketing, and technical documentation services to businesses.
Need to post multiple photos to Instagram* from a computer? We will tell you how to do this through the social network and through the SMMplanner scheduling posting service.
If you're going to post multiple photos to Instagram* from your computer, the first thing to remember is that no matter how hard you try, you can't fit more than 10 photos or pictures in one post. The rest of the process is simple and fast, let's do it.
Home page Open your profile home page or feed. On the top option panel there is a plus sign in a square. Click on it to post some photos to Instagram* from your computer.
For convenience, it is better to create a folder on your PC in advance with a photo for publication and drag a photo from it to this window.
You can also click the blue "Select from Computer" button and upload photos from any folder on your PC. You can navigate between folders, but you won't be able to select pictures from several at once.
Uploaded photosAfter uploading several photos and before posting them, you can edit them. To do this, click in the menu " Crop ".
Grid helps you to center the desired part of the frameUse the grid to move the image around to select the desired area of the photo. To do this, move the cursor over the photo and hold down the left mouse button. Everything, you can move the image.
Picture formats, you can choose the appropriate one Click the button with the circled checkmarks to select the format of the uploaded image and use the grid to move it horizontally or vertically.
There is also an option Zoom , which is controlled by a button with a magnifying glass in a circle. You can zoom in and out of objects in the photo to place the areas you need. This is a great way to help followers pay attention to the right part of the frame.
Add a photoWith the plus button you can add photos to the carousel . It works provided that there is space left - the number is less than or equal to 10. You can change the order of the photos in which they will be shown to subscribers. To do this, click "Next", and then on the plus in the circle and select files from your PC in the window that opens. Nothing complicated :-) In this way, you can set not only consecutive frames, but also a variety of pictures.
Click Next After all the manipulations with the number and scale of the photo, click "Next" and go to the "Edit" menu. There you can apply filters and change image settings.
In the image editing menu, you can apply 1 of 12 suggested filters to each photo. Click on "Filters" and use any of the ones you like. You can choose a separate filter for each image, but we still recommend choosing similar filters so that the photos do not look too scattered within the same post.
Image SettingsImage settings allow you to adjust brightness, contrast, saturation, etc. Click Settings and move the slider along the line, adjust the level of each parameter until you like the result. Already changed values can be transferred back if you do not like what happened. Or generally click on the arrow to the left of "Edit" to exit the editor and enter it again. In this case, the settings will be reset, and you will not have to reattach the pictures.
We talked about creating a beautiful visual in the article “How to create a beautiful visual for Instagram* in 2022”. In it, we tell you how to design posts in your account so that readers like your profile, and show what rules and tricks you should follow.
This is what the photo looks like after editing. After applying the settings and photo filters, click "Next" to move on and add a caption, hashtags, and more.
We talked more about hashtags in the article “How to use hashtags to promote on Instagram *: examples, opportunities, mistakes” - we talked about how to use tags correctly so that they benefit your account.
Menu before publication - do not forget to enter the text By the way, about the text. It is better that subscribers are hooked not only by the picture, but also by the text under it. This will help users stay on your profile. If you need ready-made texts, take a look at our article Posts for Instagram*: where to get ready-made texts. And if the text turns out to be too large - it does not matter. What to do in this case, we tell in the article "Large texts on Instagram *: why are they needed and how to design. "
"
In the Create Publication menu, you can add a signature, geodata, and take advantage of Accessibility and Advanced Settings.
AccessibilityBy selecting the "Accessibility" option, you can make a caption for each photo for people with visual impairments. Write your own text or it will be generated automatically. Alternative text is displayed only for special programs that recognize such texts and use them to describe the content of the photo aloud.
Advanced settingsIf you don't want your post to be commented on, disable this feature in the "Advanced settings".
Description of the publication Create a caption with or without hashtags, add a geotag to your publication. It all depends on the nature of your post: if you have a “local” business and you want your photos to be easy to find, use geotags and geotags, without neglecting hashtags with your brand. More about place hashtags in our articles “80 hashtags for promotion and promotion in social networks” and “How to correctly search for posts and people by hashtags on Instagram *: instructions”. In them you can find detailed information on how to use it and why, as well as what benefits it can bring.
A great way to not only publish several photos in one post, but also prepare posts in advance before publication is to use the SMMplannert delayed posting service. When registering via the link, you will get free access to all functionality for 2 weeks.
So, how to post a few photos on Instagram* from a computer:
Log in to the site, go to the "Posts" tab.
In the same way, you can publish a post in several social networks at onceClick "Schedule a post". An active window appears, in which we will create a future post for the profile.
In an empty box, write the text for the future postAdd photos. We click on "Photo / Video", a page with folders on the computer opens. Among them we find what we will publish.
To post multiple photos on Instagram* from your computer, simply select all the photos you want to post.
Select a page or multiple projects where the post will be published. An expanded list of options will appear:
You can also add a poll to your post, or create a custom design for one or each of the photos using Canva. There are many options for editing and improving images for a post. But the main advantage of the service is that it will publish posts while you are resting :-)
When everything is ready, click "OK", and the post will go to publication at the time specified for it.
Read our blog to keep abreast of news, find out the tricks of publications and advertising, understand how to promote accounts in all social networks. We'll tell you everything!
We make your page interesting and encourage subscribers to look at your page or website more often for shopping
Fresh publications regularly
Get our book Social Media Content Marketing: How to get into the head of your followers and make them fall in love with your brand.
Subscribe to the newsletter and get a book as a gift!
Instagram is an actively developing social network that never ceases to please with new functionality and user-friendly interface. Relatively recently, the function of adding more than 1 image has become available to users. This has greatly simplified the lives of many people, as the rather boring collages have faded into the background. The advantages over them are obvious: posts are larger, which allows you to take a good look at everything, and full-fledged pictures look much more attractive than their small copies or parts. To understand all the benefits, let's look at how to put, make and add a lot and upload several photos at once to Instagram, how to send and upload them to Instagram, post, insert, publish, merge, expose, launch, and publish 2 (second) photo in one Instagram post.
Surely you have already noticed that some people have dots displayed. If you swipe the entry, other images will become available to you.
The main stages of adding more than two or three pictures:

The instruction is detailed, so there should be no problems with further use of the innovation. In any case, Instagram developers help their users adapt to the new conditions for maintaining their pages.
If the function is not available on your device, just go to the Play Market or Apple Store (depending on which platform you are using) and click the "update" button.
If even after this manipulation nothing happened, restart the phone or close the application, and after 15 minutes go back to it.
Throws you out? This is a version 10.13 issue. In this case, you will just have to wait for the update on your device.
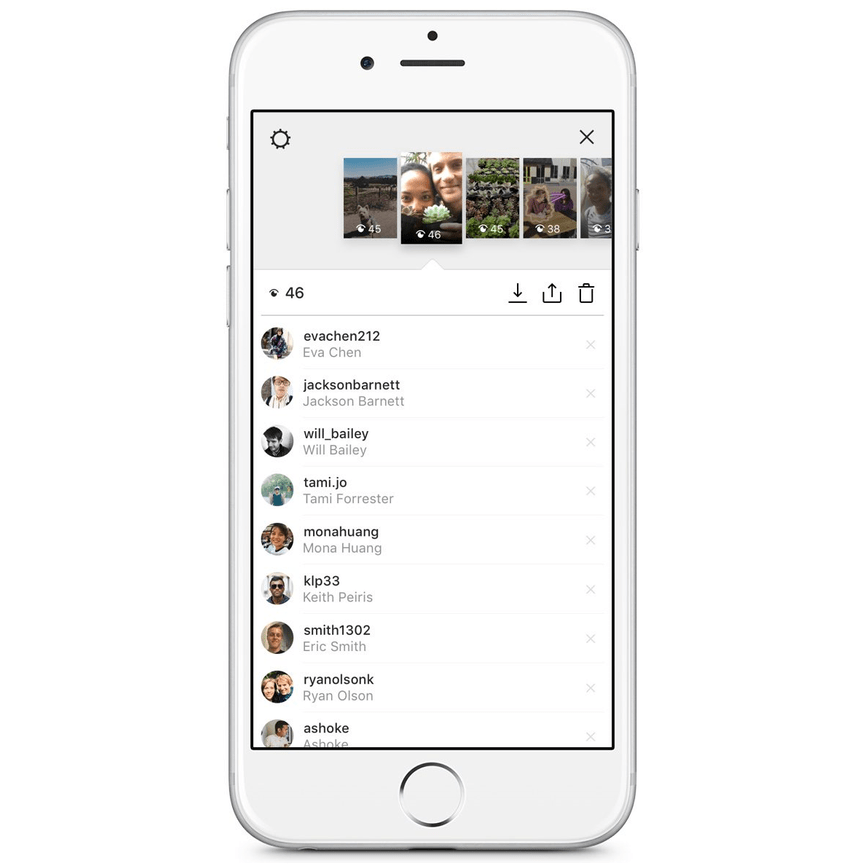
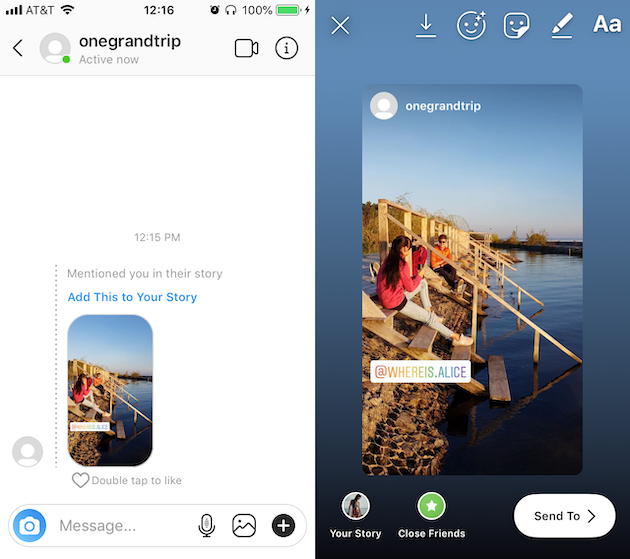
Many users are already familiar with the concept of "story". The function provides for posting a photo or video lasting 24 hours. After the time expires, the publication will no longer be available to subscribers.
They are gaining popularity as the main advantage is the ability to view users who have clicked on the glowing halo around the profile picture.
Now the question is: “How to upload more than one photo to a story?” Unfortunately, this is not possible, as the story is designed to publish only one moment at a time. You can post a new photo or video in the next. Timing - 15 seconds.
If you add 2+ pictures within a day, they will automatically merge into one photo stream. Your subscribers will be able to block view stories.
Experienced users know that to insert a photo from Explorer, you just need to swipe up from the bottom of the screen. In this case, the storage will open in a reduced version. The main rule: you can upload a frame that was taken in the last 24 hours.
But there is a little secret: if you want to show an old photo, just screen the screen.
Unfortunately, Instagram does not allow you to delete more than two or three pictures at a time. You won't be able to do this even if you download the mobile app on your computer. You can get rid of several images at once only if they are all within the same post.
Now there are many services that provide such an opportunity.
Instagram is an ideal platform for the implementation of creative endeavors, so knowing the main tools and innovations is a top priority for those who want to develop their profile based on the rules of the service. Simultaneous posting of more than two photos contributes to pleasant and comfortable work.