Facebook doesn't have the best reputation when it comes to personal privacy, but that doesn't mean the social media platform doesn't try. Buried in Facebook's privacy settings are a wealth of options that you can tweak to improve to better protect yourself.
Before you can adjust anything, though, it's helpful to know how to find Facebook's privacy settings; those controls can feel labyrinthine at times. Here's how to get to Facebook's privacy controls and the top 10 settings you should know how to use.
How you get to Facebook's privacy settings depends on whether you are using Facebook in a desktop browser, mobile browser, or in a mobile app.
It's a good idea to make changes to your Facebook privacy settings in a desktop browser because Facebook has moved these settings inside a Privacy Checkup "guided review" on the mobile browser and mobile app. That makes it difficult to find and implement changes to specific settings on a mobile device unless you are willing to complete the multi-page checkup.
1. Open Facebook in a web browser on your desktop computer and log in if needed.
2. Click the downward arrow at the top right of the page to see the Account menu.
3. Click Settings & privacy.
Head to Settings & privacy for Facebook privacy settings. Dave Johnson
 4. In the Settings & privacy menu, click Settings.
5. On the Settings page, you'll find most privacy settings in the Privacy section in the navigation menu on the left. A few additional settings can also be found in the Profile and Tagging section as well.
Most privacy settings are found in the Privacy and Profile and Tagging sections. Dave Johnson1. Open the Facebook webpage in a browser on your mobile device and log in if needed.
2. Tap the three-line menu at the top right.
3. Scroll down and tap Settings.
4. Tap and then complete the Privacy Checkup to find important privacy settings.
You'll find the privacy settings in Privacy Checkup. Dave Johnson1. Start the Facebook app.
2. Tap the three-line menu at the bottom right (top right on Android).
3. Scroll down and tap Settings & Privacy.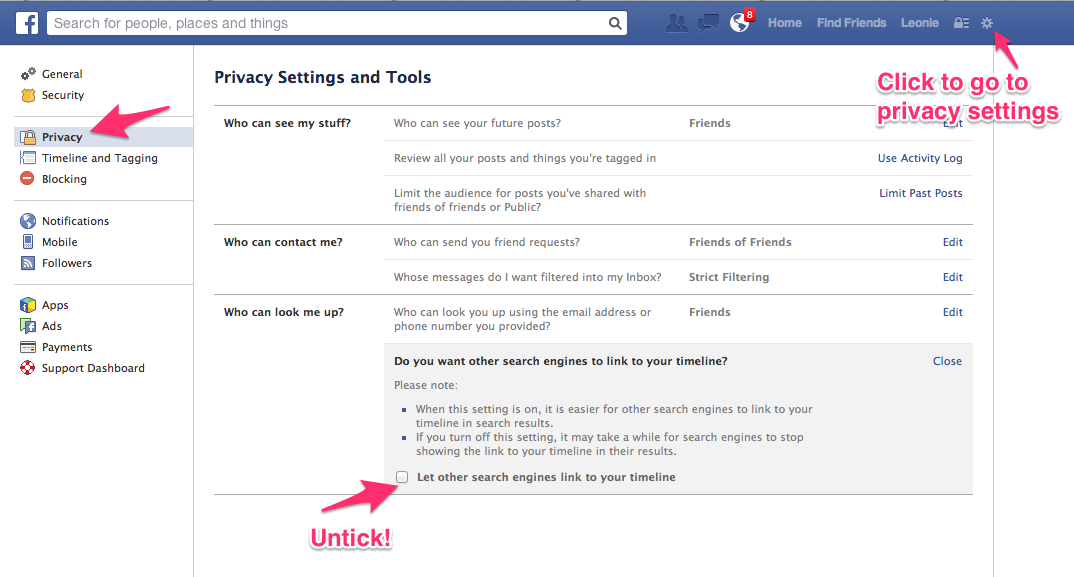
4. Tap Settings.
To get to the Privacy Checkup, go to the Settings & Privacy option and then tap Settings. Dave Johnson5. Tap and then complete the Privacy Checkup to find important privacy settings.
While many people publish their posts publicly, if you're concerned about your privacy, you probably prefer to post only to friends, or perhaps friends of friends. To control this, go to the browser's Settings page, then click Privacy. In the Your Activity section, find Who can see your future posts? Click Edit and change the audience as desired.
By default, your friends list can be seen by anyone who visits your profile page. To make it hidden, go to the browser's Settings page, then click Privacy. In the How People Find and Contact You section, find Who can see your friends list? and click Edit. In the drop-down menu, change it to a more restrictive audience, like Friends or Friends of Friends.
If you have older posts you'd rather not share with the world, you can quickly change the visibility of all past posts with a single click. Go to the browser's Settings page, then click Privacy. In the Your Activity section, click Limit The Audience for Old Posts on Your Timeline. Click Limit Past Posts and confirm you want to do that to set the visibility of all past posts just to Friends.
You can keep older posts from appearing in your timeline for anyone but your friends. Dave JohnsonIf you don't want your Facebook profile to appear in search engines like Google, you can disable this feature in Facebook. Go to the browser's Settings page, then click Privacy. In the How People Find and Contact You section, find Do you want search engines outside of Facebook to link to your profile? Click Edit and clear the checkbox. Confirm you want to make this change.
You might not want just anyone to be able to post photos and messages on your profile's timeline. If you want to be the only person who can post, go to the browser's Settings page and then click Profile and Tagging. In the Profile section, find Who can post on your profile and click Friends. Change it to Only me.
Want to manually approve any post you're tagged in before it appears on your profile? Go to the browser's Settings and then click Profile and Tagging.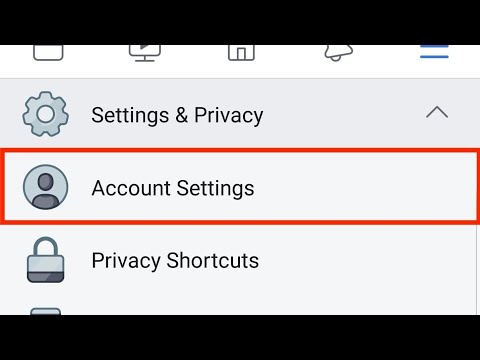 In the Reviewing section, turn on Review posts you're tagged in before the post appears on your profile by swiping the button to the right.
If someone knows your phone number or email address, Facebook will let that person search for you with that info. You can disable this intrusive search feature. Go to the browser's Settings page, then click Privacy. In the How People Find and Contact You section, find Who can find you using the email address you provided? Click Edit and change the result from Everyone to something more restrictive. You can do the same with Who can look you up using the phone number you provided?
In a more innocent time, you might have logged into games, apps, and websites via Facebook and shared a lot of personal information. It's time to clean house. Go to the browser's Settings page and then click Apps and Websites. For any entries you no longer want to use, click Remove. If you want to stay connected to any apps, click View and Edit and then Remove any permissions you currently allow — like your Friends list, for example.
You can prevent specific users from interacting with your profile or posts. Go to the browser's Settings page and then click Blocking. In the Block users section, type the person's name and then click Block. You'll see a list of possible users; find the problematic user and click Block.
Finally, it's a good idea to inspect your profile through the eyes of a stranger — is there anything private or embarrassing available to the public? In a web browser, open Facebook and go to your profile page. Click the three-dot menu on the right, beneath Edit profile, and choose View As. You can now see the page the way a public user sees it. When you're done, click Exit View As at the top right.
Dave Johnson
Freelance Writer
Dave Johnson is a technology journalist who writes about consumer tech and how the industry is transforming the speculative world of science fiction into modern-day real life. Dave grew up in New Jersey before entering the Air Force to operate satellites, teach space operations, and do space launch planning. He then spent eight years as a content lead on the Windows team at Microsoft. As a photographer, Dave has photographed wolves in their natural environment; he's also a scuba instructor and co-host of several podcasts. Dave is the author of more than two dozen books and has contributed to many sites and publications including CNET, Forbes, PC World, How To Geek, and Insider.
Read moreRead less
by Suzanne Kantra on July 08, 2021
in Facebook, Computers and Software, Computer Safety & Support, Tips & How-Tos, Privacy, Tech 101, Social Networking :: 466 comments
Techlicious editors independently review products.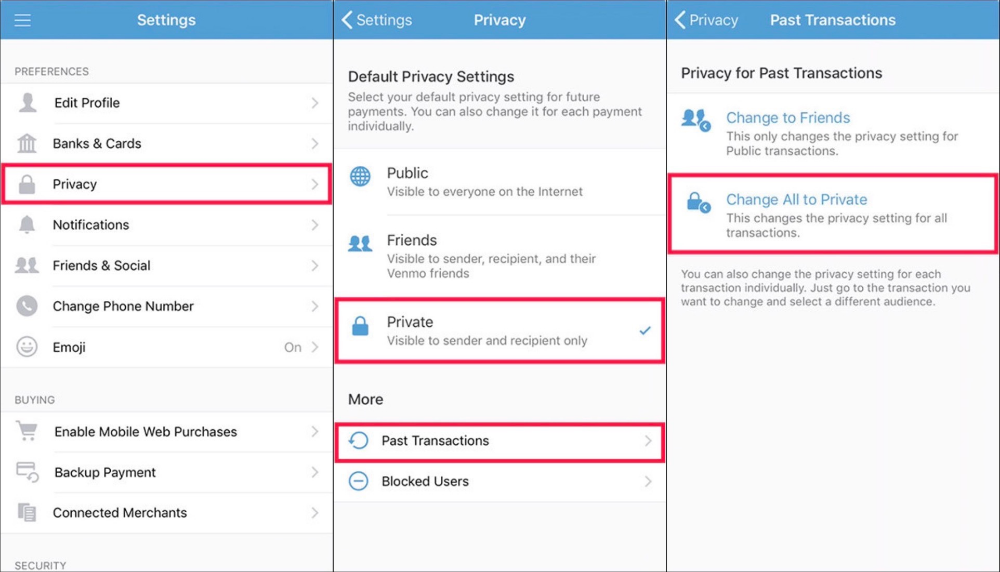 To help support our mission, we may earn affiliate commissions from links contained on this page.
Privacy issues and privacy controls on Facebook are ever-changing, and I've read through hundreds of comments and emails from our readers who are confused about how to keep their information private and what specific Facebook privacy settings actually do.
For example, when you post a picture of your kids at a family gathering, which one of your Facebook friends can share it? What private information are those Facebook game apps collecting for "third-party uses"? How do you make sure that your live video stream is seen only by people you choose?
Every action you take on Facebook has privacy and sharing implications that you need to consider before uploading that next selfie. However, it takes a lot of time to check all of your Facebook settings and, even then, it's not always clear what the right choices are to ensure your privacy is protected.
I just went through a complete review of every Facebook privacy setting currently available (Facebook is constantly making changes and I will continue to update this article). My recommendation for most people is to start with Facebook's "Privacy Checkup", which covers many of the key areas. In this guide, I will walk you through how to do the Privacy Checkup, and break it down setting-by-setting to make it easy for you to decide what you should change. I also have direct links to "hidden" Facebook settings that aren't part of the standard Checkup but have important privacy implications.
To get to Facebook's Privacy Checkup, open the menu (dropdown arrow on laptops or triple bars in the mobile app), select "Settings & Privacy," and then select "Privacy Checkup" (for laptops) or "Privacy Shortcuts" and then "Privacy Checkup" (in the mobile app). Here, you can find an easy-to-follow walkthrough of your current settings as they pertain to:
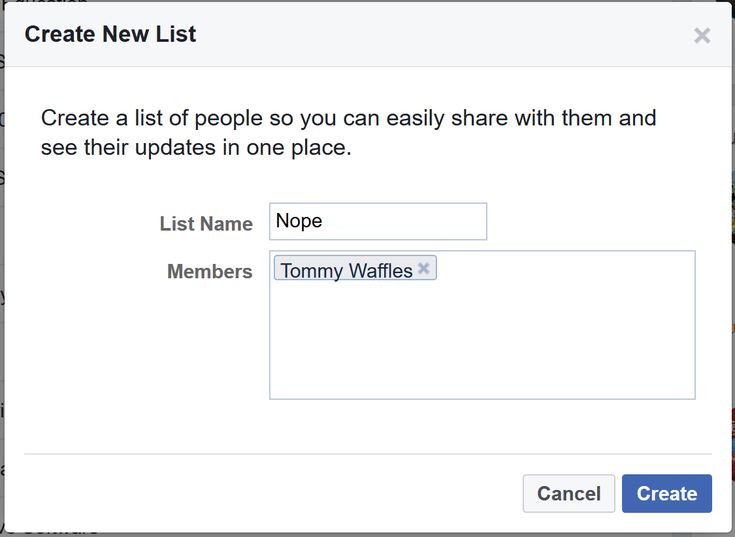
In this section, you can check your profile information, settings for Posts and Stories, and settings for blocking people. You can limit your audience to just you, your Facebook Friends or Custom lists that you create. For instance, you can create a family list, acquaintances list, or work list. Go to facebook.com/friends and click on Custom Lists to get started.
Here you can see the privacy settings – who can view your information – for your phone number, email addresses, birthday, hometown, relationship status, and other personal details about your life.
Under emails, it will show all email addresses associated with your account and who can view them. Email addresses are important because you can use any of them to log into your account with your Facebook password. Be careful to remove any old email address or ones where you're not using secure passwords, because if that email address is hacked it could compromise your Facebook account, as well.
For email addresses that you still have but don't others to use or see, you can limit the audience to “Only me. ” If you find an email address that you don't want to be associated with your account, you can't delete it through Facebook's Privacy Checkup. If you want to delete an email, go to www.facebook.com/settings?tab=account. Under General Account Settings, clicking on Contact will reveal a list of email addresses that you can make your primary email or remove.
For your birthday, you can choose to share your whole birthday or just the month and day. That way, your Friends can wish you a happy birthday on Facebook on your special day without necessarily knowing your exact age. Birthdays are sometimes used as a security verification for various services, so you want to keep it as protected as possible.
You can also set your birthday by going to go to your profile page (you can access it by clicking on your name in the menu bar) and clicking on "About." In the "Contact and Basic Info" section, you can change the settings for your birthday.
For your hometown, this setting only affects what your Friends can see. Advertisers and others may still access this information, especially if you are using the Facebook app, which tracks your location automatically.
You can also set your hometown and current city by going to go to your profile page (you can access it by clicking on your name in the menu bar) and clicking on "About." In the "Overview" section, you can change the settings for your hometown and current city.
If you have set a relationship with another Facebook user, it will be shared unless you set it otherwise.
You can also set your relationship status by going to go to your profile page (you can access it by clicking on your name in the menu bar) and clicking on "About." In the "Overview" section, you can change the settings for your relationship status.
You can choose to share your work history and where you went to high school, college, and graduate school. Each of these entries has its own audience setting from "Only me" up to including "Everyone." This setting may help old friends find you, it also may be used for targeted advertising.
You can also set your work history and where you went to school by going to go to your profile page (you can access it by clicking on your name in the menu bar) and clicking on "About." In the "Work and Education" section, you can change the settings for your work history and where you went to school.
If you want to limit who can see your list of Facebook Friends, you can set your audience from "Only me" up to including "Everyone." Since friend lists can be used for phishing and to create fake profiles, I highly recommend setting this to Friends only.
You can also choose who can see your friends list on your profile page by going directly to www.facebook.com/settings?tab=privacy and you'll find the option in the "How People Find and Contact You" section.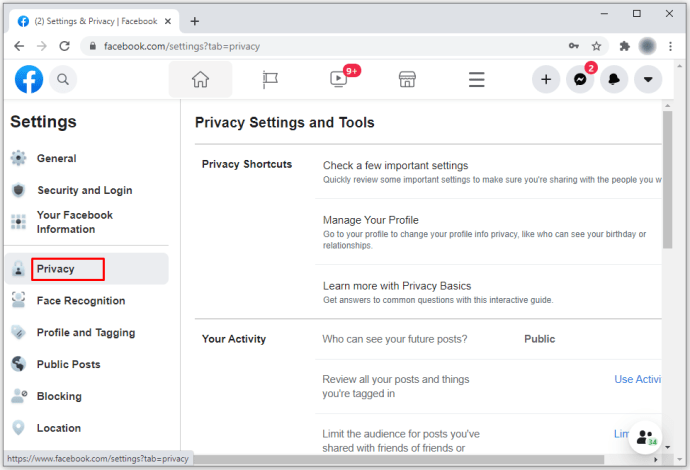
Facebook lumps people, Pages, and lists that you follow together. So it's all people, Pages, and lists or nothing. You can set your audience from "Only me" up to including "Everyone." Consider whether there are any sensitive Pages you follow that you wouldn't want the world to know about.
You can choose who can see the people, Pages, and lists you follow by going directly to www.facebook.com/settings?tab=privacy and you'll find the option in the "Your Activity" section.
If you're curious about what your Facebook profile looks like to other people, you can go to your profile page (you can access it by clicking on your name in the menu bar) and click on the triple dots next to the "Edit Profile" button and select "View As."
When you post a new profile picture or change other information that you've made available to "Everyone," you can still limit who can like or comment.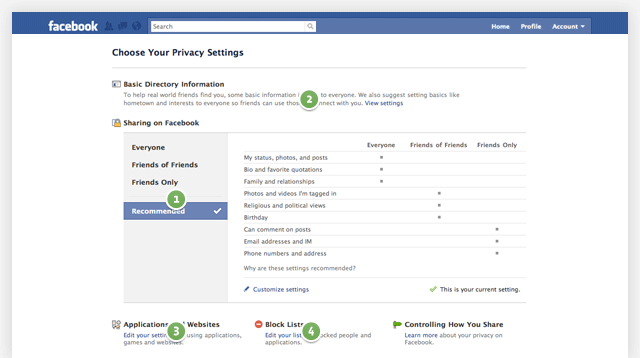 This setting is not available through Privacy Checkup. If you want to limit what random people can say on your profile pictures, go to www.facebook.com/settings?tab=followers, and you can select "Friends," "Friends of Friends," or "Everyone."
To add more information to your Facebook profile page, go to your profile page (you can access it by clicking on your name in the menu bar). In the About tab, you'll see all of the categories of information that you can add your religious views, political views, your social channels, websites, primary language, nickname, birth name, and more. For each piece of information, you can see your audience from "Only Me" up to including "Everyone." Most of this stuff seems to serve little purpose except for use in targeted advertising.
In this section, you can select who can read your future posts and stories, as well as read your prior posts on Facebook.
"Future Posts" is where you set your default audience for your regular posts, including text posts, photos, and videos. These are the normal Facebook options for "Friends," "Friends of Friends," "Everyone," or "Custom." My advice is to keep it to Friends unless you are trying to promote yourself to everyone or you have a specific need for a Custom setting (e.g., to exclude a toxic friend or relative).
You can choose who can see your future posts by going directly to www.facebook.com/settings?tab=privacy and you'll find the option in the "Your Activity" section.
You can always override your default setting for a specific post at the time you create it by clicking on the downward caret next to the audience and selecting a new one.
When you create a public post, everyone on Facebook can see it. However, you can limit who gets to comment on your public posts. This is not available through Privacy Checkup. Go to www.facebook.com/settings?tab=followers, and you can select "Friends," "Friends of Friends," or "Everyone."
If someone tags you in a post, you can choose whether to allow additional people to view the post (e.g., your Facebook Friends) if they aren't already in the post's audience. You can also control how these posts appear on your Facebook profile.
You can choose who can see posts you're tagged in by going directly to www.facebook.com/settings?tab=timeline and you'll find the option in the "Tagging" section.
You can limit the people who can post on your profile page from "Only me" up to including "Everyone." This option is not available through the Privacy Checkup. Go to www.facebook.com/settings?tab=timeline, and you'll find this option in the Viewing and Sharing section. My advice is to keep it to Friends or Friend of Friends, unless you enjoy random comments from strangers.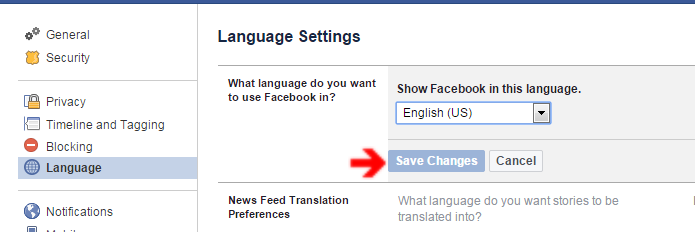
If you're concerned about crude language appearing on your profile page, you can add up to 1,000 keywords that will cause a post to be hidden. The post will still remain visible to the people who posted and their Facebook Friends. This option is not available through the Privacy Checkup. Go to www.facebook.com/settings?tab=timeline, and you'll find this option in the Viewing and Sharing section. Though you're probably better off just limiting who can post to your profile above to Friends (unless your friends are the problem!)
You may not want everyone to see what other people are posting on your profile page. You can change the audience from "Only me" up to including "Everyone." This option is not available through the Privacy Checkup. Go to www.facebook.com/settings?tab=timeline, and you'll find this option in the Viewing and Sharing section.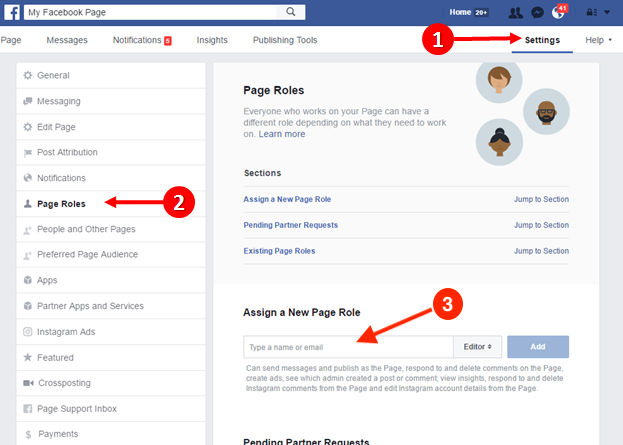
If you are tagged in a post by someone on Facebook, some of your Facebook friends may not see the post because they aren't in the audience designated by the person who created the post. You can choose to make posts that you are tagged in visible to all of your Facebook Friends or a custom group of your Friends. Or, you can choose not to expand the audience by selecting "Only me." This option is not available through the Privacy Checkup. Go to www.facebook.com/settings?tab=timeline, and you'll find the option in the Tagging section.
If you are tagged in a post, the post defaults to automatically showing up on your Timeline. I recommend you choose the setting to review the posts before they appear. This is not available through the Privacy Checkup. Go to www.facebook.com/settings?tab=timeline, and you'll find the option in the Reviewing section.
Ever been tagged in an embarrassing photo from two decades ago uploaded by that old college classmate? You can remove these tagged items, but not through the Privacy Checkup. Go to your profile page (you can access it by clicking on your name in the menu bar) and click on Manage Posts.
In the box that pops up, click on Filters. In the Post Filters box, you can select "only show posts I'm tagged in." You can choose to hide the posts or remove the posts. First, go through and select the posts where you want to remove yourself (untag yourself), click "Next," and select "Remove Tags." Then go through and select the posts that you want to be able to view but don't want others to see in your Timeline, click Next, and then select "Hide Posts."
Posting an old photo from a school or work outing? Once you share it, your Facebook Friends may want to tag more people in the photo.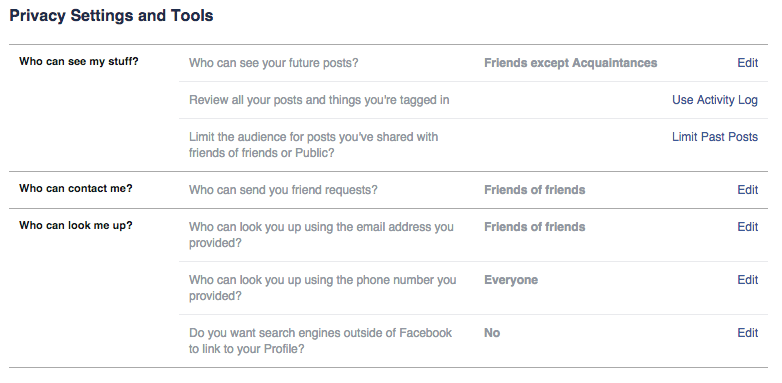 By default, your Facebook Friends can add tags. However, you can choose to review these tags before they appear on your post. This option is not available through the Privacy Checkup. Go to www.facebook.com/settings?tab=timeline, and you'll find the option in the Reviewing section.
The setting for "Limit Past Posts" only applies to Public posts. You can choose to restrict the audience to only Friends or Friends of friends. When you limit your past posts here, it will apply to ALL of your public posts. We recommend the Friends setting over the Public one. When set to Public, all of your posts can be seen by anyone on or off Facebook. Unless you're a celebrity or running a page that is used to generate interest in a business that you run, you will likely want to keep your activity restricted to those you have Friended. Keep in mind that anyone who is tagged in your posts and their Facebook friends may still be able to view these posts.
You can choose who can view old posts by going directly to www. facebook.com/settings?tab=privacy and clicking on "Limit Past Posts" in the "Your Activity" section.
If you want to change the audience for specific posts, you'll have to go into each post individually to change it. You can change the sharing settings of any individual Facebook update by clicking on the triple dots, then sharing button to the left of the Post button.
For "Stories," which are visible for 24 hours, you can limit your audience to your Facebook Friends or create a custom list of people with whom you want to share your stories. You can only set your default story audience within the Privacy Checkup. For individual stories, click on the cog next to "Your Story" when you create a story and you'll find the option to change your story audience for that story.
If you tag someone in any post, that person can share it to their Story, along with your full name and a link to your post.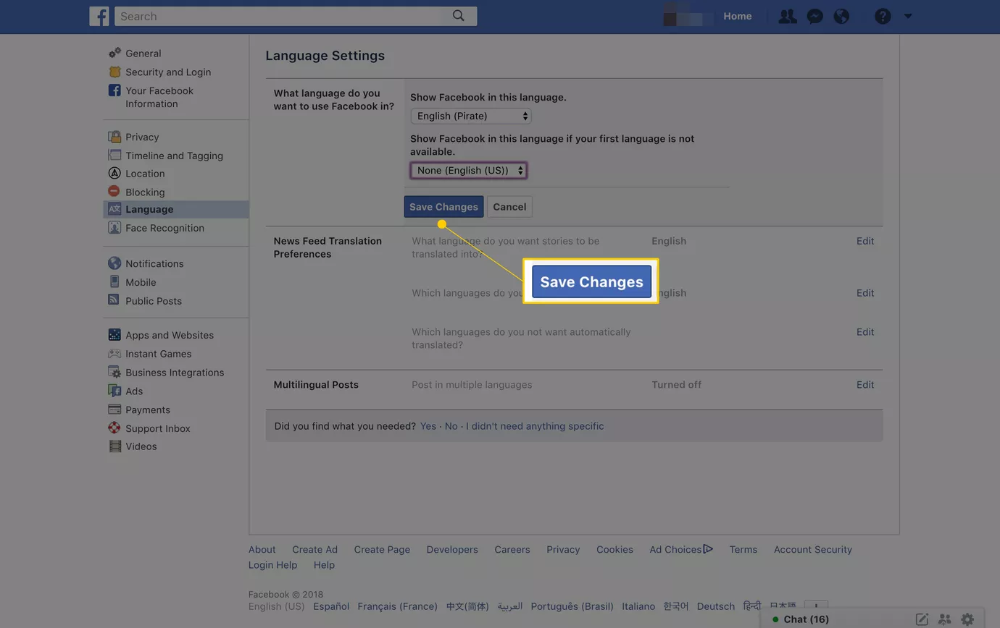 You can disable this feature, but not through the Privacy Checkup. Go to www.facebook.com/settings?tab=timeline, and you'll find this option in the Viewing and Sharing section.
If your Story is public, you can allow others to share your Story to their own Story, along with your full name and a link to your original Story. You cannot turn off this feature through Privacy Checkup. Go to www.facebook.com/settings?tab=stories to make your choice.
If you tag someone in your Story, that person can share your Story, along with your full name and a link to your original Story. You cannot turn off this feature through Privacy Checkup. Go to www.facebook.com/settings?tab=stories to make your choice.
Blocking a person means that you are invisible to that person on Facebook. So if a mutual Friend tags you in a post, that person won't see the post. If you comment on a mutual Friend's post, that person won't see the comment. There are a few exceptions. If you both use a Facebook app or game or if you've both joined a group, the blocked person could see you. And, the person you block won't disappear entirely from your view. If a mutual Friend posts a photo and tags the blocked person, you may still see it on your Friend's timeline.
To block someone, go directly to www.facebook.com/settings?tab=blocking and add their name in the "Block users" section.
If you just want to stop a person from sending you messages or attempting to connect via a video call in Messenger, you can go to www.facebook.com/settings?tab=blocking and add their name in the "Block messages" box.
If you just want to stop a person from sending invitations to try an app (occurs when one of your friends is trying to get free stuff in a game), you can go to www.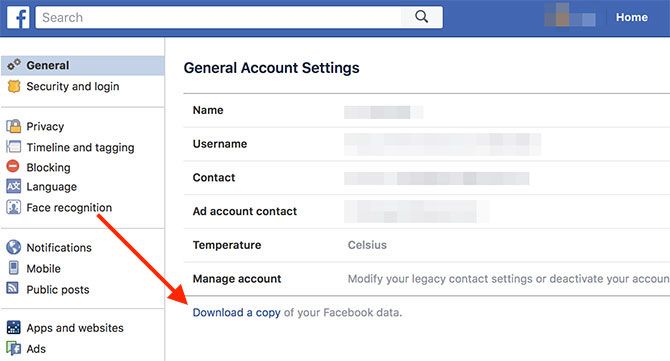 facebook.com/settings?tab=blocking and add their name in the "Block app invites" box.
If you just want to stop a person from sending event invitations, you can go to www.facebook.com/settings?tab=blocking and add their name in the "Block event invites" box.
If you want an app to stop contacting you and prevent the app from obtaining non-public information about you through Facebook, you can go to www.facebook.com/settings?tab=blocking and add the name of the app in the "Block apps" box.
If you want a Page to stop interacting with your posts or be able to like or reply to your comments, you can go to www.facebook.com/settings?tab=blocking and add the name of the Page in the "Block Pages" box. You will be unable to post to the Page's Timeline or message the Page. And, if you currently like the Page, blocking the Page will automatically unlike and unfollow the Page.
In this section, you can change your password, turn on two-factor authentication, and get alerts when there is an unrecognized login to your account. If you already have two-factor authentication turned on and alerts are set for unrecognized logins, you'll receive the message that "You're all set. No security actions are recommended at this time."
Do you have a strong password for your Facebook account – one that is unique to Facebook and at least 12 characters, including upper and lower case letters, numbers, and special characters? If the answer is no, you should consider upgrading to a strong password. To ensure you remember your new strong password and to make it easier to use strong passwords going forward, we recommend using a password manager. Our current Techlicious Top Pick for the best password manager is Dashlane. We're also fans (and users) of 1Password, as well.
A strong password is essential, but that's not enough if it's compromised in a data breach or you are tricked into giving it away in a Facebook credentials phishing attack. That's where two-factor authentication comes in.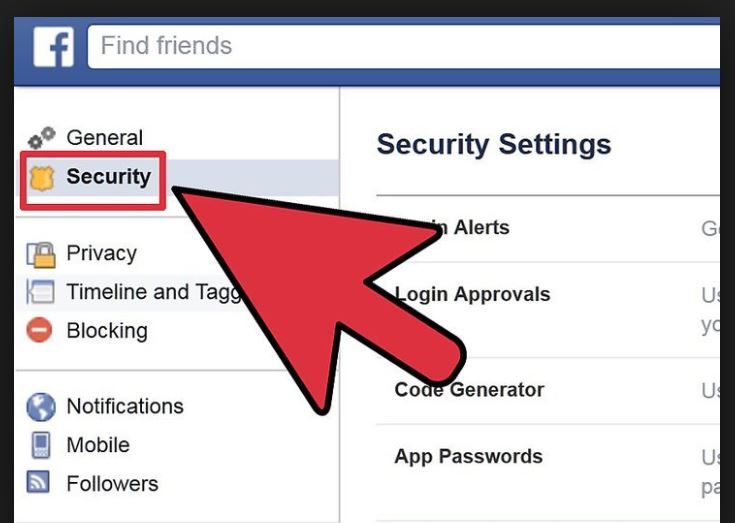 When two-factor authentication is turned on, anyone trying to log into your account from a new device or browser would need to provide a one-time-use code delivered via an app, text message, or email. I highly recommend turning on two-factor authentication.
You can also go directly to www.facebook.com/settings?tab=security and find the option to turn on two-factor authentication in the "Two-Factor Authentication" section.
You should also check the list of devices and browsers that don't require a code when you log in to ensure there aren't any of your old devices on the list. You can't check this through the Privacy Checkup. Go to www.facebook.com/settings?tab=security, and in the Two-Factor Authentication box, click on "View" next to "Authorized Logins."
Login alerts can be sent any time that you log into your account from a device or browser that you don't usually use. I highly recommend turning on alerts. You can choose to have alerts sent via Facebook, Messenger, email, or any combination of these methods.
You can go directly to www.facebook.com/settings?tab=security, and click on "Edit" next to "Get alerts about unrecognized logins" in the "Setting Up Extra Security" section.
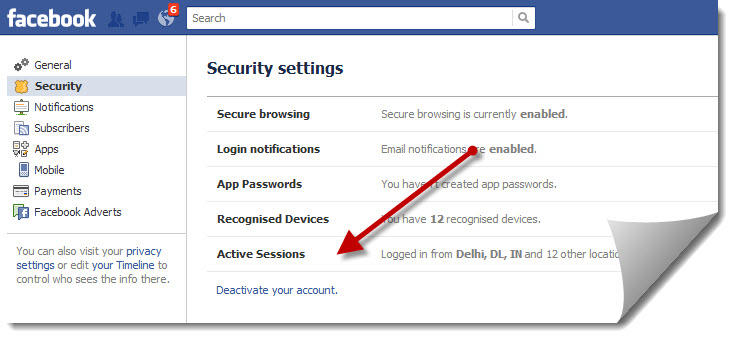
You can see where you're logged into Facebook – the device and physical location – by going to www.facebook.com/settings?tab=security and checking the box entitled "Where You're Logged In." If you see a suspicious login, you can click on the triple dots next to it and "Log Out" that device.
This section walks you through the ways that you can limit how people can find you through search engines (like Google), or with your phone number, email or name on through Facebook.
You have two options for limiting who can send you a Friend request: Everyone or Friends of friends. Unless you're being inundated with requests or don't want to be found, I recommend leaving the setting on Everyone so legitimate people who want to connect can.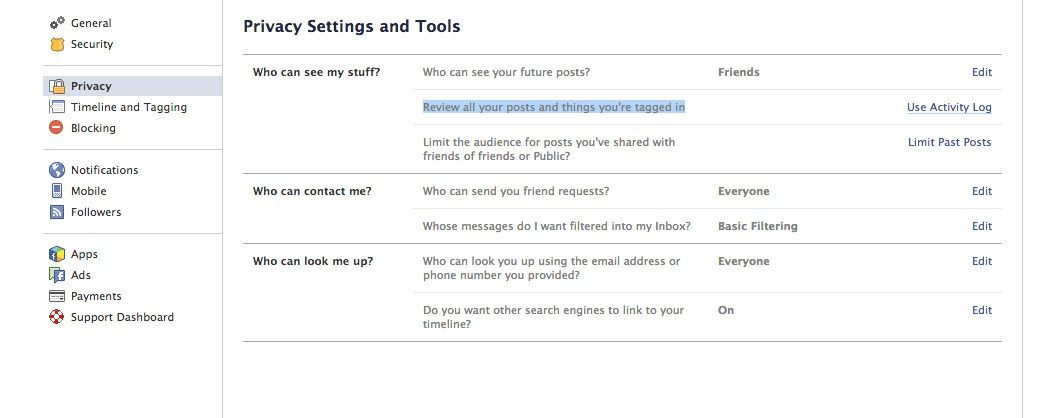
You can access this directly by going to www.facebook.com/settings?tab=privacy and you'll find the option in the "How People Find and Contact You" section.
People can look you up on Facebook with your phone number or email address, even if you have them hidden on your profile. This method make it easy for people you know to find you, especially if you have a common name on Facebook, like Jane Smith. Have the settings option set to "Everyone" or "Friends of Friends" if you want people to find you using your email address or phone number. Or, you can also choose to fully hide your email addresses or phone numbers by selecting "Only me" as the audience. The settings you choose apply to all of your phone numbers or all of your email addresses.
You can access this directly by going to www.facebook.com/settings?tab=privacy and you'll find the option in the "How People Find and Contact You" section.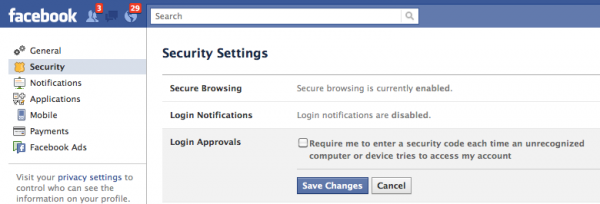
You can find your Facebook profile on search engines like Google. If you don't want your Facebook profile coming up in search, you can toggle this setting off in the privacy checkup or you can access it directly by going to www.facebook.com/settings?tab=privacy and looking in the "How People Find and Contact You" section.
Facebook makes it easy to log into other websites and apps with your Facebook account. Likewise, Facebook makes tagging easy by using face recognition to suggest people to tag in photos. If these conveniences are too invasive for you, here's where to turn them off.
Instead of creating a new user name and password for an app or website, you may have used your Facebook account. If you no longer use the app or website, it's a good idea to remove the connection. However, some apps and websites may hold valuable information in your account. When you remove the connection to your Facebook account, you lose access to your account.
If you want to delete your connection, click on "Remove" next to the website or app name. In the pop up window you'll be given the option to "delete all of the posts, photos, and videos that the site or app has posted on your Timeline" and/or "Allow Facebook to notify [app name] the the login was removed." This second option may enable you to recover data in the account you created with your Facebook login.
You can remove apps and sites by going to www.facebook.com/settings?tab=applications. While you're there, you should click on the "View and Edit" button next to any app and website logins you want to keep to check what data the app or site is collecting and see what information is required for the connection and what is optional.
You can turn off the ability to use Facebook to log into apps, websites, and games, but you won't find this in the Privacy Checkup. Go to www.facebook.com/settings?tab=applications, and in the Preferences section, click on the button next to "Apps, Websites and games."
You can turn off annoying notifications for game requests from friends, game status updates, and app notifications, but you won't find this in the Privacy Checkup. Go to www.facebook.com/settings?tab=applications, and in the Preferences section, click on the button next to "Game and app notifications."
Facebook Instant Games often harvest a lot of personal data, and they can keep on collecting it long after you've stopped playing. You can remove the game connection and prevent the developers from receiving additional information, but not through the Privacy Checkup. Go to www.facebook.com/settings?tab=instant_games, and you'll see tabs for Active games, Expired games, and Removed games. Click on "View and edit" next to a game, and you'll see all of the information that you have shared. Removing the game will sever the connection so the developer won't continue to receive data.
Facebook uses face-matching technology to suggest who you should tag in photos. It also lets you know when you might appear in a photo or video but haven't yet been tagged (if you're in the audience for the original post). It will only suggest people that are on your Friends list. If you don't want to be tagged when your friends are tagging photos, toggle this option off. Facebook claims to also use face recognition to prevent strangers from using a photo of you as their profile photo. However, based on the number of cloned accounts I've seen, it doesn't seem to be working very well.
You can also turn off face recognition by going to directly to www.facebook.com/settings?tab=facerec
Facebook will show you ads – that's how they make their money. It's just a question of whether those ads will be targeted to your demographics and interests or non-targeted (and, perhaps, less relevant to you).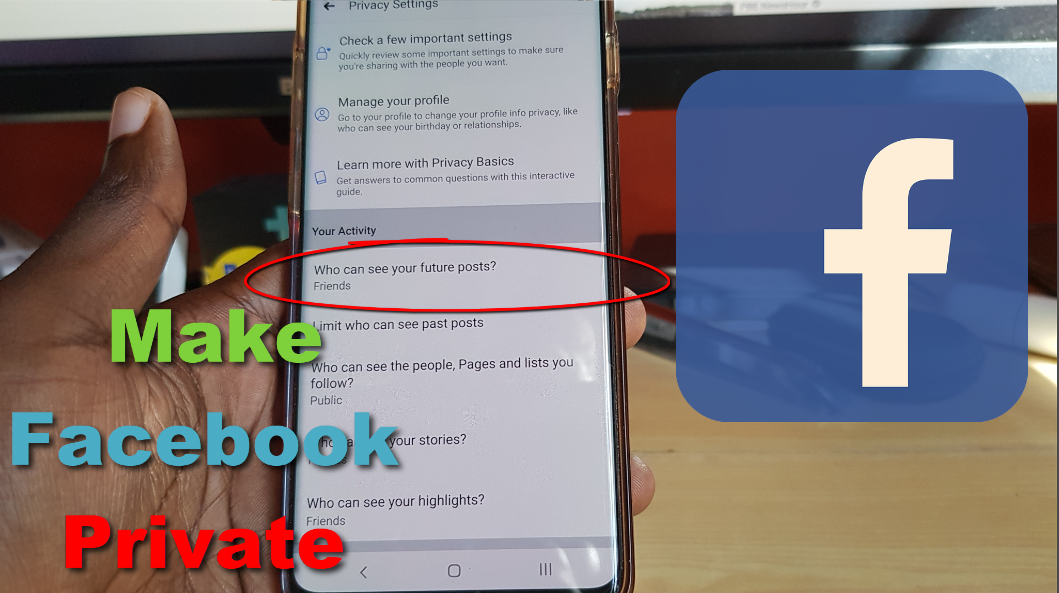
If you're tired of being inundated with a specific company's ads, you can choose to hide them. You won't find this in the Privacy Checkup, but you can go to www.facebook.com/adpreferences/advertisers. There you will find a list of the advertisers you have seen most recently, and you can click on the "Hide Ads" button next to any offenders.
While you can't choose to see fewer ads overall, you can choose to see fewer ads in the following categories: Alcohol, Parenting, Pets, and (clumped together) Social Issues, Elections or Politics. You won't find this in the Privacy Checkup, but you can go to www.facebook.com/adpreferences/ad_topics and check the "See Fewer" box next to any categories that don't appeal to you. If you see "Undo," it means you've already chosen to "See Fewer."
You can choose to prevent Facebook from using data from its partners to show personalized ads.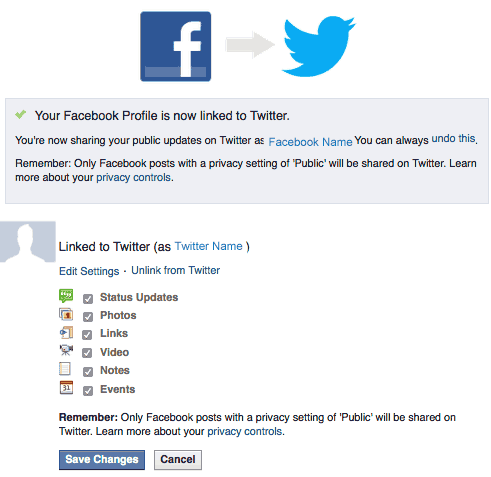 You won't find the option the Privacy Checkup, but you can go to www.facebook.com/adpreferences/ad_settings and click on "Data about your activity from partners." There, you can toggle off "Use Data from Partners."
However, this won't stop the off-Facebook tracking. If you want to stop sharing your off-Facebook browsing activity with Facebook, you won't find the option in the Privacy Checkup. Go to www.facebook.com/off_facebook_activity and click on "Clear History." This doesn't delete the data, but it does sever the connection with your account. You'll also want to click on "More Options" beneath "Clear History" and then select "Manage Future Activity." Select "Manage Future Activity" again, and you can stop Facebook from saving your activity going forward.
Here, you can choose whether to share your marital status, employer, job title, and level of education with advertisers. This doesn't remove the information from your Facebook profile; it just impacts the ads you see.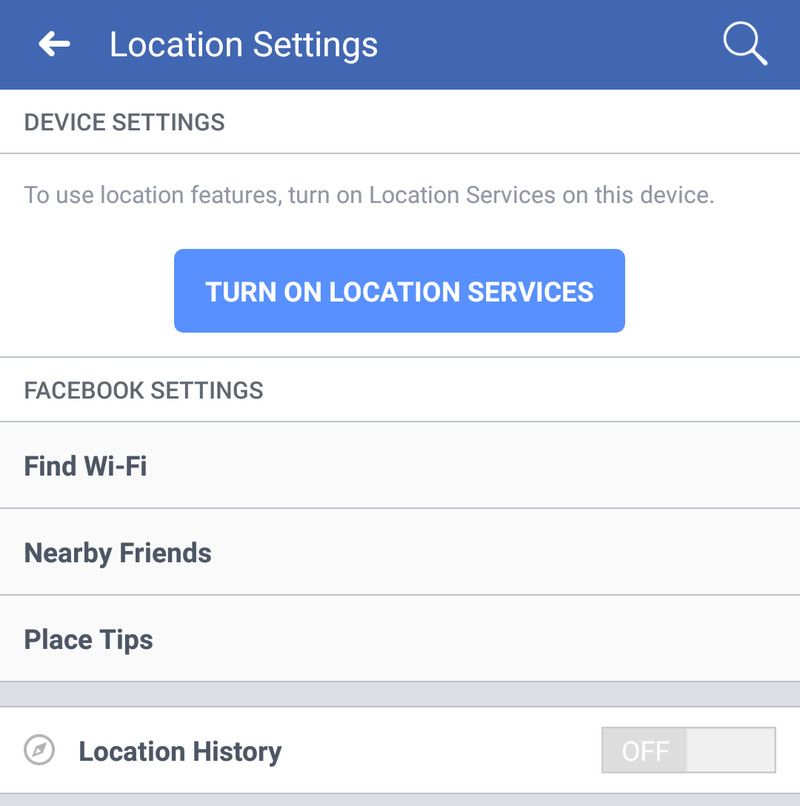
You can also go directly to www.facebook.com/adpreferences/ad_settings and clicking on "Categories used to reach you." There you can toggle off any data you don't want to share.
In addition to basic profile information, Facebook uses other information you've shared with it to serve you ads. You can remove interest categories, but you won't find the option in the Privacy Checkup. Go to www.facebook.com/adpreferences/ad_settings and click on "Interest Categories." Here, you can click on the "Remove" button next to any categories you don't want used to target ads to you.
Some companies have lists of people that they want to reach with their ads. Facebook allows companies to target ads based on these lists, or even exclude you from seeing ads (for example, the DNC may want to exclude their ads from people on the RNC list). You can choose to not be shown ads using a list, as well as not excluded from seeing ads.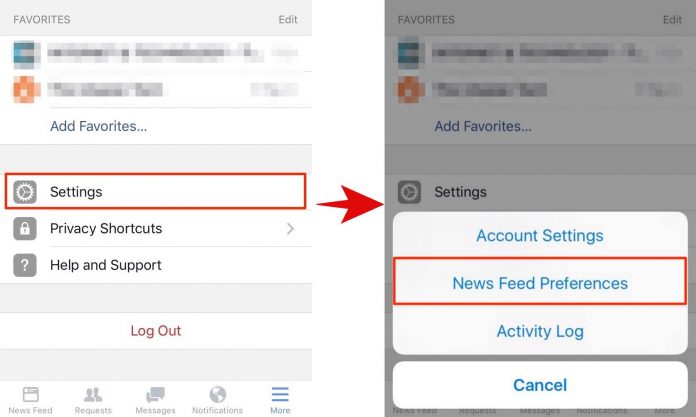 You can't select this option through the Privacy Checkup, but you can go to www.facebook.com/adpreferences/ad_settings and click on "Audience-based advertising." There, you will see a list of all of the companies that have you on their audience list. Click on a company, and you can find out why you were included in the advertiser's audience. Click on the arrow next to the reason and you can choose whether the company's list can be used to either include or exclude you from seeing ads.
Facebook serves a lot of advertising on websites and through apps off of Facebook. You can turn off personalized ads for those sites and apps, but not through the Privacy Checkup. Go to www.facebook.com/adpreferences/ad_settings and click on Ads Shown off of Facebook. There, you can toggle off personalized ads.
Have you ever liked or followed a company, made a comment, shared a company's Page, checked into an event held by a company, made a recommendation, or joined a Facebook event held by a company? Facebook can broadcast your action as an advertisement to all your friends.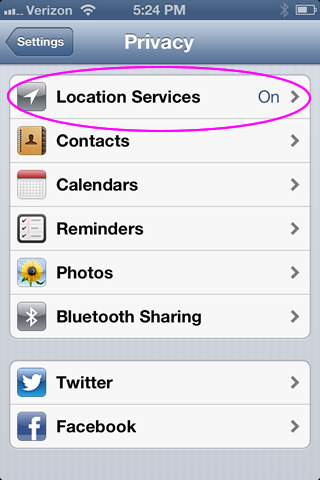
If you don't like this type of inadvertent endorsement, you can limit who can see these social interactions alongside ads to "Only me."
You can also go directly to www.facebook.com/adpreferences/ad_settings and clicking on "Social interactions." In the popup you can select "Only me" or "Friends."
That covers your privacy setting options on Facebook. If you want to dig in even further, Facebook has a page explaining the basics of Facebook privacy tools as well as Facebook's latest data policies.
Still confused by a specific issue or question with your account? Ask below in the comments and we'll do our best to help you out.
Updated on 7/8/2021
[shocked woman with laptop via Shutterstock, all other images via Facebook]
For the past 20+ years, Techlicious founder Suzanne Kantra has been exploring and writing about the world’s most exciting and important science and technology issues. Prior to Techlicious, Suzanne was the Technology Editor for Martha Stewart Living Omnimedia and the Senior Technology Editor for Popular Science. Suzanne has been featured on CNN, CBS, NBC and dozens of other TV and radio networks.
Help Center
Maintain your privacy, security, and personal safety
Privacy
Manage the audience for your Facebook posts
We're updating the mobile version of Facebook.com. More
Settings and privacy check
Change Facebook privacy settings
Facebook privacy check
What is public information on Facebook?
Who can see your posts?
How do I choose who can see your Facebook post?
Who can like and comment on my Facebook content?
Who can see your posts on Facebook?
Who can see my posts if they use hashtags?
How do I set up an audience if I'm using a previous mobile version of Facebook that doesn't have an audience selector?
Your profile information
How do I manage my Facebook profile audience?
How do I edit the basic information on my Facebook profile and choose who can see it?
How do people who are not on my Facebook friends list see my profile?
How do I control who can see my email address on my Facebook profile?
How do I control who can see my Facebook friends list?
How do I control who sees my contact information on my Facebook profile?
Your Timeline
Can I see who is viewing my Facebook profile?
Can people see my private messages on my timeline?
How do I choose who can see your previous posts on Facebook?
Manage the audience of your Facebook Timeline posts
Manage who sees posts and photos you've been tagged in on Facebook
How do I change the audience of a post on Facebook?
Facebook search results show content that I have hidden from my profile
People can still see photos or posts tagged with my profile that I have hidden from my Facebook timeline
© 2022 Meta
Af-SoomaaliAfrikaansAzərbaycan diliBahasa IndonesiaBahasa MelayuBasa JawaBisayaBosanskiBrezhonegCatalàCorsuCymraegDanskDeutschEestiEnglish (UK)English (US)EspañolEspañol (España)EsperantoEuskaraFilipinoFrançais (Canada)Français (France)FryskFulaFøroysktGaeilgeGalegoGuaraniHausaHrvatskiIkinyarwandaInuktitutItalianoIñupiatunKiswahiliKreyòl AyisyenKurdî (Kurmancî)LatviešuLietuviųMagyarMalagasyMaltiNederlandsNorsk (bokmål)Norsk (nynorsk)O'zbekPolskiPortuguês (Brasil)Português (Portugal)RomânăSarduShonaShqipSlovenčinaSlovenščinaSuomiSvenskaTiếng Việttürkçevlaamszazaíslenskačeštinaślōnskŏ gŏdkaεληνικάbehlarskymacdonskoykholreusholrepskitatarchitarpyk okyanka -chyrascha հ ע עاmy اoul اوuzzlfarnarnarnarn emples often اردوالnklflenlenlflfnknknkiant յերեն etult يةاارmyیپښوکوریی وە opinی नेपालीमराठीहिन्दी অসমীয়াবাংলা ਪੰਜਾਬੀ ગુજરાતી தமிழ் తెలుగు ಕನ್ನಡ മലയാളം ภาษา ไทย ສາ ລາວ မြန်မာဘာသာ ქართული አማርኛ ភាសាខ្មែរ ⵜⴰⵎⴰⵣⵉⵖⵜ 中文 (简体) 中文 (香港) 日本語 日本語 日本語 한국어 9 한국어 9 한국어
Information
Confidentiality
Conditions and Rules
Advertising preferences
Vacancies
COOKIE
Create a page
Create a page
90,000 Facebook settings: how, why and where are over the past few years of Facebook settings several times, adding something somewhere, removing and transferring. Getting tangled up in them is like doing nothing. Therefore, we decided to write again about how to protect your account on this social network. The post about security has already been released, and in this article we will talk about privacy settings.
There are quite a few privacy settings for your page hidden in different tabs on Facebook. Let's talk about the main thing.
Who can see my content? There are three interesting settings here.
1. Who can see your posts in the future? This option allows you to specify who can view your posts: your friends, friends of friends, all Internet users, or some specific people. The specification "in the future" means that these changes will not affect already published posts - only new ones. It is worth noting that there is a separate button for quick access to this setting: you will find it under the window for creating a new post, to the left of the "Submit" button.
2. Review all your publications and those objects in which you are marked . By clicking on this link, you will be taken to the "Action Log". If you liked something, left a message under a friend's post or tagged someone in the photo, then this data will go to the "Journal" page. For example, in the "Comments" tab you will find all your comments, while the "Like" tab contains all the posts you have liked. In general, here you can quickly find the information you need.
3. Restrict the audience for all posts on my timeline . This setting allows you to hide old posts from your friends' friends or from all Internet users in general. Your friends will still be able to view them. Be careful: by restricting access to all already created posts, you will not be able to return everything back just as easily - you will have to edit the access settings for each individual publication. More about it here.
Remember, you can change the permissions for individual posts at any time by simply selecting "Edit Post", then clicking the button to the left of "Save" and selecting the audience from the drop-down list.
Who can contact me? This setting allows you to choose who can ask you to be friends: all or only friends of your friends.
Who can find me? You can search for people on Facebook by phone number or email address. Here you can allow or block social networks from showing your account to users who try to find you using these contact details.
Also here you can hide your Facebook account from the search results of Google, Yandex and other search engines.
Who can post on my timeline?
Who can post to your timeline? This setting allows you to control who can post on your page: just you or your friends as well. The first (and often only) thing people use this feature for is to post birthday greetings. But if you have strangers as friends, we recommend that you restrict access to your timeline.
Submit tags made by friends before they are posted to your timeline? Turn on this option so that nothing gets into your timeline. Then all posts in which you have been tagged will automatically be sent for consideration to "Chronicle Review" . Never heard of this page? Not surprisingly, many do not know about it at all, although they visit it regularly. Users go here by clicking on the alert icon, a red number that appears on the globe icon.
You can activate this option either in the Timeline Overview (upper right corner, Notifications button) or in the Timeline and Tags settings.
Remember, this setting only affects posts on your timeline. Posts you're tagged in will still be available in search results, the news feed, and other places on Facebook.
Who can see posts on my timeline?
See what others see on your timeline. Do you want to look at your page "from outside"? Click this link and see how other people or a specific friend sees your timeline.
Who can see the posts you're tagged in on your timeline? We control the content we publish. But friends sometimes tag us in photos or in posts that are better not to show to other people. Each tagged post can be checked manually before it gets into the timeline (we talked about this above), or you can hide all other people's posts at once using this option.
You can change this setting from "Everyone" to "Only me" or leave access to such publications to a certain circle of people. You can also manually remove tags from each post or photo you don't like. More about it here.
Who can see what others post on your timeline? In the previous paragraph, you were asked to set access rights to posts in which you were tagged. Here you can also choose the privacy settings for the posts that your friends have published on your page - the same birthday greetings (not tags).
How can I manage other user's tag settings and tag recommendations?
Check tags people add to your own posts before they appear on Facebook? Sometimes friends tag people in your photos that aren't actually in them, or people you don't want to tag. For example, this way you can attract the attention of a person who is personally unpleasant to you to your post. By activating this option, you will check other people's tags on your posts before they become visible to all other users of the social network, including the person tagged in the post.
When you are tagged in a post, who can see it other than the people it's already open to? When you are tagged in a post, you can add it to your timeline or hide it. But even if you hide a post, it will still be available on the page of the person who created it, as well as in the news feed, in search results for mutual friends, and in some other places. If you want to hide such posts from everyone, select the "Only Me" setting.
Who sees tag recommendations when photos of people like you are uploaded? Facebook uses its facial recognition system to guess who is in the photo. When users upload photos of their friends, the social network invites them to tag these people in the pictures. With this setting, you can prevent Facebook from doing this.
We are interested in three settings on this page.
Limited list. This is another way to separate publications into private and public. By adding a friend here, you hide posts that are available to the Friends audience from him. They will still be able to see your posts set to Public, your posts on a Mutual Friends Timeline, or the photos you tagged them in. Facebook doesn't let friends know that they've been added to the Restricted list. More about this option here.
Block users. If you want to end all contact with someone, block them. They will then no longer be able to see content posted to your timeline, tag you, invite you to events or groups, write to you, or send you friend requests.
Block pages. The same can be done with a page owned by a store, newspaper, or other organization. If you block such an account, the store will not be able to write to you.