Most restaurateurs already know to include their menus on many business review sites, but it is absolutely vital to take time to add your menu to your Facebook Page.
Adding a menu to your Facebook Page doesn’t just complete a restaurant’s online presence; it’s also a valuable method of customer acquisition. Potential customers who otherwise may not know about your restaurant outside of Facebook can easily browse your menu and make a better-informed dining decision based on your offerings.
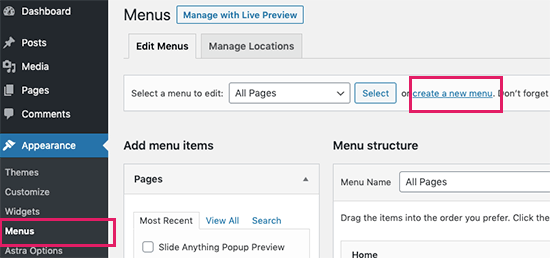
Before adding a menu to your Facebook Page make sure you take steps to learn how to claim your Facebook business page. You won’t be able to add a menu without doing this first.
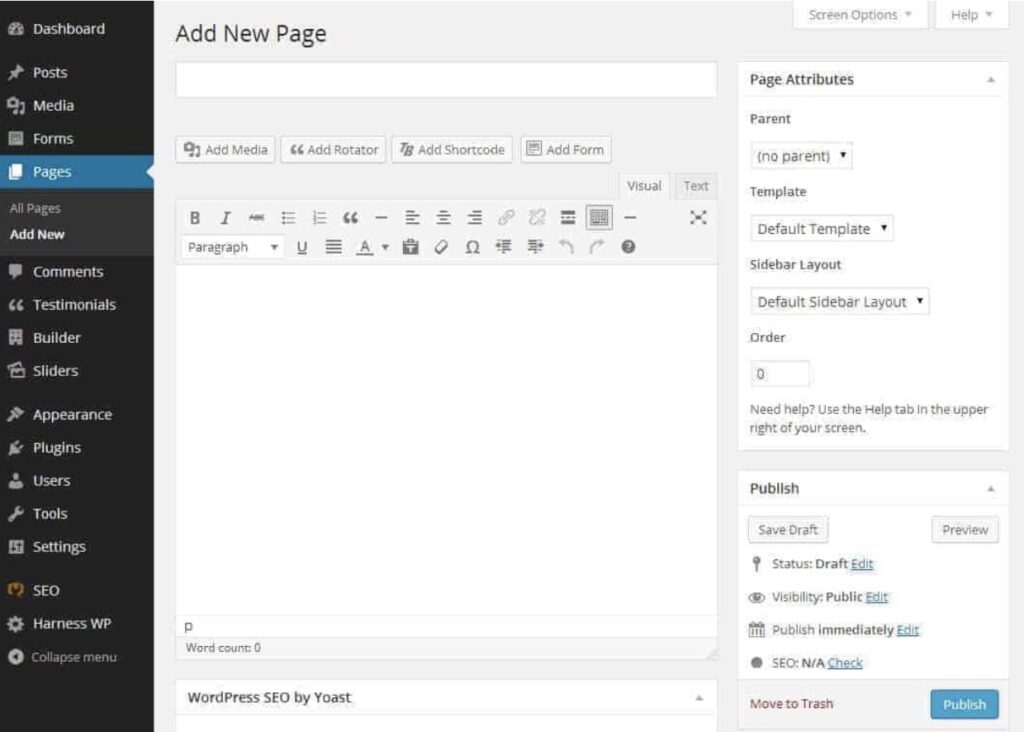
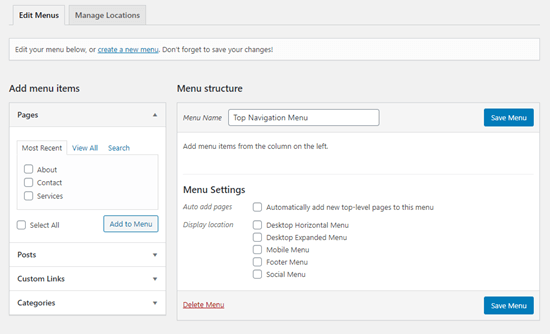
To add a menu, you’ll need to go to your Facebook business Page by clicking on the “Pages” tab on the left side of the screen. Once you are at your restaurant’s Page:
Once uploaded, you can add further details to your menu, including pickup, delivery, and payment options. You can also include information about the specific type of food offered at your restaurant. If you want to edit your menu, just follow the same instructions above.
As you are adding your menu, keep in mind the following menu guidelines set by Facebook. Failure to follow these guidelines could mean the removal of your menu from your Page.
You also have the option to remove a menu on your Facebook Page in a few easy steps.
Once your menu is uploaded, a QR code will be generated for it, which can be useful for sharing menu details online and in person. To view it:
Having restaurant menus on a Facebook Page is a crucial part of elevating the customer experience for new and returning diners alike. Customer reviews data shows that 93% of consumers will look at a menu before dining out. Furthermore, 77% of diners prefer peer reviews over critic reviews when it comes to choosing a restaurant, and Facebook and Google combined hold 76% of all reviews.
In other words, people are looking to these sites in large numbers to make an informed decision before they dine. By adding a menu to your Facebook business Page on top of showing Facebook reviews, you can provide consumers immediate relevant information, so that they don’t disengage from your Page and search elsewhere.
07 Aug
Is your restaurant menu available on your Facebook Page?
Even if customers can view it on your website, you'll also want to add a menu to your Facebook Page.
This way you make it easy and convenient for existing and new customers to view your menu.
In this episode of Social Snacks, you'll learn how to add a menu to your Facebook Page in just a few minutes!
To add a menu to your restaurant's Facebook Page, watch this short video tutorial.
Transcription Services by GMR Transcription
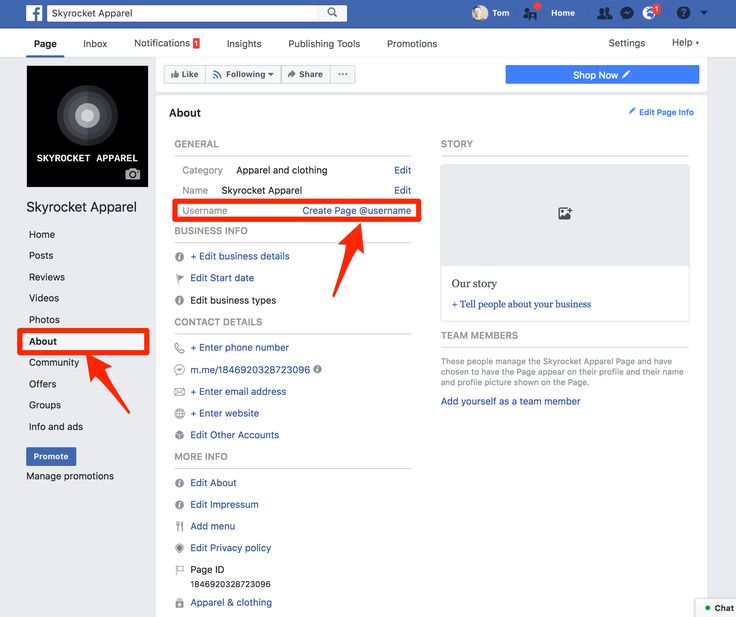
Under the about section, make sure your page category is set to Local Business > Restaurant/Cafe
Set your Facebook Page category to Local Business > Restaurant / Cafe
Once you set your Facebook Page category, you'll see an option to add a menu to your Facebook Page.
You can add your restaurant menu as an image or a PDF file.
To add your menu, click the edit option
 Click the edit option
Here you can add your menu to your Facebook Page.
You can choose to add a still image of your restaurant menu or upload a PDF file.
Upload a photo of your restaurant menu or a PDF version
Click on customize address to set a custom Facebook Groups url
After you've added your restaurant menu to your Facebook Page, fans can access it from the about section.
Fans can view your restaurant menu from the about section on your Facebook Page
Adding your restaurant menu to your Facebook Page takes just a couple of minutes to do.
In fact, I'm surprised more restaurants haven't added their menu to their Facebook Page by now.
By adding a menu to your Facebook Page, it can help with your restaurant marketing and add value for your Facebook fans.
Once you've added your menu, don't forget to tell your fans about it and let them know how they can view your menu.
Need more ideas on how to promote your restaurant menu on Facebook?
Read this article to learn about six other ways.
Learn More
What are some other features you would like to have on your restaurant's Facebook Page?
Share your ideas with us on Facebook, Twitter or LinkedIn.
About The Author
Christian Karasiewicz Founder, Social Chefs Founder and CEO of Social Chefs, a digital marketing agency. I host two shows, #SocialChatter, the industries longest running social media marketing talk show and Social Snacks, 5 minute or less social media marketing tutorials.
To add or change your page profile photo:
All background photos are public. This means that every visitor can see them.
To add or change a page background photo:
When choosing a background photo for your Facebook page, remember the following rules:
 Background photos must not be misleading or infringe the copyrights of others.
 Different features are available depending on the page category. The following table shows the different page categories (horizontally) and available functions (vertically):
| Company or brand | Community or public figure | |
|---|---|---|
| Short description | ✔ | ✔ |
| Website address | ✔ | ✔ |
| Services | ✔ | ✔ |
| Ratings and opinions | ✔ | ✔ |
| ✔ | ✔ | |
| Telephone | ✔ | ✔ |
| Physical address | ✔ | |
| Card | ✔ | |
| Visits | ✔ |
Page categories appear below the page title in search results and can help people find what they are looking for. Depending on the selected category, different functions may be available for the page. When choosing a category, strive for detail. For example, select the category "Italian Restaurant" instead of "Restaurant". You can select up to three categories so that customers have more information about the specific services you offer.
To edit the page category:
No limit on the number of page category edits. If you do not see a category that fully reflects the nature of your site, choose the one that is closest to you.
Page templates allow you to customize the default tabs and buttons according to the page type (for example, the Restaurants and Cafes template is optimized for restaurant pages).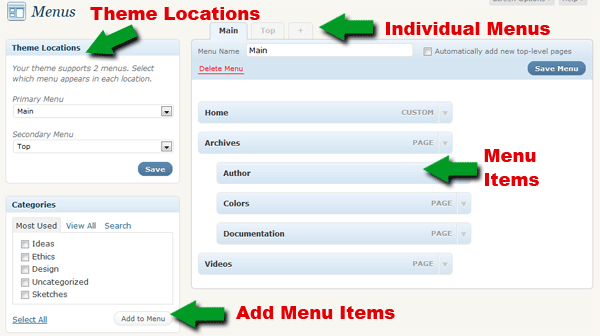 The page template can be changed at any time.
To change the page template:
You can add different types of basic information, depending on the category of your site. For example, if your site is in the Local Business category, you can add your address, phone number, and other business information.
To add information to your page:
This data will appear in the Info section of your page and on the right side of this page's timeline.
To change the page's web address (URL), change the username.
To add or change a physical address:
Please note that you can only add one address. If you can't add an address to a page, try changing its category.
To add business hours:
If you don't see the Clock section, change the category of the page.
You can add a list of services to a page. Thanks to this, visitors will find out what your company offers. To add services to a page, you must first add a tab Services .
To add a Services tab to a page:
After adding a tab to a page, you can add services.
To add services:
To add a menu to a Page:
Facebook may review your menu and ask you to make changes if necessary.
If the menu was added as a photo or PDF file, you will need to edit the file and re-add it to the Page following the instructions above.
If your menu was added using SinglePlatform, email [email protected] the following information:
The SinglePlatform support team will update your Facebook Menu free of charge within 2 business days of submitting your request. Please note that the SinglePlatform tool only works with US and Canadian menus.
To remove a menu from your Page:
When adding a menu, keep the following in mind:
If your menu does not comply with this manual, it may be deleted.
To allow people to tagging visits on your Business Page:
If you can't resolve hits, you might need to change the Page's category.
To turn off tagging on a Company Page:
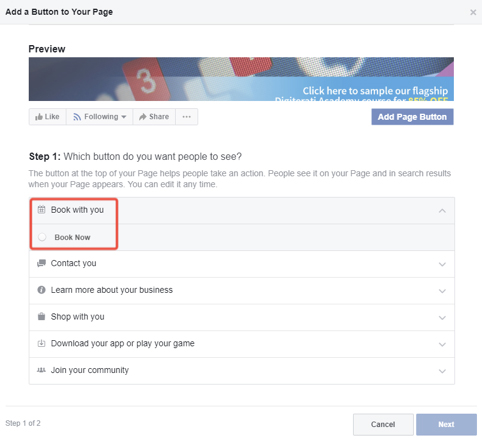
To add a call to action button to a Page, you must be an administrator, editor, moderator, or advertiser.
Call to action buttons can help your customers:
You might also consider connecting to your Page with services such as MyTime, HomeAdvisor, or delivery.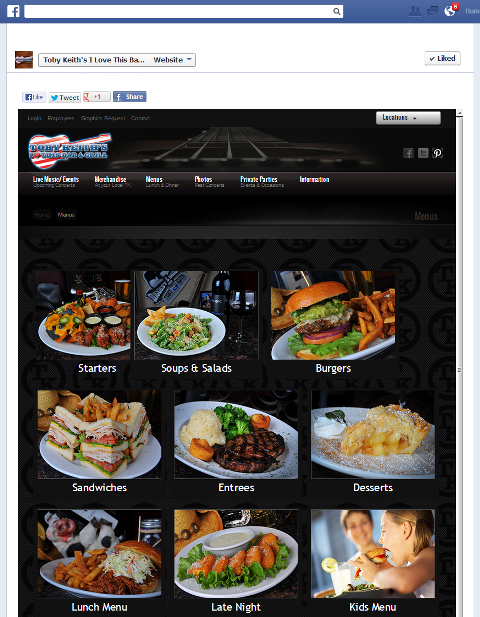 com.
com.
To add a call-to-action button to a Page:
After creating the button, you can check how it works:
To edit the call to action button on your Page:
To remove a call to action button on a Page:
Tabs are visible on the left side of the page, while sections are visible in the middle of the page. After reordering the tabs on the left side of the page, the sections of the page in the middle will also be in the same order. For example, if you rearrange the page tabs to make the Photos tab first, the Photos section in the middle of the page will also be first.
If you are administrator or page editor , you can add or remove tabs and page sections or change their order. Keep in mind that some tabs and sections cannot be deleted (for example, Home, Info, Likes, Messages, Photos, and Videos), while in the case of others, you can change their order (for example, " Homepage").
You also cannot add certain tabs and sections (eg group ) to location pages.
Tab Main cannot be moved.
To change the order of tabs and sections:
Please note that you can only remove the following tabs and sections: Events, Groups, Notes, Services, Store, Jobs, Offers, and " Reviews".
To delete a tab or section:
Before you can add a tab Groups , your Page must be published.
To add a tab or section:
The Facebook Shop section allows you to showcase and sell products directly on Facebook. Customers will be able to buy your products directly from this section.
To add a Shop section to a Facebook Page:
By adding the "Shop" section, you accept the Terms for sellers. Customers will see the Store section of your Page after you add at least one approved product.
Products from your store can be shown on the Marketplace if they meet certain requirements. The Facebook Shop can also be used to list items for Shopping on Instagram.
You must be an administrator to view and edit the page's privacy settings.
If you are an administrator, you can:
You can also unpublish page so that it is only visible to the people who manage it.
If you add restrictions, only eligible users can see the page. People who like your page but don't meet the requirements will be removed.
You can change page restrictions at any time, but deleted users will not be added back. Keep in mind that you won't be able to exchange messages on external sites if your page has country or age restrictions.
You can choose to show or hide the page in selected countries. You must be an administrator to add or change country restrictions:
If no countries are specified, your Page will be visible to all users.
Age limits allow you to limit the audience of a page. For example, if your page is about alcohol or adult products, you might want to consider an age limit. You must be an administrator to add or edit age limits on a page.
If you are an administrator:
To see how your Page looks to visitors:
If you are the administrator of , you can download a copy of the page. The file includes:
To download a copy of the page:
Once the file is ready to be uploaded, you will receive an email or a notification, depending on your privacy settings. Click on download page in the email or notification and enter your password to continue. Please note that the link to the file will expire after 4 days.
Home Social networks Facebook New feature for Facebook pages - menu
Good afternoon, friends! Today I have great news for the owners of restaurants, cafes and other catering establishments. A couple of hours ago, Facebook announced new feature that appeared on the pages - menu .
According to Facebook, more and more users use its search to find a place nearby where you can eat well or just relax with friends. By the way, just recently I got a Russian-language social search on Facebook (Open Graph), which allows you to find restaurants nearby in just one click !
If you want to try the new search in action (if you haven't got it yet), then sign up for testing the Russian-language beta version here.
So, back to the topic. Now every owner of the pages of restaurants, cafes and bars will be able to download their menu in pdf format. This feature is available to all users except those in the US and Canada, who can only create menus through the dedicated SinglePlatform app, which costs no less than $79/month. For some century, users outside of the US have had a bit more luck :))
It's actually very easy to do. In order for the menu function to be available to you, your page must belong to category Restaurant/Cafe . If you don't know how to change page category, read here.
Follow the instructions below:
How do you like the new feature? Will you use it on your page?
Update 06/08/2014 The menu option is now available on the pages of the place category "Food / Grocery". In the new page design, the menu can be loaded very simply by clicking on " Add Menu" in the "Info" block in the left column.
Next, simply download the PDF file. Facebook allows us to upload a file of only 1 MB, so the menu should be simple, without “heavy” pictures. After you upload the menu, it will become available for viewing by all users.