Die Anleitung zeigt, wie du Fotos und Videos von deinem PC aus auf Instagram posten kannst, und du findest Tipps zur optimalen Nutzung von Unternehmensprofilen auf Instagram.
Wir sind heutzutage alle sehr vertraut damit, wie man Bilder auf Instagram postet. Du lädst deine Bilder entweder aus einem Fotoalbum von deinem Smartphone hoch oder machst deine Fotos direkt in der App. Es gibt jedoch Fälle, in denen du von deinem Computer aus posten musst. Zum Beispiel, wenn du im Büro bist oder gerade dein Smartphone nicht zur Hand hast.
Instagram hat kürzlich die Möglichkeit hinzugefügt, Fotos und Videos direkt von deinem PC aus zu erstellen und zu posten. Viele Leute greifen von ihren Computern aus auf Instagram zu, insbesondere mit geschäftlichen Instagram-Accounts. Daher ist es sehr hilfreich, von deinem Computer aus Bilder posten zu können. In diesem Leitfaden findest du einen Überblick und eine Schritt-für-Schritt-Anleitung, wie du Bilder und Videos von einem PC aus auf Instagram posten kannst.
Um mehr darüber zu erfahren, wie du von einem PC aus einen Beitrag auf Instagram erstellst, lies diesen Artikel weiter.
Wenn du jemals in der Situation bist, dass du etwas auf Instagram posten möchtest, aber dein Smartphone gerade nicht dabei hast, ist es hilfreich zu wissen, wie du Bilder von einem PC aus auf Instagram posten kannst. Befolge dafür einfach die folgende Schritt-für-Schritt-Anleitung.
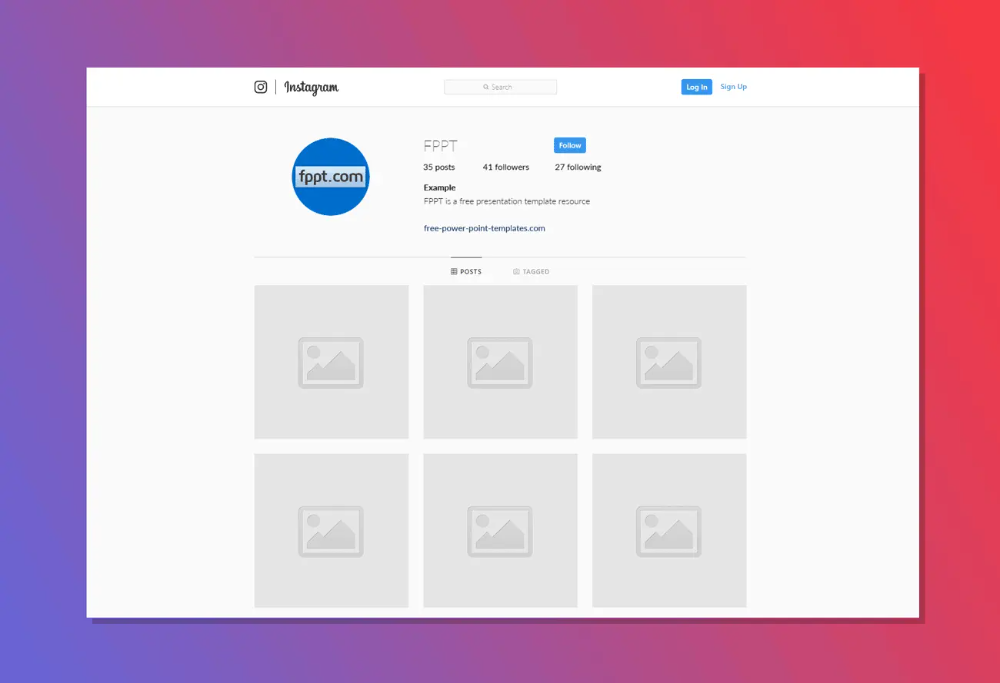
Das Wichtigste zuerst: Um von deinem Computer aus auf Instagram posten zu können, musst du zunächst Instagram.com aufrufen und dich bei deinem Account anmelden.
Sobald du dich auf deinem Computer bei deinem Instagram-Account angemeldet hast und bereit bist zu posten, klicke auf das Plus-Symbol in der oberen rechten Ecke. Das Plus-Symbol findest du zwischen den Meldungen und den Kompasssymbolen.
Nachdem du auf das Plus-Symbol geklickt hast, öffnet sich ein neuer Bildschirm.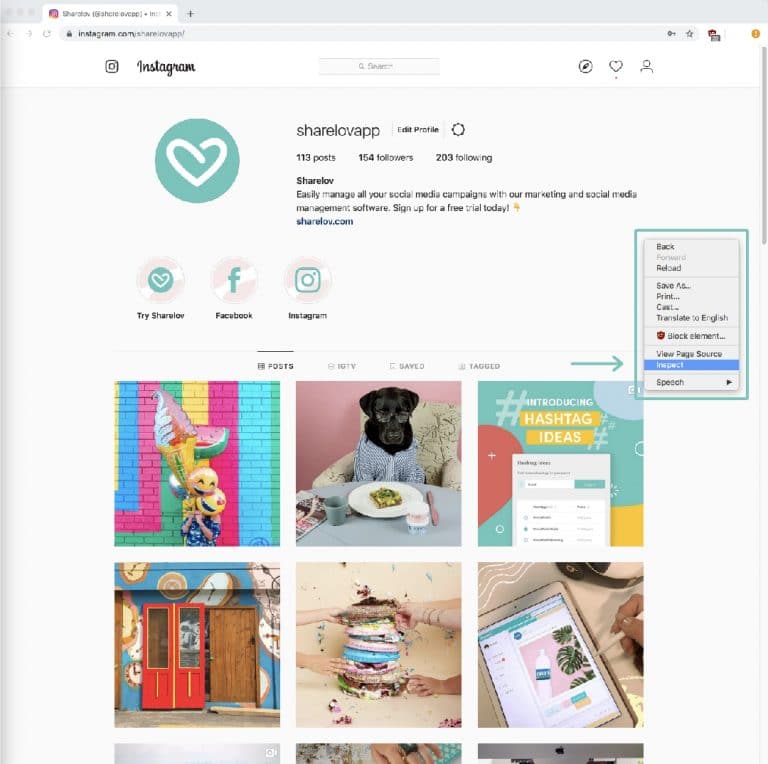 Nun klickst du auf die Schaltfläche “Von Computer auswählen”, wo du dann Fotos vom Desktop deines Computers, Dokumente oder Downloads auswählen können.
Sobald du ein Foto von deinem Computer ausgewählt hast, das du posten möchtest, kannst du das Foto bearbeiten. Du kannst verschiedene Filter hinzufügen und dein Bild zuschneiden. Du kannst es aber auch unbearbeitet lassen.
Nachdem du das Foto bearbeitet hast, kannst du eine Bildunterschrift oder einen Standort für das Foto hinzufügen und/oder Personen im Beitrag markieren.
Du kannst die Einstellungen für deinen Beitrag nach Bedarf aktualisieren. Du kannst beispielsweise entscheiden, wo es geteilt wird, Kommentarfunktionen anpassen und vieles mehr. Ebenso kannst du die Beschriftung oder den Ort ändern und weitere Tags hinzufügen.
Sobald das Foto erfolgreich hochgeladen und bearbeitet wurde und du mit den Ergebnissen zufrieden bist, kannst du den Beitrag für alle deine Follower freigeben.
Wenn du fertig bist, kannst du mit deinem Smartphone jederzeit überprüfen, wie deine über den PC geposteten Bilder auf Mobilgeräten aussehen.
Nachdem du nun weißt, wie du von einem PC aus Bilder auf Instagram posten kannst, sehen wir uns an, wie von einem PC aus Videos auf Instagram postest. Das Posten von Videos auf Instagram von einem Computer aus ist dem Posten von Bildern ziemlich ähnlich. Aber hier ist die genaue Schritt-für-Schritt-Anleitungen, die du dafür befolgen solltest:
Um Videos von deinem PC auf Instagram zu posten, musst du auf deinem Computer zunächst die Instagram-Website aufrufen und dich bei deinem Kunden-Account anmelden.
Sobald du dich auf deinem Computer bei deinem Instagram-Account angemeldet hast und bereit bist, dein Video zu posten, klicke auf das Plus-Symbol in der oberen rechten Ecke. Das Plus-Symbol befindet sich zwischen den Meldungen und den Kompasssymbolen.
Nachdem du auf das Plus-Symbol geklickt hast, sollte eine neue Seite mit der Schaltfläche “Vom Computer auswählen” angezeigt werden. Klicke auf diese Schaltfläche und du kannst auf die Videos auf deinem Computer zugreifen und eines davon zum Posten auswählen.
Sobald du ein Video zum Posten auf Instagram ausgewählt hast, kannst du das Video vorbereiten. Du kannst das Video kürzen, einen Filter hinzufügen oder andere Bearbeitungen vornehmen, wenn du dies für erforderlich hältst.
Um dein Video ansprechender zu gestalten, kannst du aus der auf Instagram verfügbaren Auswahl Musik über Spotify hinzufügen. Du kannst auch ein Titelbild auswählen. Dies kann dazu beitragen, die Ästhetik deines Feeds zu erhalten, und ermöglicht es dir, einen informativen Titel oder eine Zusammenfassung hinzuzufügen. So werden deine Videos von zukünftigen Besuchern deines Profils mit größerer Wahrscheinlichkeit mehr Klicks erhalten.
Nachdem du das Video nach deinen Wünschen vorbereitet und bearbeitet hast, kannst du eine Bildunterschrift und einen Standort hinzufügen und Personen im Beitrag markieren. Wenn du möchtest, kannst du die Kommentarfunktion auch deaktivieren.
Du kannst alle anderen Einstellungen nach Bedarf aktualisieren und Änderungen am Beitrag vornehmen. Du kannst die Beschriftung oder den Ort ändern und weitere Tags hinzufügen.
Sobald du das Video vorbereitet und bearbeitet hast, musst du nur noch auf Teilen klicken und fertig! Das ist alles, was du dafür benötigst, um von deinem Computer erfolgreich ein Video auf Instagram zu posten.
Eine andere Möglichkeit, von einem Computer aus auf Instagram zu posten, ist die Verwendung der entsprechenden Chrome-Erweiterung. Hier erfährst du, wie das geht:
 Lade die entsprechende Chrome-Erweiterung herunter
Zunächst musst du die Chrome-Erweiterung für Instagram auf deinen Laptop oder PC herunterladen. Öffne den Chrome Web Store, suche nach der “Erweiterung für Instagram” und klicke dann auf “Zu Chrome hinzufügen”. Mit dieser Erweiterung kannst du Fotos hochladen sowie Fotos und Videos herunterladen.
Sobald die Chrome-Erweiterung für Instagram auf deinen Computer heruntergeladen wurde, klicke auf die Erweiterung in der Leiste oben in deinem Browser und melde dich bei deinem Instagram-Account an.
Nachdem du dich bei deinem Instagram-Account angemeldet hast, klicke auf das Plus-Symbol in der oberen rechten Ecke der Seite. Das Plus-Symbol befindet sich zwischen den Meldungen und den Kompasssymbolen. Du kannst dann das Bild auswählen, das du von deinem Computer hochladen möchtest.
Sobald du ein Foto von deinem Computer ausgewählt hast, das du posten möchtest, kannst du das Foto bearbeiten.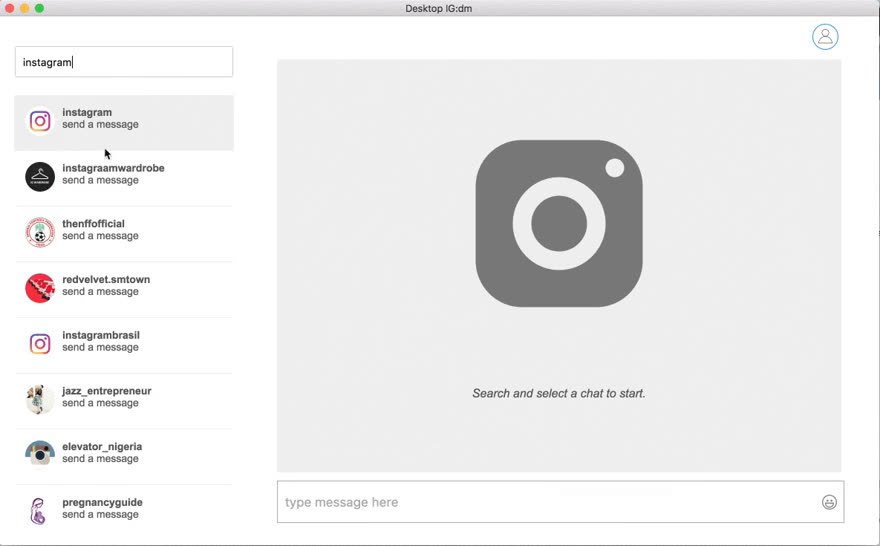 Du kannst dem Beitrag auch eine Bildunterschrift und einen Standort hinzufügen und Personen markieren. In den erweiterten Einstellungen kannst du die Kommentarfunktion auch deaktivieren.
Nachdem du dein Foto bearbeitet und eine Bildunterschrift erstellt hast, kannst du deinen Beitrag in deinem Instagram-Feed teilen.
Du kannst Instagram-Fotos und -Videos von einem PC aus posten, aber du kannst keine Instagram-Storys, Instagram-Anzeigen, IGTV-Posts oder Reels von einem Computer aus teilen. Du kannst auch kein Live-Video von einem PC aus starten. In der Desktop-Version von Instagram bist du daher auf das Posten von Fotos und Videos beschränkt. Damit kannst du jedoch viele der Instagram-Aufgaben deines Unternehmens problemlos von deinem Schreibtisch aus erledigen.
Keiner weiß aktuell, wie wir von einem PC aus eine Instagram-Story posten können, aber man weiß nie, was die Zukunft bringt.
Neben dem Posten auf Instagram über einen Webbrowser oder die Verwendung der Chrome-Erweiterung gibt es noch einige andere Möglichkeiten, wie du von einem PC auf Instagram posten kannst, wie z. B. die Verwendung einer Planungssoftware. Du kannst eine Planungssoftware wie Mailchimp verwenden, um deine Instagram-Posts im Voraus zu planen. Eine Planungssoftware kann sehr hilfreich sein, wenn es darum geht, deine Inhalte für die sozialen Netzwerke zu verwalten und sicherzustellen, dass deine Beiträge immer zur richtigen Zeit hochgeladen werden.
Wenn du ein Unternehmen besitzt, ist es wichtig, in den sozialen Medien präsent zu sein. Aber nur in den sozialen Medien präsent zu sein reicht nicht aus. Du musst darüber hinaus auch regelmäßig auf den von dir ausgewählten Socia-Media-Plattformen posten und mit deinen Followern interagieren.
Wir verstehen, dass dies für Geschäftsinhaber mit begrenzter Zeit und begrenzten Ressourcen eine Herausforderung sein kann. Hier kann die Verwendung einer Terminplanungssoftware von großem Vorteil sein. Eine Planungssoftware kann dir bei allem helfen – von der Erstellung organischer Social-Media-Beiträge bis hin zu zielgerichteten Anzeigen, sodass du alle deine Kanäle in den sozialen Medien an einem Ort verwalten kannst.
Egal, ob du ein etabliertes Unternehmen oder ein Startup hast: es ist immer sehr hilfreich zu wissen, wie man von einem PC aus auf Instagram postet. Das Posten auf Instagram von einem Computer aus ist einfach, sobald die dafür notwendigen Schritte kennst und dich mit den Unterschieden zwischen PC und Mobilgeräten vertraut gemacht hast.
Wenn du dich von all den Verwaltungsaufgaben für deine Social-Media-Beiträge überfordert fühlst, ziehe die Verwendung von Mailchimp in Betracht. Du kannst Mailchimp für dein Social-Media-Marketing nutzen sowie als Planungstool für das automatische Hochladen von Social-Media-Beiträgen zu bestimmten Zeiten.
Außerdem kannst du mit der Planungssoftware von Mailchimp einen Einblick in deine Daten gewinnen, sodass du herausfinden kannst, was auf jedem deiner Kanäle funktioniert und was nicht. Du hast Zugriff auf eine Vielzahl hilfreicher Tools, mit denen du Social-Media-Kampagnen erstellen, Anzeigen entwerfen und Inhalte für alle deine sozialen Plattformen erstellen kannst. Fang noch heute damit an und überzeuge dich selbst, welchen Unterschied die Verwendung von Mailchimp machen kann.
Tired of posting on Instagram from your phone? Wondering how to post on Instagram from your PC or Mac instead?
You’ve come to the right place. Posting on Instagram from your desktop can save you time and offer more flexibility in what you can upload (such as edited videos and images).
And you can do it without having to upload them onto your phone first.
Below we’ve outlined three different ways to post on Instagram from your computer.
How to post on Instagram from your computer
Method 1: How to post on Instagram from your computer using Hootsuite
Method 2: How to post on Instagram from a PC or Mac
Method 3: How to post on Instagram from your computer using Creator Studio
How to post an Instagram Story from desktop
How to post an Instagram carousel post from desktop
How to edit an Instagram post from desktop
Bonus: Download a free checklist that reveals the exact steps a fitness influencer used to grow from 0 to 600,000+ followers on Instagram with no budget and no expensive gear.
Below, you’ll find ways to post on Instagram from your PC or Mac. We’ll also show you how to post via Hootsuite which works on either operating system.
If you’re more of a visual learner, watch this video from our pals at Hootsuite Labs to see how easy it can be:
You can schedule feed posts, Stories, carousel posts, and Instagram ads with Hootsuite.
The instructions below will walk you through the process of posting to your Instagram feed. We cover Instagram Stories and carousels a little further down in this article.
To post on Instagram from a PC or Mac using Hootsuite, follow these steps:
 Alternatively, you can also Schedule for later if you want it to post at a different time.
 For a quick summary of how to post on Instagram from Hootsuite, watch this video:
Voila! Posting photos and videos to Instagram from PC or Mac is that easy.
Method 2: How to post on Instagram from a PC or MacAs of October 2021, all Instagram users can create and publish feed posts from the browser version of the app.
To post on Instagram from your desktop computer (PC or Mac), follow these simple steps:
 A Create new post window will pop up.
And that’s it!
At the moment, only feed posts can be created and published directly from Instagram on desktop. Keep reading to find out how to post Instagram Stories from a PC or Mac computer.
If Instagram is your social network of choice and you don’t mind not having all your social networks in one dashboard, Creator Studio could be a good option for you.
Note that when using Creator Studio, you can post and schedule all types of posts other than Instagram Stories.
How to post on Instagram using Creator Studio:

You can post an Instagram Story from your computer using a third-party social media management tool like Hootsuite. Just follow the steps outlined in this short video:
Or, read our step-by-step article on how to post an Instagram Story from your computer.
If you don’t have Hootsuite, you can post an Instagram Story from your PC or Mac through the following steps:
You’re done! It’s practically the same steps as if you were using the Instagram app on a mobile device.
#1 Social Media Tool
Create. Schedule. Publish. Engage. Measure. Win.
Start free 30-day trial
With Hootsuite, you can also create and easily publish carousel posts (with up to 10 images or videos) directly to Instagram. Here’s how.
1. Go to Planner and tap New post to launch Compose.
2. Select the Instagram account you want to publish to.
3. Include your caption in the Text box.
4. Go to Media and tap Select files to upload. Select all the images you want to include in your carousel. All selected images should appear under Media.
5. Use the yellow Schedule button to select a date and time to publish your post.
6. Tap Schedule. The post will show up in your Planner at the time you have scheduled it for.
That’s it! Your post will go live on the date and time you selected.
How to edit an Instagram post from desktopHootsuite Compose allows you to edit any image directly on your dashboard before you post it. Unfortunately, you won’t be able to edit the image once it’s posted.
Follow these steps to edit:
 This brings up Hootsuite Composer’s edit tool. It allows you to customize the aspect ratio of your image to fit practically any social media platform’s image metrics. From the sidebar, you also have the ability to add filters, adjust lighting and focus, add text and stickers, and use the brush too.
Voila! You just edited your image from your desktop.
Post to Instagram from your PC or Mac using Hootsuite. Save time, grow your audience, and measure your performance alongside all your other social channels. Try it free today.
Get Started
Easily publish and schedule Instagram posts from your computer with Hootsuite. Save time and get results.
Try it for Free
 They are the very roads and bridges to all the content that we know and love. But in fact, links have many types and types, and of course there is a significant difference between them...
 #seo promotion
ReadUX design. How to create human-centered design? Human-centered design is not a trend at all, but a real necessity of the modern world...#ux design
Read How to increase business productivity? Over the past few years, the world has been developing at an alarming rate. With the help of technology, it has now become possible to unite in teams and at the same time be more than ten thousand kilometers apart from each other...#useful for business
ReadMarketing Funnel and Sales Funnel. How do they work and how do they differ? Both funnels must work together to gather as many leads as possible (marketing funnel), lead and grow your leads (both funnels), and then turn them into customers (sales funnel). But that's the job...#internet marketing#digital marketing
Read 14 Best SEO Plugins for WordPress You have spent a lot of time to create a site that you think is flawless, worked on content for a long time and finally launched it. And now sit and wait: “I have such a good site, I’m sure there will be many visitors and customers”...
 #seo optimization#wordpress#seo promotion
certain role in decision making. The mind influences motivation and behavior by producing feelings that drive motivation and behavior. Here is an example. Let's say you are going to eat...#internet marketing
Read How IT companies will recover from COVID-19? The prolonged coronavirus pandemic and the lockdown associated with it have already taken a heavy toll on the global economy. The largest enterprises are going bankrupt, laying off staff and cutting wages So why are some landing pages not converting? It's time to find out and eliminate errors#business websites
Read 9 Ways to Grow Your Ecommerce Strategy During COVID-19People will long remember how businesses struggled to survive during the coronavirus outbreak. Therefore, right now, in this difficult period, you should rethink your customer-focused marketing strategy. ..
.. #e-commerce
Read Non-standard ways to generate leads using social networks the so-called goldmine for boosting your leads. Being on popular social networks like Instagram or Twitter is just the first step#smm
Read4 Ways to Use TikTok for BusinessTikTok is the latest social media trend with over 1.5 billion downloads on the App Store and Google Play and over 500 million monthly active users#smm#tiktok
ReadWhat is the future of mobile app development? Time flies. Trends come, trends go. New technologies are coming. And, probably, some of this will become the norm, and something will become obsolete. But mobile app development...#mobile app development#mobile app development
Read How to segment your target audience? 11 fresh ideas Let's see what segments the target audience can be divided into. But first of all, you need to understand why we need this segmentation at all...#internet marketing
Read 25 tricks to attract an audience through advertising How can a company attract potential customers if cold calls and email newsletters are no longer working? Here is a selection of 25 relevant tricks to attract an audience through advertising#internet marketing
Read6 Useful Features of the Instagram Stories EditorInstagram is great for users as it's a place to get an inside look at celebrity life, learn new recipes, follow fashion, get inspired by home decor ideas, and just about everything can be found here# smm#instagram stories#instagram
There are several official and not so official ways to add photos to Instagram* from a computer or laptop that you can use. But: I don't recommend using completely unofficial Instagram* clients, it could be potentially unsafe for your account. nine0005
This manual details how to post photos to Instagram* from your computer in various situations, some of the nuances, and a video where two methods are clearly shown. It may also be interesting: 4 ways to write in direct Instagram * on a computer.
Previously, by logging in with your Instagram* account on the official website https://www.instagram.com/* you could not publish photos and videos, but you could watch other people's photos, commenting, following, likes and other functions were available.
Starting from May 2017, when you access the site from a mobile device - tablet or phone, you can add a photo to Instagram *, even without installing the corresponding application. This feature can also be used to publish from a browser. nine0005

Here is a new way that greatly simplifies the task.
The Windows 10 App Store has recently launched the official Instagram* app, which also allows you to add a photo or video to your page. The app can be easily found by searching the app store.
After downloading the app and logging into your account (in my test, for some reason, it only logged in with email, not username), follow these simple steps:
As noted above, Instagram* for Windows 10 requires a webcam. However, this can be bypassed: if you install a virtual webcam program (I used e2eSoft VCam), then the application will assume that the camera is present and allow publishing. Also, when testing the application, for some reason it worked very unstable for me. nine0005
Another way to post a photo or video on Instagram* that is guaranteed and works properly today, with only a computer, is to use the official Android application running on a computer.
To run the Instagram* Android application on a computer, you will need third-party software - an Android emulator for Windows or another OS. You can find a list of free emulators and official sites where you can download them in the review: The best Android emulators for Windows (opens in a new tab). nine0005
Among those emulators that I can recommend for posting on Instagram* are Nox App Player and Bluestacks 2 (however, the task will not be more difficult in other emulators). The following is an example of uploading a photo using Nox App Player.
 Another way: in the emulator settings (gear in the top line of the window), in the “General” item, enable Root access and restart the emulator, after that you can simply drag and drop image files, videos and other files onto the emulator window. nine0042
 In the BlueStacks 2 emulator (official site: https://www.bluestacks.com/ru/index.html ), uploading photos and videos from a computer to Instagram* is even easier: just like in the method just described, you first need install the application itself, and then the steps will look like this: