The time has come for creativity to reign supreme on social media!
There are too many boring Facebook posts out there getting no engagement in the news feed -- or disappearing from it completely.
It's getting harder & harder to stand out!
But don’t worry... Post Planner & Canva have you covered!
Today I'm going to show you how to use these 2 apps together to create a WORLD-CLASS visual Facebook post.
In 3 minutes!
Yes, that's all it takes. And the cool thing is when you follow the instructions below, you're almost guaranteed to blow up your engagement like never before!
Ok, let's get to it.
Great FB posts often start with great texts -- whether a quote, question or interest fact.
If you’re stuck finding a great text, Post Planner’s Status Ideas engine can be the springboard for your posts.
Just click "Status Ideas", choose a category, and shuffle until you find a text you like. Then click it into the Post Planner composer box.
You can update your text & add hashtags as you see fit, then share immediately or schedule the post in your queue.
That's all pretty basic. But how do you take a great text and turn it into a world-class image that will get tons of shares?
Good question.
Here's a 7-step winning formula for an enticing Facebook post to make this easy for you!
Post Planner is the perfect place to get a scientifically-proven post idea -- and then to put your own design spin on it.
The Viral Photos finder is amazing! You can use it to find images that have already been tested.![]()
But what if your brand has its own colors & style?
No problem. Just recreate the photo to meet your brand style guide! You can do this easily within Post Planner.
Here's an example of a viral photo from Post Planner:
Here's the recreated photo from Canva & posted on Guy Kawasaki’s Facebook page. You can see the new post did very well!
In my opinion, every Facebook post should have a graphic, unless you’re creating an occasional text-only post.
>> Click to Tweet <<
According to MDG Advertising, "content featuring compelling images averages 94% more total views than those without."
Use photos & graphics that you have permission to use on your Facebook page. One of the biggest misconceptions is that just because the photo is online that you can post it anywhere. That isn’t true. Don’t do it.
There are guidelines for using other people’s intellectual property. One way to make sure that you have permission is to use Canva graphics that you design yourself right inside Post Planner!
Post Planner has made it ridiculously easy to create your own graphics right within the app using the Canva design button.
Short, sweet, and to the point! Use an action word to start your text & keep it to a minimum.
Here’s an example of a successful post on the Post Planner Facebook page.
Don’t drop a link & run! This isn’t Twitter.
Facebook fans need a little more wooing to click through, comment, or share. Kim Garst added a quick question on this post & got great engagement.
If you're witty, try a quick one-liner but make sure it's appropriate for your Facebook audience. We can't all get away with posting what George Takei does. ;)
Don’t forget that you want your Facebook post to make a difference in your social media strategy.
A question gives people the opportunity to respond to you -- this is a call-to-action or CTA. Another type of CTA is asking people to click through to read your article or maybe click to buy your product.
Why did you create this post? Is it an educational post on your blog?
Ask them to click through to read more.
Is it a photo for entertainment? Ask a question that goes with the photo.
You build engagement on your Facebook post by baking in all the essential ingredients.
Use one or 2 hashtags on Facebook for the best interactions. Choose hashtags that are relevant to your page & to the post that you're sharing.
>> Click to Tweet <<
Being consistent is important on Facebook & part of that consistency is spreading your posts out a few hours apart.
Take the time to set up your schedule in Post Planner & then easily schedule your posts into the queue. This is time-saving & creates a wonderfully balanced Facebook page.
Did you get done in 3 minutes? :)
If not, don't worry. After a few times practicing, you'll be creating world-class images in no time!
I really hope these tips help you to design some super engaging Facebook posts of your own!
Now it's my turn to learn from you. What tips have you found work best with your Facebook page?
Please let me know in the comments below.
Recently we shared simple tutorials on how to make custom Instagram images and memes in Lunacy, free design software. Today, we offer you another simple guide: learn how to make custom images for Facebook posts and share a piece of fun and style with your friends or readers.
If you are in search of a free and simple tool for making images for your personal posts, blog articles, or social media marketing goals, Lunacy editor is the one to help. Again, let us show instead of telling about it. This time the Icons8 lead designer Margarita has prepared another simple step-by-step guide demonstrating how to make a custom media for a Facebook post or an ad banner. You can use it even if you have zero design background. What’s more, Lunacy has a huge library of built-in design assets such as photos, icons, and vector illustrations, so for most cases, you won’t need to get distracted to find them elsewhere. Check the set of simple steps that will allow you to create a Facebook image in no time with our free picture editor.
So, let’s get started. Here’s the picture we wanted to get. It is a picture to support a post about plant care.
And here’s how it was made in Lunacy.
1. Create a new file; on the right-side menu, select the artboard size for Facebook Post.
2. Hold Ctrl + rotate the Mouse wheel to zoom out. On the left-side menu, in Libraries select Photos.
3. Find a suitable photo and click it.
4. Insert the photo into the artboard customizing it to the size you need.
5. Add a couple more photos supporting the topic.
6. Select the Rectangle Tool.
7. Draw a rectangle to intersect with the photo.
8. Change its color; use the eyedropper to select a suitable shade from one of the photos, if necessary, edit it with sliders.
9. Select the Line Tool.
10. Hold Shift and draw a horizontal line so that it intersected one of the photos.
11. Change the color of the line, again the eyedropper and sliders are at your disposal for that goal.
12. Select the Text Tool and create the title text.
13. Edit the font, size, and color of the text part; the tools for it are found in the right-side menu.
14. Create a description text to place under the photo, edit its font and size. As well as we did it for shapes, select the color in the photo using the eyedropper, edit it with the sliders.
15. Neatly align the text in relation to other elements.
16. At the top left, find the Objects tab.
17. Select all objects (Shortcut Ctrl + A), click Make Exportable on the bottom right.
18. Then, in the same place, click on the Export Selected button and export the image to your computer. Done!
The flow shown above allows you to make you any custom designs and cool images with Lunacy for your posts in any social network; it can be effectively used as a free banner maker or image editor. What makes it different from basic online Facebook post makers is the ability to work offline, the direct access to the huge libraries of photo and graphic content integrated into the editor, and the much wider variety of options to play with fonts, sizes, and combinations. The guide can be helpful for social media managers, content makers, bloggers, writers, educators, and just any people who share their experiences, fun, and lifestyle to the world via social networks.![]() Feel yourself a designer even if you’ve never tried it before!
Feel yourself a designer even if you’ve never tried it before!
Got any questions? Welcome to the comments here. And don’t miss new tutorials on how to design in Lunacy graphic design software, they are coming soon!
About the author: Margarita Ivanchikova is one of the lead designers for Icons8, who finds time to not only create icons, illustrations, and animations but also share her experience with other designers in tutorials and guides. Check her video tutorial on morphing graphics in After Effects and simple guides on making custom social media images and original memes in Lunacy.
content marketing content strategy design design guide + 19
Categories
Kseniia Shmatova
February 4 | 2020
Kseniia Shmatova
February 4 | 2020
For several years now, Facebook has provided the ability to add appropriately sized images for different placements in one ad.
In this article, I will help you understand the nuances of creating such ads and share some tips to help you set up your ads the first time.
First of all, you need to understand in which placements you want to place an ad. The ability to add images for different placements is not available for all purposes. For example, it is not possible to select the goal "Traffic" (Messenger), "Conversions" (Messenger), "Engagement" (likes of Pages, responses to invitations, messages).
The following formats cannot be used: Collections, Carousel, and Instant Experience. Also, you cannot change images for different types of devices, i.e. use one creative on desktop and another on mobile. More information can be found in Facebook Help.
Although now the image sizes for different placements are the same in some cases (i.e. one size fits, say, Facebook Feed and Instagram Feed), but there are those places for which the size is different:
So, you have decided on the placements where you want to show your ad, prepared the same image in different sizes. Next, create ads in Ads Manager as usual until you reach the Format section at the ad level. Choose option Create ad → One image or video.
In Media Object Add Media → Add Image.
After adding a single 1080x1080 image, Facebook itself tries to adapt it to different placements.
As you can see in the screenshot, the second and third images are not cropped as we would like, due to which part of the text and the creative itself are lost.
Therefore, for other places of interest to us, we will add the same image, but in different sizes. This is done very simply: click on Edit next to the image whose size we will change.
In the window that opens, change the image for the placement we need (that is, add the same image, only in a different size).
Next, we move on to creating the ad itself: add Body text, Title, Description, Site URL, Show link, Call to action .
When creating an ad, there is a Preview option. You can see how your image, body text, title, etc. will appear in a given placement.
In the same window you can edit the image by substituting the required size.
In general, this is all that needs to be done to ensure that one ad displays correctly in various placements (the image fits the right size and important information is not cut off).
Finish creating the ad by adding the parameters you need (Facebook Pixel, URL Parameters, Offline Events, Application Events) and click Confirm . After passing the moderation, your ad will start showing to users in the placements you selected earlier.
 So, for example, a horizontal image can be automatically cropped by Facebook, which will lose the meaning of your creative and make it uninteresting for the user. And in the image for Stories, you need to remember that a couple of centimeters from the top will be occupied by the name of your Facebook page or Instagram account, which represent your company in advertising. And a couple of centimeters at the bottom of the Stories will take the Call to Action. Accordingly, in these parts of the image there should not be any important information, but it is best that there is just a plain background.
Subscribe
Blog
Vacancy
Subscribe
Blog
Vacancy
Get a special offer
Email entered incorrectly
Please fill in the fields markedUP
By tagging someone in a photo or post, you create a link to that person's Facebook profile. A post in which a person is credited can also be added to their profile feed. If you tag a friend in your status, all the people you allow to see the status change will be able to click on the friend's name and go to their profile. Your status change may also appear in that friend's feed.
If you tag someone, that person will receive a notification. Also, if you or one of your friends tags someone in your post, the post may become visible to a new audience as well as friends of the tagged person.
Tags added to photos and posts of people who are not your friends can appear in the Posting area of the profile feed : You can specify whether you want to allow them to appear on your timeline.
You can also approve tags added by any other user, including through friends.
To tag a person or page in a picture:

You can tag up to 50 people or pages in a photo. If you tagged someone in a photo, that person's friends can see the photo, like it, or comment on it. Also, if you're tagging a photo that wasn't added by a friend, you'll need to verify the tagging from the person who added the photo.
You can tag other pages and profiles in photos and movies if those pages or people have given permission to tag them. You can tag people in photos and movies on your page as long as they have clicked the Like button and are at least 18 years old.
Your personal and tagged photos are visible to:
To change who sees the photos you upload to Facebook, change the audience or remove them from the audience. If you are tagged in a photo and you don't like it, you can remove the tag or ask the owner of the photo to do so.
Remember that photos and posts you hide from your profile feed will still be visible to the audience they were shared with elsewhere on Facebook, such as News and Search. To see and check the messages hidden in the profile feed, go to the activity log.
When you tag someone, the material (eg photo, post) can be shared with the tagged person and their friends. This means that if you weren't part of the audience until now, they will be able to see the material.
For example, if you tagged Alina in a picture with your friends, the circle of recipients will expand to Friends(+) and include your friends and Alina's friends.
If you don't want the photo, post, or other content to be visible to friends of the tagged person, you can disable this setting on a per-post basis when you post. To do this, click on the audience selection icon next to the event, select User Settings and uncheck Friends of the tagged people.
The audience will also be expanded to Friends(+) when other users tag your post or photo.
To control who can see posts you're tagged in after they're posted to your timeline:
You can approve pictures and messages you're tagged in before they appear on your timeline.
Anyone can tag you in a photo and post on Facebook. Tags added by people who are not your friends can appear in the Commit Info area of your Timeline , where you can specify whether you want them to be shown on your Timeline.
Be aware that posts you choose not to appear in your feed may appear in your News Feed and other places on Facebook.
Depending on your settings, you will be notified when someone tags you. In the settings you can specify which notifications you want to receive:
You can also use the feature to verify photos that friends tag you in before they appear on your timeline.
If you don't like the content you're tagged in, you can remove the tag or ask the person who tagged you to remove the post .
To remove a tag from a post you've been tagged in, click the v icon in the top right corner of the post and select Delete label .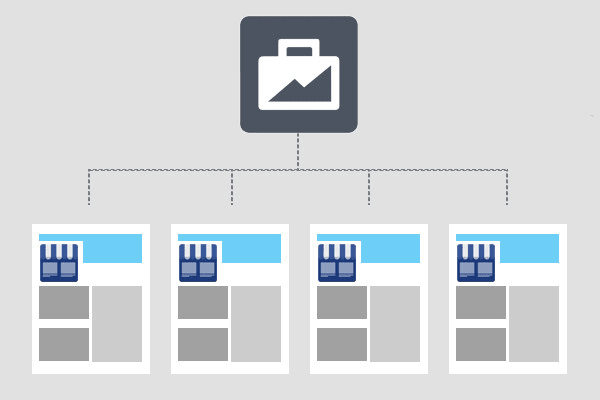
You can also remove tags from multiple posts at the same time:
The activity log allows you to view your personal photos and photos in which you have been tagged for a public audience.
To view tagged photos with setting Public :
You can also approve pictures that have been hidden on your timeline by selecting Hidden from the On timeline dropdown . Keep in mind that photos you hide on your timeline may still be visible to the audience they were shared with elsewhere on Facebook.
Object recognition technology analyzes pixels in photos and movies to calculate a unique number called template . The system compares other Facebook photos and videos with this pattern. If it finds a match, marks the objects.
If a photo or video is tagged, the information from that material is not used in the template. If you turn off the face recognition option, the template will be deleted.
This technology is currently only available in select locations. It will be available on your profile if you are at least 18 years old.
The following are examples of using face recognition on Facebook:

Note : Facebook does not provide facial recognition to help strangers identify you.
Facebook is constantly striving to improve recognition technology, but it can't find you in all photos . Facial recognition works best on posts where you're part of the audience. This may include photos posted by your friends and friends of friends.
In some cases, images may not be viewable:
To enable or disable face recognition on your account: